
sunny_nites
Enlightened
I've really been enjoying using and modding my Illuminex-4! It's a great little light but it does have a couple of quirks.
I'm going to write up a post on some mods I've done in the Homemade Forum at some point but I wanted to do a quick piece on some fixes I've found for several complaints about the light that I have seen in other columns.
The first is the "only a couple of turns to power on", "only a couple of threads holding the head on when powered off" and "poor beam quality or beam artifacts" fix.
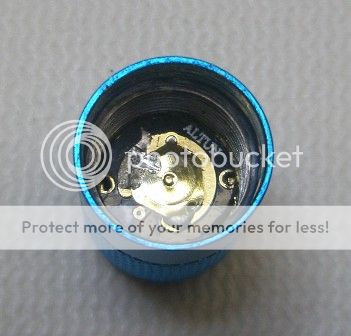
The Cree XP-G2 and support electronics are housed in a small brass pill that is screwed into the head. The pill is not secured by Loctite, glue, solder or anything else. This makes it easy to pull out to work on but can also allow it to back out and cause all of the above issues. Luckily the fix is pretty simple.
Note the two brass outlined holes in the circuit board on the left and right in the pill in this pic:
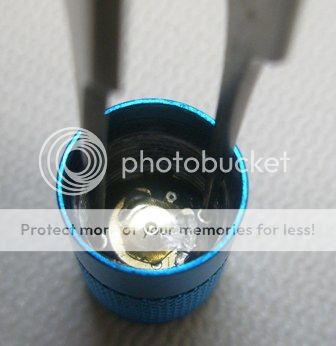
You can use a pair of fine pointed tweezers like these to gently screw the pill in to tighten it up:

like this:
The second complaint is that there is either no low setting or just a fraction of a turn to get the low setting. When adjusted properly, it should take around 1/4 to 1/3 of a turn to engage the high setting from the low setting. I don't have a picture for this fix and unfortunately this one could be a bit more complicated. Basically what happens is that the membrane switch in the above picture gets the dimple inverted, so instead of the brass top plate being popped up, it is popped down.
I've had some luck using the same tweezers and (again, gently!!) putting very light pressure on the outside edges of the plate to get the middle to pop back up. The other fix and I would only recommend this if you are comfortable working on electronic stuff, is to use the same tweezers to unscrew the pill out far enough to allow you to use something very thin, like a single side razor blade or such to slide between the top plate and the circuit board to pop up the switch.
I haven't run a cross a permanent fix but the problem really only shows up if the battery compartment is screwed in too tightly. So, if you do have this problem and manage to get the membrane to pop back up to it's normal position, only screw the battery compartment in just tight enough to engage the settings.
And the last issue is with the o-ring getting chewed up or lost.
I've noticed that the o-ring tends to ride out of its groove which can allow the threads in the head to grind it up or if the head is removed, to quickly disappear. This pic shows the o-ring in its correct position:
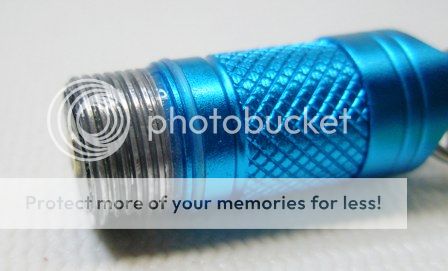
I've found that the o-ring tends to stay in place better if it is lubed. I've been using heavy silicone grease, the same stuff they use on watches, from Anchor and so far have had pretty good luck with it. Beyond that, I always visually inspect the o-ring when I pull the light apart to charge the battery.
Hope this helps and good luck!
I'm going to write up a post on some mods I've done in the Homemade Forum at some point but I wanted to do a quick piece on some fixes I've found for several complaints about the light that I have seen in other columns.
The first is the "only a couple of turns to power on", "only a couple of threads holding the head on when powered off" and "poor beam quality or beam artifacts" fix.
The Cree XP-G2 and support electronics are housed in a small brass pill that is screwed into the head. The pill is not secured by Loctite, glue, solder or anything else. This makes it easy to pull out to work on but can also allow it to back out and cause all of the above issues. Luckily the fix is pretty simple.
Note the two brass outlined holes in the circuit board on the left and right in the pill in this pic:
You can use a pair of fine pointed tweezers like these to gently screw the pill in to tighten it up:
like this:
The second complaint is that there is either no low setting or just a fraction of a turn to get the low setting. When adjusted properly, it should take around 1/4 to 1/3 of a turn to engage the high setting from the low setting. I don't have a picture for this fix and unfortunately this one could be a bit more complicated. Basically what happens is that the membrane switch in the above picture gets the dimple inverted, so instead of the brass top plate being popped up, it is popped down.
I've had some luck using the same tweezers and (again, gently!!) putting very light pressure on the outside edges of the plate to get the middle to pop back up. The other fix and I would only recommend this if you are comfortable working on electronic stuff, is to use the same tweezers to unscrew the pill out far enough to allow you to use something very thin, like a single side razor blade or such to slide between the top plate and the circuit board to pop up the switch.
I haven't run a cross a permanent fix but the problem really only shows up if the battery compartment is screwed in too tightly. So, if you do have this problem and manage to get the membrane to pop back up to it's normal position, only screw the battery compartment in just tight enough to engage the settings.
And the last issue is with the o-ring getting chewed up or lost.
I've noticed that the o-ring tends to ride out of its groove which can allow the threads in the head to grind it up or if the head is removed, to quickly disappear. This pic shows the o-ring in its correct position:
I've found that the o-ring tends to stay in place better if it is lubed. I've been using heavy silicone grease, the same stuff they use on watches, from Anchor and so far have had pretty good luck with it. Beyond that, I always visually inspect the o-ring when I pull the light apart to charge the battery.
Hope this helps and good luck!