• You must be a Supporting Member to participate in the Candle Power Forums Marketplace.

    You can become a Supporting Member.

Makita LXT with Dual Tri-Rebel head

dat2zip

Flashlight Enthusiast
Joined
Jan 5, 2002
Messages
3,420
Location
Bay Area
I have no idea what the title should be...

I've had a need for a dual light setup like my primary soldering station. I have a second microscope station now and it is in dire need of lighting.

I've been working on this setup now since early December and I now have a partially working prototype.

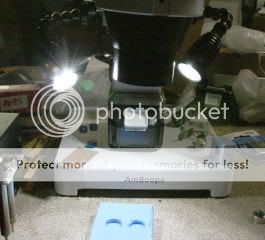
Here is a picture of it at the microscope station. The battery assembly is sitting on the base plate for the boom. It's hard to see in the picture as the microscope is directly in front of it in this picture.
t_makita_tri06.jpg


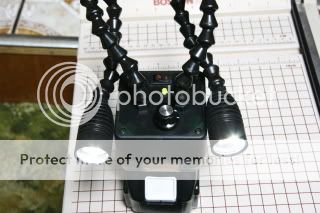
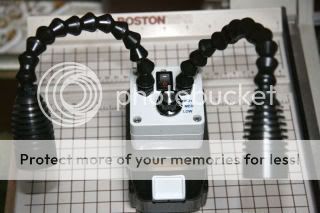
Here is the view of the light assembly completed.
t_makita_tri04.jpg


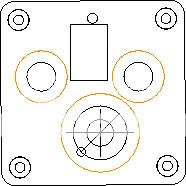
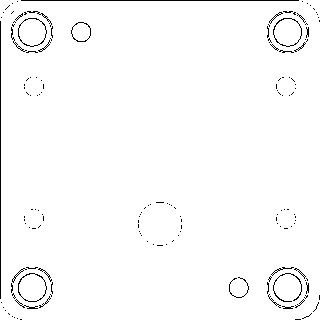
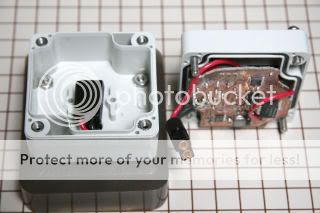
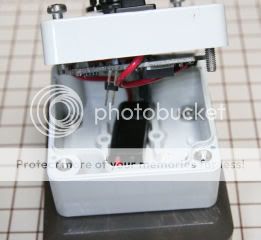
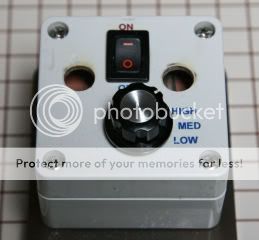
It took me a long time to come up with fitting all the parts inside the small box. The rotary switch, power on/off switch, two loc line adaptors, converter board and interconnections were a real challenge on this project.
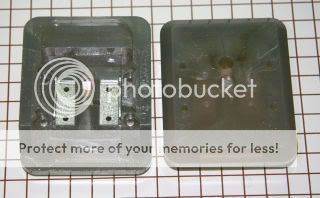
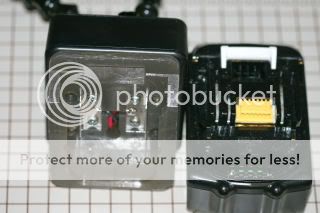
I finally found a nice power connector that fits inside the box allowing me to take the box apart allowing troubleshooting and service of the internal parts.
t_makita_tri03.jpg


Another view of the with the connector mated.
t_makita_tri02.jpg


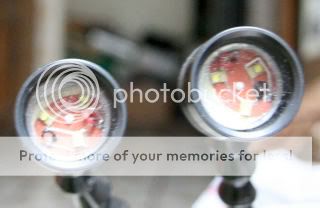
The lights are the PR cans that Don and I made as a limited run and have seen little usage. I made a custom heat sink to mount three Rebels on them.

t_makita_tri05.jpg


A real bummer is the microprocessor seems to have noise coupling into it and the three level control is currently not working. Also, on this prototype I left off accidentally the battery voltage monitoring circuit so the low battery status indicator is not in this prototype.

Currently the only thing working is the on/off switch and the converter is running at max power which is set for 0.5A. With both tri-rebels in parallel that means each LED is getting 1/2 that or ~250mA. Still plenty bright.

Here is a picture of the top of the box before mounting the loc-line.

t_makita_tri01.jpg


The converter is a new buck converter.

Wayne
 

dat2zip

Flashlight Enthusiast
Joined
Jan 5, 2002
Messages
3,420
Location
Bay Area
I found a slightly larger box to sit on top of the Makita Dock and made a second dual head configuration.

The driver is a true CC true white balance driver (LEDs don't go from white to yellowish color over the control range! ) set for 1A max output. The microprocessor monitors the battery voltage and rotary switch to provide three levels of brightness and control the dual LED battery status. Each head has three Rebel LEDs wired in series. Both heads are wired in parallel with the output of the driver. At full output each string of three LEDs has 500mA flowing through them.

The longer length loc-line allows for optimum placement in use. As shown they are in the "Star Wars" Pricess Leia configuration. :eek:

The LED glows green for good battery, orange when the battery is getting low and red when the battery capacity is near critical.

t_IMG_9979.jpg


here for larger image.

Corrections found on the prototype board have been corrected for and I have ordered a small run of 10 PCBs that I might load and make available. More than likely I will laser cut the top and bottom boxes for all the hardware and connectors needed.

The output configuration can be customized as needed. It's possible to put 6 loc-line heads each with a single LED and have three each wired in series and the two triple LED configurations wired in parallel like shown above.

One single LED could be driven from this putting 1A maximum to the LED.

What's not available are the blank heads that are loc-line compatible. A few Aleph PR-Cans were made and only a limited number of Aleph cans.

It might make sense to revisit this depending on the potential demand out there.

Wayne
 

Nebula

Enlightened
Joined
Sep 9, 2006
Messages
993
Location
Northern Virginia
Very nice job, Wayne. :thumbsup:

If you decide to build some of these for sale, I will take one. If possible, I prefer to use my new Ryobi Li-ion battery packs. The new Ryobi batteries have a built in "fuel meter" with pushbutton access to the battery level - green/yellow/red. Of course it requires a push of a button so it is not real-time like your solution.

Kirk
 

Weylan

Enlightened
Joined
Mar 2, 2005
Messages
356
Location
Fremont, CA
I might be interested in 1. Depending on price.

I have had a Taskled.com Flexled that is also out of stock but works really well.

This is ideal because of the common battery type and charger.

But it provides more light which the taskled only had a LUX1 and could run kind of hot. And 1 stalk is not quite enough for a desk lamp or doing work over a larger area.

What is the expected runtimes in the different modes?

Is there an option to get all the parts but the driver and LEDs? I would like to run something like 2x Q5s with reflectors in HOP? But I prefer the Shark/remora or nflex ( sorry, I like the UI and I have a bunch of lights that use the same UI already).

I have been thinking of something like this but have not had the materials and time to explore the use of the makita battery pack and connector.

This could turn out to be a really nice long term project for those wanting more light and adjustability.
 

dat2zip

Flashlight Enthusiast
Joined
Jan 5, 2002
Messages
3,420
Location
Bay Area
The dock portion of the battery pack will be put online soon. With that component you can make any custom configuration you desire.

I would be very careful which driver you use. Some can not run beyond 16V.

Wayne
 

Weylan

Enlightened
Joined
Mar 2, 2005
Messages
356
Location
Fremont, CA
As is this is awesome! I like it. If I did not already have so many lights that used the other UI, I would use the Shark/Ramora. I look forward to building an interface using the solution!

So are the heads going to be available?
Run time expected?
How is the heatsinking for these heads as is?
Will these heads be good or have enough thermal mass for a Q5 for various stages of output? Or would having to add a heatsink to the back be necessary?
 

dat2zip

Flashlight Enthusiast
Joined
Jan 5, 2002
Messages
3,420
Location
Bay Area
As is this is awesome! I like it. If I did not already have so many lights that used the other UI, I would use the Shark/Ramora. I look forward to building an interface using the solution!

So are the heads going to be available?
Run time expected?
How is the heatsinking for these heads as is?
Will these heads be good or have enough thermal mass for a Q5 for various stages of output? Or would having to add a heatsink to the back be necessary?

The configuration shown draws ~680mA on high with a fresh battery and the battery capacity is rated at 3A. That's ~ 3 / 0.68 runtime_hours on high.

The tri-head configuration I have on the microscope lights get warm when cranked all the way up. They are being driven at 200mA max. One Q5 should be fine at 1A with this head. It will get hot. I had the same head previously with a single Luxeon being driven at 750mA and the head got too hot to touch and I had to ensure there was a fan turned on whenever I used the station for more than a few minutes.

I'm not clear what you mean additional heatsink mass? The only way to improve the thermal properties is to increase surface area. Adding internal mass only slows down how hot it gets. It will still get just as hot. It will take longer to get there.

The head has been available on the shoppe under the McLux category. It's called the McLux PR can.

Wayne
 
Last edited:

Weylan

Enlightened
Joined
Mar 2, 2005
Messages
356
Location
Fremont, CA
So the MCLUX pr can head.

How well, or what would be the best solution for trying to get a Cree Q5, and a reflector into the can head?

How else would you suggest to get that in, with a heatsink of some kind in the bottom?

Or how far does the tri rebel flood seem to be reasonablly usable? I know that you using it for microscope use is awesome. But realisticlly I need to justify its use for every day use as a nightlight (like the tank), hallway light, reading light, homework light for my son, computer light for dad to do work and general room light durring movies.
 

dat2zip

Flashlight Enthusiast
Joined
Jan 5, 2002
Messages
3,420
Location
Bay Area
So the MCLUX pr can head.

How well, or what would be the best solution for trying to get a Cree Q5, and a reflector into the can head?

How else would you suggest to get that in, with a heatsink of some kind in the bottom?

Or how far does the tri rebel flood seem to be reasonablly usable? I know that you using it for microscope use is awesome. But realisticlly I need to justify its use for every day use as a nightlight (like the tank), hallway light, reading light, homework light for my son, computer light for dad to do work and general room light durring movies.

You can experiment with any bare single LED and test the flood effect and see what it will do. Three Rebels flood is quite bright at 200mA and will light up any dark room.

The 500mA high 6 LED configuration easily outlights the pantry shelf 6 feet away vs the single overhead 100W standard room light. Even on medium I can move the Makita and see the shadow is brighter than the room ambient light.

I've been using the portable LXT lights I've made for almost everything now. Home repair, facet fixing, drilling, milling, replacing ceiling bulbs etc. It's seems I'm always going for one of these for many of the tasks I have around the house.

I now just love the feeling knowing the actual battery status and feel confident to use the light on high without worry.

Before the first one shown in this post I was using a LXT Cree bar that I made before I made these and it was bouncing around from station to station to provide lighting.

I use these in many of my garage tasks like soldering, gluing ect. Why? I don't need extensions cords and outlet strips all over the place. Many of tasks do not take long and it's actually super convenient the light is not attached to cord. I can place it where I need it and with a flood I don't get shadows or have the need to move the light while I'm working.

Personally, I know using more LEDs is more expensive, but, I also know that the LED efficacy goes up as you under drive the LED. Thus, my feeling is I'd rather use two LEDs than try to overdrive one LED. You get two distinct advantages. First, you get more light. Second, you don't generate much heat in an under driven situation. When the LED is cool running the light should have a long usage without worry that the LED light output will drop over time.

There are a lot of nice little LEDs putting out quite a bit of light now from Osram, Nichia, Edison Opto, Lumileds etc... These smaller LEDs allow clustering in smaller packages.

Wayne
 

Weylan

Enlightened
Joined
Mar 2, 2005
Messages
356
Location
Fremont, CA
It makes sense that you get more light from more LEDs and under driving them gives you less heat that you benefit over all.

I look forward to seeing more of the Makita interface pictures?

This going to be made available in Kit form? The PR cans seem to be available with the KIT as a SINGLE but not in the configuration you show here. I was definitly looking at this Double configuration as the option to go with as well as Now that I do the calculations the 3 rebel 100s in each PR CAN, can be an awesome combination.

More pictures! grin

Bring on the interface! I am now searching for battery and chargers! Got a cheap source?

Oh man this light could be $290 when done?

$50 for 1 PR CAN.
$50 for 2nd PR CAN.
$30 for driver.
$60 for 2x 3 rebel stars.

$45 Charger
$100 2x 3ah battery
 

dat2zip

Flashlight Enthusiast
Joined
Jan 5, 2002
Messages
3,420
Location
Bay Area
It makes sense that you get more light from more LEDs and under driving them gives you less heat that you benefit over all.

I look forward to seeing more of the Makita interface pictures?

This going to be made available in Kit form? The PR cans seem to be available with the KIT as a SINGLE but not in the configuration you show here. I was definitly looking at this Double configuration as the option to go with as well as Now that I do the calculations the 3 rebel 100s in each PR CAN, can be an awesome combination.

More pictures! grin

Bring on the interface! I am now searching for battery and chargers! Got a cheap source?

Oh man this light could be $290 when done?

$50 for 1 PR CAN.
$50 for 2nd PR CAN.
$30 for driver.
$60 for 2x 3 rebel stars.

$45 Charger
$100 2x 3ah battery

Don't forget the Thin PCB to mount the Rebels on unless you are planning gluing them down directly to the heat sink. Also, there is a custom aluminum disk heat sink that sits inside the PR Can. The PR Can was originally designed to bolt an LED on a Star MCPCB and a reflector dropped down on top of that.

The current revision of the Rebel flower PCB is IMHO too hard to use. I can mount the Rebel LEDs on it, but, without the special tools I have it's near impossible as the board will curl up if the whole board is heated at once. Since the simpliest way is to solder paste the whole board, place the Rebel LEDs on it and then toaster oven the whole board when the board curls up the LEDs may tend to slide or shift off some.

I've ordered another batch with changes and I hope to have the curling effect under control. If the new batch doesn't curl those will be the ones offered on the shoppe.

Wayne
 

dat2zip

Flashlight Enthusiast
Joined
Jan 5, 2002
Messages
3,420
Location
Bay Area
Here is the Makita Dock base. It mates to the LXT battery and is the fundamental building block to start with for the LXT battery.

t_IMG_9986.jpg


The drawings I made to laser cut the holes for the Hammond 1554 box.

Hammond_1554lid.jpg


hammond_1554box.gif


Wayne
 
Last edited:

McGizmo

Flashaholic
Joined
May 1, 2002
Messages
17,291
Location
Maui
I don't know how I missed this thread but better late than never.

:thumbsup:

Cool Wayne!

It's nice to see the PR Can get some air time! I recall Darell calling it a beehive back when...
 

dat2zip

Flashlight Enthusiast
Joined
Jan 5, 2002
Messages
3,420
Location
Bay Area
Here's a picture of the inside of the box.
t_IMG_9991.jpg


Bottom view of the Makita Dock.
t_IMG_9992.jpg


Wayne
 

rkJr

Enlightened
Joined
Oct 3, 2007
Messages
232
Location
Ramona, CA
yes, what's new with this, if anything?

"If you build it, they will buy"

seems many here are interested in these....
 

dat2zip

Flashlight Enthusiast
Joined
Jan 5, 2002
Messages
3,420
Location
Bay Area
It may not be clear how locline works. Maybe, the following picture will help clear up any confusion.

t640_IMG_0040.jpg


The basic LocLine component shown above as B can be made any length you desire. Many other accessories mate with this to adapt it to many other things. In this case we make the locline having threaded ends. One is bolted to the box and the other end screws into the PRCAN head.

The Makita Dock went online today here and here.

It can be bolted to the Cree bar as shown below.
cree_bar_light_2006.jpg


I have ordered custom milled boxes with silk screened lettering on the top of the box to match the connector, LED and switch that are on the board. I hope to make a small batch of boards and will offer them either individually or as full assemblies depending on what people want.

Just got my two P7 LEDs so the next assembly will be one of the new boards and a dual head configuration with a P7 LED in each head each driven in series. More than likely I will set the max current to 2A to keep the heat at some manageable level so that the heads don't get too hot in extended usage.

Wayne
 
Last edited:

Weylan

Enlightened
Joined
Mar 2, 2005
Messages
356
Location
Fremont, CA
How about posting a parts list of what is needed so we get a good feel for what we need to get if we order from you?

I am planning on making 2 lights.

1 with lockline heads and 1 as a room light using 8 LEDs. One I need the base material just the base material.

And one I need to parts list for the Dual head monstrosity!

Could I request for a picture, you created a sort of KIT for the basic loc-line section so we can see and think about rough length and parts. Say 8-10 inches in length maybe with all the connectors except the head.

Maybe here in this thread you put a picture of the exploded view of all the parts and their part number? OOOHHH that would be cool!
 
Last edited:
Top