
nakamoomin
Newly Enlightened
- Joined
- Mar 30, 2009
- Messages
- 18
I've just been introduced to the world of LED lighting. Over the last two weeks I've received two lights from an undisclosed (but very popular) dealer in HongKong (DX).
These so-called budget lights are great value, but both have been "twitchy". The first (Romisen RC-F4) had an issue with its switch being unreliable. The second (MTE "P7-D", 5-mode) had a flickering issue. I'm sure others have problems with budget lights, and therefore I've made this tiny troubleshooting guide. Feel free to comment as I am a noob with regards to LED flashlights (except for a Luxeon I bikelight I designed and built for an engineering project in university a few years back).
OK! Here goes!
my lights
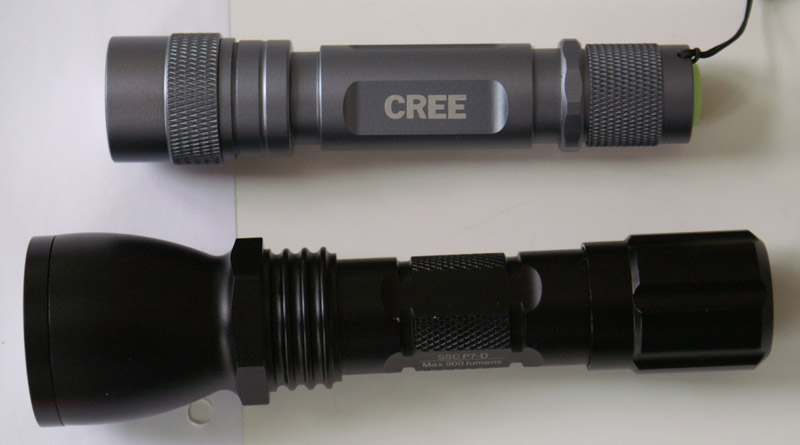
These are the lights I will use today (I also have a DX Pig-light, but I've never had any issues with it, so recon these are maintenance-free, ha ha), the Romisen RC-F4 and the MTE "P7-D" (5-mode).
DIM OUTPUT
1) Check the batteries!
If output is dim, but there is no flickering issue, the battery is a likely culprit. Some voltage-regulating circuitry may also flicker when the voltage drops, but this is rare. Remember: If your light uses more than one battery you need to be EXTREMELY careful not to mix-and-match batteries of different capacity or voltage. If you suspect that one of the batteries are dead (sometimes even brand new ones are dead) remove them and get them checked. This goes for all lithium-based batteries, primaries as well as rechargeables. Consider purchasing protected cells as well.
2) Check the LED
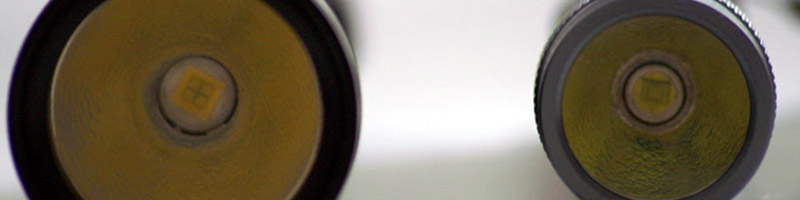
Visually inspect the LED to see if it shows any sign of being "burnt" (discoloration, dark spots). This should be visible through the lens.
3) Check the solder-points and contact-points
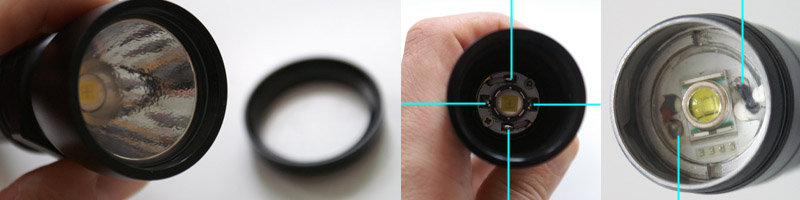
Visually inspect the solder-points by removing the head. If this is not possible remove the bezel and extract the glass and reflector if possible. Some heads are glued (such as the MTE "P7-D") but it may still be possible to access the LED/pill by removing the bezel/lens/reflector. Be very carful not to touch the reflector. It is polished and aluminium is soft. If you don't know what you're doing cleaning it is likely to ruin it! Wipe the lens when you reassemble. If everything seems all right, continue troubleshooting using the steps regarding flickering/switch issues.
FLICKERING / SWITCH ISSUES
1) Clean the internals of the light
Use compressed air or "tap and blow" to make sure no metal shavings/debris from the manufacture of the metal parts is caught inside the tube.
2) Check the contact between body and tailcap/switch-assembly
Remove the tailcap and use a paper-clip or otherwise suitable piece of metal and make contact between battery negative and the body. Make sure you make the contact on a part of the body that is not anodized. If the flickering stops, this may indicate a "bad" switch or bad contact between tailcap and body. Use a pair of needle-nose pliers (or a pair of sturdy tweezers) to tighten the switch-assembly (turn clockwise). If the switch-assembly is tight in the tailcap, remove it (counter-clocwise) to inspect.
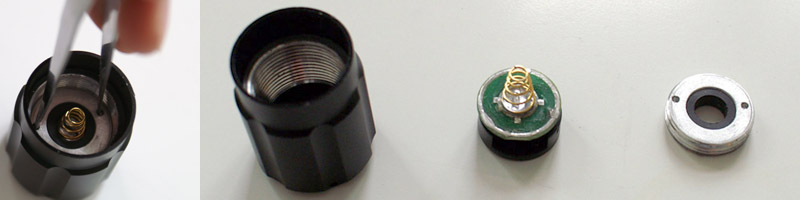
Some switches are "open" (MTE "P7-D") while others are "closed" (Romisen RC-F4). If your switch is of the "closed" type, it will hold the switch within a container that is inserted into the tailcap. If it is "open" the tailcap itself will form the container.
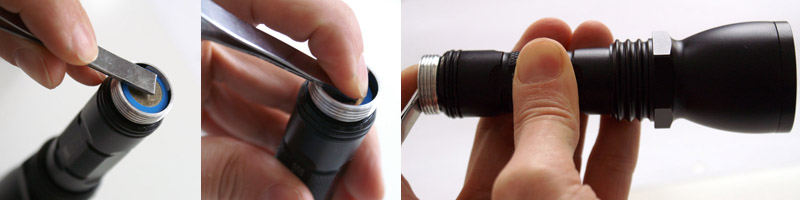
For "closed" switches, tighten the inner seal (see picture), reassemble and test. If no improvement is seen, continue with procedure for "open" switches.
For "open" switches, remove the parts and check for contact. Use a fine-grain sanding-paper (400 grit or higher) to clean the contact surfaces for solder-flux and other impurities.
Reassemble.
3) Check the contact between body and pill.
Do the paper-clip test as described previously. Vary the pressure on the battery. If the flickering is reduced/stops when pressure is applied, this indicates a contact problem between the pill and the body.
Get access to the pill by removing the head or by removing the bezel/lens/reflector. Remember to NOT touch the "shiny" parts of the reflector with your bare hands (or anything greasy)
Check if the pill is tight by using a pair of tweezers/needle-nose pliers and twist it clockwise. If it is tight there may be a problem with the wiring, which requires advanced repair (perhaps to be covered in another thread).
Reassemble and you're done.

I hope this is helpful. I searched these forums for help on my MTE "P7-D" as it was nearly unusable when I got it (heavy flickering) and there was no easy check-list for troubleshooting these lights. Here it is! Feel free to comment!
Tom.
These so-called budget lights are great value, but both have been "twitchy". The first (Romisen RC-F4) had an issue with its switch being unreliable. The second (MTE "P7-D", 5-mode) had a flickering issue. I'm sure others have problems with budget lights, and therefore I've made this tiny troubleshooting guide. Feel free to comment as I am a noob with regards to LED flashlights (except for a Luxeon I bikelight I designed and built for an engineering project in university a few years back).
OK! Here goes!
my lights
These are the lights I will use today (I also have a DX Pig-light, but I've never had any issues with it, so recon these are maintenance-free, ha ha), the Romisen RC-F4 and the MTE "P7-D" (5-mode).
DIM OUTPUT
1) Check the batteries!
If output is dim, but there is no flickering issue, the battery is a likely culprit. Some voltage-regulating circuitry may also flicker when the voltage drops, but this is rare. Remember: If your light uses more than one battery you need to be EXTREMELY careful not to mix-and-match batteries of different capacity or voltage. If you suspect that one of the batteries are dead (sometimes even brand new ones are dead) remove them and get them checked. This goes for all lithium-based batteries, primaries as well as rechargeables. Consider purchasing protected cells as well.
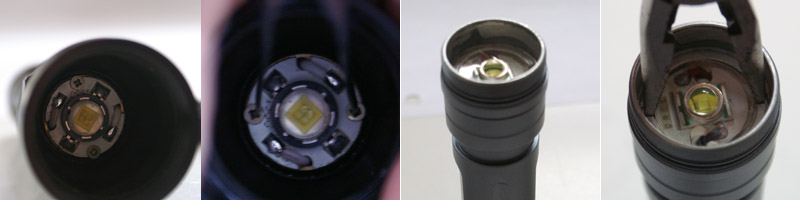
2) Check the LED
Visually inspect the LED to see if it shows any sign of being "burnt" (discoloration, dark spots). This should be visible through the lens.
3) Check the solder-points and contact-points
Visually inspect the solder-points by removing the head. If this is not possible remove the bezel and extract the glass and reflector if possible. Some heads are glued (such as the MTE "P7-D") but it may still be possible to access the LED/pill by removing the bezel/lens/reflector. Be very carful not to touch the reflector. It is polished and aluminium is soft. If you don't know what you're doing cleaning it is likely to ruin it! Wipe the lens when you reassemble. If everything seems all right, continue troubleshooting using the steps regarding flickering/switch issues.
FLICKERING / SWITCH ISSUES
1) Clean the internals of the light
Use compressed air or "tap and blow" to make sure no metal shavings/debris from the manufacture of the metal parts is caught inside the tube.
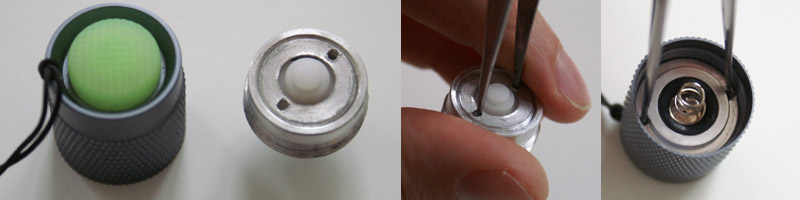
2) Check the contact between body and tailcap/switch-assembly
Remove the tailcap and use a paper-clip or otherwise suitable piece of metal and make contact between battery negative and the body. Make sure you make the contact on a part of the body that is not anodized. If the flickering stops, this may indicate a "bad" switch or bad contact between tailcap and body. Use a pair of needle-nose pliers (or a pair of sturdy tweezers) to tighten the switch-assembly (turn clockwise). If the switch-assembly is tight in the tailcap, remove it (counter-clocwise) to inspect.
Some switches are "open" (MTE "P7-D") while others are "closed" (Romisen RC-F4). If your switch is of the "closed" type, it will hold the switch within a container that is inserted into the tailcap. If it is "open" the tailcap itself will form the container.
For "closed" switches, tighten the inner seal (see picture), reassemble and test. If no improvement is seen, continue with procedure for "open" switches.
For "open" switches, remove the parts and check for contact. Use a fine-grain sanding-paper (400 grit or higher) to clean the contact surfaces for solder-flux and other impurities.
Reassemble.
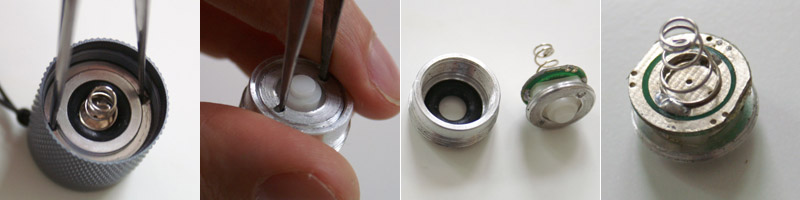
3) Check the contact between body and pill.
Do the paper-clip test as described previously. Vary the pressure on the battery. If the flickering is reduced/stops when pressure is applied, this indicates a contact problem between the pill and the body.
Get access to the pill by removing the head or by removing the bezel/lens/reflector. Remember to NOT touch the "shiny" parts of the reflector with your bare hands (or anything greasy)
Check if the pill is tight by using a pair of tweezers/needle-nose pliers and twist it clockwise. If it is tight there may be a problem with the wiring, which requires advanced repair (perhaps to be covered in another thread).
Reassemble and you're done.
I hope this is helpful. I searched these forums for help on my MTE "P7-D" as it was nearly unusable when I got it (heavy flickering) and there was no easy check-list for troubleshooting these lights. Here it is! Feel free to comment!
Tom.
Last edited:
")