
Reviewer's Note: The Legion II (Standard Edition) was provided for review by Neoseikan. Please see his sales thread in CPFMP for more info.
Warning: very pic heavy, as always
Legion II specifications:
To begin, you may notice some chips and blemishes on my review sample (especially a very noticeable gouge on the bezel ring at one point). Neoseikan was running low on samples, so he sent me one with surface imperfections for review (rather than passing these parts along to paying customers). Not a problem for me, but I honestly don't know what to expect from an actual purchased shipping light. Normally, I should expect those to be in near-perfect condition upon arrival.
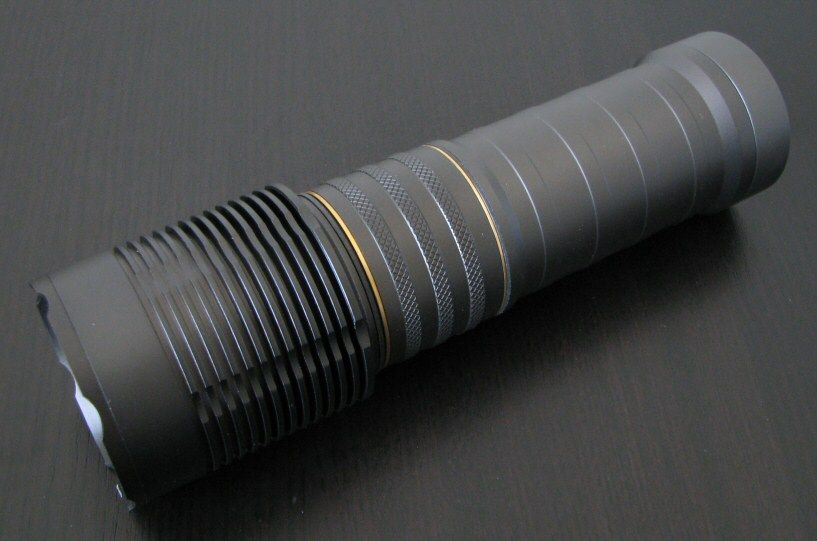
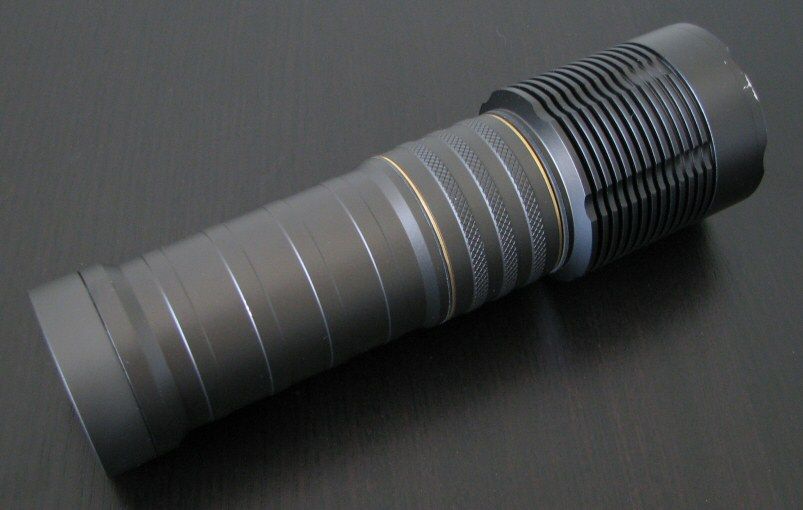
Despite the blemishes on the review sample, overall quality of the anodizing seems high. I personally quite like the color and over hand-feel of the light. The design is fairly streamlined, and the fins around the base of the head are smooth to the touch (i.e. no sharp edges anywhere). There are no identification labels of any kind on my sample.
There is no package picture to show you, as the review sample was sent alone wrapped in layers of protective foam and bubble wrap, in a bubble-envelope mailer. As such, I am not clear about how these units get shipped normally, and with what sort of instructions/extras. :shrug:
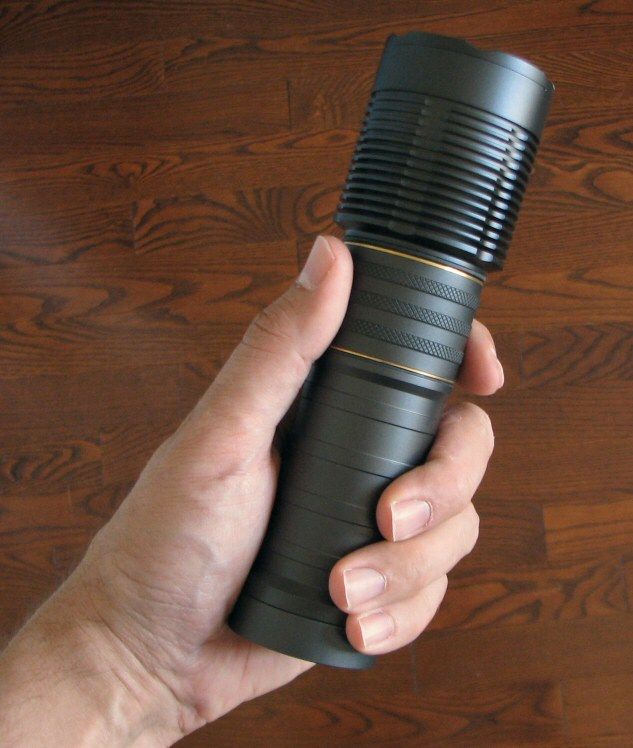
Here is how it looks in my hands, and compared to a couple lights of its class:
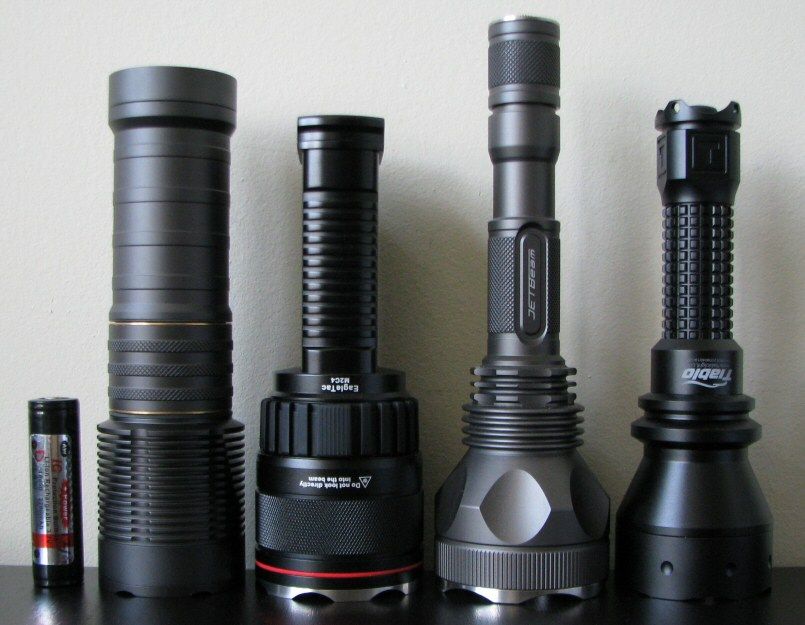
From left to right: AW 18650 protected battery, Neofab Legion II, EagleTac M2C4, JetBeam M1X, Taiblo ACE-G
Legion II Weight (no battery): 352.6g
Legion II Dimensions: Length 181mm, Width (bezel) 53.2mm, Width (tailcap) 45.9mm
Although a bit taller, overall weight is very similar to the EagleTac M2C4 (SSC P7 version). The weight feels appropriate for the overall size, and the light seems well-balanced (i.e. not top-heavy, like the heavier EagleTac M2XC4)
So, let's begin with the tailcap:
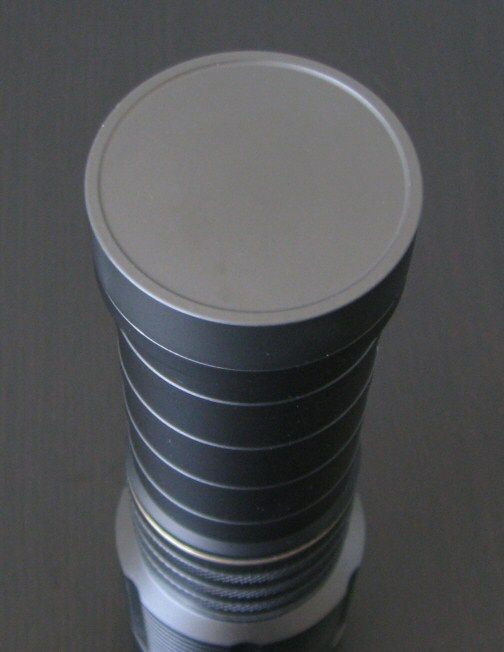
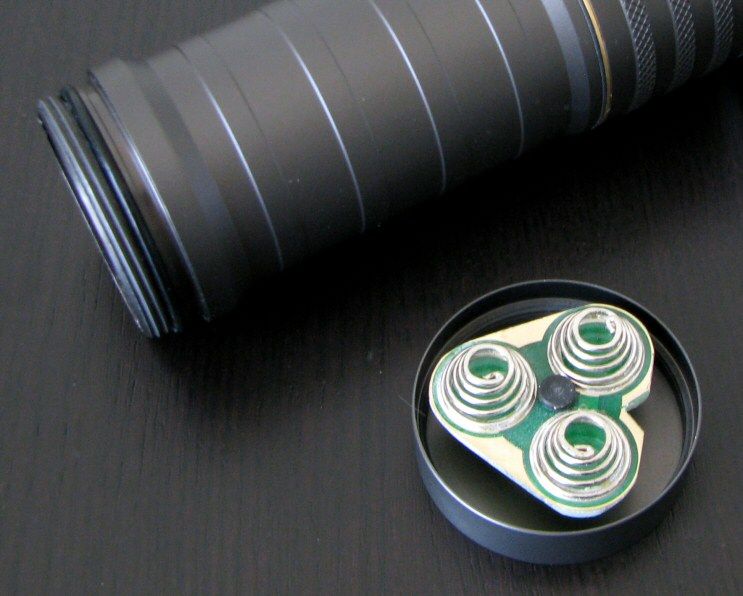
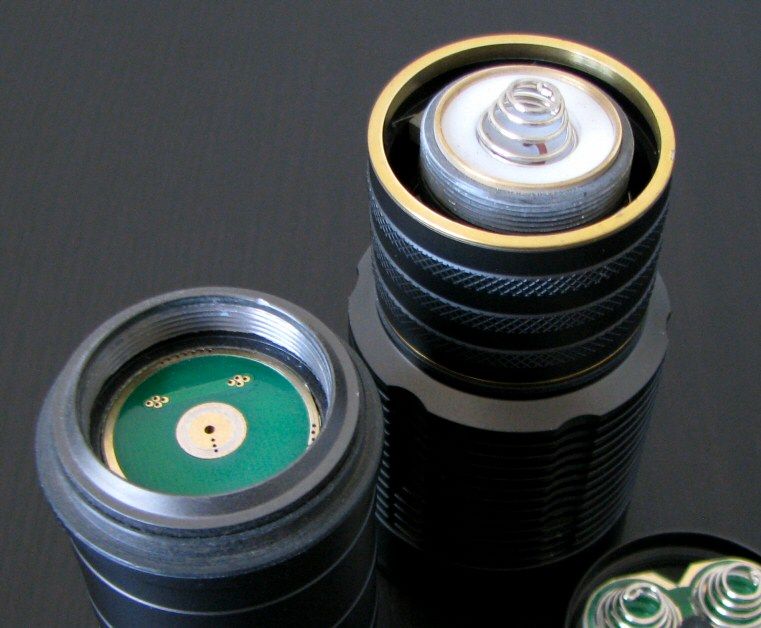
As you can see, the Standard Edition has a plain flat tailcap that allows tailstanding. The light uses a side-by-side 3-cell battery arrangement, hence the need for 3 springs in the tailcap. This design is fairly unique – the contact disk in the tailcap spins freely, and has a notch allowing you to line up the board with the battery tube to insure correct polarity and contact with all three batteries (the body notch is located at ~3 o'clock in the pic below).
This is why the contact board has to be able to spin freely – once you line up the tailcap springs/board with the body tube, you will need to screw down the tailcap portion without moving the contact disk/springs. In practice, I found this worked well – as long as you take care to properly line everything up before you get started scewing down the tailcap.
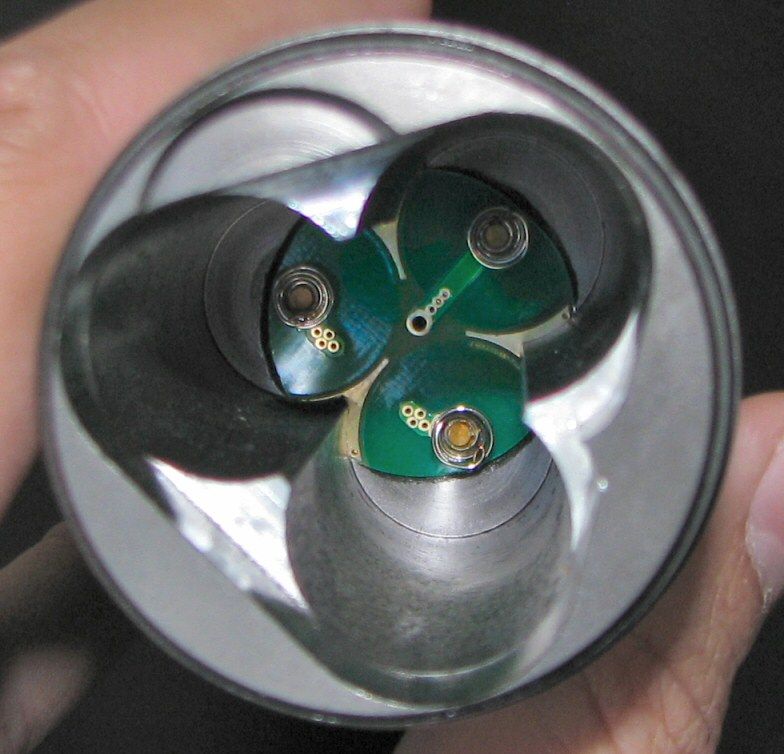
If you look down the battery tube in the pic above, you will see the other contact disk at the top of the battery tube, with another set of three springs. If you look carefully, you will see the battery tube body makes direct contact with the board at the 3 points that surround the batteries. It's important to note here that if you ever remove the head from the battery tube, make sure this contact disk remains firmly in place. If that contact disk were to get accidentally rotated while batteries were loaded, you would risk shorting out the cells (again, mine stayed firmly in place with all my disassembly/testing, but it is something Neoseikan recommends you watch for).
 Note that there is no physical indication here as to how to install batteries into the light. I've reproduced below the original manual Neoseikan e-mailed around to CPF members, explaining the battery orientation.
Again, I don't know what instructions come with the light, but I think actual labels on the body tube would be a good idea.
So how does the control mechanism work?
Normally, you would not need to ever remove the battery tube from the head. In my case, the light arrived with the spring disconnected from the control ring, so I had to open it up to take a look.
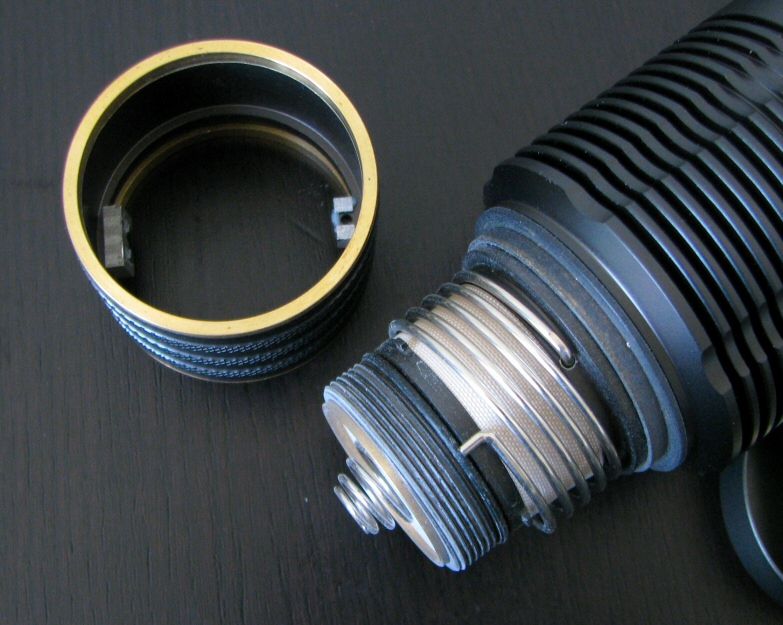
The control mechanism is due to a sturdy spring that coils around the head several times. It is fixed within the body of the head at one end (closest to the emitter), and is free-floating at the other end. If you look inside the control ring external cover piece on the left above, you will see there's a hole (around 3 o'clock) where the free-floating end of the spring slips into. This had come loose on my sample and needed to be re-attached. Neo informed me that he didn't want to glue it in place on my sample, since he figured I would want to disassemble the light.
With everything in place, you can twist the control right left or right about an eight of a full turn in either direction. Switching is controlled by a rapid turn-release (see below for a discussion of the UI).
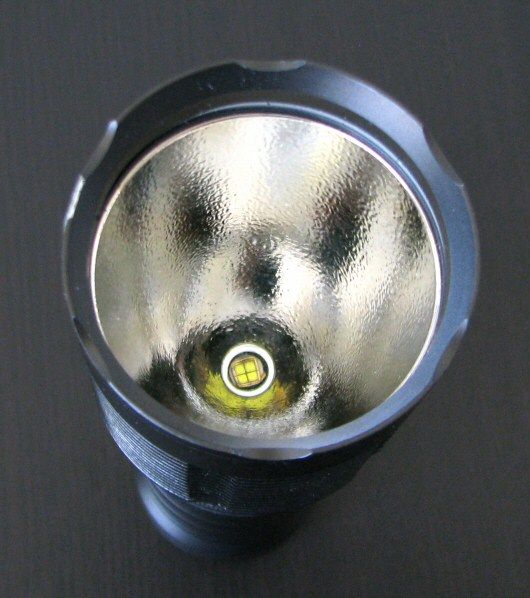
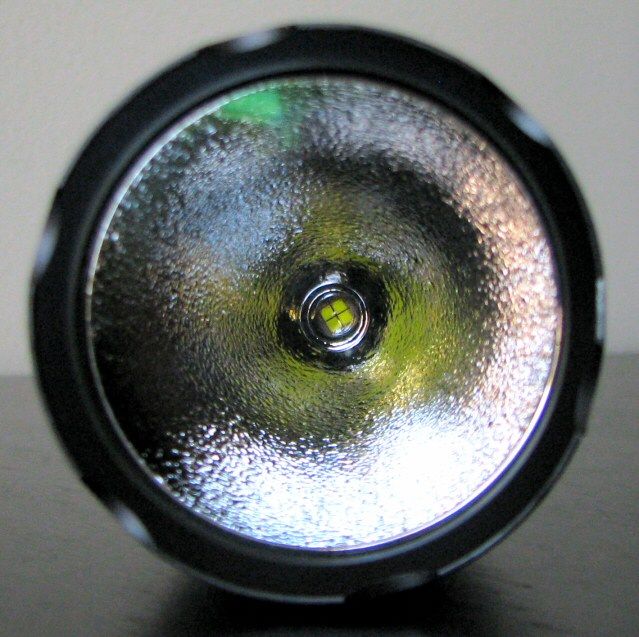
The Legion II comes with a very deep OP reflector. This is likely to result in good throw and narrower overall spillbeam width.
One comment – consistent with the custom-built nature of this light, there are few things to look out for here. Although the parts seem to be of high quality, there is a fair amount of noticeable dust and smudges on the inside of the lens of my light. :sigh: While cosmetically unappealing, this doesn't really affect the beam in any measurable way. However, it is not a good idea to leave it in there, as the dust could dislodge and potentially damage the reflector or emitter. Unfortunately, I haven't been able to get the bezel ring unscrewed yet – it is stuck on there pretty tight. I haven't tried my strap wrenches yet, but the old underside-of-a-mousepad trick didn't work (it simply shredded my mousepad).
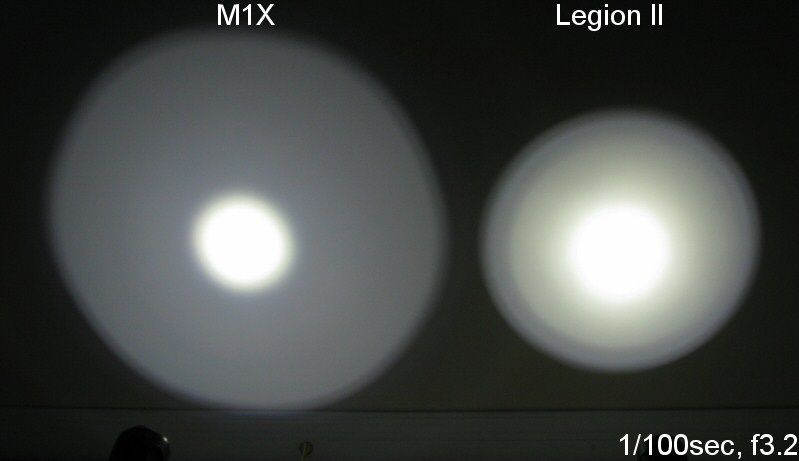
Here are some comparison beamshots, taken on Max on 18650 AW protected Li-ion. Distance is about 0.5 meters from a white wall.
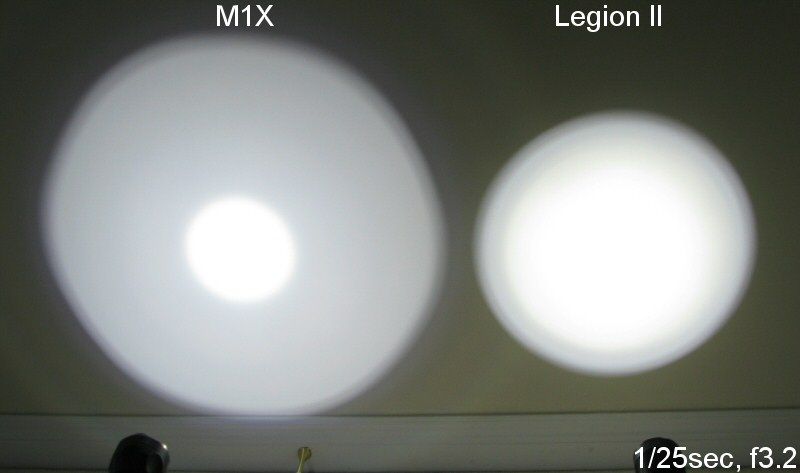
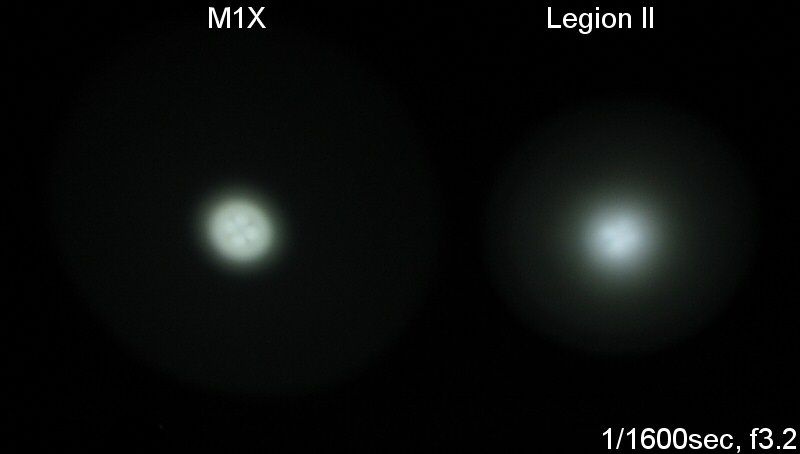
I chose the JetBeam M1X as a direct comparator, since it also has a deep reflector (although in the M1X's case, this is combined with a wider and shallower front opening to provide wider spill as well).
Although taken at a different exposure setting (and therefore not directly comparable in output to the two lights above), the two EagleTac M2 lights should give you an idea size-wise as to how a 3xCree (M2XC4) and a fairly typical MC-E light (M2C4) spillbeam patterns compare.
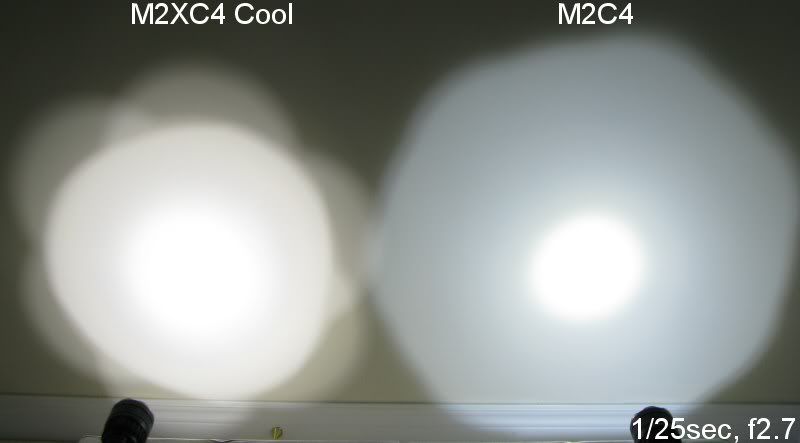
The point here is that the Legion II spillbeam width is narrower than a typical MC-E/P7 light – it's even a bit narrower than what you find in a multi-emitter setup like the M2XC4. This means that all of the light is distributed over a narrower area – resulting in a narrower but brighter spillbeam. Note that the actual spill area is quite acceptable in width for the real world.
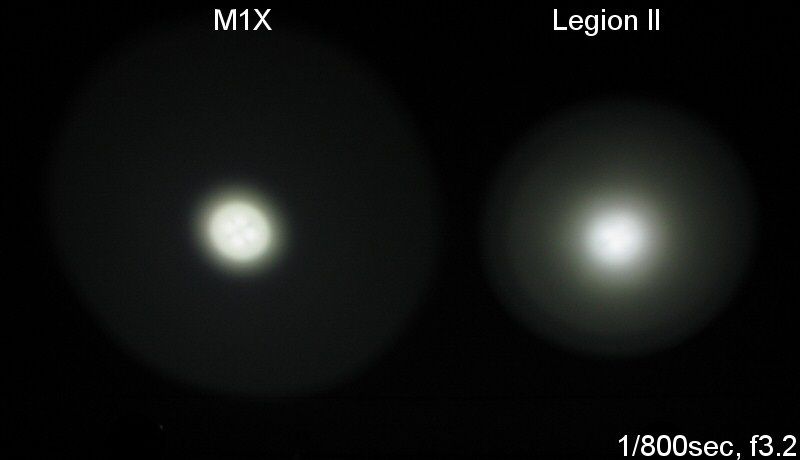
Also as expected, center-beam throw is very good – nearly as high as my M1X. But the Legion II reflector design seems to be doing a much better job minimizing the "donut hole" and cross-hatching appearance of the quad-die emitter.oo:
Unfortunately, I haven't had the chance to take outdoor beam shots yet (still to come …). But personally, I find this beam pattern to be very pleasing outdoors. The narrower spill beam means that the periphery of what you are looking at is actually much better lit up than with many of the other quad-die setups.
User Interface
The Legion II uses a variation of the same user interface found on the earlier Spartanian II. Although this fairly unique UI may seem complex at first, it is actually quite simple and quickly becomes intuitive.
Simply put, the light has two set states that you can program - and either one can be accessed directly from off. The light uses a spring-activated control switch, accessed by twisting the middle section of the light. Below, I will describe the standard arrangement for right-handed lights. Apparently, neoseikan can provide lights with circuits customized for left-handed use (i.e. reversed hand-operation of the switching described below).
For momentary-on at either of the two set levels, simply twist the mid-section to the left or right and hold it there. The left and right positions are the two set-able states of the light. Release the mid-section, and the light shuts off.
If you hold the light in the on position for more than a few seconds, the light will flash briefly to indicate it is set to remain on once you release the switch. The time required varies for two sides - about 5 secs for the left position, about 1 sec for the right. This is apparently deliberate so that you can set one level for momentary on without an immediate lock-on (i.e. to the left), and one level to quick lock-on (i.e. to the right). But personally, I would prefer the same time for both sides.
Once the light is in the constant-on state, you can alter the light output by doing a quick twist-and-release switch to the left to reduce the brightness level one step, and a quick switch to the right to raise the level. The light has 5 levels in total (see runtimes below for relative outputs)
To set a new default level for the left or right on-states, simply unscrew the tailcap once the desired level is chosen. This will turn off the light and activate the memory for that side (i.e. whichever side you turned the light on in).
To turn off the light normally, without resetting the memory, twist the mid-section switch to the right and hold it there for about 2-3 secs. It's necessary to hold it that long so the circuit knows you are not just trying to do a brightness step increase.
An interesting feature of these lights is the option to a battery check. From on, simply twist to the left and hold. It will flash a number of times to let you know the relative battery life remaining.
The only significant difference from the Spartanian II is the number of levels – there are only 5 on the Legion II. Scroll down to the runtimes later in this review for a comparison of their relative outputs.
I found the UI easy to use once I got used to the rapid twist/release needed for switching.
No PWM
I was unable to detect any sign of PWM at any output level with my home-made sound card-oscilloscope setup.
Testing Method: All my output numbers are relative for my home-made light box setup, a la Quickbeam's flashlight reviews method. You can directly compare all my relative output values from different reviews - i.e. an output value of "10" in one graph is the same as "10" in another. All runtimes are done under a cooling fan.
Throw values are the square-root of lux measurements taken at 5 meters from the lens, using a light meter, and then extrapolated back to estimate values for 1 meter. This will be my standard way to present throw on these types of lights from now on. The beams don't really have a chance to fully converge until typically several meters out
Some of the other lights take a couple of minutes to settle into their regulated output state (i.e. their initial output is higher, but not for long). As such, all my output and throw numbers are taken after 2 mins of continuous runtime (on 2x18650 AW Protected cells).
Throw/Output Summary Chart:
Consistent with what you saw in the beamshots, the Legion II has excellent throw for a MC-E light – second only to my M1X.
Max output is also very consistent with the M1X, which is certainly quite respectable for this class of light. The main difference between the lights being the spillbeam pattern, of course.
Output/Runtime Comparison
All 18650 runtimes were done on AW protected cells (2200mAh).
As expected, given the 3x18650 battery source, the light has admirable regulation at all output levels.
Output levels are well-spaced, but I wouldn't consider any of them particularly "low". This is a common issue for current-controlled lights. I should note though that this is a departure from the Spartanian II, which switched from current-controlled to PWM at the lower output settings, in order to provide true low output.

Comparison to other multi-emitter lights will need to take into account the 3x battery source for the Legion II, compared to the 2x config in most of the competition. After factoring that in, overall output/runtime efficiency doesn't seem as high as the EagleTac offerings, but it is definitely higher than the PWM-based competition. Absolute runtime performance will be at least as good as the EagleTacs, when matched for output (thanks to the extra battery in the Legion II).
Potential Issues
The light lacks any physical indication on how to properly insert the batteries – you need to refer to the e-mailed instructions.
The warning in the instructions about not unscrewing the head refers to ensuring that the contact disc at the top of the battery tube doesn't move (and potentially short the batteries). Best to ensure that the batteries are not installed in the light during any sort of partial disassembly, just in case.
Light lacks a true "low" mode, consistent with its apparent use of current-controlled technology.
The light runs only on 3x18650 Li-ion (i.e. no primary cells accepted).
There is no attachment point for a wrist lanyard, and no holster or other retaining device is provided with the light. It is also not as "grippy" as some lights in this class, but I find the ridge detail helps provide sufficient grip.
My sample came with noticeable dust and marks on the inside of the lens.
Preliminary Observations
I am very impressed with the beam profile of this light. Thanks to the deep reflector, you get a narrower spillbeam than typical for this class – but that means you get brighter spill that you can actually use at intermediate distances (i.e. narrower spill also means brighter spill). The overall beam pattern of this light is actually closer to many 3x single-die emitter configurations (but without the overlapping daisy-flower appearance close-up). IMO, this pattern is very well suited to a general-purpose multi-emitter light - it will light up the immediate and intermediate area around your position quite nicely.
And it is no slouch in the throw department either – it is one of the furthest throwing quad-die-based lights in my collection at the moment (second only to the JetBeam M1X). But the notorious donut or cross-hatching pattern of the quad-die emitter is remarkably reduced on my sample. Simply put, the standard OP reflector does an all-around commendable job. :thumbsup:
Ergonomically, I also like the overall feel and shape (reminds me of a lightsaber :laughing. Of course, I have larger than average hands, so your experience could be different. For example, my wife (who is a petite size) found it very difficult to activate the control ring one-handed. For most users, it will likely just be a bit of a stretch. The resistance of the control ring spring seems to be slightly improved (i.e. slightly stiffer) compared to my earlier Spartanian II.
The user interface is relatively unchanged from the Spartanian, except for reduced number of output levels. In fact, that is one of the few areas in which the Legion feels like a step backward – it's lowest output level is not as low as most the competition in this space (including the other current-controlled lights). Something like the Spartanian II's dual-circuit design that provided true low modes (through PWM) would be a bonus here.
Overall output/runtime efficiency is quite good – better than the PWM-based competition - but not quite as high as the EagleTac offerings. Of course, the extra cell means that absolute runtimes will be a bit longer than other 2x18650 lights for the same output level.
As for the actual control ring interface, I can see some people preferring it more than others. I find it fairly intuitive when you get used to it (except the bit about unscrewing the tailcap to memorize on-state output levels :shrug. And the relative battery life remaining indicator is something I wish more manufacturers thought of.
In the end, this is a thoughtfully-designed light that is fun to swing around. But it is important to understand what you are buying here – this is more of custom-built and hobbyist-designed light. There are bound to be a few inconsistencies and rough edges from sample to sample, and you won't receive the typical bundle of extras or level of support that you would get from a mass-produced item of a major manufacturer.
As with all lights, I recommend you check around the reviews and user opinions on all the models in this class, and then choose the light that is right for your needs and uses. I'm still planning to do a round-up review for this multi-emitter class (but am a little swamped with new lights to test at the moment ). For the time being, please check out the master list of reviews in my signature, to compare to other lights mentioned here.
Warning: very pic heavy, as always
Legion II specifications:
- CREE MC-E M-bin;
- 6061-T6 Aluminum
- Hard Anodized (type III) Grey finish;
- Orange Peel (OP) textured reflector included, smooth reflector available separately
- SHOTT B270 Double side multi layer coated 99% transparency glass lens
- 4 layer driver board; 0.007mohm resistor;
- Uses 3*18650 Li-on (not included)
- Max regulated output 742 lumens
- Runtime on Max output – up to 3 hours regulated, depending on battery source
- Five output levels
- Built-in battery gauge
- Optional stainless steel bezel and tailcap available
- CPF price: $179 plus shipping (includes OP reflector)
To begin, you may notice some chips and blemishes on my review sample (especially a very noticeable gouge on the bezel ring at one point). Neoseikan was running low on samples, so he sent me one with surface imperfections for review (rather than passing these parts along to paying customers). Not a problem for me, but I honestly don't know what to expect from an actual purchased shipping light. Normally, I should expect those to be in near-perfect condition upon arrival.
Despite the blemishes on the review sample, overall quality of the anodizing seems high. I personally quite like the color and over hand-feel of the light. The design is fairly streamlined, and the fins around the base of the head are smooth to the touch (i.e. no sharp edges anywhere). There are no identification labels of any kind on my sample.
There is no package picture to show you, as the review sample was sent alone wrapped in layers of protective foam and bubble wrap, in a bubble-envelope mailer. As such, I am not clear about how these units get shipped normally, and with what sort of instructions/extras. :shrug:
Here is how it looks in my hands, and compared to a couple lights of its class:
From left to right: AW 18650 protected battery, Neofab Legion II, EagleTac M2C4, JetBeam M1X, Taiblo ACE-G
Legion II Weight (no battery): 352.6g
Legion II Dimensions: Length 181mm, Width (bezel) 53.2mm, Width (tailcap) 45.9mm
Although a bit taller, overall weight is very similar to the EagleTac M2C4 (SSC P7 version). The weight feels appropriate for the overall size, and the light seems well-balanced (i.e. not top-heavy, like the heavier EagleTac M2XC4)
So, let's begin with the tailcap:
As you can see, the Standard Edition has a plain flat tailcap that allows tailstanding. The light uses a side-by-side 3-cell battery arrangement, hence the need for 3 springs in the tailcap. This design is fairly unique – the contact disk in the tailcap spins freely, and has a notch allowing you to line up the board with the battery tube to insure correct polarity and contact with all three batteries (the body notch is located at ~3 o'clock in the pic below).
This is why the contact board has to be able to spin freely – once you line up the tailcap springs/board with the body tube, you will need to screw down the tailcap portion without moving the contact disk/springs. In practice, I found this worked well – as long as you take care to properly line everything up before you get started scewing down the tailcap.
If you look down the battery tube in the pic above, you will see the other contact disk at the top of the battery tube, with another set of three springs. If you look carefully, you will see the battery tube body makes direct contact with the board at the 3 points that surround the batteries. It's important to note here that if you ever remove the head from the battery tube, make sure this contact disk remains firmly in place. If that contact disk were to get accidentally rotated while batteries were loaded, you would risk shorting out the cells (again, mine stayed firmly in place with all my disassembly/testing, but it is something Neoseikan recommends you watch for).
Note that there is no physical indication here as to how to install batteries into the light. I've reproduced below the original manual Neoseikan e-mailed around to CPF members, explaining the battery orientation.
Again, I don't know what instructions come with the light, but I think actual labels on the body tube would be a good idea.
So how does the control mechanism work?
Normally, you would not need to ever remove the battery tube from the head. In my case, the light arrived with the spring disconnected from the control ring, so I had to open it up to take a look.
The control mechanism is due to a sturdy spring that coils around the head several times. It is fixed within the body of the head at one end (closest to the emitter), and is free-floating at the other end. If you look inside the control ring external cover piece on the left above, you will see there's a hole (around 3 o'clock) where the free-floating end of the spring slips into. This had come loose on my sample and needed to be re-attached. Neo informed me that he didn't want to glue it in place on my sample, since he figured I would want to disassemble the light.
With everything in place, you can twist the control right left or right about an eight of a full turn in either direction. Switching is controlled by a rapid turn-release (see below for a discussion of the UI).
The Legion II comes with a very deep OP reflector. This is likely to result in good throw and narrower overall spillbeam width.
One comment – consistent with the custom-built nature of this light, there are few things to look out for here. Although the parts seem to be of high quality, there is a fair amount of noticeable dust and smudges on the inside of the lens of my light. :sigh: While cosmetically unappealing, this doesn't really affect the beam in any measurable way. However, it is not a good idea to leave it in there, as the dust could dislodge and potentially damage the reflector or emitter. Unfortunately, I haven't been able to get the bezel ring unscrewed yet – it is stuck on there pretty tight. I haven't tried my strap wrenches yet, but the old underside-of-a-mousepad trick didn't work (it simply shredded my mousepad).
Here are some comparison beamshots, taken on Max on 18650 AW protected Li-ion. Distance is about 0.5 meters from a white wall.
I chose the JetBeam M1X as a direct comparator, since it also has a deep reflector (although in the M1X's case, this is combined with a wider and shallower front opening to provide wider spill as well).
Although taken at a different exposure setting (and therefore not directly comparable in output to the two lights above), the two EagleTac M2 lights should give you an idea size-wise as to how a 3xCree (M2XC4) and a fairly typical MC-E light (M2C4) spillbeam patterns compare.
The point here is that the Legion II spillbeam width is narrower than a typical MC-E/P7 light – it's even a bit narrower than what you find in a multi-emitter setup like the M2XC4. This means that all of the light is distributed over a narrower area – resulting in a narrower but brighter spillbeam. Note that the actual spill area is quite acceptable in width for the real world.
Also as expected, center-beam throw is very good – nearly as high as my M1X. But the Legion II reflector design seems to be doing a much better job minimizing the "donut hole" and cross-hatching appearance of the quad-die emitter.
oo:Unfortunately, I haven't had the chance to take outdoor beam shots yet (still to come …
). But personally, I find this beam pattern to be very pleasing outdoors. The narrower spill beam means that the periphery of what you are looking at is actually much better lit up than with many of the other quad-die setups. User Interface
The Legion II uses a variation of the same user interface found on the earlier Spartanian II. Although this fairly unique UI may seem complex at first, it is actually quite simple and quickly becomes intuitive.
Simply put, the light has two set states that you can program - and either one can be accessed directly from off. The light uses a spring-activated control switch, accessed by twisting the middle section of the light. Below, I will describe the standard arrangement for right-handed lights. Apparently, neoseikan can provide lights with circuits customized for left-handed use (i.e. reversed hand-operation of the switching described below).
For momentary-on at either of the two set levels, simply twist the mid-section to the left or right and hold it there. The left and right positions are the two set-able states of the light. Release the mid-section, and the light shuts off.
If you hold the light in the on position for more than a few seconds, the light will flash briefly to indicate it is set to remain on once you release the switch. The time required varies for two sides - about 5 secs for the left position, about 1 sec for the right. This is apparently deliberate so that you can set one level for momentary on without an immediate lock-on (i.e. to the left), and one level to quick lock-on (i.e. to the right). But personally, I would prefer the same time for both sides.
Once the light is in the constant-on state, you can alter the light output by doing a quick twist-and-release switch to the left to reduce the brightness level one step, and a quick switch to the right to raise the level. The light has 5 levels in total (see runtimes below for relative outputs)
To set a new default level for the left or right on-states, simply unscrew the tailcap once the desired level is chosen. This will turn off the light and activate the memory for that side (i.e. whichever side you turned the light on in).
To turn off the light normally, without resetting the memory, twist the mid-section switch to the right and hold it there for about 2-3 secs. It's necessary to hold it that long so the circuit knows you are not just trying to do a brightness step increase.
An interesting feature of these lights is the option to a battery check. From on, simply twist to the left and hold. It will flash a number of times to let you know the relative battery life remaining.
The only significant difference from the Spartanian II is the number of levels – there are only 5 on the Legion II. Scroll down to the runtimes later in this review for a comparison of their relative outputs.
I found the UI easy to use once I got used to the rapid twist/release needed for switching.
No PWM
I was unable to detect any sign of PWM at any output level with my home-made sound card-oscilloscope setup.
Testing Method: All my output numbers are relative for my home-made light box setup, a la Quickbeam's flashlight reviews method. You can directly compare all my relative output values from different reviews - i.e. an output value of "10" in one graph is the same as "10" in another. All runtimes are done under a cooling fan.
Throw values are the square-root of lux measurements taken at 5 meters from the lens, using a light meter, and then extrapolated back to estimate values for 1 meter. This will be my standard way to present throw on these types of lights from now on. The beams don't really have a chance to fully converge until typically several meters out
Some of the other lights take a couple of minutes to settle into their regulated output state (i.e. their initial output is higher, but not for long). As such, all my output and throw numbers are taken after 2 mins of continuous runtime (on 2x18650 AW Protected cells).
Throw/Output Summary Chart:
Consistent with what you saw in the beamshots, the Legion II has excellent throw for a MC-E light – second only to my M1X.
Max output is also very consistent with the M1X, which is certainly quite respectable for this class of light. The main difference between the lights being the spillbeam pattern, of course.
Output/Runtime Comparison
All 18650 runtimes were done on AW protected cells (2200mAh).
As expected, given the 3x18650 battery source, the light has admirable regulation at all output levels.
Output levels are well-spaced, but I wouldn't consider any of them particularly "low". This is a common issue for current-controlled lights. I should note though that this is a departure from the Spartanian II, which switched from current-controlled to PWM at the lower output settings, in order to provide true low output.
Comparison to other multi-emitter lights will need to take into account the 3x battery source for the Legion II, compared to the 2x config in most of the competition. After factoring that in, overall output/runtime efficiency doesn't seem as high as the EagleTac offerings, but it is definitely higher than the PWM-based competition. Absolute runtime performance will be at least as good as the EagleTacs, when matched for output (thanks to the extra battery in the Legion II).
Potential Issues
The light lacks any physical indication on how to properly insert the batteries – you need to refer to the e-mailed instructions.
The warning in the instructions about not unscrewing the head refers to ensuring that the contact disc at the top of the battery tube doesn't move (and potentially short the batteries). Best to ensure that the batteries are not installed in the light during any sort of partial disassembly, just in case.
Light lacks a true "low" mode, consistent with its apparent use of current-controlled technology.
The light runs only on 3x18650 Li-ion (i.e. no primary cells accepted).
There is no attachment point for a wrist lanyard, and no holster or other retaining device is provided with the light. It is also not as "grippy" as some lights in this class, but I find the ridge detail helps provide sufficient grip.
My sample came with noticeable dust and marks on the inside of the lens.
Preliminary Observations
I am very impressed with the beam profile of this light. Thanks to the deep reflector, you get a narrower spillbeam than typical for this class – but that means you get brighter spill that you can actually use at intermediate distances (i.e. narrower spill also means brighter spill). The overall beam pattern of this light is actually closer to many 3x single-die emitter configurations (but without the overlapping daisy-flower appearance close-up). IMO, this pattern is very well suited to a general-purpose multi-emitter light - it will light up the immediate and intermediate area around your position quite nicely.
And it is no slouch in the throw department either – it is one of the furthest throwing quad-die-based lights in my collection at the moment (second only to the JetBeam M1X). But the notorious donut or cross-hatching pattern of the quad-die emitter is remarkably reduced on my sample. Simply put, the standard OP reflector does an all-around commendable job. :thumbsup:
Ergonomically, I also like the overall feel and shape (reminds me of a lightsaber :laughing
. Of course, I have larger than average hands, so your experience could be different. For example, my wife (who is a petite size) found it very difficult to activate the control ring one-handed. For most users, it will likely just be a bit of a stretch. The resistance of the control ring spring seems to be slightly improved (i.e. slightly stiffer) compared to my earlier Spartanian II. The user interface is relatively unchanged from the Spartanian, except for reduced number of output levels. In fact, that is one of the few areas in which the Legion feels like a step backward – it's lowest output level is not as low as most the competition in this space (including the other current-controlled lights). Something like the Spartanian II's dual-circuit design that provided true low modes (through PWM) would be a bonus here.
Overall output/runtime efficiency is quite good – better than the PWM-based competition - but not quite as high as the EagleTac offerings. Of course, the extra cell means that absolute runtimes will be a bit longer than other 2x18650 lights for the same output level.
As for the actual control ring interface, I can see some people preferring it more than others. I find it fairly intuitive when you get used to it (except the bit about unscrewing the tailcap to memorize on-state output levels :shrug
. And the relative battery life remaining indicator is something I wish more manufacturers thought of.In the end, this is a thoughtfully-designed light that is fun to swing around. But it is important to understand what you are buying here – this is more of custom-built and hobbyist-designed light.
There are bound to be a few inconsistencies and rough edges from sample to sample, and you won't receive the typical bundle of extras or level of support that you would get from a mass-produced item of a major manufacturer. As with all lights, I recommend you check around the reviews and user opinions on all the models in this class, and then choose the light that is right for your needs and uses. I'm still planning to do a round-up review for this multi-emitter class (but am a little swamped with new lights to test at the moment
). For the time being, please check out the master list of reviews in my signature, to compare to other lights mentioned here.
Last edited:
