gt40
Enlightened
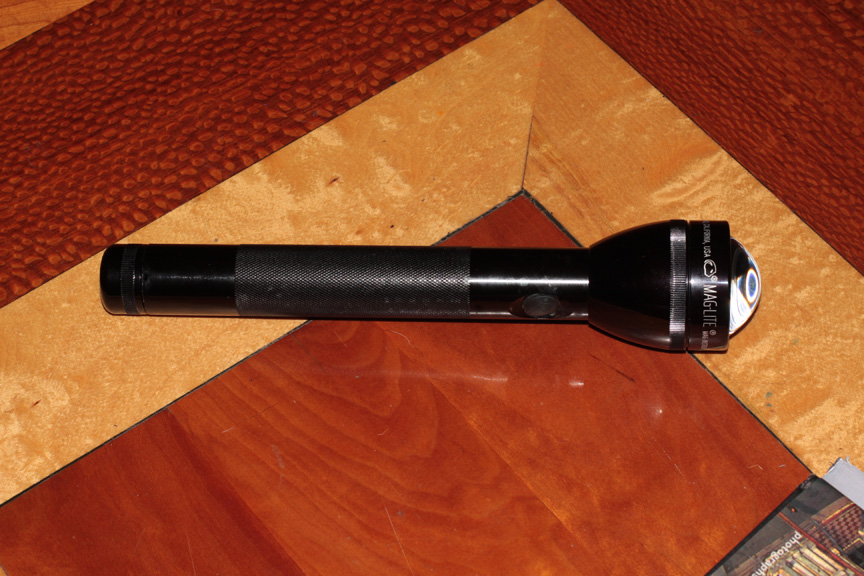
Mag 3 "C" SST-90 MG aspherical with LDO10C Driver and 26650's - UPDATE: VIDEO ADDED
UPDATE: VIDEO of the light running at a stable 11 AMP: http://vimeo.com/9088275
I just completed my first modified light since plunging down the rabbit hole that is this forum.
Build:
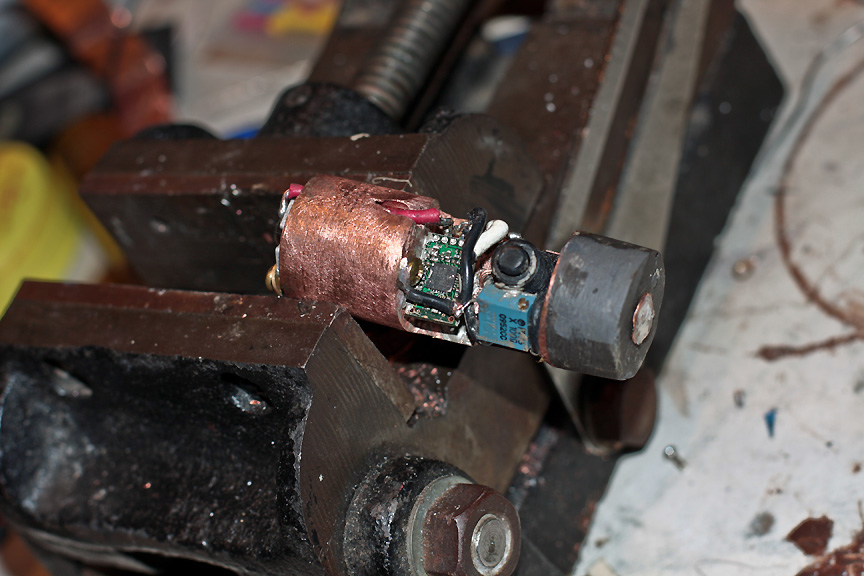
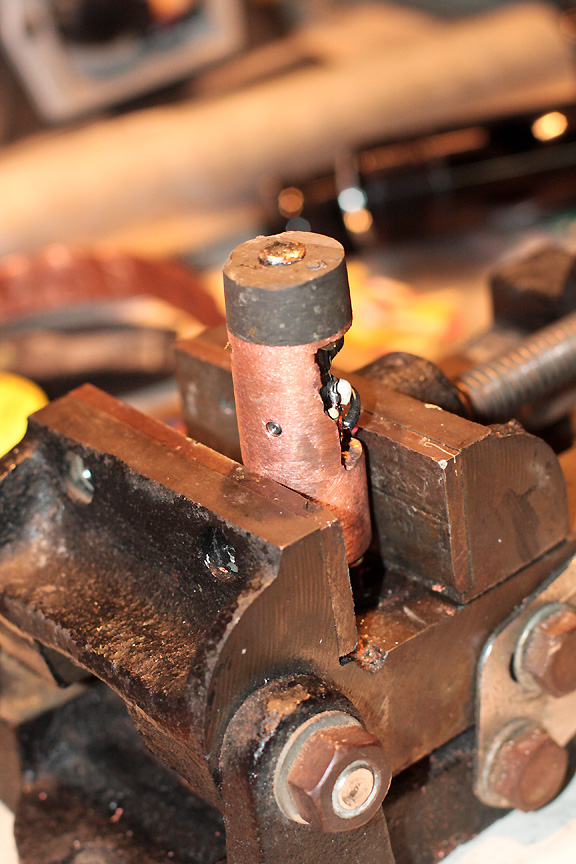
Mag 3 C host bored out to accept battery space 26650 IMR's. I found I could fit 2 comfortably lengthwise in the tube with my custom copper heat sink that is over 2" long. I bored the tube with a brake hone on my drill press.
I will post some pics of the heat sink soon but it is over 10 ounces in weight and roughly 1" x 2.5" long. FYI, it is held in place with a 8/32 hex set screw that is close to where the stock switch would be aka like the stock mag assembly.
Switch:
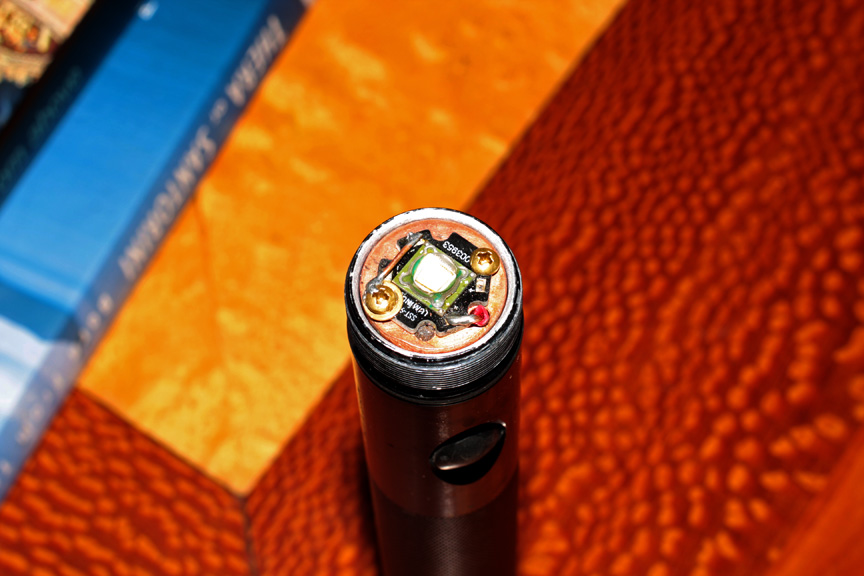
I used a judco 10amp switch in place of the stock mag switch. I found I could cut out a section wide enough to fit the switch and the LDO1C driver and it all fits while allowing a much larger heatsink than most I have seen.
Driver:
I bought the following:
1dc/dc converter: LDO10C-005W05-VJ LDO10C-005W05
Source: http://www.arrow.com/
data sheet:http://www.powerconversion.com/produ...eet/170/LDO10C
2. Thermister: KTY83/110
Source: http://avnetexpress.avnet.com
data sheet: www.nxp.com/documents/data_sheet/KTY83_SER.pdf
3. 510 ohm resistor
Source: local Fry's electronics
4. 100 ohm trimmer resister
Source: Fry's
I wired it up according to member Pepko's thread(link listed below) with the thermister and 510 resister in parallel and then the trimmer after them. These are connected between the trim pin and the ground. It is really cool because you can just change the resistance with the trimmer once your close to dial it in exactly at the voltage you want. I used a spare pot to verify the settings and play with some other battery combos and it really works + it is extremely small. It also drops the voltage slightly as the led heats up per Luminus spec requirements.
I tried it with just a resister and it tended to run away on the amps as it heated up without the thermister to compensate. You can run a higher initial voltage as a result. This actually makes it brighter than keeping a stable voltage.
BTW, the LDO1C is rated for 10 amps/50 watts.
I got this driver idea from this thread:
http://www.candlepowerforums.com/vb/...0&postcount=19
He posted more info and pics on some other site too: http://forum.fotonmag.cz/index.php?s...ndpost&p=14743
I verified it worked for me so i ordered parts to make 3 for upcoming projects.
FYI, you can make the LDO10c into a boost driver by feeding the trim pin current instead of resister.
It is about 20 dollars in parts and a little solder.
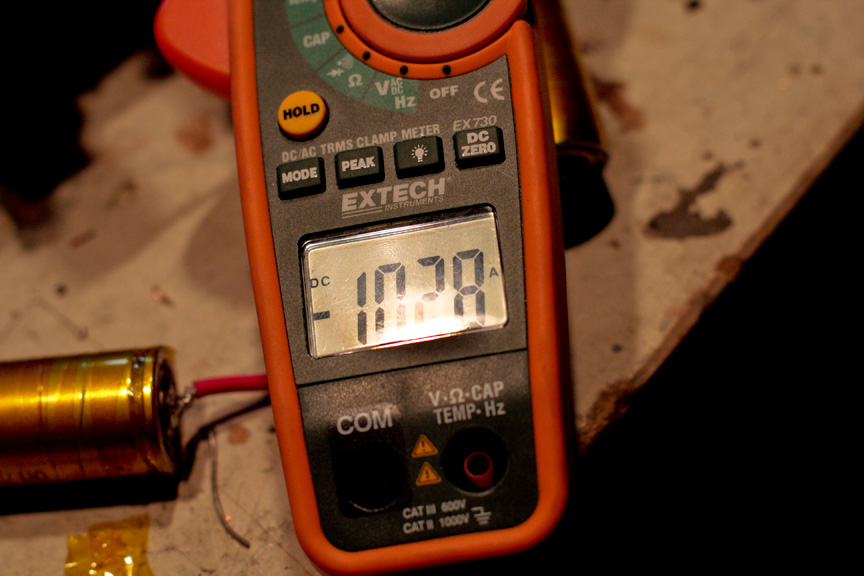
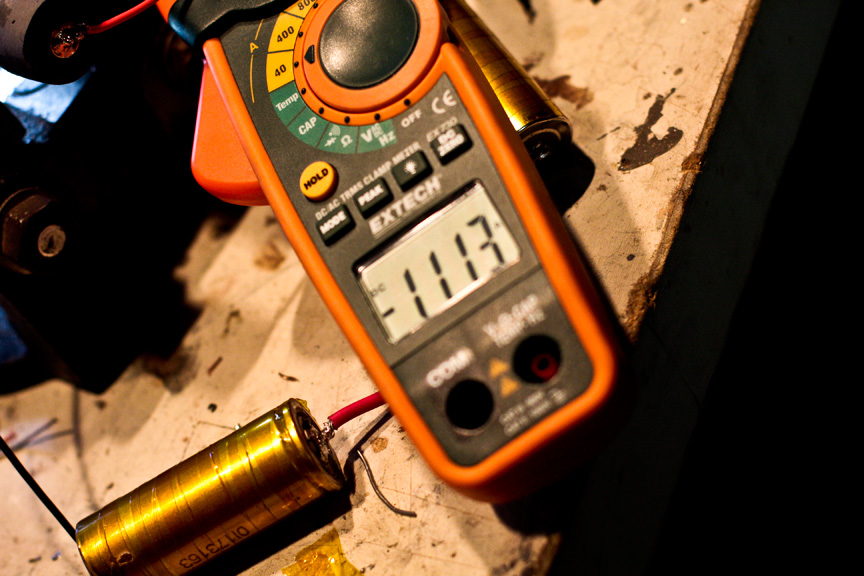
I killed one after running it at 12 amps but it is set now at 10 amps. You can set the amp level exactly what you want it to by changing the trimmer pot. I ran it at 5- 10 amps and it seems stable at 10 so I am keeping it there.
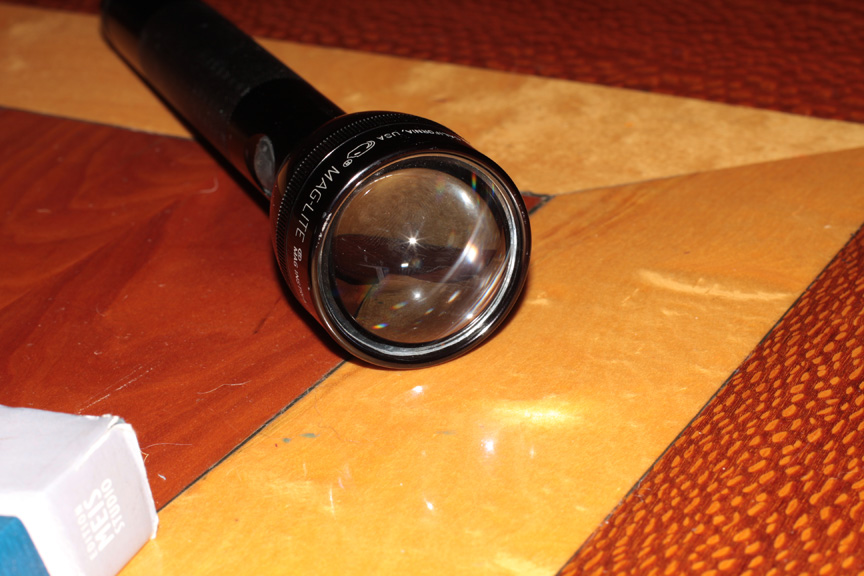
I ordered a couple of MG lens. It is MG part # 01-LAG-123 or LAG-52.0-37.0C
I ran no reflector and I ground the inside of the stock bezel to fit with my brake hone. I am still trying to decide which oversized bezel to put on to protect the lens.
I am really happy with the size factor on the Mag C and it is crazy bright with decent run time.
Batteries: battery space 26650 IMR's They seem to have decent run time and deliver amps to spare. I am charging them with a Bantam BC-6 charger.
Anyway here are some initial pics. I will post more of the heatsink and driver tonight:
F2.8, 1 second exposure:
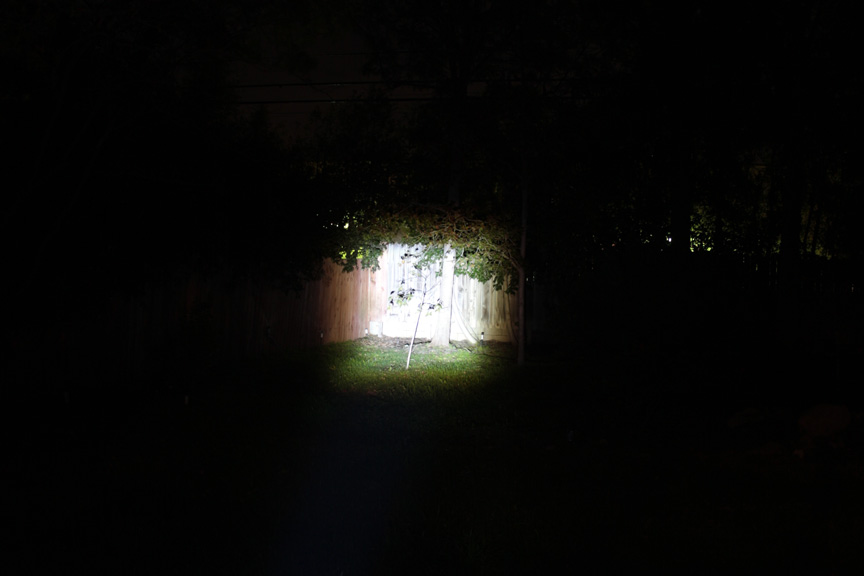
F2.8/ 1 second exposure
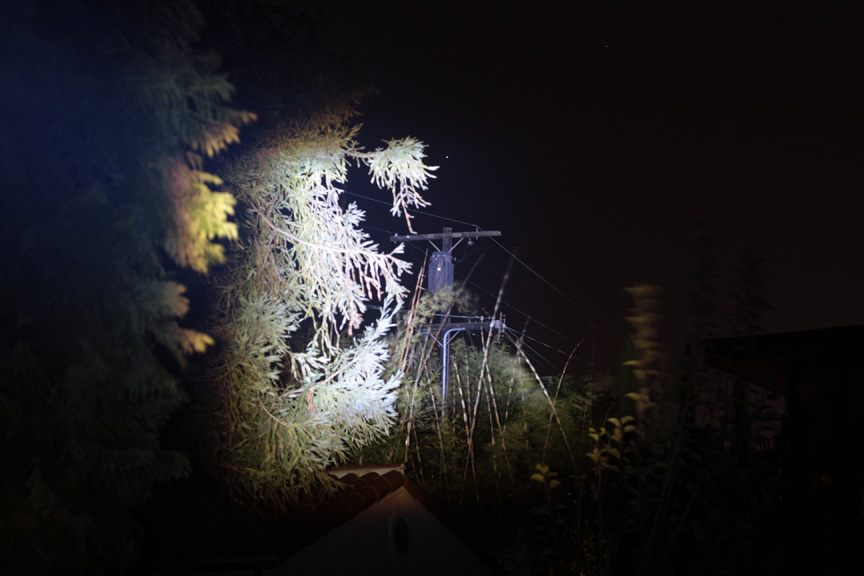
The fence is about 60 feet and the telephone pole is around 200 feet.
All and all, I am very excited about my first build. I am already starting another one that will be a dive light.
UPDATE: VIDEO of the light running at a stable 11 AMP: http://vimeo.com/9088275
I just completed my first modified light since plunging down the rabbit hole that is this forum.
Build:
Mag 3 C host bored out to accept battery space 26650 IMR's. I found I could fit 2 comfortably lengthwise in the tube with my custom copper heat sink that is over 2" long. I bored the tube with a brake hone on my drill press.
I will post some pics of the heat sink soon but it is over 10 ounces in weight and roughly 1" x 2.5" long. FYI, it is held in place with a 8/32 hex set screw that is close to where the stock switch would be aka like the stock mag assembly.
Switch:
I used a judco 10amp switch in place of the stock mag switch. I found I could cut out a section wide enough to fit the switch and the LDO1C driver and it all fits while allowing a much larger heatsink than most I have seen.
Driver:
I bought the following:
1dc/dc converter: LDO10C-005W05-VJ LDO10C-005W05
Source: http://www.arrow.com/
data sheet:http://www.powerconversion.com/produ...eet/170/LDO10C
2. Thermister: KTY83/110
Source: http://avnetexpress.avnet.com
data sheet: www.nxp.com/documents/data_sheet/KTY83_SER.pdf
3. 510 ohm resistor
Source: local Fry's electronics
4. 100 ohm trimmer resister
Source: Fry's
I wired it up according to member Pepko's thread(link listed below) with the thermister and 510 resister in parallel and then the trimmer after them. These are connected between the trim pin and the ground. It is really cool because you can just change the resistance with the trimmer once your close to dial it in exactly at the voltage you want. I used a spare pot to verify the settings and play with some other battery combos and it really works + it is extremely small. It also drops the voltage slightly as the led heats up per Luminus spec requirements.
I tried it with just a resister and it tended to run away on the amps as it heated up without the thermister to compensate. You can run a higher initial voltage as a result. This actually makes it brighter than keeping a stable voltage.
BTW, the LDO1C is rated for 10 amps/50 watts.
I got this driver idea from this thread:
http://www.candlepowerforums.com/vb/...0&postcount=19
He posted more info and pics on some other site too: http://forum.fotonmag.cz/index.php?s...ndpost&p=14743
I verified it worked for me so i ordered parts to make 3 for upcoming projects.
FYI, you can make the LDO10c into a boost driver by feeding the trim pin current instead of resister.
It is about 20 dollars in parts and a little solder.
I killed one after running it at 12 amps but it is set now at 10 amps. You can set the amp level exactly what you want it to by changing the trimmer pot. I ran it at 5- 10 amps and it seems stable at 10 so I am keeping it there.
I ordered a couple of MG lens. It is MG part # 01-LAG-123 or LAG-52.0-37.0C
I ran no reflector and I ground the inside of the stock bezel to fit with my brake hone. I am still trying to decide which oversized bezel to put on to protect the lens.
I am really happy with the size factor on the Mag C and it is crazy bright with decent run time.
Batteries: battery space 26650 IMR's They seem to have decent run time and deliver amps to spare. I am charging them with a Bantam BC-6 charger.
Anyway here are some initial pics. I will post more of the heatsink and driver tonight:
F2.8, 1 second exposure:
F2.8/ 1 second exposure
The fence is about 60 feet and the telephone pole is around 200 feet.
All and all, I am very excited about my first build. I am already starting another one that will be a dive light.
Last edited: