On dynos, power, and circuits

BrianMc

Enlightened
Joined
Nov 4, 2009
Messages
940
Decided that since this post got eaten, I'd do it as a thread. (Threads survived!)
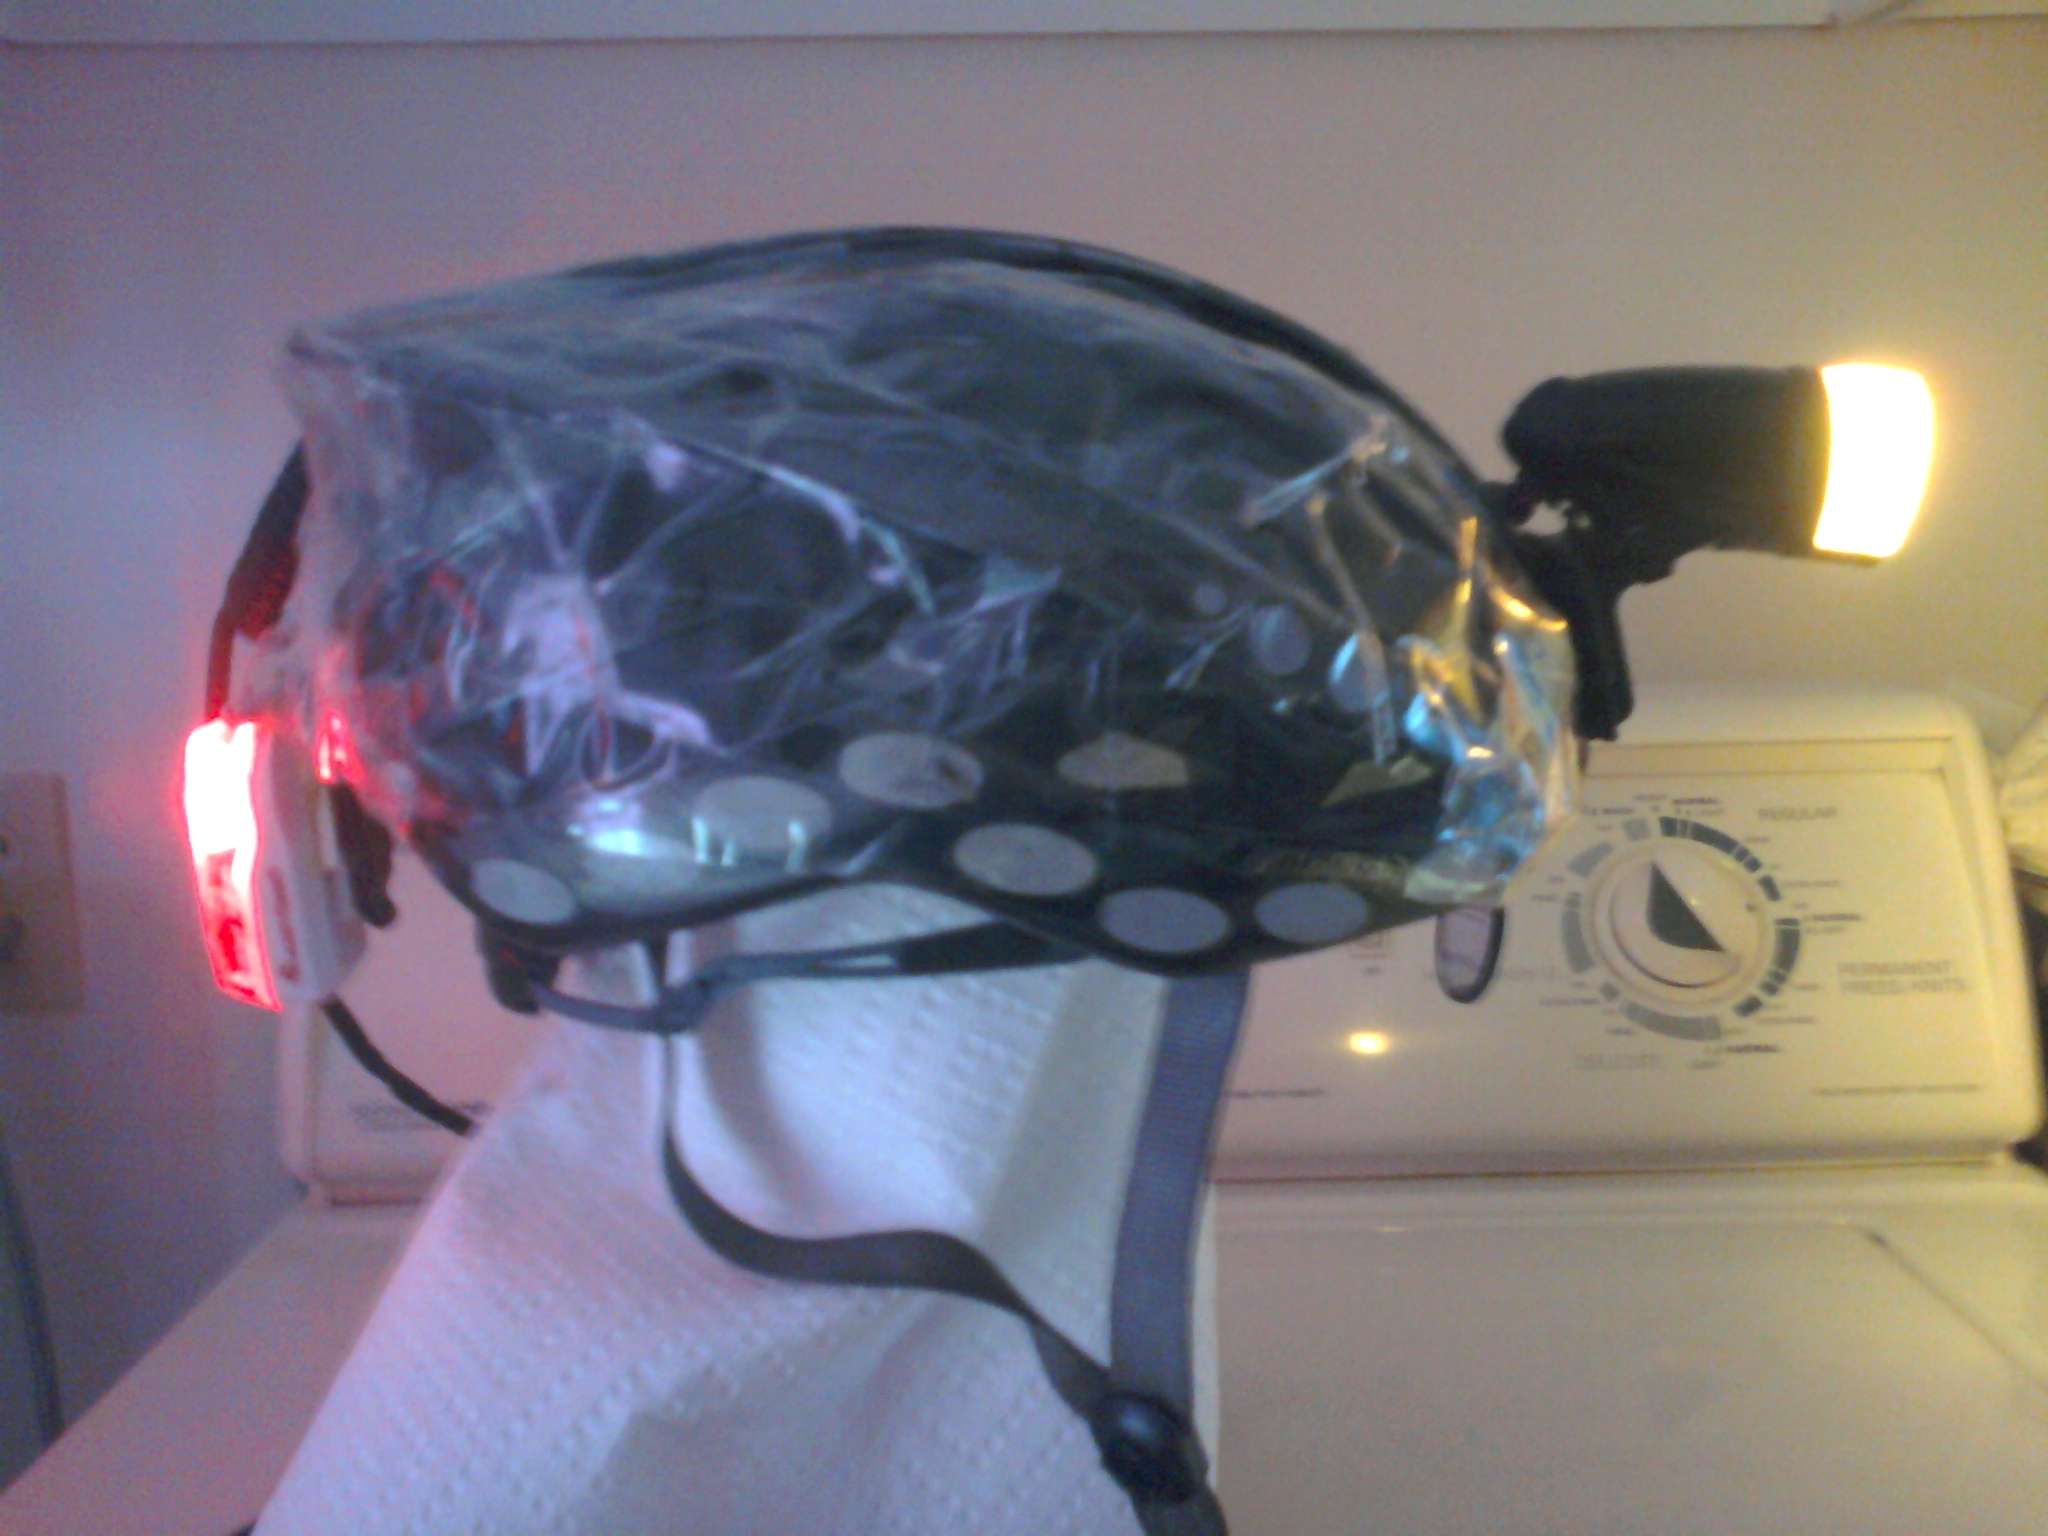
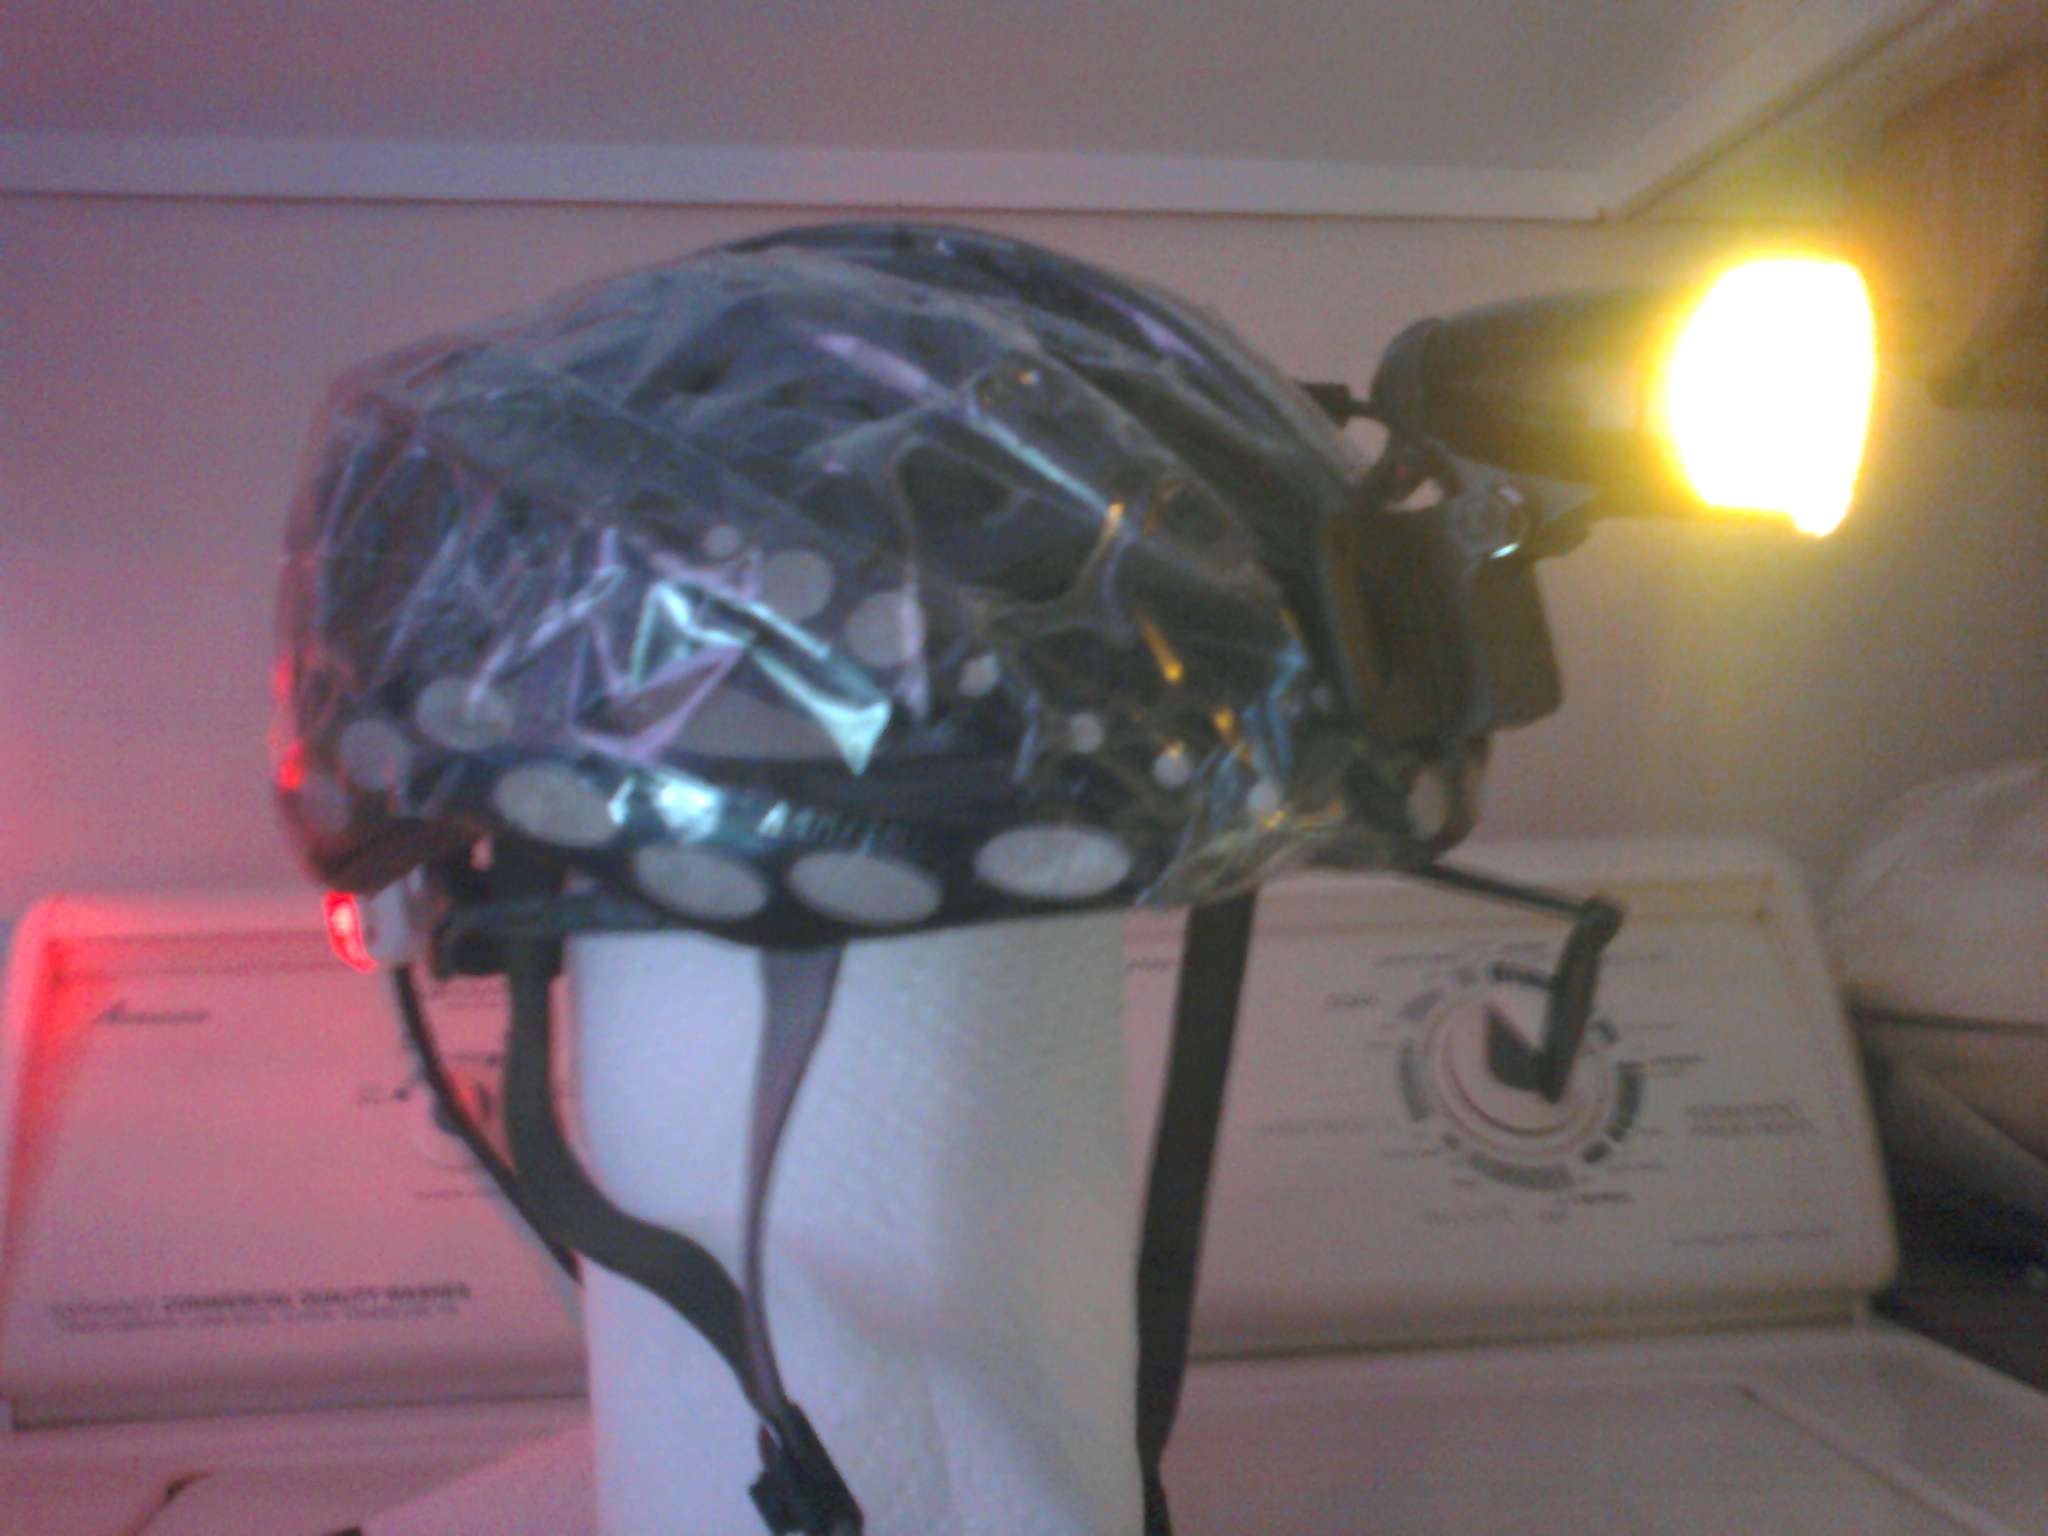
The bike:

photo0167q.jpg


A 1984 Schwinn 4130 DB lugged frame "World Sport" from Taiwan, converted from 2 x 6 27" to 1 x 9 700C, here sporting Nokian 32 mm (30 actual) studded snows. Used as a commuter to volunteer work and for errands in all weather.

The Dyno hub:

photo0168x.jpg


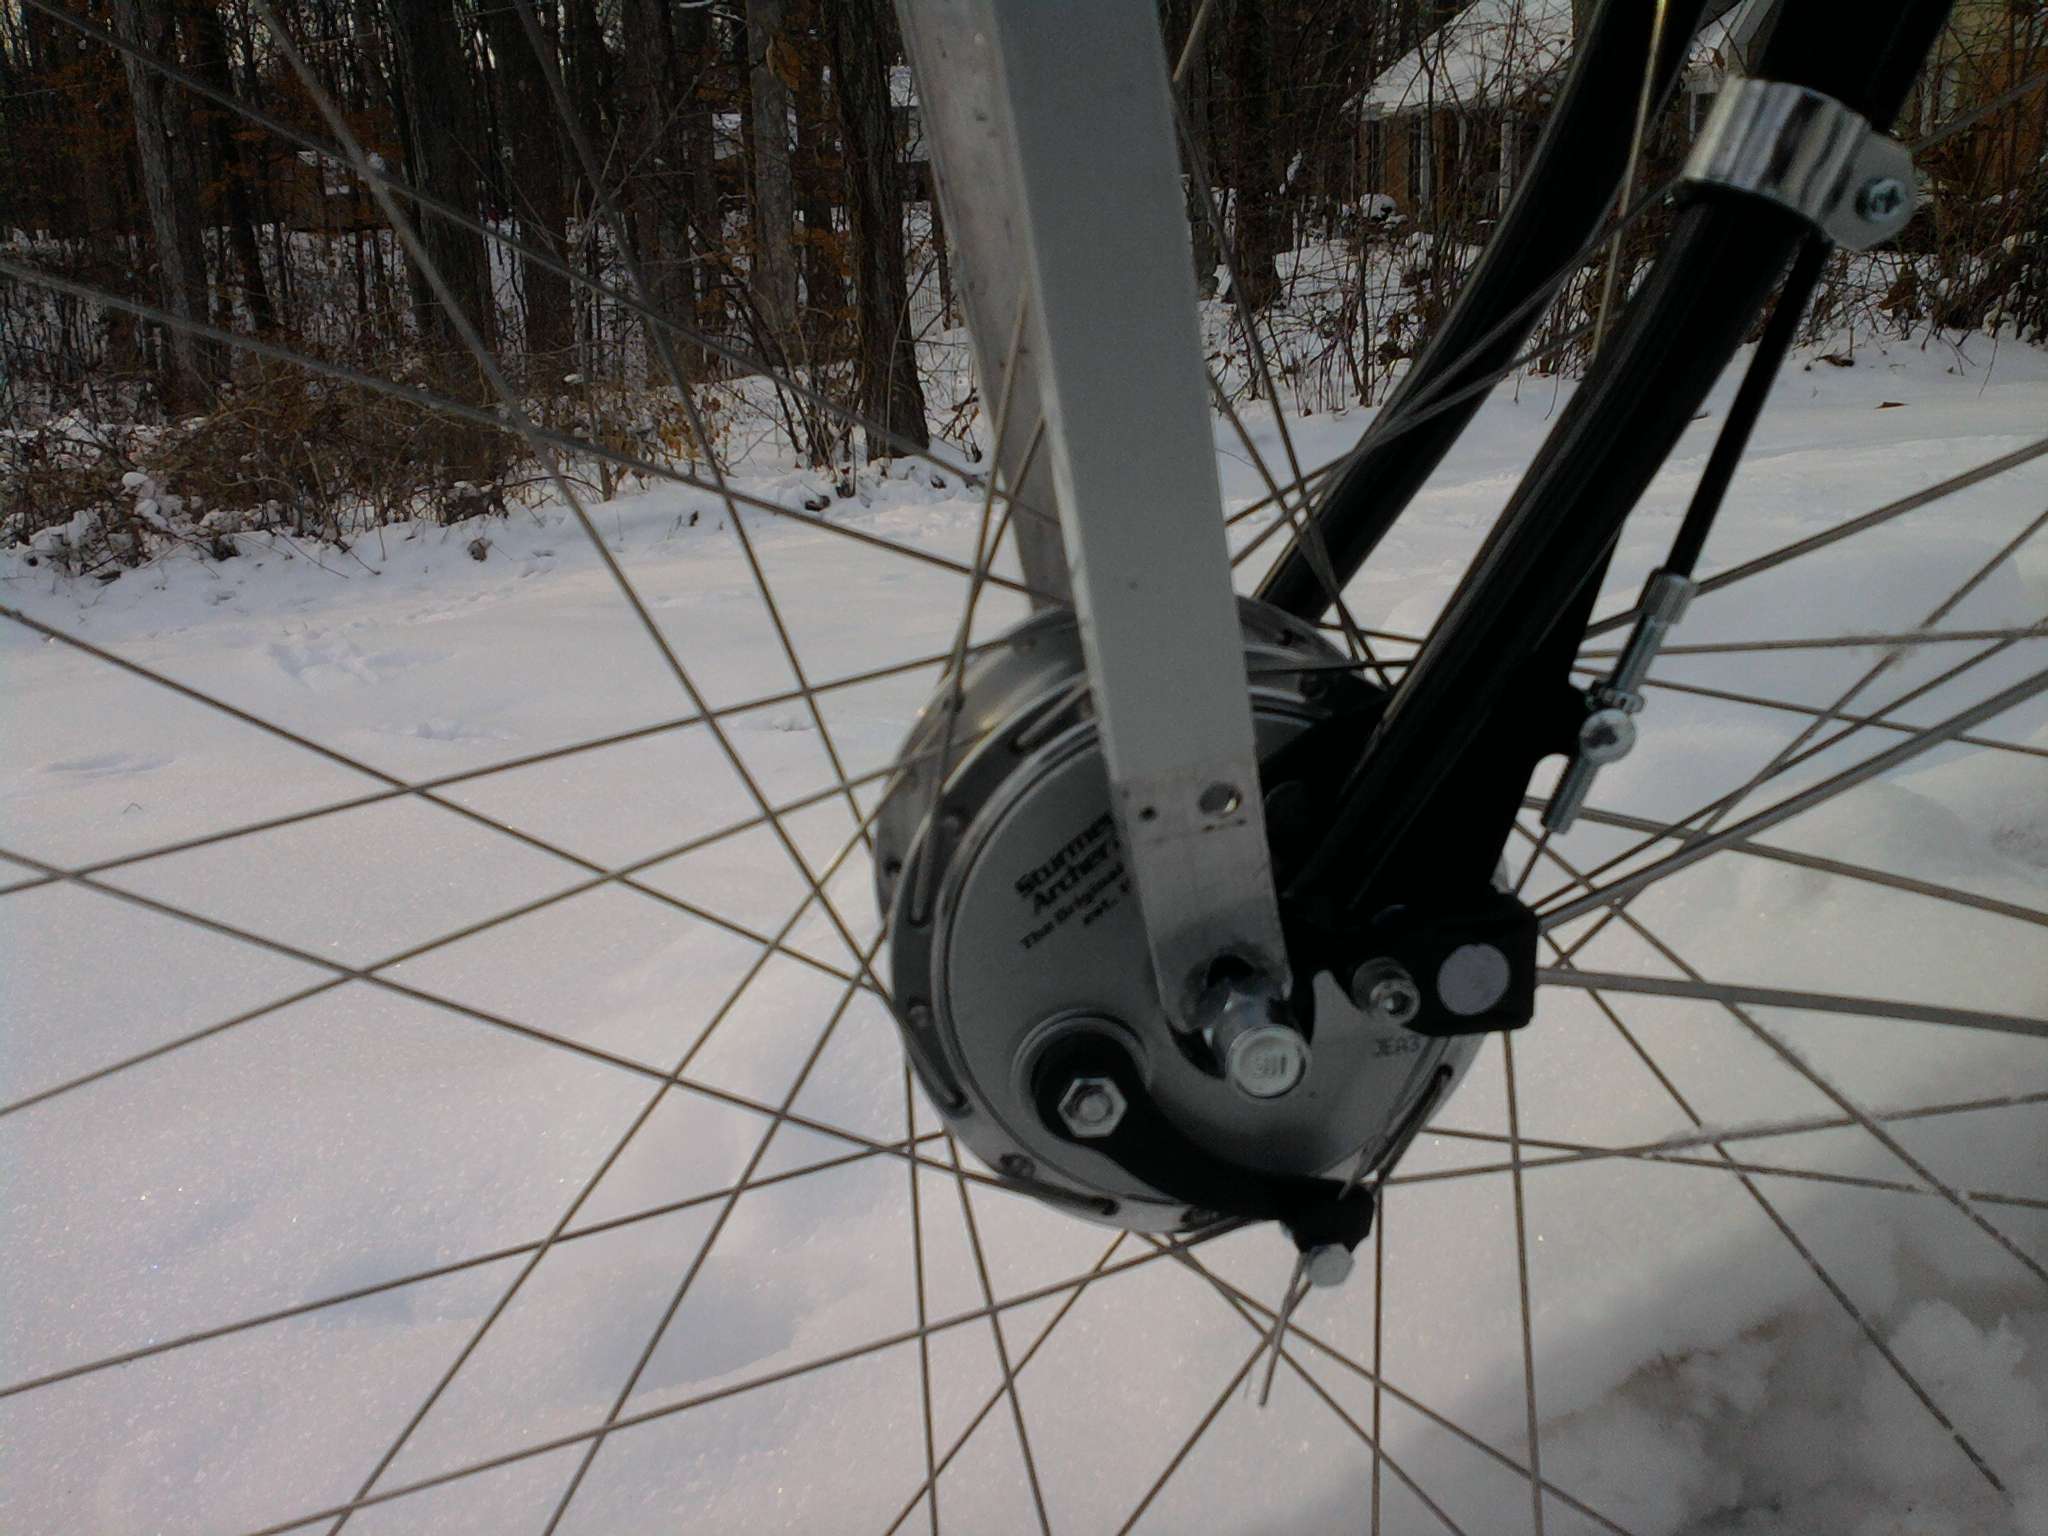
A Sturmey Archer XL-FDD (90 mm drum brake, and dyno hub) in wheel with Velocity Dyad 700 C rim, DB stainless spokes.

The circuitry in housing:


Martin's circuitboard wired according to his instructions for 3 LED and Shimano hub (supposedly Sanyo makes the dyno part of both the SA and Shimano hubs). The 3 XP-G's have lower Vf so the tuning varistor optimum was '0'. Classic 1" threaded fork and quill stem required alternate mounting and enclosure. Used a 1.5" fluorescent tube cover shortened, and its caps hold US AC plugs as strain reliefs. The leads to the hub and light are soldered to the prongs. A wire tie snugged the connection of cap and plug and silicon poting sealed it. The light is hardwired to the controller and an On/Off switch in the Dyno lead is on the bars.
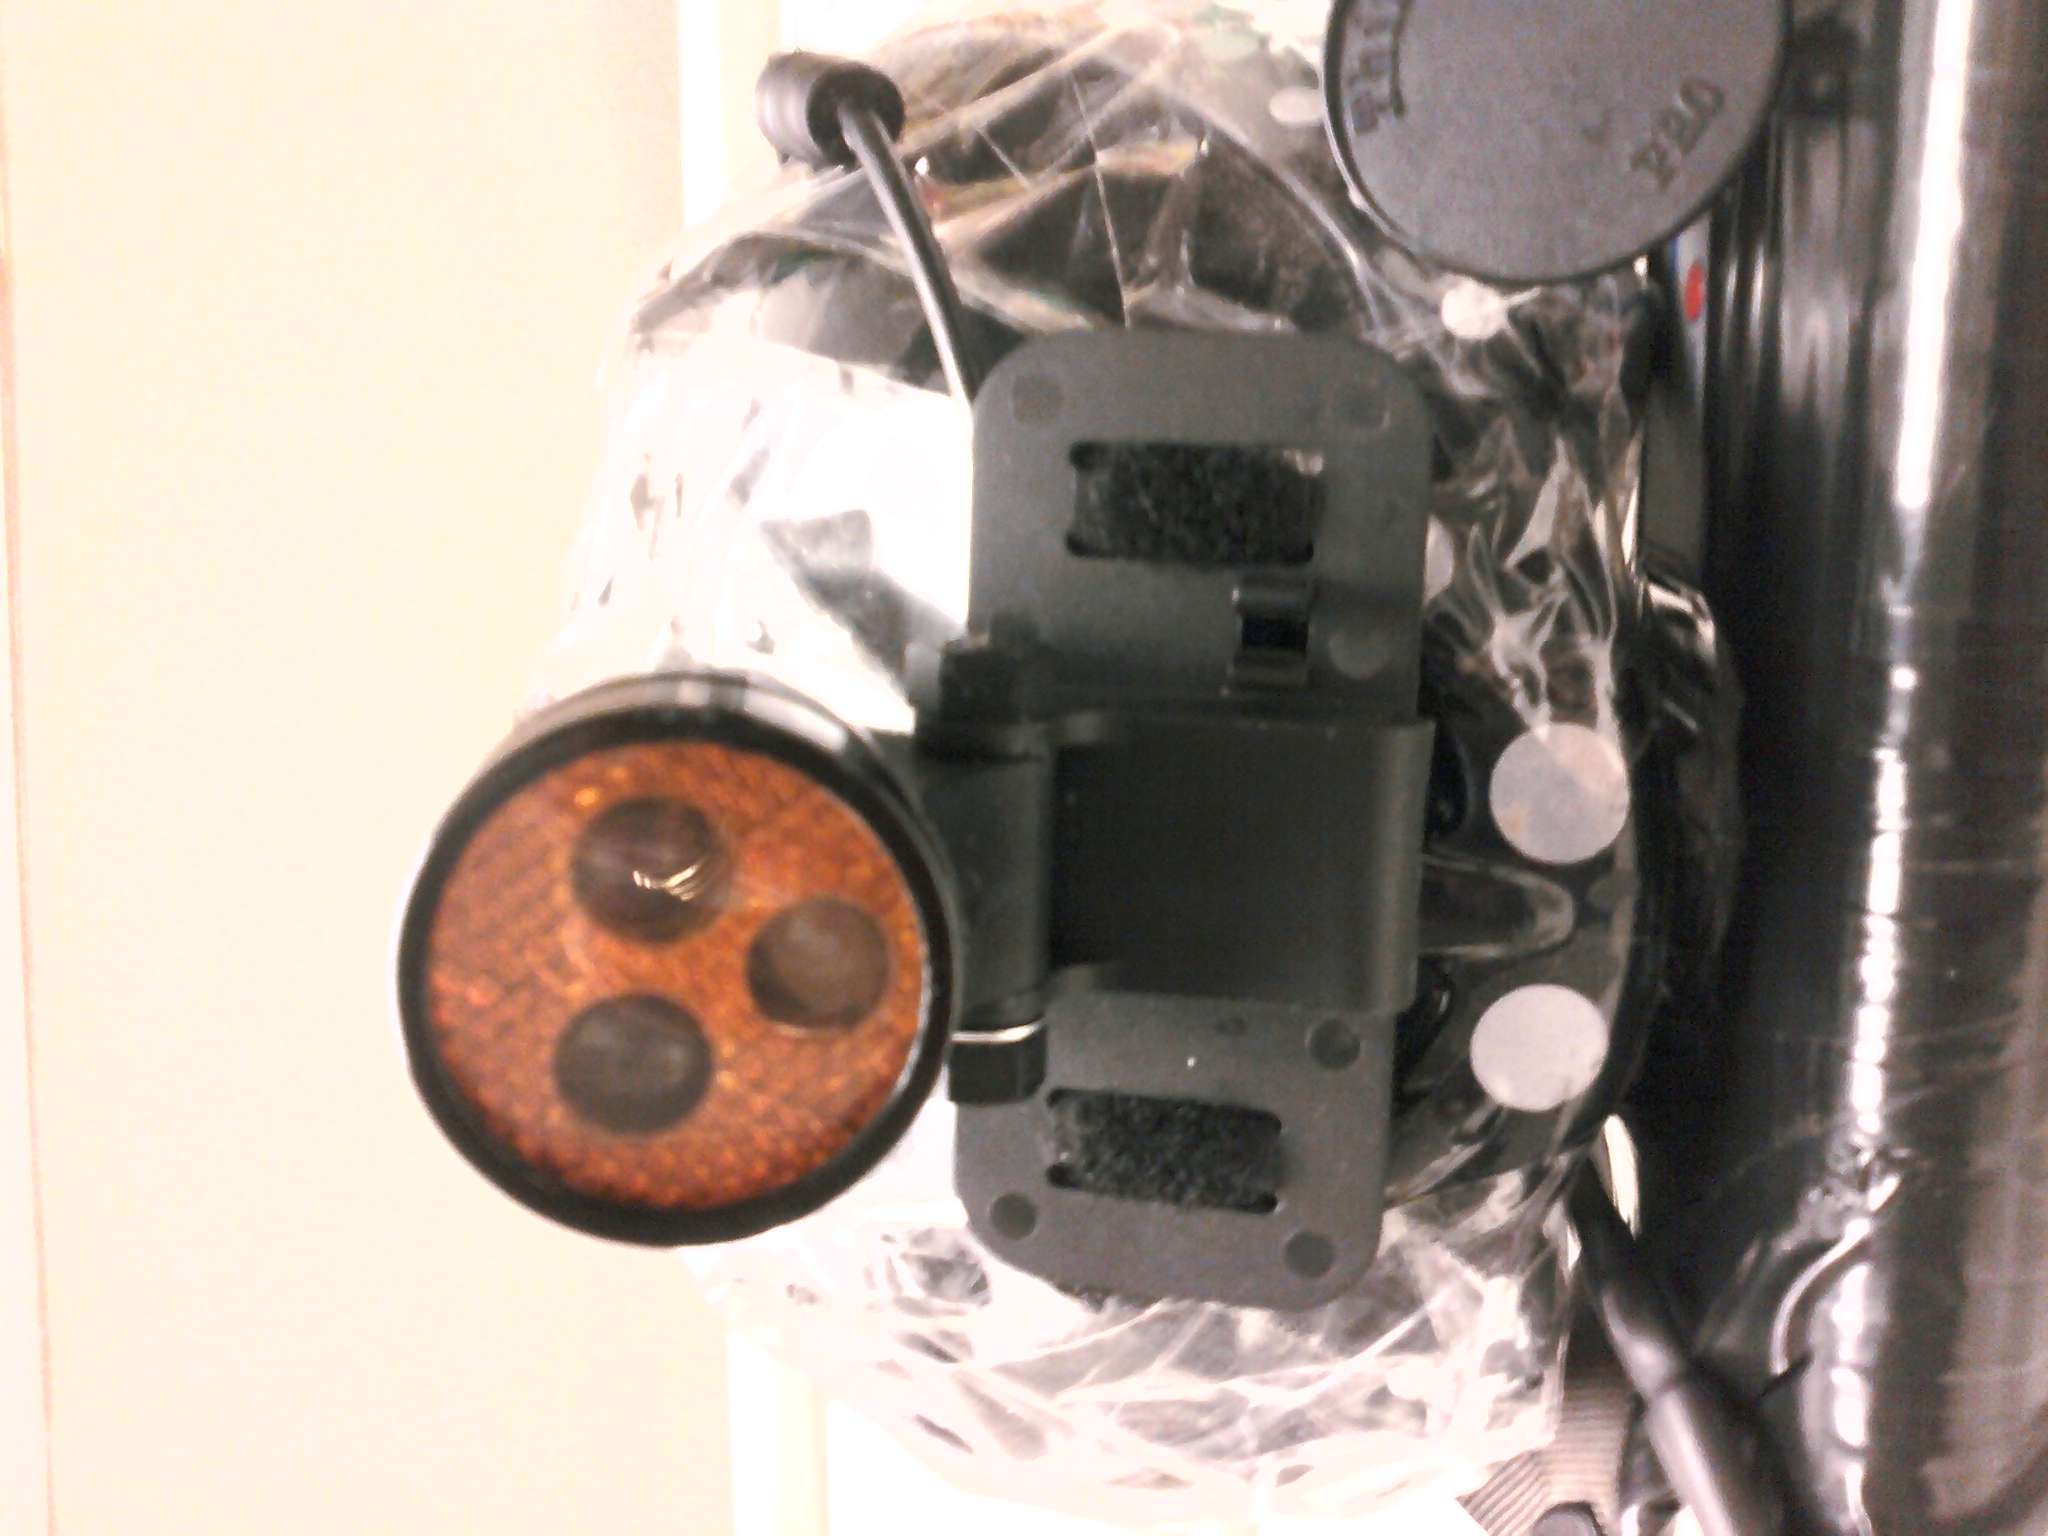
The light:


A Marwi housing and 'old style' mount both from EL34. Mount rotated 90 degrees, mounted on a brakect from a previous light.


The Housing includes a copper pipe liner from a 1 1/2" copper pipe union, a copper pill from a 1" copper pipe cap. The driver was removed for conversion and a capcitor crammed in (tight fit!).


Three XP-G R5s with Carclo 10417 lenses, a fresnel lens from a plastic landscape light (above, bar shaped beam), a black 35 mm film canister cut as a shade with aluminum tape liner, manage the light beam and spill.

Report:

I run this all the time. I get good day response from drivers with and without the flashing helmet light. Even though the dyno light is not flashing its movement is accentuated on the leading edge of the front carrier so attracts eyes. A wide low beam below mid car door height extends to each side. I may need to invert the pill moving two LEDs up under the hood, but haven't videotaped it to assess the need. It is bright enough for wet pavement. I have light down to "fall over speed" so good enough there. No standlight. With the tail lights lighting up the road behind and the helmet light on, I don't need a standlight.

It mates well with my hard cut off helmet thrower light which I just rebuilt and will get its own thread. Video to come.

Brake:

The 90 mm brake was intended for cargo bikes. Adding up the weight of a dyno hub disc brake, disc brake compatible upgrade fork, and other bits and pieces it is competitive on weight and about $200 cheaper to implement on a classic road frame.

It requires a long pull lever. In a drum brake, the rear shoe activates the front as it begins to drag so you get a power asssist of sorts and the activation to the point of a front wheelie requires little hand strength. The modulation from just starting to brake to that point is very nice. Ridden in rain, snow, freezing rain it is just as good as when dry (minus tire traction issues, that is). I have had about 50 pounds of carg and that did not phase it one bit. The only aspect that took getting used to is how well it works all the time every time. I can live with that! :)
 
Last edited:

pe2er

Enlightened
Joined
Dec 22, 2007
Messages
380
Location
Europe - Holland - Almere
Re: Another First Dyno Light

Nice bike, and nice light. I Think you are wise to (also) have dynamo-driven lights. It is great to be independent of batteries and have a functional light available every time.

Also like your drum-brake. I have two of them on my Strada and they have proven to be reliable so far :)
 

BrianMc

Enlightened
Joined
Nov 4, 2009
Messages
940
Re: Another First Dyno Light

Even when you try to limit the money you spend on a bike meant to pay its own way, it is suprising how the costs on a 'free' bike mount up. But yes, it may be a factory frame but it is a good classic factory frame in a relatively rare size. The frame survived several bashings that bent the rims, the fork, the rear axle, AND hub! It was missing the cockpit, too (likely destroyed in the last crash). I had some of the parts lying around. Only the headset, rear brake, and frame remain. It was 100% paid for then Santa brought gifts. It is 60% paid for at the moment when those gifts are factored in as capital to be paid off. The Dyno hub means I only need one of two packs for the helmet light, or failing that, grab the Xenon flasher (AA's) and roll. That freedom to go without as much fuss and planing sets dyno setups in a different 'light' if you will. :) The weather-proof (even freezing rain) braking: priceless.
 

BrianMc

Enlightened
Joined
Nov 4, 2009
Messages
940
Re: Another First Dyno Light

On thermal management:
If I have figured Martins' circuit correctly, I am getting about 5 watts out of 3 XP-G R5s at 12 kph or 8 mph and higher. My light was first used with a battery at 1 A (10 Watts, about 8 heat, plus 1 from the driver), and only about 0.8 sq in air interface per watt of heat. So it has a copper liner inside 95% of the Al shell to distribute heat rapidly over the entire light body. I found a little over a 2 * C difference between the MCPCB and coolest spot on the light body at 1 A indoors. At 1 A on the bike, it was warm on full power on sunny days (daytime running light), but not hot, cooler than I'd expect for something black in the sun. Now it has something like 1.6 sq inches per watt or more and it feels like ambient to the touch to me. The pill has a soldered collar of 1/8" thick CU in the back of it which is serious overkill and makes it a heavier light, than it needs to be. It did prove that a copper liner can help in a small radiative area light.
 

BrianMc

Enlightened
Joined
Nov 4, 2009
Messages
940
Re: Another First Dyno Light

Ride today at 58-60 * F. Light on for about 5 miles at speeds above the max output. Sunny. Brown vinyl briefcase warmed by the sun, was warmer than the black anodized light, which was slightly warmer that the steel frame (ambient). The copper liner and pill were tested and proven in battery drive when first built up and appear to be working as well as in the battery version.
 

BrianMc

Enlightened
Joined
Nov 4, 2009
Messages
940
Re: Another First Dyno Light

Thanks. Just finished V2 of helmet light. Completing a light for the other bike and then I can do beamshots and video.
 

BrianMc

Enlightened
Joined
Nov 4, 2009
Messages
940
Re: Another First Dyno Light

The first video of this light firing in 'anger' is here with the companion helmet light. I plan videos of it riding toward the camera as if an oncoming car, and of riding along with me (camera on handle bars hoefully close to my eye height. I will have to work at a test bed to rotate the wheel for a beam shot, so that may be a bit much.
 

Steve K

Flashlight Enthusiast
Joined
Jun 10, 2002
Messages
2,786
Location
Peoria, IL
Re: Another First Dyno Light

Good work on the lights and the video! Overall, it looks like you would be easily visible to any motorist who is awake. The obvious problem is the focus of the camera used for the video. It makes it hard to distinguish any smaller features, so I don't know if I'm seeing reflectors or not.

All in all, I think the biggest risk might be the blinding of oncoming motorists! :)

regards,
Steve K.
 

BrianMc

Enlightened
Joined
Nov 4, 2009
Messages
940
Re: Another First Dyno Light

Good work .. Overall, it looks like you would be easily visible to any motorist who is awake. The obvious problem is the focus of the camera used for the video. It makes it hard to distinguish any smaller features, so I don't know if I'm seeing reflectors or not. All in all, I think the biggest risk might be the blinding of oncoming motorists! :) regards, Steve K.

The problem is, that with cell phones. texting, and intoxicants, there is awake and almost asleep wrt driving. :(

Hoping to pentrate some of that fog....

Yeah, the only good thing about the focus is that it is better than my eyes without glasses! So this is what a driver with better vision than mine and who forgot their glasses would see sitting in a high boy pickup downholl to the intersection! I knew I had to run through the process to see where I messed up and there still seemed to be worthwhile info here.

As to blinding: You can see the lights are when I rode straight at the camera. I WANT it to be then. If someone is in my lane. Even over much less than the 3' I'm OK with bus and truck drivers (camera is high).

The high beam is this shape:

photo0191by.jpg


Which becomes a series of stacked quadrangles a lane wide starting about 40' out. The cutoff is severe. In fact, the old light was hard to notice once it got closer than about 1/8 mile so you were not in the expanding main beam. I can avert it from oncoming or aim it at cross traffic threatening to not yield with a head turn.

The low is a question. I have not inverted the heat sink to put the two LEDs back under the hood as it was tested before in an upside down mount. With no way to roll the front wheel and be an oncoming pedestrian/motorist as I have no clone. I have to do my ride at the camera thing as before. What is here with the high camera looks good. The side spill is below door handle height of a Hyundai that was oncoming that night. Still, until specifically tested, it is an issue that is unresolved.
 

Steve K

Flashlight Enthusiast
Joined
Jun 10, 2002
Messages
2,786
Location
Peoria, IL
Re: Another First Dyno Light

have you posted info about the optics design in this light? I'm using some basic optics in my quad XR-E headlight. One optic is moderately narrow, and the other three are narrower. Seems to be working okay, since I don't have people flashing their high beams at me, but cars do notice me in the mostly rural area that I ride in.

I would like to get a better design sometime, with optics that approximate the German standard. Still thinking about splitting a BiSY headlamp in half and mounting a modern white LED in it, similar to what some of the German fellows have done. Maybe run a switching regulator that has the duty cycle vary with dynamo speed in order to match the load to the dynamo over the range of operating speeds?? So many ideas that would be fun to play with, and so little time to play! :)

regards,

Steve K.
 

BrianMc

Enlightened
Joined
Nov 4, 2009
Messages
940
Re: Another First Dyno Light

The ideas behind the low beam/high beam were developed and reported in nauseating detail in this thread. Bon appetit! :tired:lovecpf

My post on completion, Version 1 beamshots, and my fresnel lens effort, and finally the build with video in the last few posts of some tweaks.

A short version of the ideas. IMHO the German standards seek to preserve oncoming drivers night vision at the cost of the cyclist being clearly seen. In areas where less bicycle aware motorists predominate or for drivers distracted by phones and worse, this is not a safe thing for the cyclist. Since we have only a helmet and not a steel cage, I think we need to be a bit more visible. That said, burning drivers' retinas is out.

OTOH the idea of placing a lot of power in a narrow band near the horizon and having it less dense closer to the cyclist is spot on in the German standards. I combined the idea of separate lights for these duties as in the old halogen setups, with a low placed light front of rack or fork crown for good shadow and contrast, a high vantage point for the high beam to aid it's throw and rapid, easy, no-hands-needed control of it, a bit more spill than the German standards allow but staying close to them to make sure I'm seen AND can see, and now some side lighting, too for cars and pedestrians seeing me from angles where the front beams are not very visible.
:thumbsup:

So the Dyno light is part of a lighting system, as it should be.

The V2 (Dyno) low beam is now right side up so the shade has the single LED immediately below it and not the pair. They are not centered so it lets more than twice the light past the shade. I like the low angle flood I get ditch to ditch on my residential streets as wild animals are an issue. You don't want to be surprised by a skunk. In my drive and on the road this side lighting is below the door handles, but there may be enough spill above to bug drivers too much. Lighting that patch of pavement on streets and roads where there are no street lights to make the ANSI vest glow, should provide a moving patch of light to help drivers recognize, estimate speed, and locate me. If it is too aggressive on their vision, I will first try a different shade conformation, if no go, I will remove the heat sink , rotate it 180 * and return to the tested beam version with two LEDs immediately below the shade. I wished I had evaluated it while still a battery light, as setting the bike up stationary and walking to it as if a driver without the front wheel spinning, won't work.:ohgeez::thinking:

The high beam Version 2 is more of a work in progress than the Dyno light and I will cover it in a new thread. An appetizer here. (Hungry yet?) Originally, I did not get the separation I wanted in the three beams which you can see in the Version 1 beamshots and compare to the wall shot 2 posts up, because the lenses are a shoehorn fit. You can see by the new wall shot I now have a 'Marshmallow Man' beam shape which creates a path of light when laid down on pavement. I can narrow to less than half a lane bringing it 15 feet ahead of the bike or widen it to two lanes width losing some over the horizon by looking further down the road. The output at 1 A laughs off wet pavement while the light is still cool and higher output. It did not trip the 70 * C at 45 * F with a 9 mph wind and my speed in the 15-16 range, but I'd like it to run under 50 * C without tripping on the hottest summer nights as before. Days are no heat issue as it is flashing then.

:sigh:

Current state of helmet light without the hood:

photo0206.jpg


With the hood, the helmet light setup from 'HE double hockey sticks'?:

photo0219i.jpg


photo0220f.jpg

By brianmcb at 2011-03-21

Could bump it up with a Radbot 1000 off the back, I suppose. :naughty:

I have only met two vehicles with this rig at night (not my usual night bike) and I don't know if I was so weird looking (check the video, it is), or thought to be a one light car, or was blinding them, or some combination. Both slowed, but both got out of the middle of the d&*n road and gave me room, so demonstrating the very point about needing a certian level of 'being seen' to avoid injury.
:oops:
 
Last edited:

pe2er

Enlightened
Joined
Dec 22, 2007
Messages
380
Location
Europe - Holland - Almere
Re: Another First Dyno Light

A short version of the ideas. IMHO the German standards seek to preserve oncoming drivers night vision at the cost of the cyclist being clearly seen. In areas where less bicycle aware motorists predominate or for drivers distracted by phones and worse, this is not a safe thing for the cyclist. Since we have only a helmet and not a steel cage, I think we need to be a bit more visible. That said, burning drivers' retinas is out.

OTOH the idea of placing a lot of power in a narrow band near the horizon and having it less dense closer to the cyclist is spot on in the German standards. …
:thumbsup:
Hi Brian,

I Totally agree with your point of view in regards to the 'German Standard' (StVZO approved) lights. I regularly use the German B&M IQ Cyo light in combination with other 'be seen' lights for just that reason.

Like the video's, but see that you still have not remedied the tilted camera angle :D
 

BrianMc

Enlightened
Joined
Nov 4, 2009
Messages
940
Re: Another First Dyno Light

...I totally agree with your point of view in regards to the 'German Standard' (StVZO approved) lights. I regularly use the German B&M IQ Cyo light in combination with other 'be seen' lights for just that reason. Like the video's, but see that you still have not remedied the tilted camera angle :D

Thanks for the support. Same old videos with same old flaws except the recent one of the 'ride by shooting' (of video) using the Sony which has a lot better night capabilities than the keyfob cameras.

Too bad I accidentally took it out of focus messing around in the dark!
 

Steve K

Flashlight Enthusiast
Joined
Jun 10, 2002
Messages
2,786
Location
Peoria, IL
Re: Another First Dyno Light

oh my... I didn't know that this was part of the "let's design a headlight" thread. There's a happy medium somewhere between a beam that complies with German standards and the symmetric lenses that I've got. The method of adopting the optics & reflectors from a BiSY and defocusing it a bit might work for me, but honestly, I'm not sure when I'll find time to do it. I suspect I'll be able to buy a very nice commercially built light before long, or maybe inherit the guts of a dead B&M IQ Cyo or something like that.

For now, I like the idea of multiple LEDs with different beam widths, and different aiming points. I used optics with different beam widths in my quad Cree light, but haven't developed a means of individually adjusting the aim. Maybe a sort of a ball & socket design for LED/optic/heatsink assembly?? Similar to how some brake pads allow you to adjust the angle of the pad relative to the rim....

anyway.. nice execution of the concept, and very good results!

regards,

Steve K.
 

BrianMc

Enlightened
Joined
Nov 4, 2009
Messages
940
Re: Another First Dyno Light

oh my... ...I suspect I'll be able to buy a very nice commercially built light before long, or maybe inherit the guts of a dead B&M IQ Cyo or something like that.

Hoping to prod mfrs for you. :)

For now, I like the idea of multiple LEDs with different beam widths, and different aiming points. I used optics with different beam widths in my quad Cree light, but haven't developed a means of individually adjusting the aim. Maybe a sort of a ball & socket design for LED/optic/heatsink assembly?? Similar to how some brake pads allow you to adjust the angle of the pad relative to the rim....anyway.. nice execution of the concept, and very good results! regards, Steve K.

The aspheric lenses have two other ways to aim: setting the lens so the LED is high lowers the beam, and tilting the lens out at the bottom lowers the beam. (Of course opposite results with opposite positioning.) The trouble is in an MR11 body 32 mm ID with three 16 mm lenses, and 10 mm MCPCB's it is hard to do, as Version 1 showed.

Am about halfway with twin separately aimable (up/down) low and medium beam lights. Brake mount height and expect to hood them to control impolite spill while allowing enough to be seen by easily. Bigger lenses get the light into narrower beams with out the loss of the aspherics and underdriven for lower power use to decrease in battery size needed. Eventually they will be dynamo, too with a tail light.

So we are thinking along the same lines.
 

BrianMc

Enlightened
Joined
Nov 4, 2009
Messages
940
Re: Another First Dyno Light

...The obvious problem is the focus of the camera used for the video. It makes it hard to distinguish any smaller features, so I don't know if I'm seeing reflectors or not....Steve K.

Repeated the ride by in daylight with a tripod under the same camera. Yep. Insufficient resolution at that distance to make out details in the best focus. Lost in pixelation. What we see (in the video) isn't what was there or not there but what a near signted person without their glasses would see. That is an interesting point of view, if not overly helpful to answering the question of side visibility to most. :)

So the quest is on for a camera with enough resolution to do the job.
 

highlander9

Newly Enlightened
Joined
Apr 23, 2011
Messages
15
Re: Another First Dyno Light

Hi, I like your lighting system.

Did you use version 12 of Martin's regulator? the switching, rectifier regulator?

The reason I would like to know is because I plan to use a Sturmey-Archer xl-fdd as well for my bike. From research, I found that Martin built all his dynohub circuits based on the tests he ran with the Shimano DH-3D71 dynohub. Your inference about the Shimano and Sturmey-Archer using the same Sanyo internal part--has it been justified now that you've broken in your Sturmey-Archer xl-fdd? In other words, have you been successfully been able to kick on the voltage doubler and bridge rectifier at the speeds talked about in the power curves? If not, were there any modifications--e.g. using different valued capacitors or different valued resistors in order to make it work? Overall, you seemed pretty positive going into it that the Sturmey-Archer dynohub will behave pretty similarly to the Shimano dynohub, therefore just followed the given parameters for the 3-led version in Martin's Excel spreadsheet? I'm no electronics guru, so could you explain to me what factors I would have to change say if my average speeds were 25-30 mph and top speed was 40mph? I plan to maybe use 3-leds like you have plus maybe a tail light.

Thanks,
Highlander9
 

panicmechanic

Newly Enlightened
Joined
Nov 23, 2009
Messages
130
Location
Germany
Re: Another First Dyno Light

Hi,

and :welcome:
I'm not Brian, but I'll answer what I know:
Your inference about the Shimano and Sturmey-Archer using the same Sanyo internal part--has it been justified now that you've broken in your Sturmey-Archer xl-fdd?
Definitely not. Though they are similar enough to work with the same circuit, the Shimano's electrical output is higher at low-to-medium speeds. The SturmeyArcher is a tad low there, not even compliant to German standards. Sadly this does not mean it is more efficient at high speeds.
...say if my average speeds were 25-30 mph and top speed was 40mph?

What?
You don't need a dynohub, you can draw power directly from the motor battery :whistle:
 
Top