LED backlight for stained glass

Steve K

Flashlight Enthusiast
Joined
Jun 10, 2002
Messages
2,786
Location
Peoria, IL
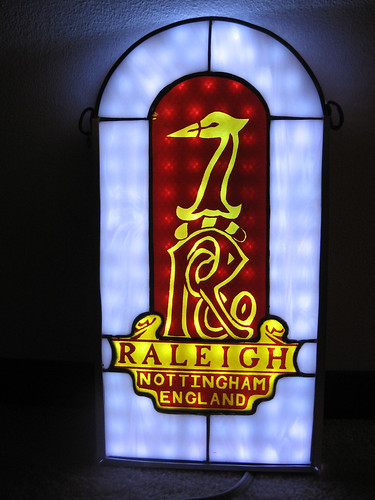
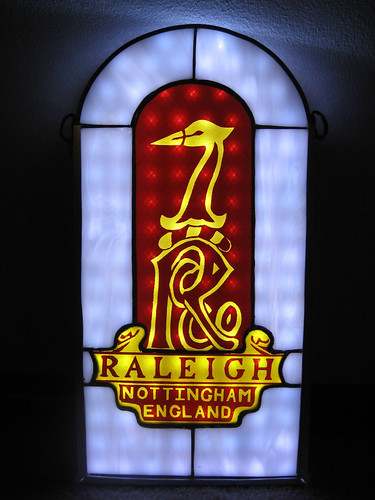
Many years ago, a friend made a stained glass piece for me. There have been quite a few years that I didn't have good place to hang it, so I thought I'd try making a backlight for it, and just hang it on a wall.

The final result can be seen in my Flickr set
http://www.flickr.com/photos/kurtsj00/sets/72157626354608597/detail/

5719123509_8a5ea8973e.jpg


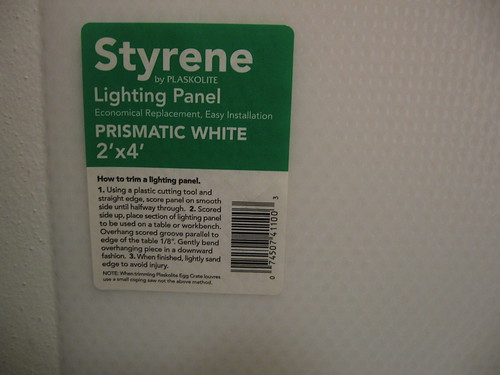
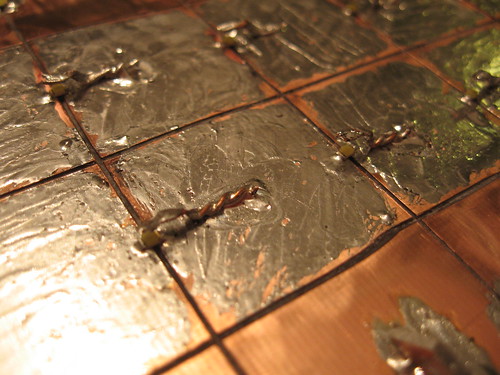
Basically, it's just a grid of small SMT white LEDs running at 20mA each. They are divided into four strings of 32 LEDs. It's powered directly from AC power, with a simple linear current regulator controlling the current into each string. The safety ground connection is tied to the metal structure, and I've got a fuse in the circuit, just in case something comes loose and lets dangerous voltages contact the chassis.

The only thing I'm not happy with at this point is the diffusion of the light. It could be solved with more distance between the LEDs and the diffuser sheet that sits behind the stained glass, but that would require scrapping a bunch of the framework and starting over. :p

Has anyone else built anything similar to this? How did it work out?

regards,

Steve K.
 
Last edited:

blasterman

Flashlight Enthusiast
Joined
Jul 17, 2008
Messages
1,802
Kind of. What I do is build a box about 18" high and 10" square with textured or frosted glass. I then put LEDs in the bottom and fire them up, which causes neat textures in the glass.

I otherwise ran into the same problem as you. LEDs cause hot spots behind the glass and it has to be moved quite far away to smooth things out.
 

Ken_McE

Flashlight Enthusiast
Joined
Jun 16, 2003
Messages
1,687
The only thing I'm not happy with at this point is the diffusion of the light. It could be solved with more distance between the LEDs and the diffuser sheet that sits behind the stained glass, but that would require scrapping a bunch of the framework and starting over. :p

Has anyone else built anything similar to this? How did it work out?

Hi Steve,

LED emergency exit lights deal with this issue all the time. When the LEDs face directly towards the viewer you do get that dotsy look. There is an advantage in that you get maximum brightness this way, although the lighting is uneven.

What Blasterman is describing is what I know as "cavity lit". the LEDs are aranged around the sides of an open space facing sideways relative to the viewer. They light up the entire cavity, light bounces off the back wall and out towards the viewer. You lose some efficiency but you get very even lighting. The cavity should have a highly reflective coating, usually gloss white. The cavity does not need to be particularly deep.

You could keep your frame and move the LEDs. You could lightly sand the LEDs to diffuse them more. You might even leave it as is and know that even if you'd do it differently next time, it does look quite good.

P.S.

I followed Harold Bs link to the Luminit. I don't fully know or understand the material, but it looks like a layer of it might work nicely in your light. If you stop by http://www.luminitco.com/node/62 they have free samples. If you do get some, perhaps you could post what it's like?
 
Last edited:

Steve K

Flashlight Enthusiast
Joined
Jun 10, 2002
Messages
2,786
Location
Peoria, IL
hi Ken,

I hadn't considered that sort of design. Almost like an integrating sphere, in some respects. Are there any guidelines regarding dimensions? My application is about 8.5" wide, 15" tall, but right now, it's only 1" deep. The whole front surface is the exit port for the light, compared to maybe ... 20%? .. of the front surface for an exit sign. Seems like it would be a huge challenge to get even illumination under this sort of condition.

My plan B is to get a thick sheet of plexiglass, inject light into the sides, and roughen the front surface so as to let the light get out. The texture on the front could be varied to increase or decrease the amount of light that is allowed to escape at any given point. The challenge would be the mounting of the LEDs along the edges without looking too bulky (adding too much the width of the backlight as viewed from the front) and the method of efficiently injecting the light into the side of the plexiglass. It would be nice to be able to mold a smooth hemispherical recess into the edge of the plexiglass, and position the LED emitter at the center of that recess. i.e. very similar to the recess in the molded optics that are commonly used with LEDs.

As far as modifications to the existing design.... the leds are definitely not going to be moved! They are low power devices and there are 132 of them. I don't think they could be fit onto the sides of the framework, even if the "cavity lit" method would work. Besides, they are somewhat fragile, and don't survive the desoldering process.

The LEDs already have a very wide "beam". The plastic package is translucent, so it does radiate over most of the hemisphere.

I've done a little tweaking of the diffuser material. The front surface was glossy, so I used some coarse sandpaper to roughen it. I've also used a second layer of the diffuser material where the red/yellow glass is, since this glass doesn't diffuse the light at all. The white glass along the boarders does diffuse the light somewhat. Still, the biggest improvement is gained by increasing the distance from the LEDs to the diffusing material. This could be accomplished by replacing the U channel along the sides, top and bottom with wider stock. The downside is the to all of the cutting and drilling. I'd have to run a few experiments to see how much distance I'd need from LEDs to diffuser, and see if you can even buy U channel in that width.

thanks for all of the input!

Steve K.
 

EZO

Flashlight Enthusiast
Joined
Jul 15, 2010
Messages
1,431
Location
Vermont, USA
The only thing I'm not happy with at this point is the diffusion of the light.

I have photographed a lot of stained glass for magazine work both on location and in the studio. The studio shots for the covers were perhaps some of the more challenging to light properly of any project I've done. Of course, photography is different than a display case for stained glass but the concepts are similar.

Lighting a suspended stained glass panel from the sides and back with diffused light proved to be the best solution for the cover photos. It required bounced and some diffused light from behind as well as allowing just enough light to hit the front at the proper angle to show off the surface texture of the glass without bad reflections. Obviously, you don't need to worry about the surface texture here but proper diffusion is the key element.

So the other posts here are on the right track about lighting from the edge or within a cavity.

I'm thinking you might be able to improve your current design without major alterations by simply adding an extra layer of diffusion, (or replacing the current diffusion material with a more effective one). There's an outstanding product I've been relying on for more than 20 years called TOUGH LUX (also known as TOUGH ROLUX) that comes in rolls or sheets and can be purchased by the yard. It is extremely heat stable and completely neutral in effecting the color temperature of your light source. It is also very easy to work with and can be cut with a scissors or X-acto knife (comes in 3 or 4 mil). It is made from a semi-rigid polyester and doesn't crinkle easily.The diffusion properties of this material are extremely effective and might dramatically improve the look of your project just by adding a sheet to what you've already done.


P.S. The source I linked might be willing to provide you with a sample of Tough Lux if you ask. They used to have a small swatch book with all their diffusion materials but I don't know if that is still available.
 
Last edited:

EZO

Flashlight Enthusiast
Joined
Jul 15, 2010
Messages
1,431
Location
Vermont, USA
Hi Steve - Sorry I see that you posted just before my last post that you've already tried an extra layer of diffusion. What material are you using? In my experience plexiglass does a poor job compared to materials specifically designed for the purpose.
 

Steve K

Flashlight Enthusiast
Joined
Jun 10, 2002
Messages
2,786
Location
Peoria, IL
$85 for a roll of the Tough Lux would be a bit hard to justify at this point. Anyone got a 18" x 12" segment that they would sell me?

The stuff I have now is from Ace Hardware, and is the stuff you fit in the flourescent light fixture in the ceiling. It comes in a sheet about 2' x 4', I think, for about $7.

I did a small experiment yesterday trying to incorporate some of the principles of the "cavity lit" concept. The idea was to increase the length of the optical path for the light, introducing more distance for the light to diverge. The idea was to basically place a reflective material over the led, causing the light to hit the circuit board surrounding the led, and causing more scattering or just a longer distance for the beam to spread out.

The ideal implementation would have involved polished metal surfaces at the reflector and on the circuit board. The practical implementation was to take some copper wire, hammer it flat, and tin it with solder. This provided the reflective surface over the led. The reflector is barely larger than the led's emitter, so it worked out well. I also tinned the circuit board around the led to make it more reflective than the plain copper was. I implemented this over an area of about 4 or 5 square inches so I could see how it compared to an unchanged area. Overall, it definitely reduced the spots of high intensity. I'm not sure if it also reduced the overall illumination excessively. I took a few pictures, and maybe I'll get them posted in a day or so.

If it doesn't work out, I'll remove my reflective wire. My hope is that the tinned copper will help brighten the areas around the leds and make the illumination more even. In some regards, the original technique was somewhat like the "cavity lit" concept. The light hits the diffuser, of which some makes it through, but some is reflected back onto the circuit board. If the tin makes the board more reflective, then it ought to improve things.

regards,

Steve K.
 

EZO

Flashlight Enthusiast
Joined
Jul 15, 2010
Messages
1,431
Location
Vermont, USA
Steve, Aside from the cost I didn't imagine you would need a 5 foot by 15 foot piece of Tough Lux for 85 bucks. That's why I mentioned that it is available by the yard or in sheets. A 20x24 inch sheet goes for $7.95. I haven't ordered from Set Shop in awhile but they do tend to charge a lot for shipping since they usually deal with larger studios, and film crews who place large orders and have large budgets. Still, it might be worth a phone call or email to them and see what they would want to ship a single sheet.

I'll see if I have a piece for you (and PM you if I do) but most of my supply has been in heavy use for a long time and probably wouldn't be pristine enough for your purposes. Years ago I purchased a full roll and used the material to custom make a pair of roll up window shades for a studio I used to have. They filled the room with an amazing diffused light but after I moved to a new studio I cut up the shades and have been using the pieces on my other lighting equipment ever since. When it's handled a lot it can get some creases and collect some smudges but this generally doesn't effect their use in photographic lighting applications. On the other hand the stuff is quite durable and if used in a permanent installation lasts virtually forever. I've used it over very hot lights with no problems and it is quite dimensionally stable as well. In fact, I've used Tough Lux in a window and in a door in my home as a privacy glass that lets in unaltered diffused sunlight and after years they look like they came from the factory that way.
 

Steve K

Flashlight Enthusiast
Joined
Jun 10, 2002
Messages
2,786
Location
Peoria, IL
This is the diffuser material I used between the LEDs and glass:
5728627396_c7441a036a.jpg


The cheesy/clever "reflector" placed over some of the LEDs to improve the diffusion:
5728084191_e774cc5844.jpg


The final result is here. The upper right quarter of the red/yellow glass is the area that was modified with the "reflectors".
5728635252_a049b32a93.jpg


I haven't made up my mind whether this constitutes an improvement or not. Maybe the best option is to try some of the recommended diffusion material....

Steve K.
 

en2oh

Newly Enlightened
Joined
Aug 8, 2015
Messages
5
This is the diffuser material I used between the LEDs and glass:
5728627396_c7441a036a.jpg


The cheesy/clever "reflector" placed over some of the LEDs to improve the diffusion:
5728084191_e774cc5844.jpg


The final result is here. The upper right quarter of the red/yellow glass is the area that was modified with the "reflectors".
5728635252_a049b32a93.jpg


I haven't made up my mind whether this constitutes an improvement or not. Maybe the best option is to try some of the recommended diffusion material....

Steve K.


Here is an alternative for you.
I would check out Craigs List or similar (IE Kijiji in Canada) and look for a scrapped 60" LCD panel TV.
In these sales, the person is often parting out a TV with a cracked LCD screen. What you want is behind the screen, so to speak.

In the backlight for the newer TV's, they all use (since 2013 I think) LED backlighting. Some use edge lit, others use back light.
the truly thin ones, ie less than 1" thick likely use edge lit. For the backlit technology, you will need sufficient depth of the light box to "more or less" uniformly cover the diffuser assembly.

The assembly is really quite clever. First, there is a fairly rigid, textured plastic surface that is not frosted but is not transparent in terms of looking at either the top or bottom. Next comes the orthogonally oriented "brightness enhancement" or sometimes called "Prismatic Layers" (there are two situated at right angles to each other) and finally, a diffuser sheet.

Depending on how uniform a light distribution your need is, will depend on how many of these sheets you need. I can tell you that even just adding the first layer (closest to the LED array) will dramatically improve things. Adding the prismatic layers will increase your light capture significantly.

If you are so inclined, you could use the backlight box complete with array of LED's but recognize that you may need to rewire it extensively. These are designed to allow individual areas of the screen to be brightened or darkened, dynamically to enhance contrast.

If you go with edge light, using something like LuciteLUX in .125" thick panels, the cost will be significantly more AND you will likely find trouble sourcing the material. Back light box will add to depth but improve the result for less cost. Remember that with 120 deg LED's, (with or without reflectors) you will need to consider the cones of light when designing your LED array and part of that consideration is how far the array needs to be from the backlight pack.

Good luck,
Doug
 

Steve K

Flashlight Enthusiast
Joined
Jun 10, 2002
Messages
2,786
Location
Peoria, IL
thanks for the input!

I've got a friend that runs a TV repair shop, so I just dropped him an e-mail to see if he has anything that I can scavenge parts from. If the LEDs along the edge don't add too much border to what I've got now, that should be a good solution.

I've considered increasing the depth of the frame that I've got now. It's been a while since I've thought about this stuff (since 2011 or so!), so I don't recall what experiments I've done to determine what the increase will need to be. If it's more than a factor of 2... I'm not sure what I'll do. Maybe just increase it a modest amount and live with it??
 

en2oh

Newly Enlightened
Joined
Aug 8, 2015
Messages
5
thanks for the input!

I've got a friend that runs a TV repair shop, so I just dropped him an e-mail to see if he has anything that I can scavenge parts from. If the LEDs along the edge don't add too much border to what I've got now, that should be a good solution.

I've considered increasing the depth of the frame that I've got now. It's been a while since I've thought about this stuff (since 2011 or so!), so I don't recall what experiments I've done to determine what the increase will need to be. If it's more than a factor of 2... I'm not sure what I'll do. Maybe just increase it a modest amount and live with it??

The edge lit approach has limits to size but lighting the long side(s) of the panel might work nicely. I was surprised by how shallow the direct backlight implementation was on this Panasonic. Probably less than 2" but with a very large array of reflected LED's. I only wanted the diffusing panel (including the prismatic layers) so left him the LED array. The nice thing for your application is the metal heatsink/housing for the LED array.

Good luck,
Doug
 
Top