Wanted to throw this idea out to the experts, so please humor me if you will...
Two things lacking from my reviews have been:
- PWM readings (building audio cable connected to solar cell and will use a PC soundcard oscilloscope program)
- Lumens measurement. While I can do a ceiling bounce, there are usually too many factors introduced (beam shape/intensity chief amongst them)
For the latter, I've been meaning to build an IS but don't like the idea that there would not be a stable platform/holder for the light while I'm taking measurements (especially for runtime logging). Also, based upon what I've read, I felt tweaking the baffle has been one of the trickiest parts to calibrating it properly. So I came up with this idea based on the following criteria:
- must accomodate bezel head up to 4" in diam
- allow consistent repeatable measurements
- provide stable platform for light to rest on while doing runtime / logging and light must be exposed to allow fan to cool it
- not be affected by ambient lighting while logging is in progress
- no fiddling w/a baffle
- simple to build w/easily sourced parts
- reasonably budget friendly
- allow light sensor to be easily removed for other measurements
- easy for others to build/reproduce
I've read about a PVC U-pipe idea but decided to add an extra 90deg. elbow to further reduce the likelihood of any direct reflection making it to the light sensor and ended up with this:


Total parts used cost $34.40 before taxes:
- 3 x 4" 90deg. PVC elbows
- 1 x 4" -> 3" step down adapter
- 1 x 3" -> 1.5" stepd down adapter/cap
The entire contraption will be strapped/bolted onto a wood base. The end where I'm shining the light into will have a glass/plastic lens over it that can accomodate lights up to 4" and establish a platform for the light to rest bezel down on and be completely exposed to allow a fan to keep it cool. I'll cut card board/paper templates for smaller lights that will allow perfect centering thus allowing consistent repeatable measurements. The other end w/the step down adapters will need to be sanded down to fit but will hold the light sensor.
Worst case is that if this doesn't work, since no glue or alteration is involved, I can return the 3 x 90deg. elbow which was the majority of the cost for this project. The step down adapters will need to be sanded down and can not be returned but I'm sure I cand find other uses for them.
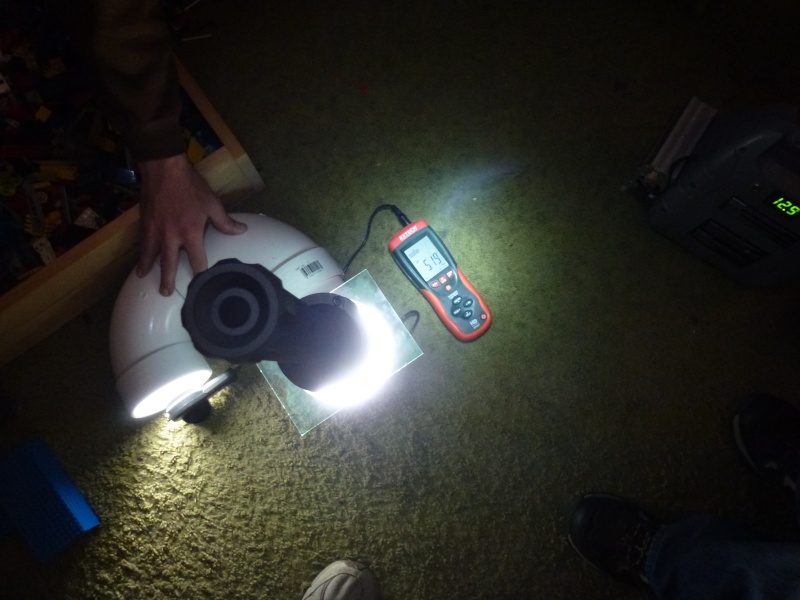
For now, just as a POC for myself, I skipped the step down adapters and just placed the sensor at the lip of one end. I placed a piece of glass on the light end to hold the light in place. I noticed that I'm allowed some flexibility w/the placement of the light w/out affecting the reading drastically (the sensor however will read a bit higher once centered in the step down adapter).
Here are some lights with the mfg's claimed ANSI values and what I measured (PVC) after 30 seconds:
Icon Link

High 50
PVC - 41
Klarus XT20

High 1200
PVC - 1222 (this light uses PWM even on high so I actually should've done an avg instead of eyeballing a single value)
Niteye EYE30


Turbo 2000 / High 1000
PVC - 2117 / 1100
SureFire M3LT


High 400 / Low 70
PVC - 669 / 139.5
SureFire E2DL

High - 200
PVC - 234
Sunwayman T20C (forgot to take pic)
High - 438
PVC - 290
Sunwayman T40CS

High - 788
PVC - 745
Sunwayman V60C

Max - 728
PVC - 831
Xeno G10v2

High - 460 OTF
PVC - 440
So it seems like it's not too far off and thus far doesn't seem to be favoring throwers. There are of course a few anomalies like the V60C. I know for sure lux was lower than the T40CS thus why I'm surprised why the lumens measured this way was higher.
Of course there's consideration to be given to the semi-glossy surface of the PVC so I may look to coat it w/IS paint. Anyways more experimenting to come but what are your thoughts on this?
I am by no means an expert on this and can use whatever guidance and tips you guys can provide. Also, the above readings were pure lux w/no conversion done.
Cheers,
Tim
Two things lacking from my reviews have been:
- PWM readings (building audio cable connected to solar cell and will use a PC soundcard oscilloscope program)
- Lumens measurement. While I can do a ceiling bounce, there are usually too many factors introduced (beam shape/intensity chief amongst them)
For the latter, I've been meaning to build an IS but don't like the idea that there would not be a stable platform/holder for the light while I'm taking measurements (especially for runtime logging). Also, based upon what I've read, I felt tweaking the baffle has been one of the trickiest parts to calibrating it properly. So I came up with this idea based on the following criteria:
- must accomodate bezel head up to 4" in diam
- allow consistent repeatable measurements
- provide stable platform for light to rest on while doing runtime / logging and light must be exposed to allow fan to cool it
- not be affected by ambient lighting while logging is in progress
- no fiddling w/a baffle
- simple to build w/easily sourced parts
- reasonably budget friendly
- allow light sensor to be easily removed for other measurements
- easy for others to build/reproduce
I've read about a PVC U-pipe idea but decided to add an extra 90deg. elbow to further reduce the likelihood of any direct reflection making it to the light sensor and ended up with this:
Total parts used cost $34.40 before taxes:
- 3 x 4" 90deg. PVC elbows
- 1 x 4" -> 3" step down adapter
- 1 x 3" -> 1.5" stepd down adapter/cap
The entire contraption will be strapped/bolted onto a wood base. The end where I'm shining the light into will have a glass/plastic lens over it that can accomodate lights up to 4" and establish a platform for the light to rest bezel down on and be completely exposed to allow a fan to keep it cool. I'll cut card board/paper templates for smaller lights that will allow perfect centering thus allowing consistent repeatable measurements. The other end w/the step down adapters will need to be sanded down to fit but will hold the light sensor.
Worst case is that if this doesn't work, since no glue or alteration is involved, I can return the 3 x 90deg. elbow which was the majority of the cost for this project. The step down adapters will need to be sanded down and can not be returned but I'm sure I cand find other uses for them.
For now, just as a POC for myself, I skipped the step down adapters and just placed the sensor at the lip of one end. I placed a piece of glass on the light end to hold the light in place. I noticed that I'm allowed some flexibility w/the placement of the light w/out affecting the reading drastically (the sensor however will read a bit higher once centered in the step down adapter).
Here are some lights with the mfg's claimed ANSI values and what I measured (PVC) after 30 seconds:
Icon Link
High 50
PVC - 41
Klarus XT20
High 1200
PVC - 1222 (this light uses PWM even on high so I actually should've done an avg instead of eyeballing a single value)
Niteye EYE30
Turbo 2000 / High 1000
PVC - 2117 / 1100
SureFire M3LT
High 400 / Low 70
PVC - 669 / 139.5
SureFire E2DL
High - 200
PVC - 234
Sunwayman T20C (forgot to take pic)
High - 438
PVC - 290
Sunwayman T40CS
High - 788
PVC - 745
Sunwayman V60C
Max - 728
PVC - 831
Xeno G10v2
High - 460 OTF
PVC - 440
So it seems like it's not too far off and thus far doesn't seem to be favoring throwers. There are of course a few anomalies like the V60C. I know for sure lux was lower than the T40CS thus why I'm surprised why the lumens measured this way was higher.
Of course there's consideration to be given to the semi-glossy surface of the PVC so I may look to coat it w/IS paint. Anyways more experimenting to come but what are your thoughts on this?
I am by no means an expert on this and can use whatever guidance and tips you guys can provide. Also, the above readings were pure lux w/no conversion done.
Cheers,
Tim
Last edited: