wquiles
Flashaholic
***************************************************************
Nov 2012 - I sold my last V10R parts many months ago, and have not had enough interest to make a new batch, so unfortunately I don't have any parts to sell at this time.
***************************************************************
Parts/services for the Sunwayman V10R Ti+ and V11R
1) PART 1 - Replacement button cover (kit) for both the V10R Ti+ and the V11R
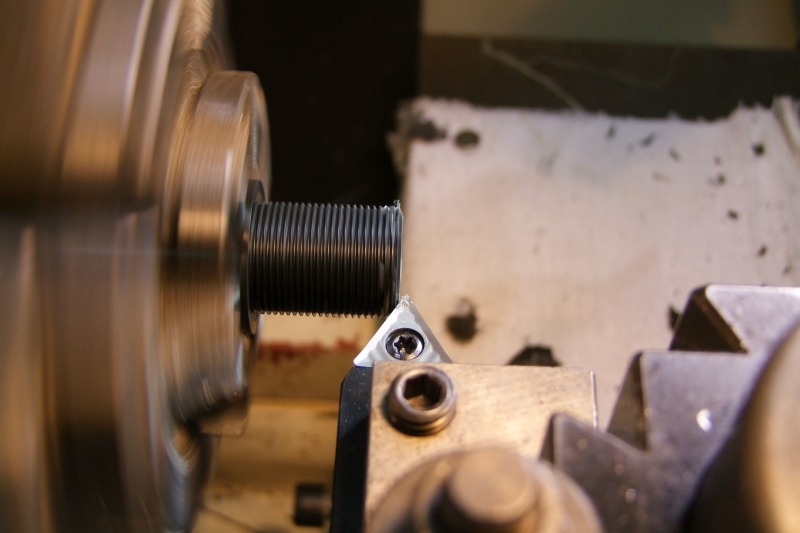
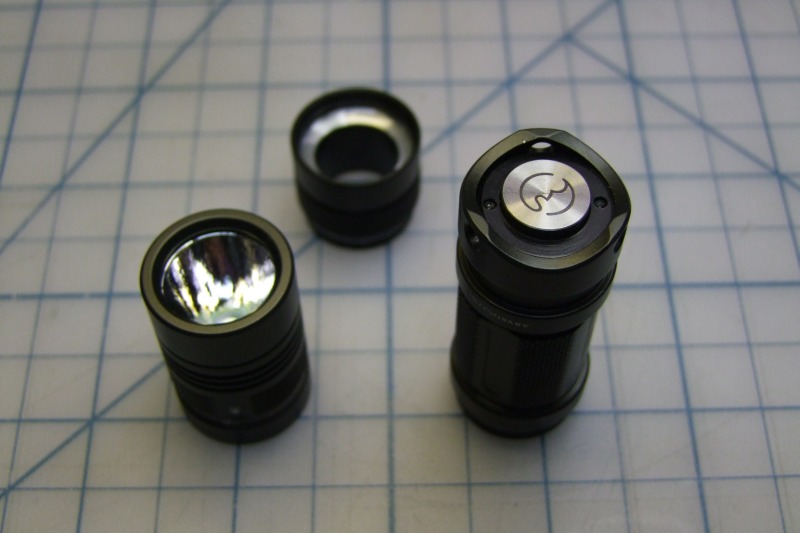
Myself and many others recently received the wonderful Sunwayman V10R Ti+ LED lights, however, the factory Titanium button cover rubs against the Titanium retainer ring, which ruins the feel of this great light. Some have been fortunate that by polishing the Ti button cover and the Ti retaining ring, they eliminate most of the problem, but for many of us even that does not solve the problem. I decided to make a Delrin replacement part to try and see if it would work better, and it turns out to work much better than the Ti part. I gotten enough emails from folks interested to get these made, so I am starting this sales thread in response to that interest.
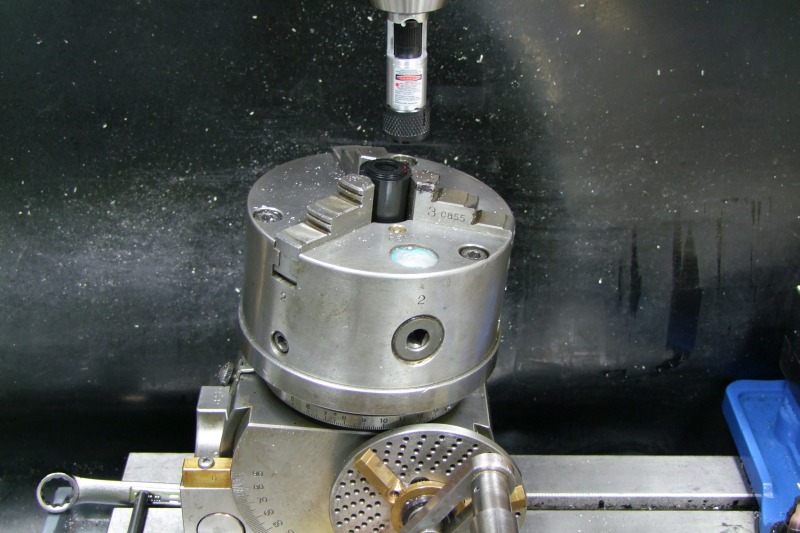
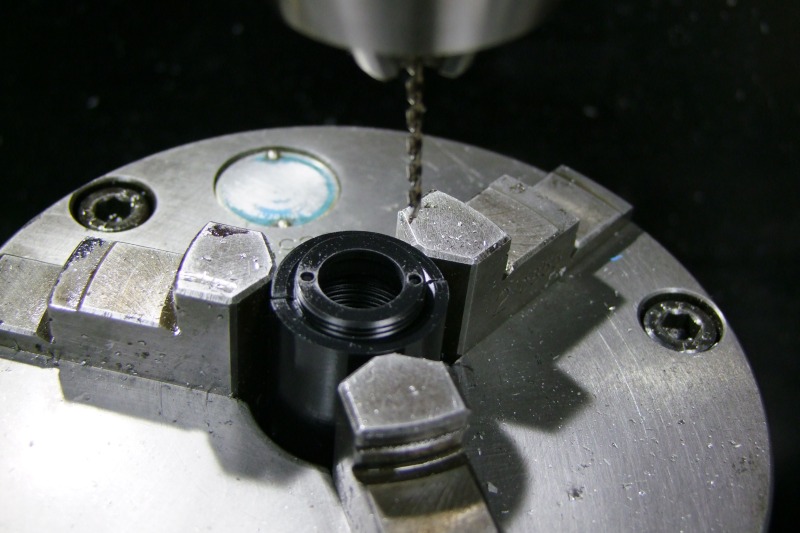
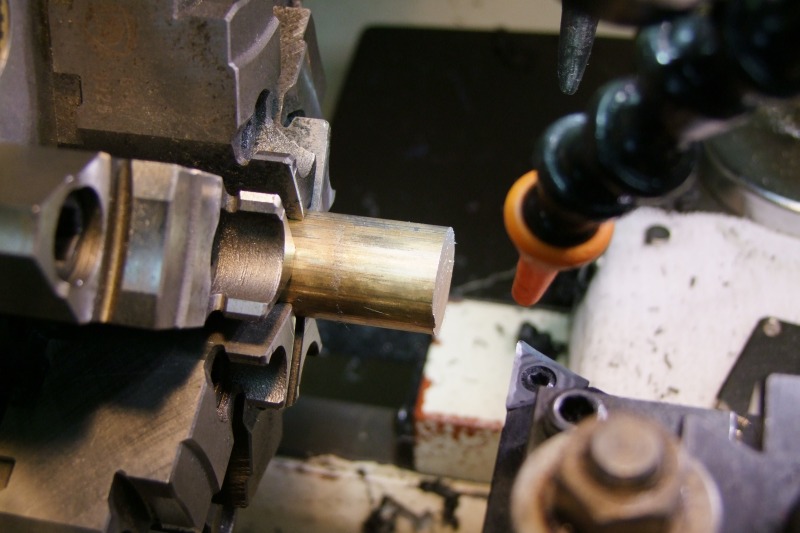
Delrin is very strong, but not as strong as Titanium, so I had to make the wall thickness greater than on the Ti part in order to make the replacement part strong/durable. I also had to come up with a slightly thinner spacer to replace the factory (white) part in order to still have the top of the new Delrin button cover to sit flush with the tailcap. I am not showing every single step to make these, but here is a short pictorial.
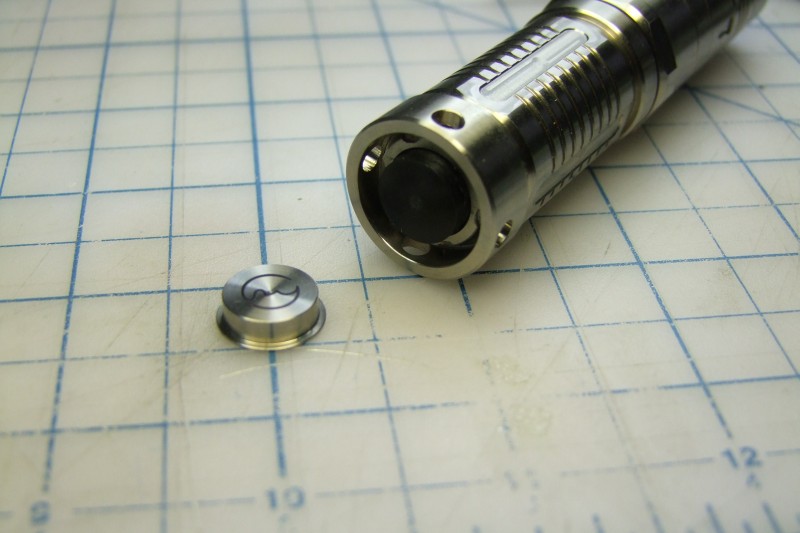
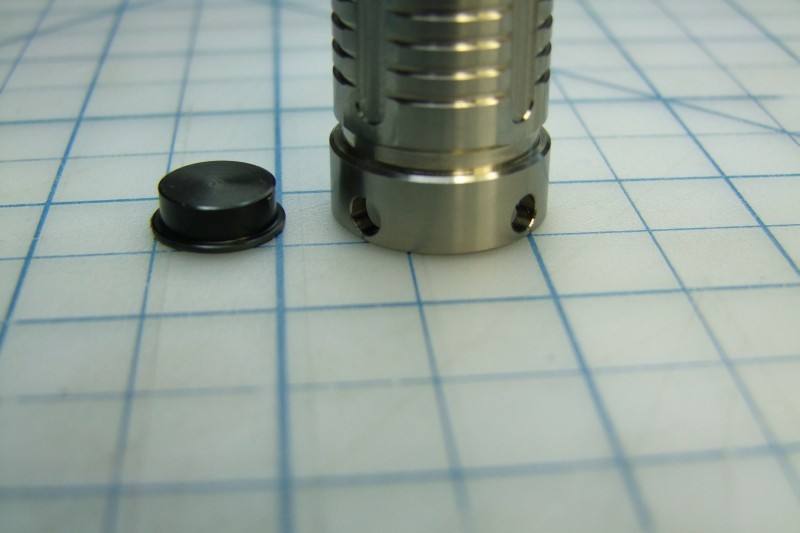
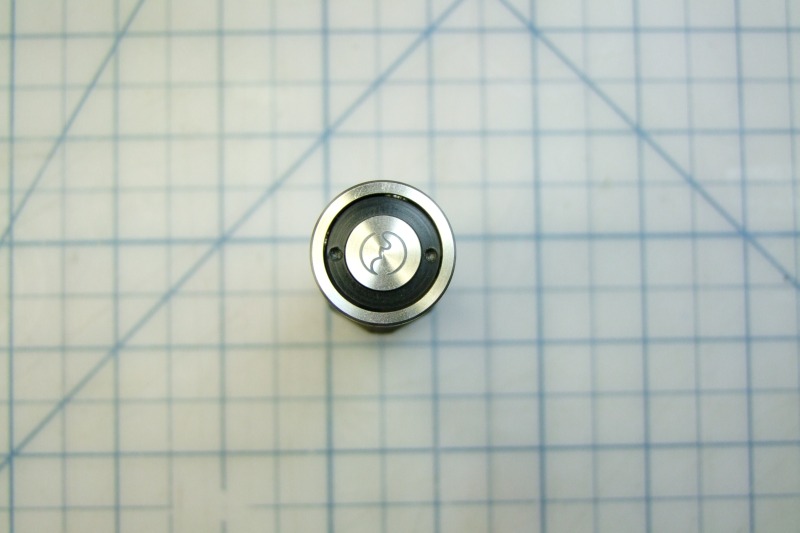
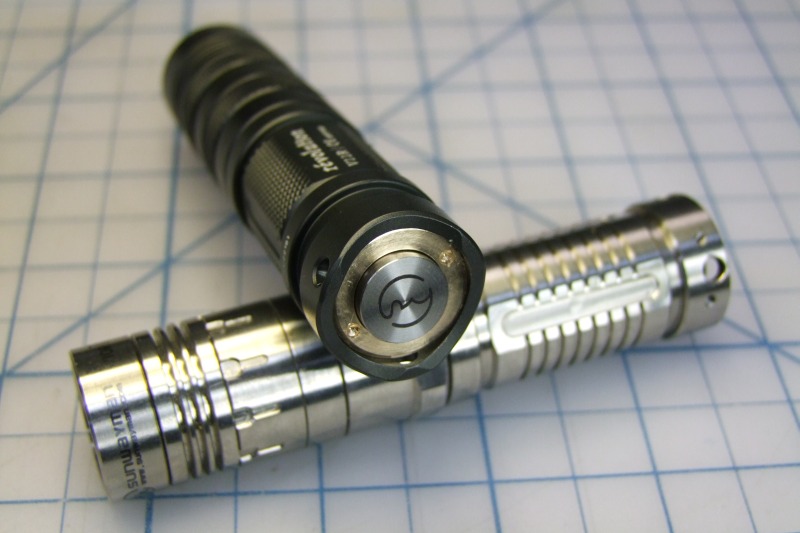
Installed:
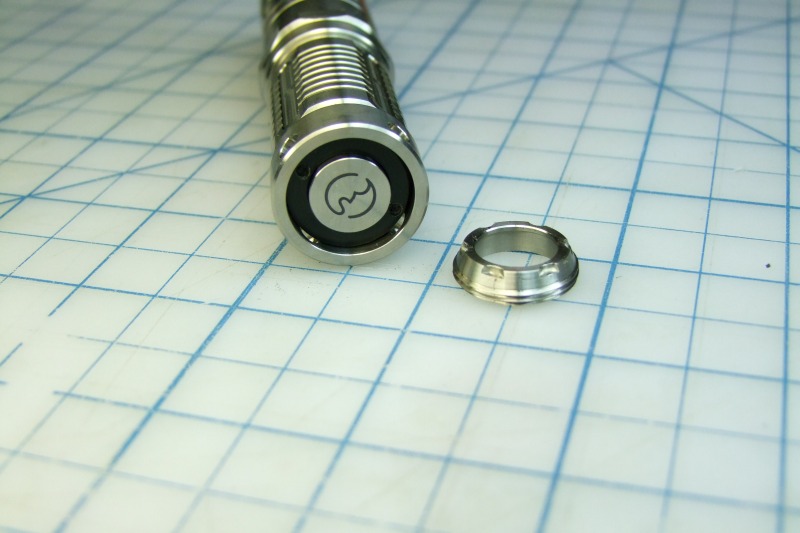
Final shot:
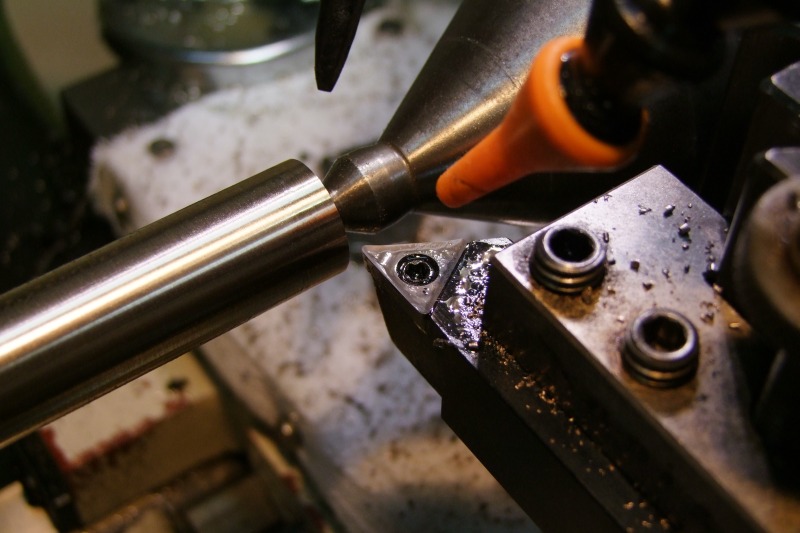
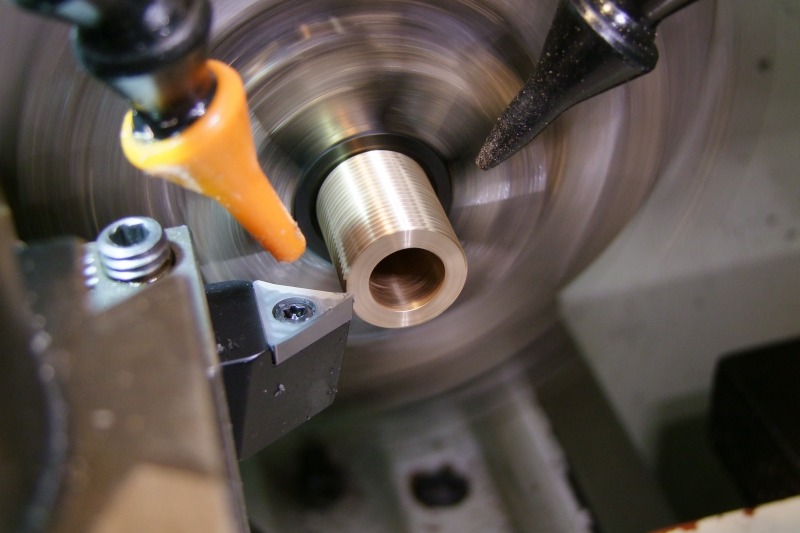
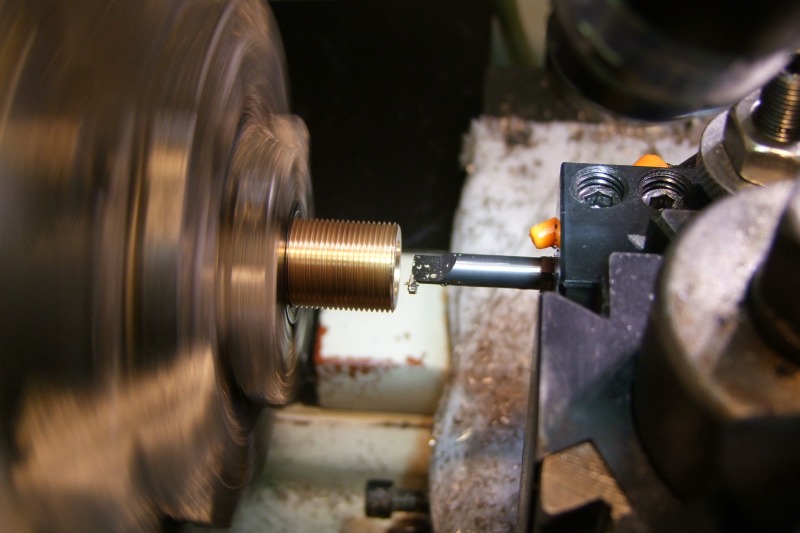
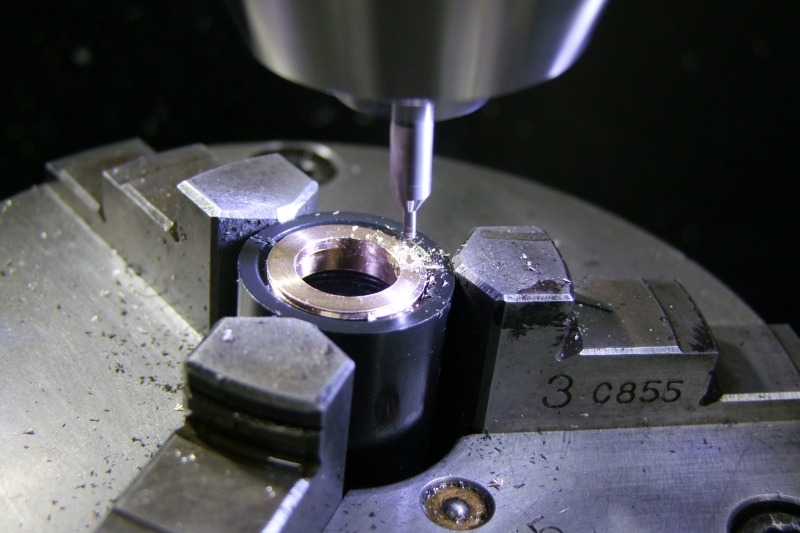
Here are the steps for "production" quality parts that I have available for sale. Lots of steps and various tools are needed to get these done properly with close tolerances:

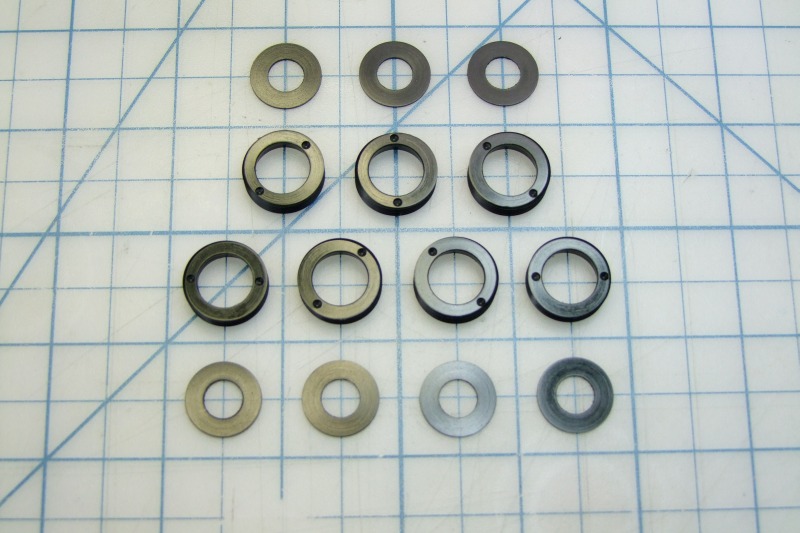
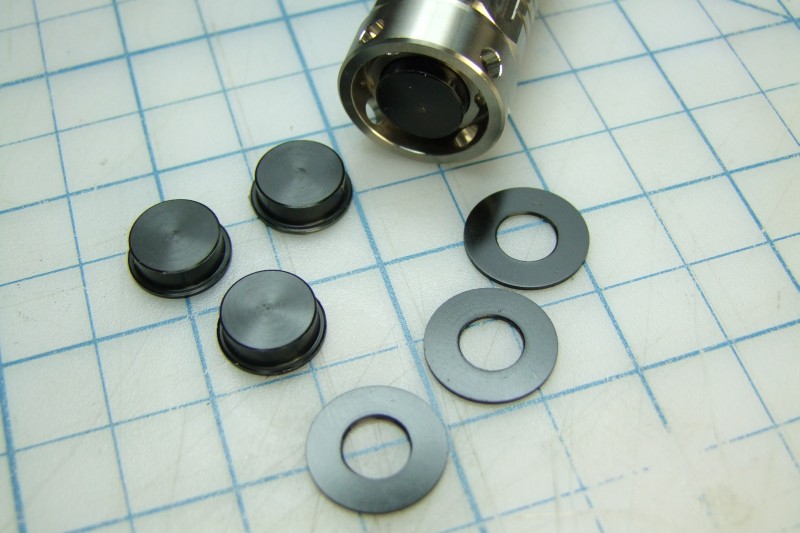
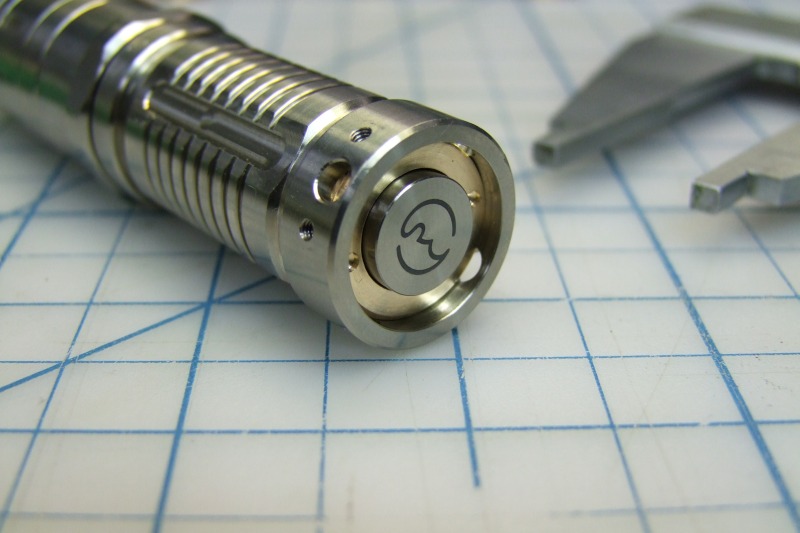
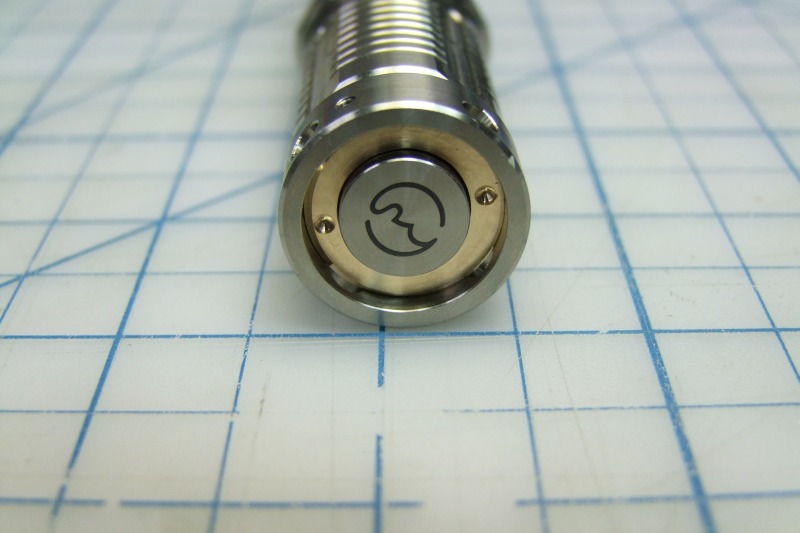
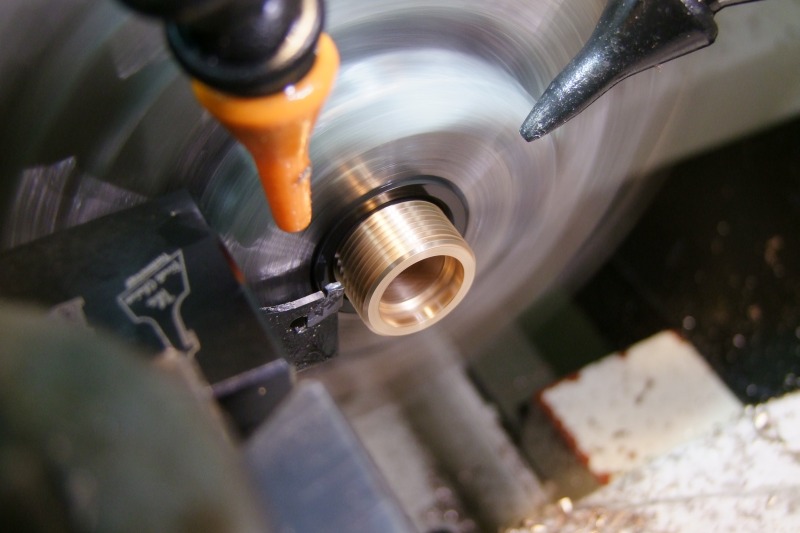
Finished "production" parts:
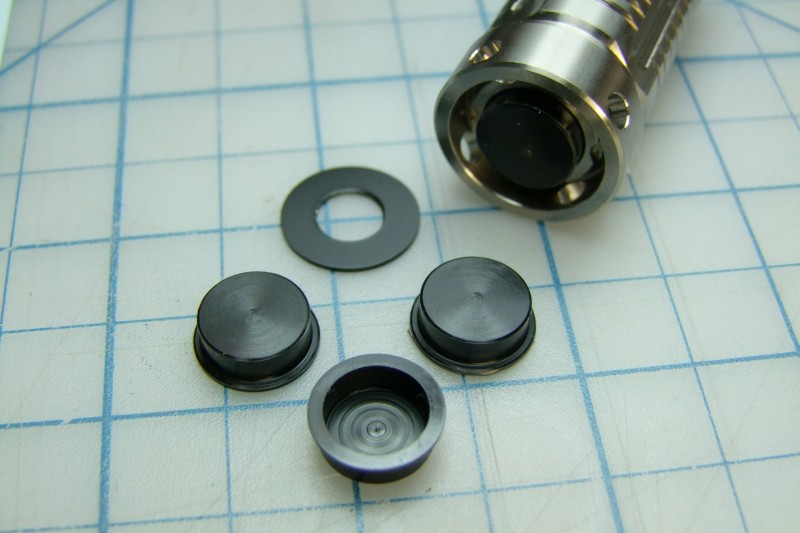
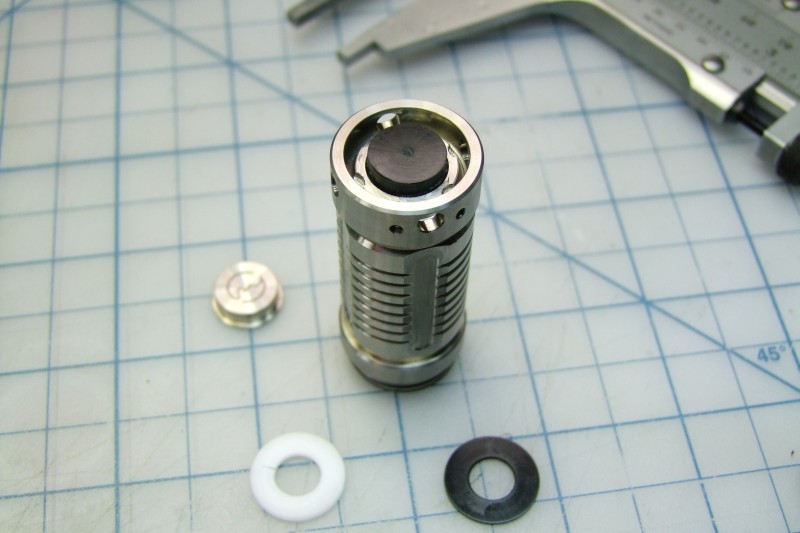
Fits perfectly flush:
NOTE: When installing the new spacer, make sure it is pressed all the way down to the switch. Also, make sure that when you re-assemble everything with my new Delrin button cover that you really screw the Titanium retaining ring (the part with threads) as tightly as possible so that the button sits flush with the tailcap.
I am selling these "kits" for $30 each (each means a kit of one spacer and one button cover), plus shipping, with a money back guarantee (except for shipping costs).
If interested first post here in this thread, AND send me an email (in my signature) for Paypal and shipping details. Paypal address is the same as the email in my signature.
Shipping options:
- Domestic USA first class - up to 2 kits - $4 (insurance is not included)
- Domestic USA priority - up to 2 kits - $7 (insurance is not included)
- International first class - up to 2 kits - $6 (insurance is not included)
- International priority - up to 2 kits - $15 (insurance is not included)
PLEASE include your forum name with your Paypal payment and make sure the address comes through.
Maximum 2x kits per person (second one ships for free).
*********************************************************************************************************************************************
2) PART 2 - replacement retaining ring kit both the V10R Ti+ and the V11R
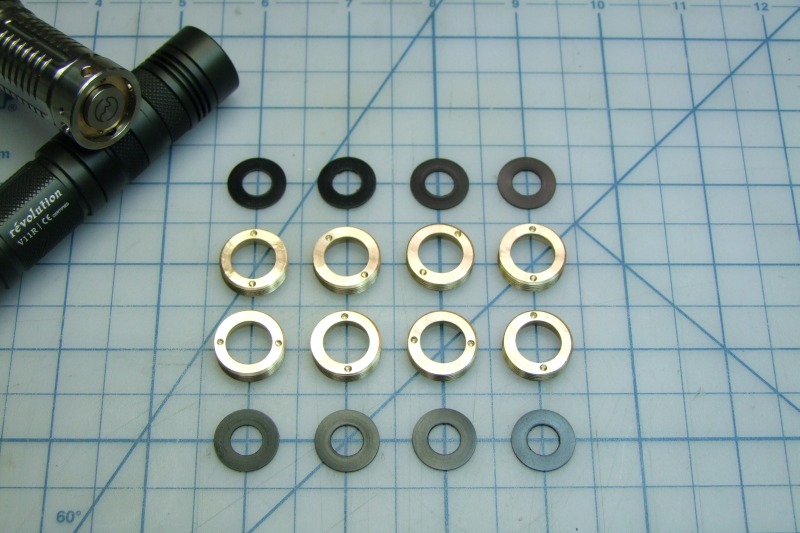
These are the replacement retaining rings for the Sunwayman V10R Ti+/V11R. These are custom made, Delrin replacement retaining rings, which allow the use of the stock/metal button cover. Zero binding, completely smooth, no sound, no gritty feel. In my humble opinion this is what the factory should have done instead of the horrible metal retaining rings. So now you can either get a replacement Delrin button kit from me, or these new custom Delrin retainers - but keep in mind that they can't fit together at the same time.
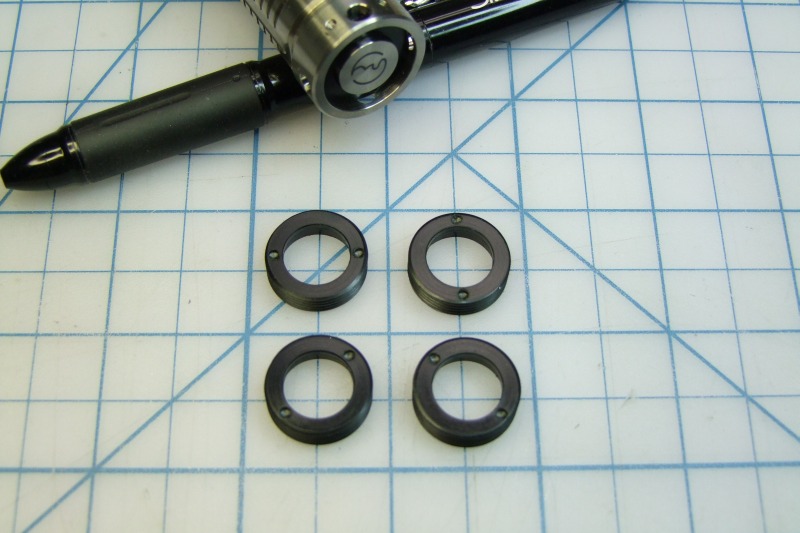
In this first batch I made 4x of them (well, 5x, but I like it so much that I am keeping one for my own V10R Ti +):
To swap these you must completely remove the head, battery, clip, and clip screws. If you are going to put the screws back, note that they will press against the new Delrin retaining ring (not visible, plus that area although threaded does not engage the threads, so no problem):
As you can see here the replacement retaining ring is slightly taller:
These come with the same thinner black Delrin spacer as in the button cover kit, so these retaining rings are also a kit, composed of the new retaining ring AND the thinner spacer. The thinner spacer simply replaces the thick white spacer that sits on top of the switch.
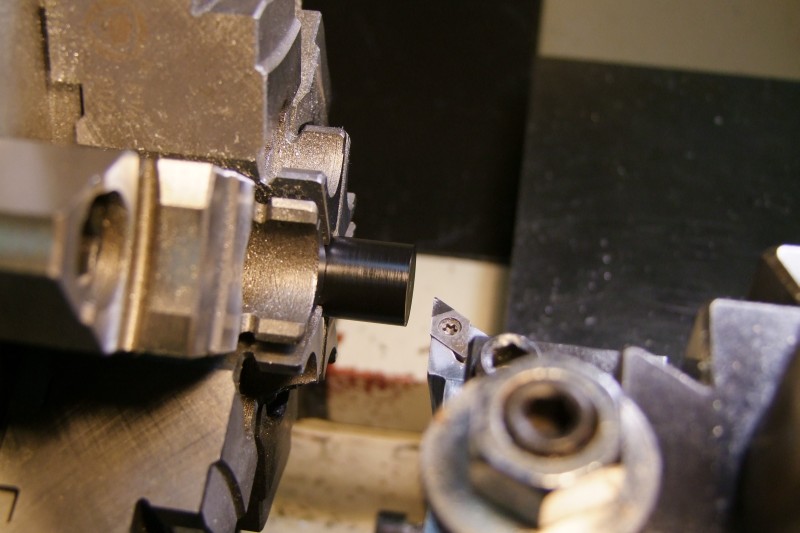
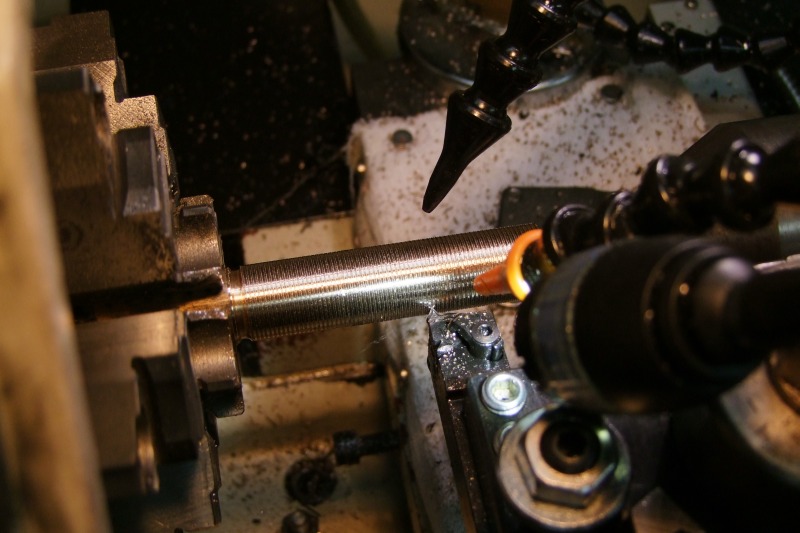
These parts take longer to machine in my manual lathe due to the threading operation and milling operation:
When installing these, PLEASE make sure you don't cross thread the soft Delrin retaining ring. With the thin spacer starting the thread engagement goes easy. If it feels really tight when starting, it means it is not aligned just right (the whole first turn should be relatively easy as things in the switch assembly are starting to get compressed a bit) - try again and make sure the ring is fairly flat and go easy.
Pricing for retaining ring kit:
Price for each kit is $40/each plus shipping (insurance optional). Shipping options:
- Domestic USA first class - up to 2 kits - $4 (insurance is not included)
- Domestic USA priority - up to 2 kits - $7 (insurance is not included)
- International first class - up to 2 kits - $6 (insurance is not included)
- International priority - up to 2 kits - $15 (insurance is not included)
Maximum 2x kits per person (second one ships for free).
PLEASE include your forum name with your Paypal payment and make sure the address comes through.
(I also just got a V11R, and I am happy to report that YES, these rings fit on the VR11 as well :devil: )
******************************************************************************
Important note: Since the factory dimensions were sloppy with the stock metal retaining ring and metal button, I changed the dimensions on my replacement button cover and retaining ring in order to get smoother operation.
- Delrin button cover: I made the Delrin replacement button cover slightly larger outside diameter to that it would fit inside the larger metal ring - a combo that produces smooth operation without binding.
- Delrin retainer ring: Since the factory retaining ring has an inner diameter which is too big/wide, the replacement Delrin retainer ring I designed with a smaller inside diameter to cope with the narrow factory metal button. This again gives you smooth operation without binding.
What does all of this means? Since I compensated the Delrin button by making it wider and compensated the Delrin retaining ring by making it narrower, you can't use together both the Delrin replacement button with the Delrin replacement retaining ring. You can only use one of the other, but not both together.
My most sincere apologies if this causes anyone grief/problems - I just want to be upfront about it.
******************************************************************************
I am also experimenting with Bearing Bronze as a material for retaining rings: - email me directly if interested in learning more about these.
I made 8x of these bronze rings - I finished the first batch of 4x on Fri and the last 4x yesterday: it just takes me a long time to make these by hand. I have been using one of these bronze rings on my personal V10R Ti+, as I wanted to use it for a couple of days to get a good basis of comparison. That was the other reason I also recently bought the V11R as I wanted to have another ring, another button, and another host to test/tweak my offerings, and have more OEM parts to fine-tune the design of the bronze pieces - to make sure things would work properly.
All that being said, no, the bronze ring does not perform better than the Delrin ring - it is just plain physics as the coefficient of friction (posted earlier in the thread) is just lower for Delrin. The Delrin is much more slippery than even the bearing bronze that I am using. Now, bearing bronze parts are MUCH better than the poorly finished OEM titanium pieces, so yes, going to bronze is an improvement. In fact I came up with a 1 to 10 scale to compare all solutions I have tried so far:
Functionality-wise:
1 = horrible, non-functional, would return the light instantly
3-4 = stock Ti ring and Ti button
7-8 = Bronze ring with Ti button - being metal on metal there "is" a slight rubbing sound - not much at all, but not like with Delrin which is totally quiet/smooth
9 = Delrin ring with Ti button - nearly perfect
10= outstanding design, perfect in every way
Of course, style-wise, the bronze ring looks much, much better in person than the Delrin ring. No contest there as the bronze looks like it "belongs" in there, compared to the black Delrin which does not look as "fancy" - purely subjective
The main reason I give the bronze piece a 7-8 vs. the 9 on the scale, is that if you purposely press the button at an angle with force, you will get a little bit of the metal on metal noise. Not a lot, not even close to the metal OEM parts, but it is not completely quiet like the Delrin. The better news is that the more you use the button, the more smooth it becomes, as the Ti lightly wears down and mates with the bronze ring. So it is like "7" to start with, and then gets to like an "8" after is used a while. But the bronze will never be completely quiet like the Delrin.
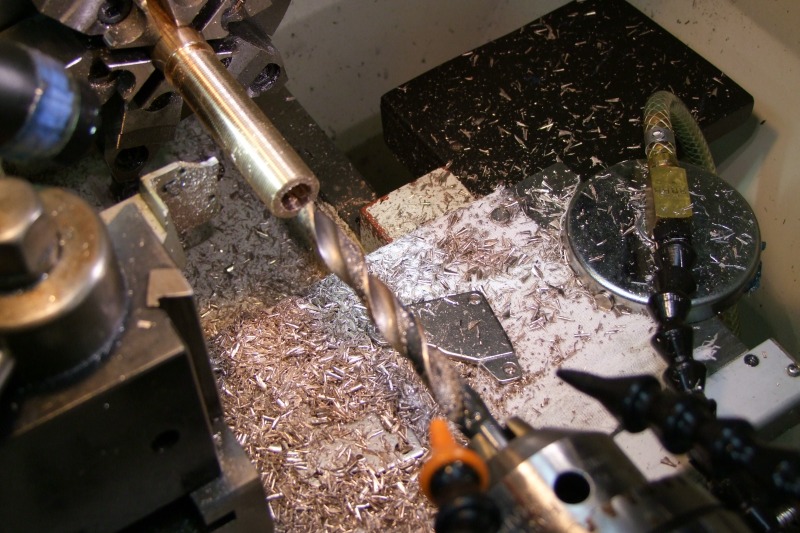
They are both easy to work with, but it takes me a little bit longer to make parts out of bronze. But the biggest challenge is the mess and cleaning that machining bronze makes - it is like 2x to 3x more time consuming to clean up after working with bronze - there are chips everywhere within a 2-3 foot radius of my lathe. Here is a brief pictorial ...
to end with this:
Lots of chips everywhere:
So Delrin is a better material for this application and cheaper for me to make, but bronze looks better and it is more expensive to make so I have to price them higher than the Delrin parts.
Pricing for bearing bronze retaining ring kit:
Price for each kit is $60/each plus shipping (insurance optional). Shipping options:
- Domestic USA first class - up to 2 kits - $4 (insurance is not included)
- Domestic USA priority - up to 2 kits - $7 (insurance is not included)
- International first class - up to 2 kits - $6 (insurance is not included)
- International priority - up to 2 kits - $15 (insurance is not included)
Maximum 2x kits per person (second one ships for free).
******************************************************************************************************
Instructions on how to install the button "kit" on both the V10R Ti+ and V11R (same instructions for the replacement retaining ring)
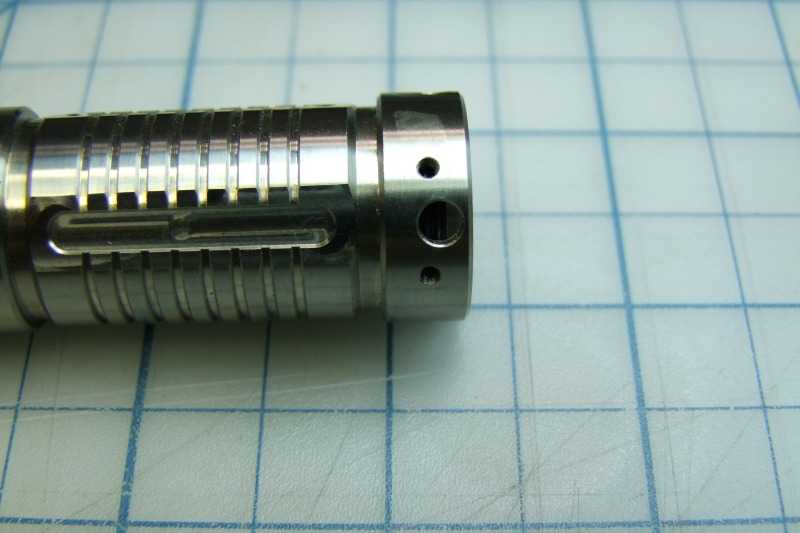
First, make sure to completely remove the clip:
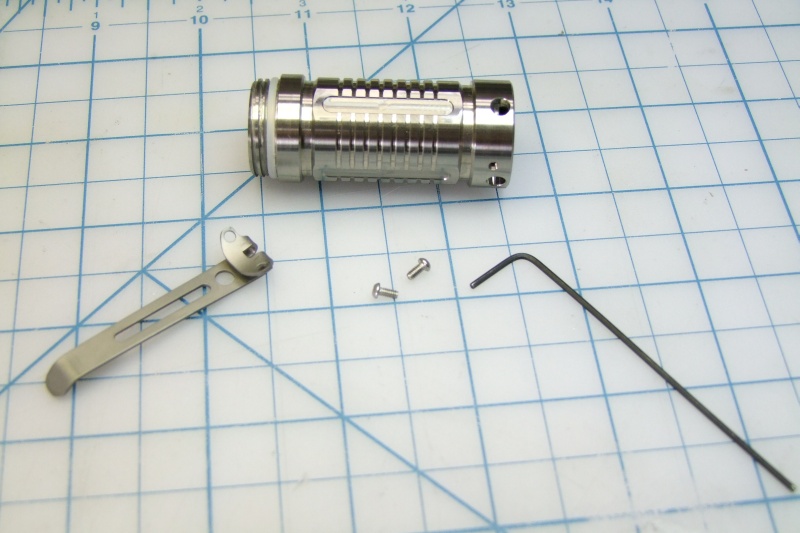
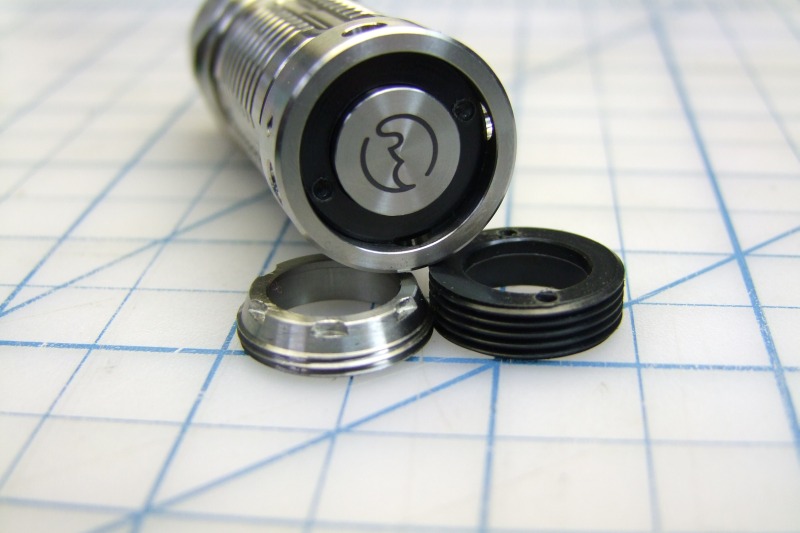
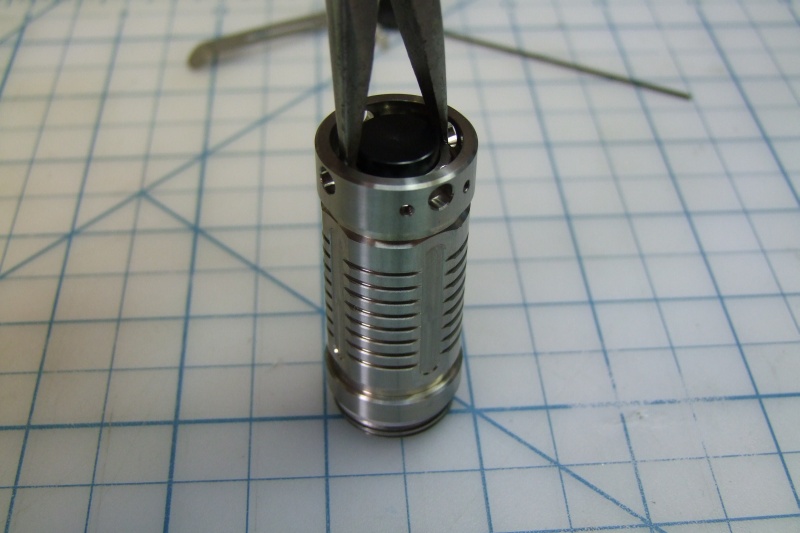
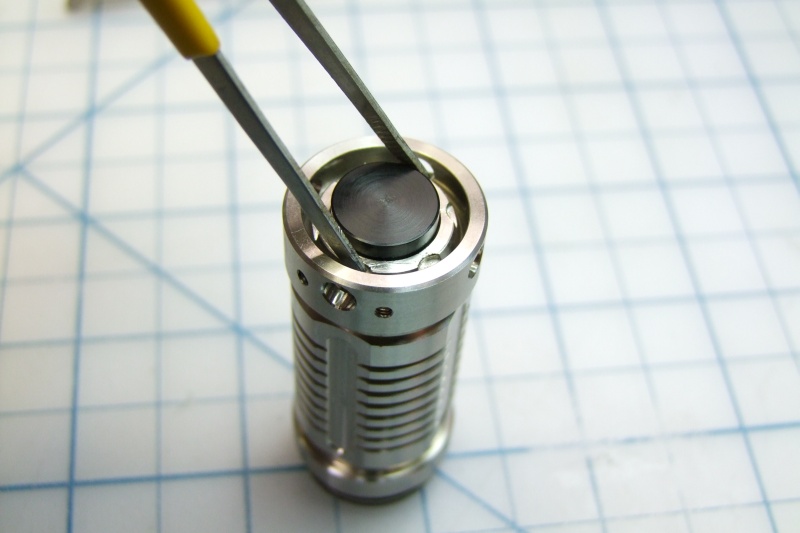
Remove the body from the rest of the light - no battery, no head. With the body flat on a surface, use thin nose pliers to remove the retaining ring. I am a lefty, so first photo shows my left hand on the pliers, second photo shows my hand keeping the body steady/level:
Once parts come out, this is the proper order in which they go back in:
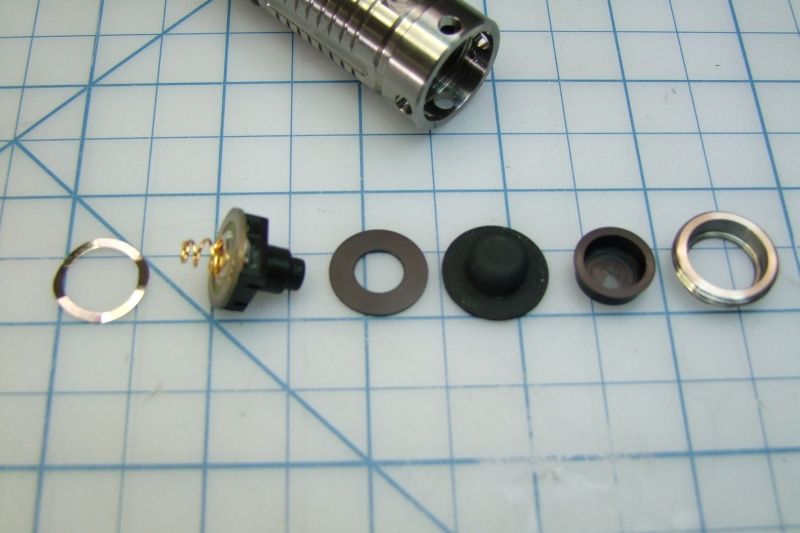
Note that the new black Delrin spacer needs to sit flush with the switch (might need to press it down - gently):

Next line up the rubber booth with the new Delrin button cover:
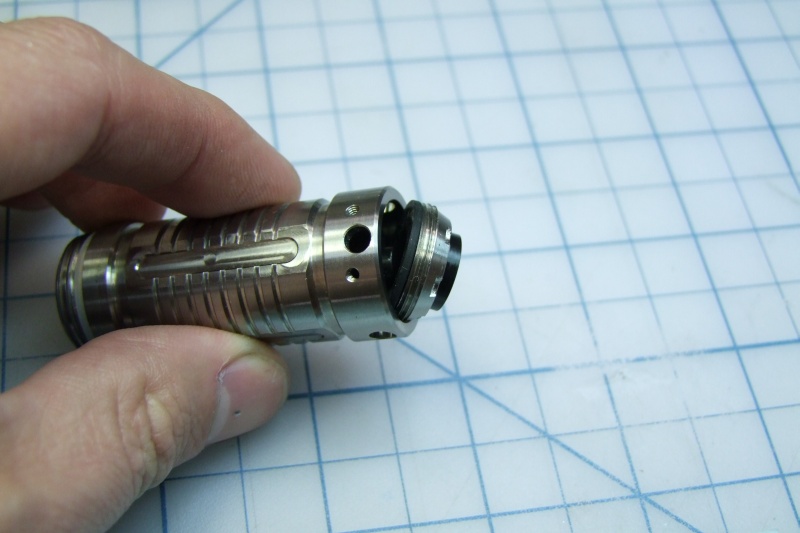
Position the retainer ring on top. The Delrin button cover is of much closer tolerances than the original metal button cover, but it will fit (I allowed some clearance):
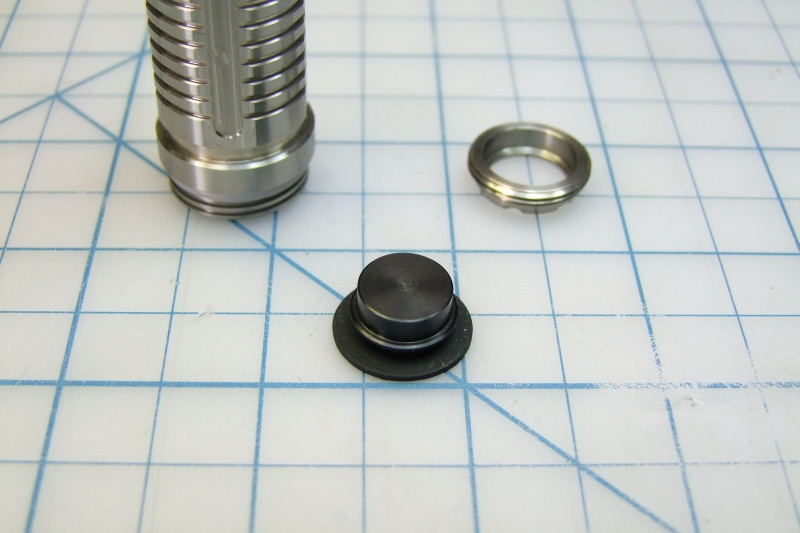
Put the metal wave washer inside the body, then the switch with the new thin Black Delrin spacer, and then while trying to keep the booth, Delrin cover, and retaining ring as one unit - place back in the body of the light:
The best tip I can think off to prevent cross threading is to thread the piece in two steps:
1) Start screwing the ring backwards first, very slowly, until you feel the slight bump of the threads aligning. What I do is that I keep the thin-nose pliers aligned and steady, and rotate the body against a flat surface (bench), which ensures that the alignment from the pliers remains true.
2) Then start screwing the part normally, which should go really easy now since the threads were aligned by the prior state.
Since we are trying to align the threads, I use something lighter (tweezers) to help guide the retaining ring while engaging the threads. Again, keep the body vertical and flat against the table:
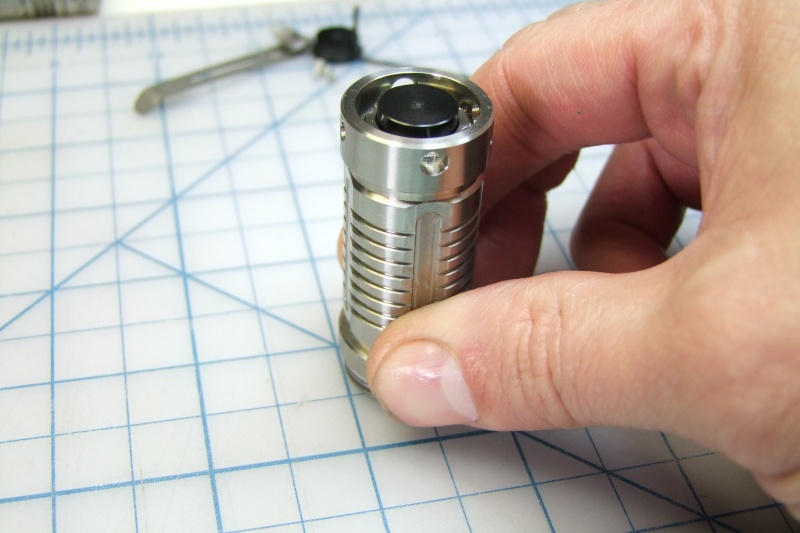
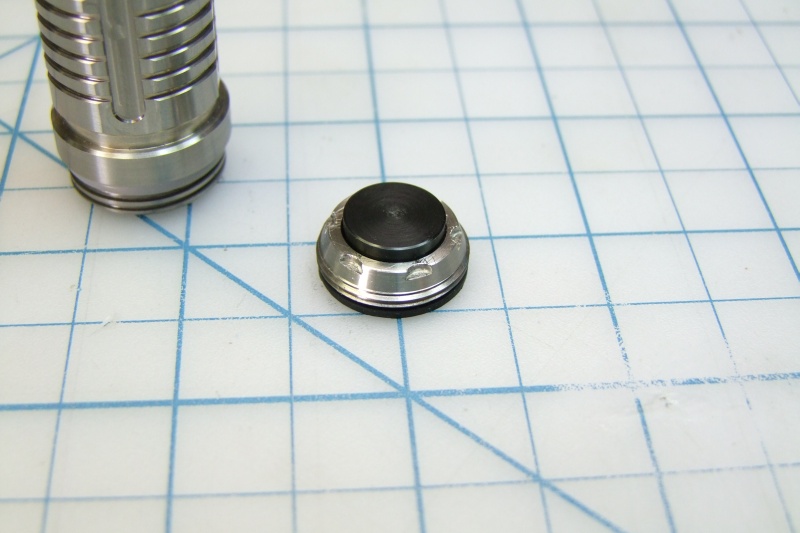
If you do NOT completely screw back in the retaining ring, the button will NOT be flush with the tailcap:
When you continue to screw the retaining ring until it stops (basically when the wave washers is fully flat/compressed), then the button will be flush:
Since the new Delrin piece might still be a little bit tight, go ahead and activate the new switch 10-20 times for the Delrin piece to become fitted to the metal retaining ring - the more you use it, the smoother it will become:
That is all. Enjoy your V10R Ti+
Will
PS - I am also offering 18mm cell boring and Nichia 219 swap services - email me for details
Nov 2012 - I sold my last V10R parts many months ago, and have not had enough interest to make a new batch, so unfortunately I don't have any parts to sell at this time.
***************************************************************
Parts/services for the Sunwayman V10R Ti+ and V11R
1) PART 1 - Replacement button cover (kit) for both the V10R Ti+ and the V11R
Myself and many others recently received the wonderful Sunwayman V10R Ti+ LED lights, however, the factory Titanium button cover rubs against the Titanium retainer ring, which ruins the feel of this great light. Some have been fortunate that by polishing the Ti button cover and the Ti retaining ring, they eliminate most of the problem, but for many of us even that does not solve the problem. I decided to make a Delrin replacement part to try and see if it would work better, and it turns out to work much better than the Ti part. I gotten enough emails from folks interested to get these made, so I am starting this sales thread in response to that interest.
Delrin is very strong, but not as strong as Titanium, so I had to make the wall thickness greater than on the Ti part in order to make the replacement part strong/durable. I also had to come up with a slightly thinner spacer to replace the factory (white) part in order to still have the top of the new Delrin button cover to sit flush with the tailcap. I am not showing every single step to make these, but here is a short pictorial.
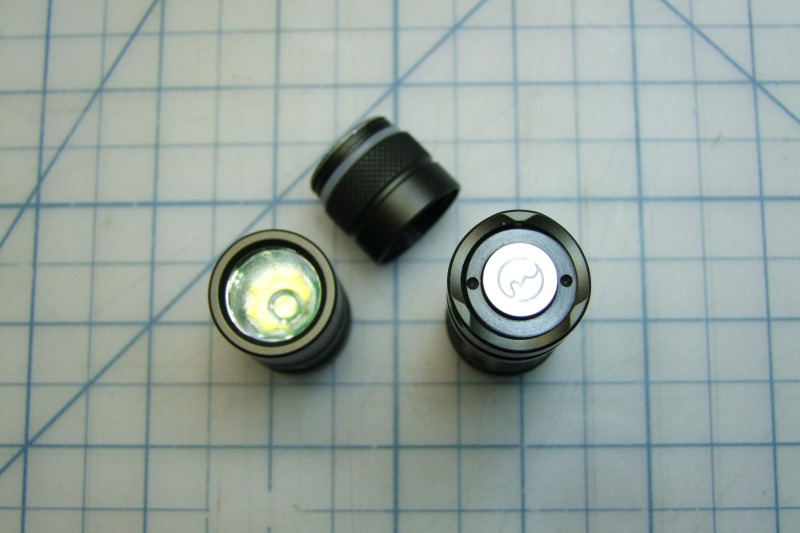
Installed:
Final shot:
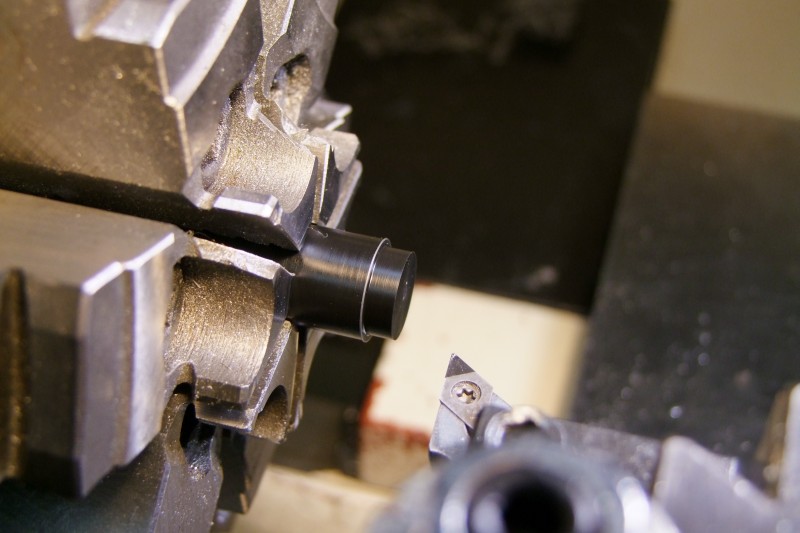
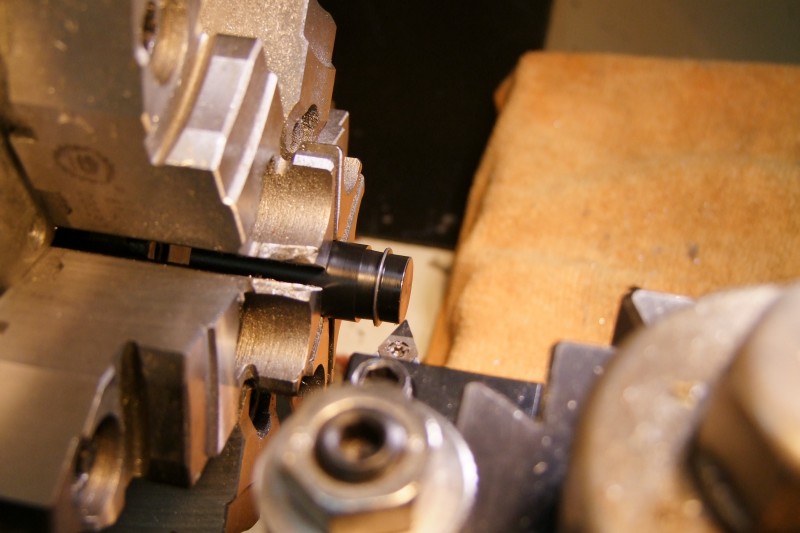
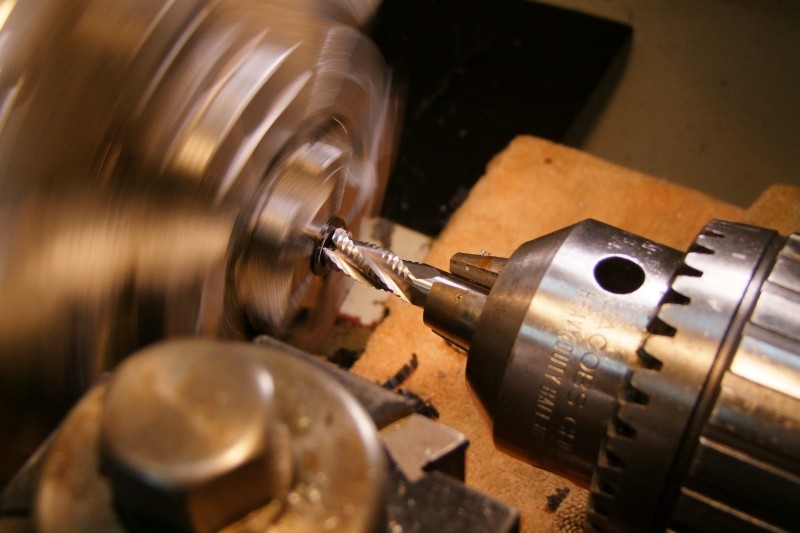
Here are the steps for "production" quality parts that I have available for sale. Lots of steps and various tools are needed to get these done properly with close tolerances:
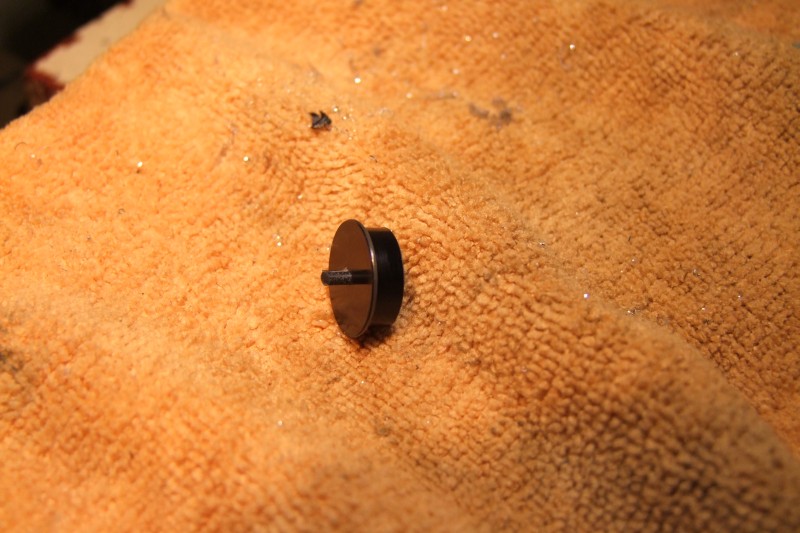
Finished "production" parts:
Fits perfectly flush:
NOTE: When installing the new spacer, make sure it is pressed all the way down to the switch. Also, make sure that when you re-assemble everything with my new Delrin button cover that you really screw the Titanium retaining ring (the part with threads) as tightly as possible so that the button sits flush with the tailcap.
I am selling these "kits" for $30 each (each means a kit of one spacer and one button cover), plus shipping, with a money back guarantee (except for shipping costs).
If interested first post here in this thread, AND send me an email (in my signature) for Paypal and shipping details. Paypal address is the same as the email in my signature.
Shipping options:
- Domestic USA first class - up to 2 kits - $4 (insurance is not included)
- Domestic USA priority - up to 2 kits - $7 (insurance is not included)
- International first class - up to 2 kits - $6 (insurance is not included)
- International priority - up to 2 kits - $15 (insurance is not included)
PLEASE include your forum name with your Paypal payment and make sure the address comes through.
Maximum 2x kits per person (second one ships for free).
*********************************************************************************************************************************************
2) PART 2 - replacement retaining ring kit both the V10R Ti+ and the V11R
These are the replacement retaining rings for the Sunwayman V10R Ti+/V11R. These are custom made, Delrin replacement retaining rings, which allow the use of the stock/metal button cover. Zero binding, completely smooth, no sound, no gritty feel. In my humble opinion this is what the factory should have done instead of the horrible metal retaining rings. So now you can either get a replacement Delrin button kit from me, or these new custom Delrin retainers - but keep in mind that they can't fit together at the same time.
In this first batch I made 4x of them (well, 5x, but I like it so much that I am keeping one for my own V10R Ti +):
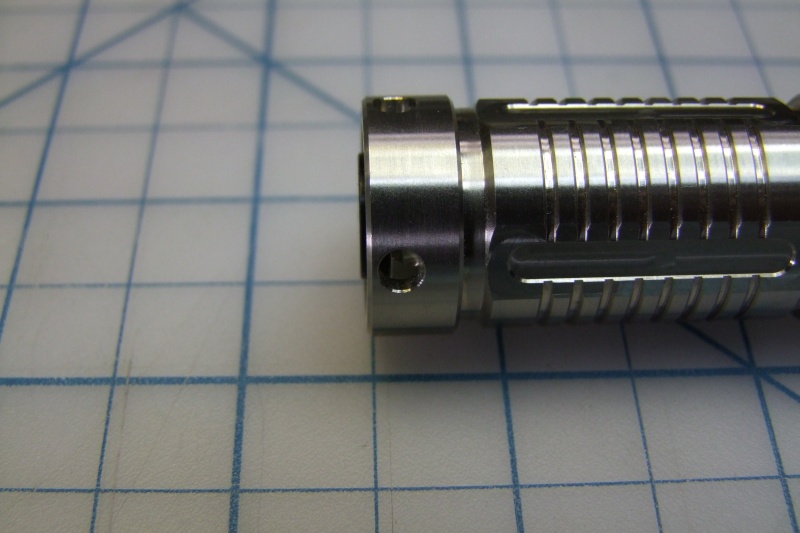
To swap these you must completely remove the head, battery, clip, and clip screws. If you are going to put the screws back, note that they will press against the new Delrin retaining ring (not visible, plus that area although threaded does not engage the threads, so no problem):
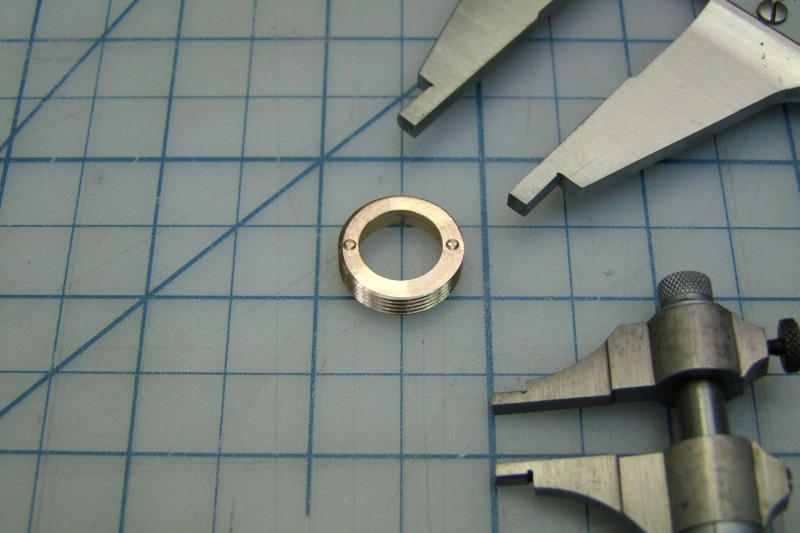
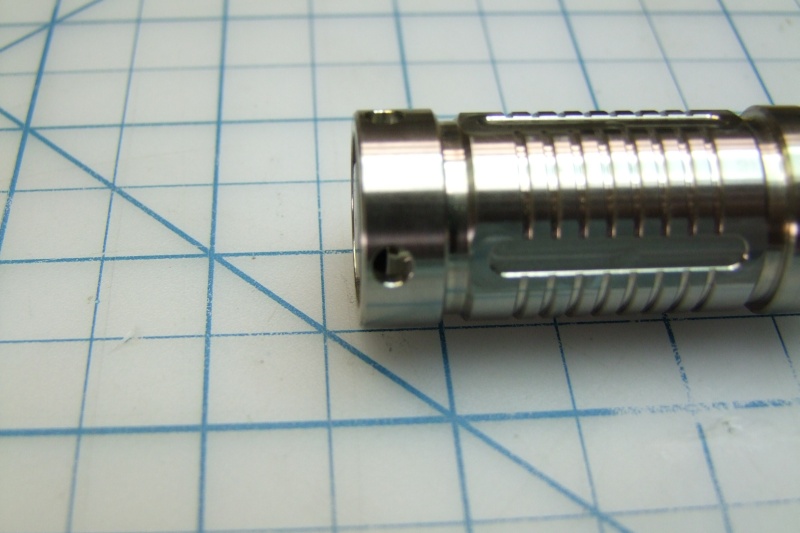
As you can see here the replacement retaining ring is slightly taller:
These come with the same thinner black Delrin spacer as in the button cover kit, so these retaining rings are also a kit, composed of the new retaining ring AND the thinner spacer. The thinner spacer simply replaces the thick white spacer that sits on top of the switch.
These parts take longer to machine in my manual lathe due to the threading operation and milling operation:
When installing these, PLEASE make sure you don't cross thread the soft Delrin retaining ring. With the thin spacer starting the thread engagement goes easy. If it feels really tight when starting, it means it is not aligned just right (the whole first turn should be relatively easy as things in the switch assembly are starting to get compressed a bit) - try again and make sure the ring is fairly flat and go easy.
Pricing for retaining ring kit:
Price for each kit is $40/each plus shipping (insurance optional). Shipping options:
- Domestic USA first class - up to 2 kits - $4 (insurance is not included)
- Domestic USA priority - up to 2 kits - $7 (insurance is not included)
- International first class - up to 2 kits - $6 (insurance is not included)
- International priority - up to 2 kits - $15 (insurance is not included)
Maximum 2x kits per person (second one ships for free).
PLEASE include your forum name with your Paypal payment and make sure the address comes through.
(I also just got a V11R, and I am happy to report that YES, these rings fit on the VR11 as well :devil: )
******************************************************************************
Important note: Since the factory dimensions were sloppy with the stock metal retaining ring and metal button, I changed the dimensions on my replacement button cover and retaining ring in order to get smoother operation.
- Delrin button cover: I made the Delrin replacement button cover slightly larger outside diameter to that it would fit inside the larger metal ring - a combo that produces smooth operation without binding.
- Delrin retainer ring: Since the factory retaining ring has an inner diameter which is too big/wide, the replacement Delrin retainer ring I designed with a smaller inside diameter to cope with the narrow factory metal button. This again gives you smooth operation without binding.
What does all of this means? Since I compensated the Delrin button by making it wider and compensated the Delrin retaining ring by making it narrower, you can't use together both the Delrin replacement button with the Delrin replacement retaining ring. You can only use one of the other, but not both together.
My most sincere apologies if this causes anyone grief/problems - I just want to be upfront about it.
******************************************************************************
I am also experimenting with Bearing Bronze as a material for retaining rings: - email me directly if interested in learning more about these.
I made 8x of these bronze rings - I finished the first batch of 4x on Fri and the last 4x yesterday: it just takes me a long time to make these by hand. I have been using one of these bronze rings on my personal V10R Ti+, as I wanted to use it for a couple of days to get a good basis of comparison. That was the other reason I also recently bought the V11R as I wanted to have another ring, another button, and another host to test/tweak my offerings, and have more OEM parts to fine-tune the design of the bronze pieces - to make sure things would work properly.
All that being said, no, the bronze ring does not perform better than the Delrin ring - it is just plain physics as the coefficient of friction (posted earlier in the thread) is just lower for Delrin. The Delrin is much more slippery than even the bearing bronze that I am using. Now, bearing bronze parts are MUCH better than the poorly finished OEM titanium pieces, so yes, going to bronze is an improvement. In fact I came up with a 1 to 10 scale to compare all solutions I have tried so far:
Functionality-wise:
1 = horrible, non-functional, would return the light instantly
3-4 = stock Ti ring and Ti button
7-8 = Bronze ring with Ti button - being metal on metal there "is" a slight rubbing sound - not much at all, but not like with Delrin which is totally quiet/smooth
9 = Delrin ring with Ti button - nearly perfect
10= outstanding design, perfect in every way
Of course, style-wise, the bronze ring looks much, much better in person than the Delrin ring. No contest there as the bronze looks like it "belongs" in there, compared to the black Delrin which does not look as "fancy" - purely subjective
The main reason I give the bronze piece a 7-8 vs. the 9 on the scale, is that if you purposely press the button at an angle with force, you will get a little bit of the metal on metal noise. Not a lot, not even close to the metal OEM parts, but it is not completely quiet like the Delrin. The better news is that the more you use the button, the more smooth it becomes, as the Ti lightly wears down and mates with the bronze ring. So it is like "7" to start with, and then gets to like an "8" after is used a while. But the bronze will never be completely quiet like the Delrin.
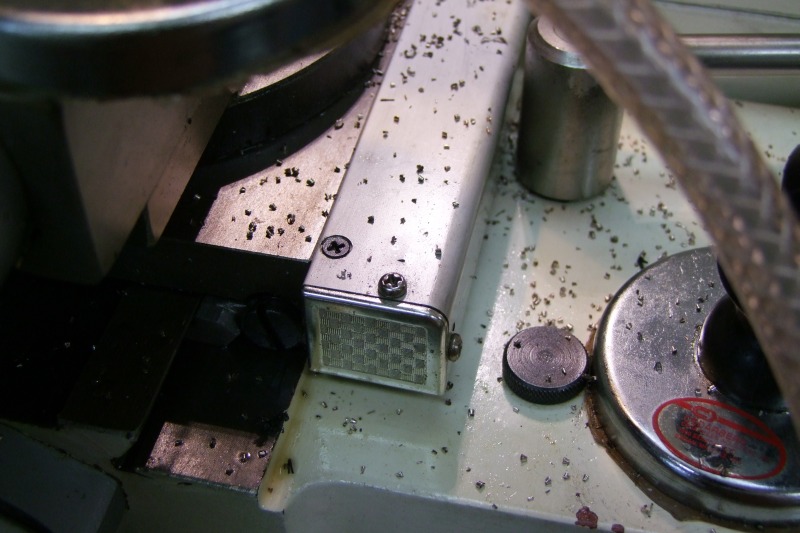
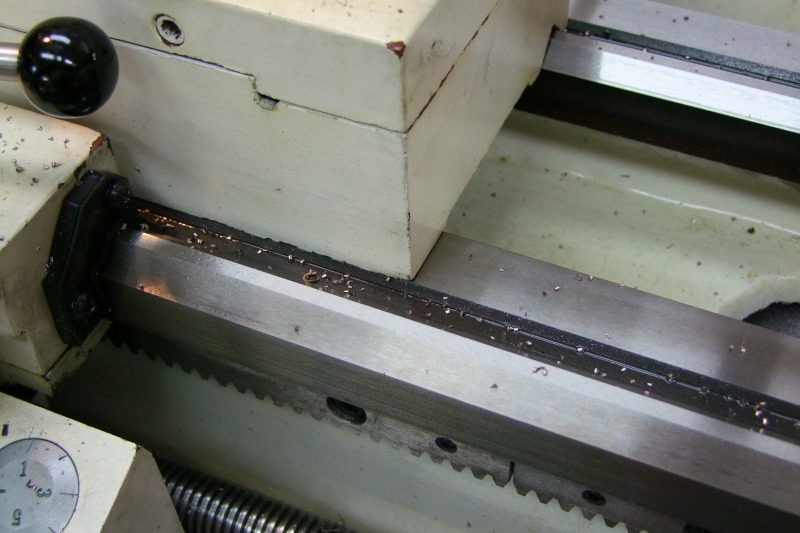
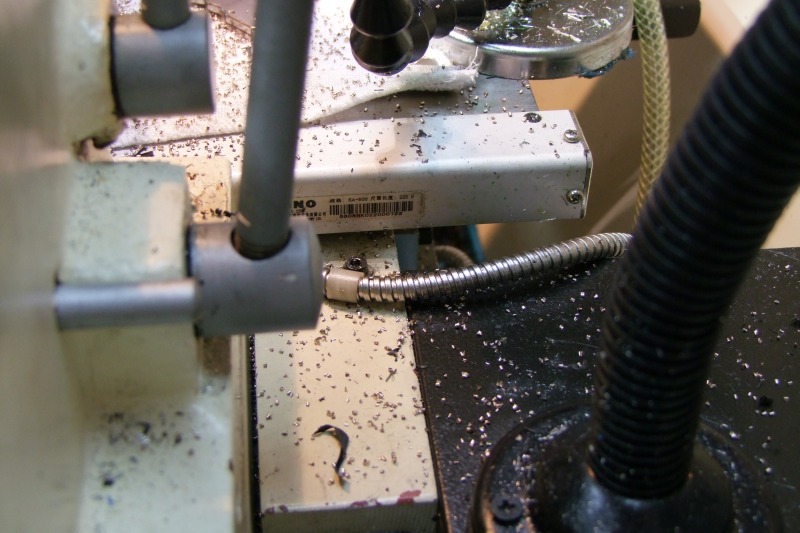
They are both easy to work with, but it takes me a little bit longer to make parts out of bronze. But the biggest challenge is the mess and cleaning that machining bronze makes - it is like 2x to 3x more time consuming to clean up after working with bronze - there are chips everywhere within a 2-3 foot radius of my lathe. Here is a brief pictorial ...
to end with this:
Lots of chips everywhere:
So Delrin is a better material for this application and cheaper for me to make, but bronze looks better and it is more expensive to make so I have to price them higher than the Delrin parts.
Pricing for bearing bronze retaining ring kit:
Price for each kit is $60/each plus shipping (insurance optional). Shipping options:
- Domestic USA first class - up to 2 kits - $4 (insurance is not included)
- Domestic USA priority - up to 2 kits - $7 (insurance is not included)
- International first class - up to 2 kits - $6 (insurance is not included)
- International priority - up to 2 kits - $15 (insurance is not included)
Maximum 2x kits per person (second one ships for free).
******************************************************************************************************
Instructions on how to install the button "kit" on both the V10R Ti+ and V11R (same instructions for the replacement retaining ring)
First, make sure to completely remove the clip:
Remove the body from the rest of the light - no battery, no head. With the body flat on a surface, use thin nose pliers to remove the retaining ring. I am a lefty, so first photo shows my left hand on the pliers, second photo shows my hand keeping the body steady/level:
Once parts come out, this is the proper order in which they go back in:
Note that the new black Delrin spacer needs to sit flush with the switch (might need to press it down - gently):
Next line up the rubber booth with the new Delrin button cover:
Position the retainer ring on top. The Delrin button cover is of much closer tolerances than the original metal button cover, but it will fit (I allowed some clearance):
Put the metal wave washer inside the body, then the switch with the new thin Black Delrin spacer, and then while trying to keep the booth, Delrin cover, and retaining ring as one unit - place back in the body of the light:
The best tip I can think off to prevent cross threading is to thread the piece in two steps:
1) Start screwing the ring backwards first, very slowly, until you feel the slight bump of the threads aligning. What I do is that I keep the thin-nose pliers aligned and steady, and rotate the body against a flat surface (bench), which ensures that the alignment from the pliers remains true.
2) Then start screwing the part normally, which should go really easy now since the threads were aligned by the prior state.
Since we are trying to align the threads, I use something lighter (tweezers) to help guide the retaining ring while engaging the threads. Again, keep the body vertical and flat against the table:
If you do NOT completely screw back in the retaining ring, the button will NOT be flush with the tailcap:
When you continue to screw the retaining ring until it stops (basically when the wave washers is fully flat/compressed), then the button will be flush:
Since the new Delrin piece might still be a little bit tight, go ahead and activate the new switch 10-20 times for the Delrin piece to become fitted to the metal retaining ring - the more you use it, the smoother it will become:
That is all. Enjoy your V10R Ti+
Will
PS - I am also offering 18mm cell boring and Nichia 219 swap services - email me for details
Last edited: