Lupine are well known for making high-end bicycle lights for extreme night time off-road riding, however, they have now taken that expertise and applied it to flashlights as well.
This review is the first of two Lupine flashlight reviews, the Betty TL S and Piko TL Mini. First up is the diminutive Piko TL Mini, diminutive in physical size only, as this mighty Mini is a really solid performer.
The Piko TL comes in three versions, the Mini, Ultra and Max. The Ultra is slightly longer than the Mini with the same output, but with longer runtime, and the Max is the same size as the Ultra but has an additional 200lm output.

Initial Impressions:
From the moment you pick up the box you start to get the impression that this is a high quality light. As you open the very well presented package and lift off the lid, the Piko TL Mini lives up to its name; it looks small. Picking it up, it is reassuringly solid feeling, not heavy so much as dense.
At first the Lupine interface seems overly complicated with a long list of programs printed onto the body of the light, but as you start to handle, use and get to know the Piko TL Mini it seems simplicity itself.
Although there is only one control, the soft click switch, it has two colours of LEDs, red and blue, and the talkative Piko TL Mini uses these to give you lots of useful feedback which I am starting to wonder how I lived without. Initially this seems confusing, but you quickly get used to it and appreciate it.
What is in the box:
The first box was actually the original delivery of both the Piko TL Mini and the Betty TL S (review coming soon) sent directly by Lupine.

Taking just the Piko TL's box aside for now, the matt black card sports the Lupine logo

Lifting the lid shows the first layer, with the Piko TL looking a little lost in all that white space.

After taking the Piko TL and its first layer out, there is a middle layer (not shown) with the manuals, and under this is the charger and optional tool free bicycle mount (more on that later)

The Piko TL Mini, Piko TL charger with in this case the UK plug adaptor and the optional Piko TL tool free bike mount.

Taking a closer look and looking inside:
Looking straight onto the top surface of the Piko TL showing the domed control soft click button (rated at 500,000 operations plus), cooling fins and the printed list of programs.

The underneath surface has a flat recess with threaded hole for attaching either of the two optional bicycle mounts.

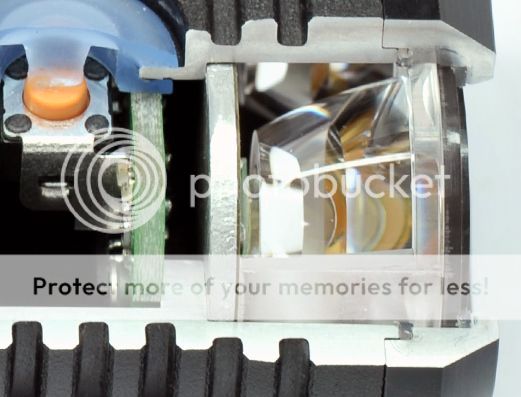
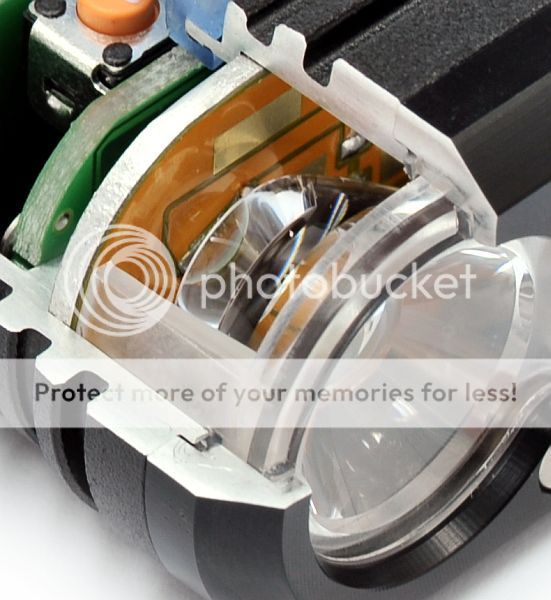
Looking directly into the lens, the Piko TL's optics make it difficult to see the LEDs themselves. Lurking behind the precision high-purity polycarbonate optics are a pair of Cree XP-G R5 emitters. The lens surround is held in place with two torx bolts which allow access for upgrading components.

Another view of the optics, showing their conical shape behind the flat front lens made from shatter proof PMMA more commonly known as Plexiglas, Lucite or Perspex.

The tail end of the Piko TL is again retained by two torx bolts. Bottom left is the charger port cover and bottom right is the lanyard fixing point.

While taking this close look, it is important to remember the size of this light. Next to the Piko TL Mini are an AW IMR 18650 cell, and a Sanyo Eneloop AA cell.

This time with a credit card for scale

The Piko TL Mini really is a small neat package

Modes and User Interface:
The long list of programs printed onto the Piko TL and corresponding pages in the manual (you can view a copy of the manual on Lupine's website) are a little imposing at first, but the whole system turns out to be simple to use.
Altogether the following output levels/modes are available in various combinations according to the programming:
550lm – 8W – 100% - 1h 30min
400lm – 5W – 62% - 2h 30min
230lm – 2.5W – 32% - 5h 30min
90lm – 1W – 12% - 15h
50lm – 0.5W – 6% - 30h
Disorientation flash
RVLR flash (Road Vehicle Lighting Regulations)
The manual lists which of these levels are included in which of the programs listed on the body of the light.
The user interface is all based around the single soft click button with red and blue lighting which:
Switches on and off
Changes output mode within the active program
Selects the programming
Provides status information
To program the Piko TL, starting with the light off, you hold down the button. While holding it down, it will flash red, the number of flashes corresponding to the output programs listed on the body of the light. One you have reached the number of flashes matching the program you want to use, let go of the button.
For example, is you want the 4 step program which has 8W, 5W, 2.5W and 0.5W output levels, simply hold down the button until it has shown 5 red flashes. Now when you switch it on it will have the four output levels available.
The blue programs are for selecting the way the Piko TL functions and allows you to switch stealth, low start, and double click on and off.
Double click means that you need to double click the button to switch on the light. This protects against accidental switching on of the light. If you want only a single click to switch on, simply select the double click off program by holding down the button until 6 blue flashes have been shown.
Low start makes the Piko TL turn on in the lowest of the available output levels within the selected program.
Stealth allows the information flashes to be mostly suppressed and prevents the button being illuminated when the light is on.
Lupine light-heartedly explain stealth in the manual that "stealth on" does not mean that the Piko TL will become invisible.
Switching off requires the button to be held down until the light goes out. Once on, cycling through the output levels of the active program is by single click.
Battery status information is provided by the button's red and blue LEDs when you switch off the light. Red flashes represent 0.1Ah of battery capacity have been used since the last full charge, and a blue flash means 1Ah has been used. So if when you turn off the Piko TL it shows four red flashes, then 0.4mAh has been used, and if one blue and one red flashes are show, 1.1Ah has been used.
By default, the Piko TL operates in the 2-step low mode with stealth off, low start off, and double click on.
So as supplied, to turn on the Piko TL you must double click the button, it will come on in the 100% output and display status information.
The Piko TL shows the following battery low signals:
Stage 1 - Dips beam briefly and button goes RED
Stage 2 - Dips beam red light flashing
Stage 4 - Pulsing with purple (red + blue) button, then shortly afterwards switches off
There is then a reserve power stage available.
When switched on again the button flashes red and blue alternately and only the lowest output level is available. The reserve power will only provide light for a couple of minutes at most, then it switches off.
Though this explanation seems long, once you get the hang of this you change the programming to suit without a second thought. I've more or less settled on 2-step low, low start on, stealth off and double click on.
Batteries and output:
The Piko TL is a rechargeable light so there are no battery choices or considerations as Lupine have done that for you. Inside the Piko TL Mini are 2 x 18500 2S1P Sanyo cells which Lupine have found to be the most reliable ones.
The Piko TL's dedicated charger

At the tail of the light is the rubber charging socket cover

Shown here with the cover lifted slightly

To measure actual output, I built an integrating sphere. The sensor is a photo-diode restricted to visible light only (so Infra-Red and Ultra-Violet will not register). This was chosen as our eyes can only use the visible wavelengths of light so this is generally the only useful output. The integrating sphere was calibrated using 12 different reference sources and taking an average of the factor used to convert the measured voltage output to Lumens. Output figures are quoted as ANSI lumens where the measurement is made 30s after turning on the specified output level. Initial figures when first switching on are always higher, but all quoted measurements are ANSI.

Please note, all quoted lumen figures are from a DIY integrating sphere, and although every effort is made to give as accurate a result as possible, they should be taken as an estimate only. The results can be used to compare outputs in this review and others I have published.
The levels listed above are ANSI, but the Piko TL manages 530lm at switch on.
The flash output is at 14.7Hz and the RVLR is 3.8Hz. All output levels are current controlled with no PWM detectable.
Output is regulated and as the batteries become depleted, the Piko TL will not drop to lower levels instead maintaining the output level until it no longer can while showing the battery warning signals.
Being a soft click button, there is parasitic drain to be considered as the internal circuit is kept powered, but being sealed I have not been able to measure this.
In The Lab
In an attempt to quantify the actual beam profile I developed the following test. There are probably many flaws in my method, but it is simple and easy to carry out and seems to provide a good enough comparison.
The method used was to support the light 1m off the floor and 1m from a wall, with a tape measure on the wall. The zero of the scale is placed in the centre of the hotspot and a lux meter is then positioned at points along the scale, with the measurements recorded. Beam shots are often taken with the light shining on a flat white wall, so this method is simply measuring the actual intensity across the beam on a flat surface, not the spherical light emission.
The results are then plotted on a graph.
For the best throw you want to see a sharp peak with less of the distracting spill. For the best flood light the trace should be pretty flat.
The Piko TL beam profile is shown here compared to the Fenix TK41 as I am also using this as a comparison to the Lupine Betty TL S (which I am also reviewing).
The Piko TL has a nice smooth bump of a profile smoothly transitioning from hotspot to spill.

Taking this a little further, I calculated an approximate factor to apply to the lux measurements, as each measurement gets further from the centre of the beam, it corresponds to a larger area onto which the light is falling. It seems to me that this should also be taken into consideration, so I applied these area corrections and came up with this odd looking graph.
The key quantity here is the area under the graph line. This should correspond to the total light output.
There is a good amount of light in the mid spill, tapering off smoothly.

The beam
As shown by the previous beam profile graphs, the Piko Tl has a refined smooth beam profile.
The beamshot is exposed to give an impression of the beam's brightness to the naked eye.

The beam is very smooth and even, the only slight imperfections are a couple of minor blemishes beyond the edge of the spill which appear at opposite sides of the beam and are casued by the fact the Piko TL has two emitters and the join between the two emitter optics results in these two blemishes.
What it is really like to use…

As mentioned in a previous section I've settled on a preferred programing for the Piko TL, however I do find myself changing from time to time and doing so is so straight forward and clearly indicated by the Piko TL.
This Piko TL does seem to really need to be in the 'double click on' setting as due to its size and exposed button, it is a bit too eager to switch on if set to 'double click off'. Being the last program, it is not that quick to switch the double click on and off, so I now leave it on all the time.
One of the best features of the Piko TL is the confidence it gives you from knowing how much battery power has been used. The Mini is fitted with a 1.7Ah battery, the battery status information tells you how much of this you have used. This is reported every time you switch off the Piko TL as long as at least 0.1Ah has been used.
The method of switching off by holding down the button does mean that the output level changes first, before the light goes off. If, like me, you have it set to low start on, this means that it flashes up to high before going off. (The one improvement I could suggest would be for the output level to only change when the button is released. This way you could turn it on to low, and then switch off without it flashing up to high)
With the constant reminder of the battery usage since the last full charge, there is little excuse for running the Piko TL right down to the point you are using the reserve power.
Whether using replaceable batteries or a built-in battery pack, what is lacking in most lights is an indication of remaining power. Generally this is overcome by carrying replacement batteries so when it does give out without warning you can change the batteries.
Some flashlights have gauges that report on voltage and some do this under load giving an idea of remaining capacity, but the Piko TL trumps this by reporting on actual total Ah used in 0.1Ah resolution. I cannot stress strongly enough how this information transforms the user's experience. With the information reported being how much capacity has been used, this means that as the battery becomes more and more depleted, there are more and more flashes shown to the user. The reducing charge level of the battery just becomes more and more obvious the more power that has been used. - With the Piko TL you know where you stand.
An interesting result of the design of the optic means the spill light is not dazzling, so when using the Piko TL tail-standing you can be close to it without light stabbing your eyes.
Maximum output is very bright for a light this size and can be maintained for extended periods. If left free standing indoors on the maximum output it will get very hot, but the thick casing distributes and radiates the heat effectively.
As a hand held flashlight the Piko TL provides a rich user experience and a beautifully smooth beam.
But this is not the full story, as the Piko TL has another string to its bow, that of the optional bicycle mount…..

Test sample provided for review by Lupine.
This review is the first of two Lupine flashlight reviews, the Betty TL S and Piko TL Mini. First up is the diminutive Piko TL Mini, diminutive in physical size only, as this mighty Mini is a really solid performer.
The Piko TL comes in three versions, the Mini, Ultra and Max. The Ultra is slightly longer than the Mini with the same output, but with longer runtime, and the Max is the same size as the Ultra but has an additional 200lm output.
Initial Impressions:
From the moment you pick up the box you start to get the impression that this is a high quality light. As you open the very well presented package and lift off the lid, the Piko TL Mini lives up to its name; it looks small. Picking it up, it is reassuringly solid feeling, not heavy so much as dense.
At first the Lupine interface seems overly complicated with a long list of programs printed onto the body of the light, but as you start to handle, use and get to know the Piko TL Mini it seems simplicity itself.
Although there is only one control, the soft click switch, it has two colours of LEDs, red and blue, and the talkative Piko TL Mini uses these to give you lots of useful feedback which I am starting to wonder how I lived without. Initially this seems confusing, but you quickly get used to it and appreciate it.
What is in the box:
The first box was actually the original delivery of both the Piko TL Mini and the Betty TL S (review coming soon) sent directly by Lupine.
Taking just the Piko TL's box aside for now, the matt black card sports the Lupine logo
Lifting the lid shows the first layer, with the Piko TL looking a little lost in all that white space.
After taking the Piko TL and its first layer out, there is a middle layer (not shown) with the manuals, and under this is the charger and optional tool free bicycle mount (more on that later)
The Piko TL Mini, Piko TL charger with in this case the UK plug adaptor and the optional Piko TL tool free bike mount.
Taking a closer look and looking inside:
Looking straight onto the top surface of the Piko TL showing the domed control soft click button (rated at 500,000 operations plus), cooling fins and the printed list of programs.
The underneath surface has a flat recess with threaded hole for attaching either of the two optional bicycle mounts.
Looking directly into the lens, the Piko TL's optics make it difficult to see the LEDs themselves. Lurking behind the precision high-purity polycarbonate optics are a pair of Cree XP-G R5 emitters. The lens surround is held in place with two torx bolts which allow access for upgrading components.
Another view of the optics, showing their conical shape behind the flat front lens made from shatter proof PMMA more commonly known as Plexiglas, Lucite or Perspex.
The tail end of the Piko TL is again retained by two torx bolts. Bottom left is the charger port cover and bottom right is the lanyard fixing point.
While taking this close look, it is important to remember the size of this light. Next to the Piko TL Mini are an AW IMR 18650 cell, and a Sanyo Eneloop AA cell.
This time with a credit card for scale
The Piko TL Mini really is a small neat package
Modes and User Interface:
The long list of programs printed onto the Piko TL and corresponding pages in the manual (you can view a copy of the manual on Lupine's website) are a little imposing at first, but the whole system turns out to be simple to use.
Altogether the following output levels/modes are available in various combinations according to the programming:
550lm – 8W – 100% - 1h 30min
400lm – 5W – 62% - 2h 30min
230lm – 2.5W – 32% - 5h 30min
90lm – 1W – 12% - 15h
50lm – 0.5W – 6% - 30h
Disorientation flash
RVLR flash (Road Vehicle Lighting Regulations)
The manual lists which of these levels are included in which of the programs listed on the body of the light.
The user interface is all based around the single soft click button with red and blue lighting which:
Switches on and off
Changes output mode within the active program
Selects the programming
Provides status information
To program the Piko TL, starting with the light off, you hold down the button. While holding it down, it will flash red, the number of flashes corresponding to the output programs listed on the body of the light. One you have reached the number of flashes matching the program you want to use, let go of the button.
For example, is you want the 4 step program which has 8W, 5W, 2.5W and 0.5W output levels, simply hold down the button until it has shown 5 red flashes. Now when you switch it on it will have the four output levels available.
The blue programs are for selecting the way the Piko TL functions and allows you to switch stealth, low start, and double click on and off.
Double click means that you need to double click the button to switch on the light. This protects against accidental switching on of the light. If you want only a single click to switch on, simply select the double click off program by holding down the button until 6 blue flashes have been shown.
Low start makes the Piko TL turn on in the lowest of the available output levels within the selected program.
Stealth allows the information flashes to be mostly suppressed and prevents the button being illuminated when the light is on.
Lupine light-heartedly explain stealth in the manual that "stealth on" does not mean that the Piko TL will become invisible.
Switching off requires the button to be held down until the light goes out. Once on, cycling through the output levels of the active program is by single click.
Battery status information is provided by the button's red and blue LEDs when you switch off the light. Red flashes represent 0.1Ah of battery capacity have been used since the last full charge, and a blue flash means 1Ah has been used. So if when you turn off the Piko TL it shows four red flashes, then 0.4mAh has been used, and if one blue and one red flashes are show, 1.1Ah has been used.
By default, the Piko TL operates in the 2-step low mode with stealth off, low start off, and double click on.
So as supplied, to turn on the Piko TL you must double click the button, it will come on in the 100% output and display status information.
The Piko TL shows the following battery low signals:
Stage 1 - Dips beam briefly and button goes RED
Stage 2 - Dips beam red light flashing
Stage 4 - Pulsing with purple (red + blue) button, then shortly afterwards switches off
There is then a reserve power stage available.
When switched on again the button flashes red and blue alternately and only the lowest output level is available. The reserve power will only provide light for a couple of minutes at most, then it switches off.
Though this explanation seems long, once you get the hang of this you change the programming to suit without a second thought. I've more or less settled on 2-step low, low start on, stealth off and double click on.
Batteries and output:
The Piko TL is a rechargeable light so there are no battery choices or considerations as Lupine have done that for you. Inside the Piko TL Mini are 2 x 18500 2S1P Sanyo cells which Lupine have found to be the most reliable ones.
The Piko TL's dedicated charger
At the tail of the light is the rubber charging socket cover
Shown here with the cover lifted slightly
To measure actual output, I built an integrating sphere. The sensor is a photo-diode restricted to visible light only (so Infra-Red and Ultra-Violet will not register). This was chosen as our eyes can only use the visible wavelengths of light so this is generally the only useful output. The integrating sphere was calibrated using 12 different reference sources and taking an average of the factor used to convert the measured voltage output to Lumens. Output figures are quoted as ANSI lumens where the measurement is made 30s after turning on the specified output level. Initial figures when first switching on are always higher, but all quoted measurements are ANSI.
Please note, all quoted lumen figures are from a DIY integrating sphere, and although every effort is made to give as accurate a result as possible, they should be taken as an estimate only. The results can be used to compare outputs in this review and others I have published.
| Lupine – Piko TL Mini | I.S. measured ANSI output Lumens | PWM frequency (Hz) |
|---|---|---|
| 8W | 497 | N/A |
| 5W | 351 | N/A |
| 2.5W | 222 | N/A |
| 0.5W | 41 | N/A |
The levels listed above are ANSI, but the Piko TL manages 530lm at switch on.
The flash output is at 14.7Hz and the RVLR is 3.8Hz. All output levels are current controlled with no PWM detectable.
Output is regulated and as the batteries become depleted, the Piko TL will not drop to lower levels instead maintaining the output level until it no longer can while showing the battery warning signals.
Being a soft click button, there is parasitic drain to be considered as the internal circuit is kept powered, but being sealed I have not been able to measure this.
In The Lab
In an attempt to quantify the actual beam profile I developed the following test. There are probably many flaws in my method, but it is simple and easy to carry out and seems to provide a good enough comparison.
The method used was to support the light 1m off the floor and 1m from a wall, with a tape measure on the wall. The zero of the scale is placed in the centre of the hotspot and a lux meter is then positioned at points along the scale, with the measurements recorded. Beam shots are often taken with the light shining on a flat white wall, so this method is simply measuring the actual intensity across the beam on a flat surface, not the spherical light emission.
The results are then plotted on a graph.
For the best throw you want to see a sharp peak with less of the distracting spill. For the best flood light the trace should be pretty flat.
The Piko TL beam profile is shown here compared to the Fenix TK41 as I am also using this as a comparison to the Lupine Betty TL S (which I am also reviewing).
The Piko TL has a nice smooth bump of a profile smoothly transitioning from hotspot to spill.
Taking this a little further, I calculated an approximate factor to apply to the lux measurements, as each measurement gets further from the centre of the beam, it corresponds to a larger area onto which the light is falling. It seems to me that this should also be taken into consideration, so I applied these area corrections and came up with this odd looking graph.
The key quantity here is the area under the graph line. This should correspond to the total light output.
There is a good amount of light in the mid spill, tapering off smoothly.
The beam
As shown by the previous beam profile graphs, the Piko Tl has a refined smooth beam profile.
The beamshot is exposed to give an impression of the beam's brightness to the naked eye.
The beam is very smooth and even, the only slight imperfections are a couple of minor blemishes beyond the edge of the spill which appear at opposite sides of the beam and are casued by the fact the Piko TL has two emitters and the join between the two emitter optics results in these two blemishes.
What it is really like to use…
As mentioned in a previous section I've settled on a preferred programing for the Piko TL, however I do find myself changing from time to time and doing so is so straight forward and clearly indicated by the Piko TL.
This Piko TL does seem to really need to be in the 'double click on' setting as due to its size and exposed button, it is a bit too eager to switch on if set to 'double click off'. Being the last program, it is not that quick to switch the double click on and off, so I now leave it on all the time.
One of the best features of the Piko TL is the confidence it gives you from knowing how much battery power has been used. The Mini is fitted with a 1.7Ah battery, the battery status information tells you how much of this you have used. This is reported every time you switch off the Piko TL as long as at least 0.1Ah has been used.
The method of switching off by holding down the button does mean that the output level changes first, before the light goes off. If, like me, you have it set to low start on, this means that it flashes up to high before going off. (The one improvement I could suggest would be for the output level to only change when the button is released. This way you could turn it on to low, and then switch off without it flashing up to high)
With the constant reminder of the battery usage since the last full charge, there is little excuse for running the Piko TL right down to the point you are using the reserve power.
Whether using replaceable batteries or a built-in battery pack, what is lacking in most lights is an indication of remaining power. Generally this is overcome by carrying replacement batteries so when it does give out without warning you can change the batteries.
Some flashlights have gauges that report on voltage and some do this under load giving an idea of remaining capacity, but the Piko TL trumps this by reporting on actual total Ah used in 0.1Ah resolution. I cannot stress strongly enough how this information transforms the user's experience. With the information reported being how much capacity has been used, this means that as the battery becomes more and more depleted, there are more and more flashes shown to the user. The reducing charge level of the battery just becomes more and more obvious the more power that has been used. - With the Piko TL you know where you stand.
An interesting result of the design of the optic means the spill light is not dazzling, so when using the Piko TL tail-standing you can be close to it without light stabbing your eyes.
Maximum output is very bright for a light this size and can be maintained for extended periods. If left free standing indoors on the maximum output it will get very hot, but the thick casing distributes and radiates the heat effectively.
As a hand held flashlight the Piko TL provides a rich user experience and a beautifully smooth beam.
But this is not the full story, as the Piko TL has another string to its bow, that of the optional bicycle mount…..
Test sample provided for review by Lupine.