
Knight_Light
Enlightened
- Joined
- Mar 2, 2013
- Messages
- 648
This is a long-term test and review of the Armytek Wizard Pro Prototype. This review and test will be incremental in nature. Content will be added, edited, and moved as the review progresses. This is a prototype unit that was provided by Armytek so the final product may differ from what is in this post.
I will try to keep this portion of the review strictly factual. The facts that will be posted in this section of the review will either be provided by Armytek (I will not verify their claims but simply post them) and/or my own observations and measurements (that I actually take/observe) along with pictures. I will try to keep opinion out of this part of the review. The purpose of this portion of the review is to give a factual as well as a visual product summation.
Directly below this part of the review you will find my opinions as well as a journal that documents the different uses, adventures and tests that this headlamp has been subject to. This part of the review will be based on my own personal preferences and opinions coupled with my own personal experiences over the years. The purpose of this portion of the review is just to give MY opinion and interpretation of this particular product offering.
Since a picture is worth 1000 words here is the Armytek Wizard Pro Prototype next to a NCR18650A for size comparison. The end of the battery matches up evenly with the base of the headlamp in this photo. The headlamp and the battery together, as seen in the picture weigh 101 g.

Here is a close-up of the TIR optic on the Armytek Wizard Pro.

Here you can see the same NCR18650A battery fully inserted into the battery tube. There is plenty of room for even oversized batteries in this headlamp. Even though there is plenty of room both in length and width there is no rattle when the tail cap is tightened down. Notice how not only are the threads anodized but also the inside of the battery tube. A 1/4 of a turn is all it takes to lock out the light.

Here you have an Orbtronic Protected 3400mAh 18650 Li-ion Rechargeable Battery (Panasonic NCR18650B) inside the battery tube with over 1.5 mm to spare. The Orbtronic measures 68.9 mm.

Here are what the threads on the battery tube look like. Well cut. Smooth and easy to operate. Anodized to enable lockout. Notice the double O-ring seal. Well lubricated from the manufacturer.

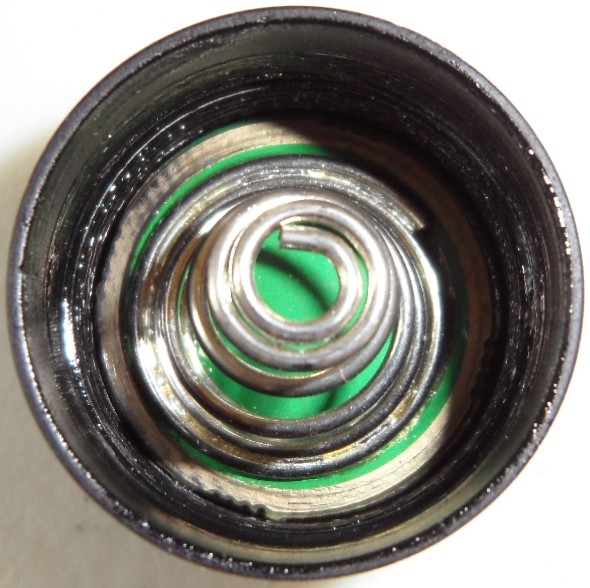
Here is an up close look at the tail cap. Notice how the spring sticks past the end of the tail cap thus guaranteeing positive contact with whatever 18650 battery that is thrown into the battery tube, even unprotected 18650's. This headlamp has its own protection circuit allowing the user to use unprotected cells safely.

A better look at the inside of the tail cap.
Down the battery tube to the business end of the headlamp shows a raised contact point enabling the use of flattop batteries.

This is how you turn the light ON & OFF, you press the switch (pictured below). It is a fairly firm raised switch requiring considerable pressure (unlikely to be turned on by accident, tail cap lockout is also an option if one is worried). When the switch is not pressed there is no color. Anytime the switch is pressed a bright red color is illuminated through the switch which disappears upon releasing the switch. In "Tactical Mode" (momentary ON) the switch remains brightly lit for as long as it is pressed (bright red color).

Here is the "State Indication" on the ON & OFF switch blinking once every 4 seconds (this feature can be turned on and turned off at will). It serves a dual purpose, letting the user know everything is okay in terms of battery voltage and temperature as well as a beacon for easier location of the light in a dark environment. It is fairly bright and can easily be seen 20 feet across the room or within a 5 to 7 foot radius when dropped into a grassy field.

Whenever the light goes into "Warning Level" or "Critical Level" for battery voltage and/or temperature threshold the "State Indication" on the ON & OFF switch will blink once per second when it reaches "Warning Level" and twice per second when it reaches the "Critical Level". The "State Indication" color at this point is a combination of green yellow orange (faint in nature and a lot lower then normal). The best representation of this is in the picture below (I know it looks more red then anything but that is the best I could do to capture the flickering).

So before you activate the light you need to put a battery inside. Once you insert the battery (has reverse polarity protection) you need to tell the headlamp what type of battery it is. You do this by following these instructions (from the official manual provided by Armytek http://www.armytek.com/index.php?dispatch=attachments.getfile&attachment_id=39).

Now that the headlamp has power you can get it to do all the things it was designed to do by following these instructions (from the official manual provided by Armytek http://www.armytek.com/index.php?dispatch=attachments.getfile&attachment_id=39).

Let me elaborate on the user interface that is described in the official manual.
To make it easier lets group the modes into sections.
So you grab the light to use and are ready to press the ON & OFF switch. At this point you have the following 2 options.
You Press and Release the ON & OFF switch. This puts you into the previous mode used (Firefly 1, Firefly 2, Mode 1, Mode 2, Mode 3 or Mode 4) except for Turbo and Strobe.
You Press and Hold the ON & OFF switch. This puts you directly into Firefly 1. Once Firefly 1 is ON you have the following two options.
At any moment when the light is ON if you quickly click 4 times you will end up in Section 4 (Specialty Modes). It will put you in whatever Specialty Mode that you last used (it memorizes the Specialty Mode). Now you have the following options.
No headlamp would be complete without a headband. Here it is the way that it comes out of the box in its unassembled state.

Here you see it put together.

From another angle.

The elastic headband is exactly 1 inch wide.

Now if a headband is not your thing or you just want to EDC the headlamp you have the capability to attach a pocket clip. The pocket clip enables deep carry. It attaches to the headlamp very securely, requiring considerable effort to remove. The way the pocket clip holds onto objects, such as a pocket, is light to medium in terms of pressure. The pocket clip is also reversible as well as magnetic (meaning you can attach magnets to it for additional mounting scenarios). Here is what it looks like attached to the headlamp.

Here is a close-up shot showing you exactly how deep in the pocket the headlamp can be worn. Notice it is not flush with the top of the headlamp.

The pocket clip will allow the headlamp to tail stand at pretty much any conceived angle.

Here are the output levels and there respective lumen ratings (the ratings were provided by Armytek and have not been verified). The indicated runtimes were calculated by me based on a 3100 mAh battery and the current specifications for each light level provided by Armytek.
Mode 1, Mode 3, Mode 4 and Turbo have now been CONFIRMED by ME and the details of the run test can be viewed below under "Confirmed Runtime Tests:".
Modes, Light Levels, and Runtimes:
Confirmed Runtime Tests:
For the runtime tests I utilized the same NCR18650A (3100 mAh) battery that had some miles on it and a fresh brand-new NCR18650B (3400 mAh) battery. The results are as follows.
Mode 1 = 30 lm:
Mode 3 = 250 lm:
Mode 4 = 550 lm:
Turbo = 1010 lm:
Starting temperature for the headlamp is 79°F both in the head and body (same temperature as in the test environment). In the table below you can see the rapid progression and the leveling off of the temperature during the runtime test.
Beam Shots:
So now that you know what modes this headlamp has and how long they will run for, what about the question, what do they look like? For Firefly 1, Firefly 2, and Mode 1 I had a friend volunteer to help me out. The next 3 photos were all taken at a distance of about 3.5 feet.
Firefly 1 = 0.5 lm:

Firefly 2 = 7 lm:

Mode 1 = 30 lm:

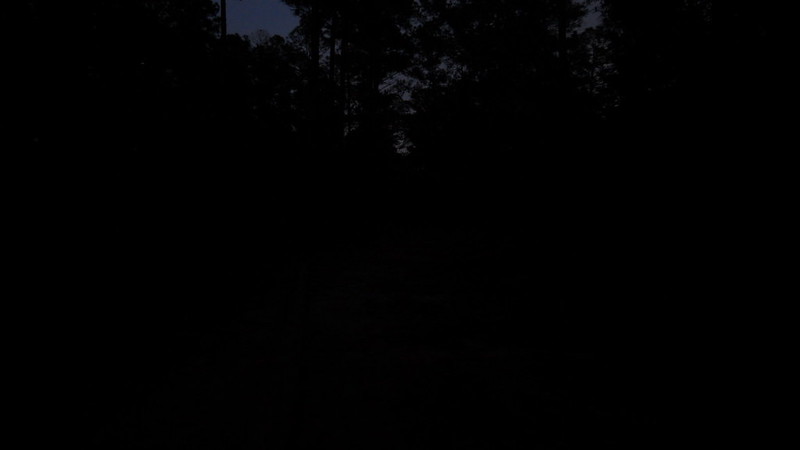
Night Hiking Shots:
These were taken during a night hike. The sky was clear and the moon was out. The fallen tree on the ground is about 30 feet long. I purposely took the pictures here as a helpful way to gauge distance.
Control:

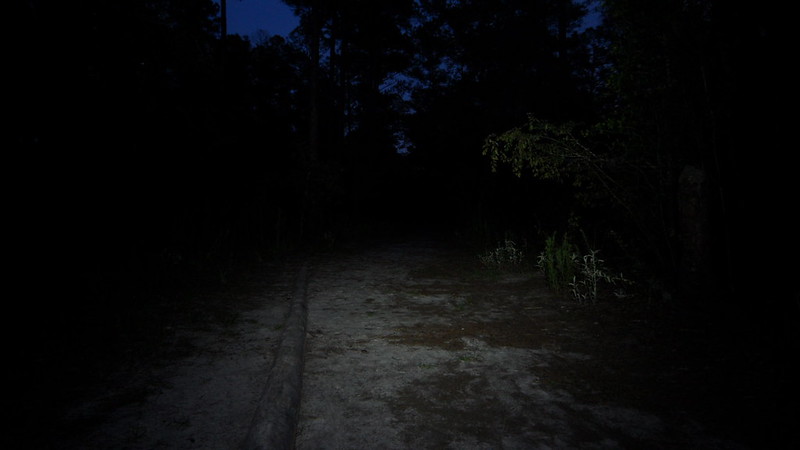
Firefly 1 = 0.5 lm:
Firefly 2 = 7 lm:

Mode 1 = 30 lm:
Mode 3 = 250 lm:

Mode 4 = 550 lm:

Turbo = 1010 lm:

I will try to keep this portion of the review strictly factual. The facts that will be posted in this section of the review will either be provided by Armytek (I will not verify their claims but simply post them) and/or my own observations and measurements (that I actually take/observe) along with pictures. I will try to keep opinion out of this part of the review. The purpose of this portion of the review is to give a factual as well as a visual product summation.
Directly below this part of the review you will find my opinions as well as a journal that documents the different uses, adventures and tests that this headlamp has been subject to. This part of the review will be based on my own personal preferences and opinions coupled with my own personal experiences over the years. The purpose of this portion of the review is just to give MY opinion and interpretation of this particular product offering.
Since a picture is worth 1000 words here is the Armytek Wizard Pro Prototype next to a NCR18650A for size comparison. The end of the battery matches up evenly with the base of the headlamp in this photo. The headlamp and the battery together, as seen in the picture weigh 101 g.
Here is a close-up of the TIR optic on the Armytek Wizard Pro.
Here you can see the same NCR18650A battery fully inserted into the battery tube. There is plenty of room for even oversized batteries in this headlamp. Even though there is plenty of room both in length and width there is no rattle when the tail cap is tightened down. Notice how not only are the threads anodized but also the inside of the battery tube. A 1/4 of a turn is all it takes to lock out the light.
Here you have an Orbtronic Protected 3400mAh 18650 Li-ion Rechargeable Battery (Panasonic NCR18650B) inside the battery tube with over 1.5 mm to spare. The Orbtronic measures 68.9 mm.
Here are what the threads on the battery tube look like. Well cut. Smooth and easy to operate. Anodized to enable lockout. Notice the double O-ring seal. Well lubricated from the manufacturer.
Here is an up close look at the tail cap. Notice how the spring sticks past the end of the tail cap thus guaranteeing positive contact with whatever 18650 battery that is thrown into the battery tube, even unprotected 18650's. This headlamp has its own protection circuit allowing the user to use unprotected cells safely.
A better look at the inside of the tail cap.
Down the battery tube to the business end of the headlamp shows a raised contact point enabling the use of flattop batteries.
This is how you turn the light ON & OFF, you press the switch (pictured below). It is a fairly firm raised switch requiring considerable pressure (unlikely to be turned on by accident, tail cap lockout is also an option if one is worried). When the switch is not pressed there is no color. Anytime the switch is pressed a bright red color is illuminated through the switch which disappears upon releasing the switch. In "Tactical Mode" (momentary ON) the switch remains brightly lit for as long as it is pressed (bright red color).
Here is the "State Indication" on the ON & OFF switch blinking once every 4 seconds (this feature can be turned on and turned off at will). It serves a dual purpose, letting the user know everything is okay in terms of battery voltage and temperature as well as a beacon for easier location of the light in a dark environment. It is fairly bright and can easily be seen 20 feet across the room or within a 5 to 7 foot radius when dropped into a grassy field.
Whenever the light goes into "Warning Level" or "Critical Level" for battery voltage and/or temperature threshold the "State Indication" on the ON & OFF switch will blink once per second when it reaches "Warning Level" and twice per second when it reaches the "Critical Level". The "State Indication" color at this point is a combination of green yellow orange (faint in nature and a lot lower then normal). The best representation of this is in the picture below (I know it looks more red then anything but that is the best I could do to capture the flickering).
So before you activate the light you need to put a battery inside. Once you insert the battery (has reverse polarity protection) you need to tell the headlamp what type of battery it is. You do this by following these instructions (from the official manual provided by Armytek http://www.armytek.com/index.php?dispatch=attachments.getfile&attachment_id=39).
Now that the headlamp has power you can get it to do all the things it was designed to do by following these instructions (from the official manual provided by Armytek http://www.armytek.com/index.php?dispatch=attachments.getfile&attachment_id=39).
Let me elaborate on the user interface that is described in the official manual.
To make it easier lets group the modes into sections.
- Section 1 is compromised by Firefly 1 & Firefly 2.
- Section 2 is compromised by Mode 1, Mode 2, Mode 3, and Mode 4.
- Section 3 is compromised by Turbo.
- Section 4 is compromised by 2 strobe modes (0.6Hz / 10Hz) and battery voltage meter (decimal). Let's call these specialty modes.
So you grab the light to use and are ready to press the ON & OFF switch. At this point you have the following 2 options.
You Press and Release the ON & OFF switch. This puts you into the previous mode used (Firefly 1, Firefly 2, Mode 1, Mode 2, Mode 3 or Mode 4) except for Turbo and Strobe.
- Now if you decide to press and hold it will go to the next highest level. In one of the following ways (if you release the ON & OFF switch at any moment you will stay in whatever light level you were in).
- If you are in Section 1 it will increase in level until you get into Section 2. It will go through all of the levels in Section 2 and then jump back down to the lowest level in Section 2 (Mode 1) and then repeat the process for as long as the switch is held down.
- If you are in Section 2 it will increase in level until you are in Mode 4 and then it will cycle back down to Mode 1. It will repeat the process for as long as the switch is held down.
- Now if you decide to double-click it will do one of the following.
- If you are in Section 1 you will automatically jump into the last level used in Section 2 (it keeps the last mode of Section 2 memorized).
- If you are in section 2 you will automatically jump into Turbo. Now depending on how you double-click one of the following will occur.
- If you double-click and let go it stays in Turbo.
- If you double-click and hold it is momentary Turbo and will go back to the last light level used (in Section 2) as soon as you release.
You Press and Hold the ON & OFF switch. This puts you directly into Firefly 1. Once Firefly 1 is ON you have the following two options.
- You let go of the switch and you will stay in Firefly 1.
- You continue to hold the switch and you will start to cycle through all of the modes in Section 1, Section 2, and Section 3. You can stop at any light level you desire by releasing the switch and it will be memorized (except for Turbo). Should you decide not to stop and keep going the light will shut off after reaching Turbo and stay off (this is a feature that Armytek incorporated so that in case the button is pressed by accident the light will not cycle indefinitely and wear out the battery, for example in a backpack).
At any moment when the light is ON if you quickly click 4 times you will end up in Section 4 (Specialty Modes). It will put you in whatever Specialty Mode that you last used (it memorizes the Specialty Mode). Now you have the following options.
- If you press and release the ON & OFF switch the light will turn off.
- If you press and hold the ON & OFF switch it will cycle to the next mode in Section 4. It will continue to cycle through the 3 modes in Section 4 for as long as you hold the ON & OFF switch. When you release the ON & OFF switch it will stop and memorize whatever mode you are in (in Section 4).
- If you Double-Click the ON & OFF switch it will return to whatever mode you were last in Section 2.
No headlamp would be complete without a headband. Here it is the way that it comes out of the box in its unassembled state.
Here you see it put together.
From another angle.
The elastic headband is exactly 1 inch wide.
Now if a headband is not your thing or you just want to EDC the headlamp you have the capability to attach a pocket clip. The pocket clip enables deep carry. It attaches to the headlamp very securely, requiring considerable effort to remove. The way the pocket clip holds onto objects, such as a pocket, is light to medium in terms of pressure. The pocket clip is also reversible as well as magnetic (meaning you can attach magnets to it for additional mounting scenarios). Here is what it looks like attached to the headlamp.
Here is a close-up shot showing you exactly how deep in the pocket the headlamp can be worn. Notice it is not flush with the top of the headlamp.
The pocket clip will allow the headlamp to tail stand at pretty much any conceived angle.
Here are the output levels and there respective lumen ratings (the ratings were provided by Armytek and have not been verified). The indicated runtimes were calculated by me based on a 3100 mAh battery and the current specifications for each light level provided by Armytek.
Mode 1, Mode 3, Mode 4 and Turbo have now been CONFIRMED by ME and the details of the run test can be viewed below under "Confirmed Runtime Tests:".
- Results with "1" were achieved utilizing an unprotected 3100 mAh Panasonic battery (NCR18650A).
- Results with "2" were achieved utilizing an unprotected 3400 mAh Panasonic battery (NCR18650B).
Modes, Light Levels, and Runtimes:
- Firefly 1 = 0.5 lm = 3050 hours or 127 days
- Firefly 2 = 7 lm = 217 hours or 9 days
- Mode 1 = 30 lm = 37h 29m CONFIRMED2
- Mode 2 = 115 lm = 14 hours
- Mode 3 = 250 lm = 7h 23m CONFIRMED1, 7h 59m CONFIRMED2
- Mode 4 = 550 lm = 2h 59m CONFIRMED1, 3h 12m CONFIRMED2
- Turbo = 1010 lm = 1h 08m CONFIRMED1
Confirmed Runtime Tests:
For the runtime tests I utilized the same NCR18650A (3100 mAh) battery that had some miles on it and a fresh brand-new NCR18650B (3400 mAh) battery. The results are as follows.
Mode 1 = 30 lm:
- At 36 hours and 40 minutes the headlamp flashed 3 times signaling that the voltage is in the "Warning Level". This was followed by the ON and OFF switch indicator light flashing once every second in a green yellow orange combination. According to Armytek the "Warning Level" is triggered when the battery voltage is 3.1 V. At this point the light level has not dropped. There is also a "Critical Level". According to Armytek the "Critical Level" is triggered when the battery voltage is 2.9 V.
- At 37 hours and 29 minutes light output drops to firefly mode 2. At this point the runtime test was concluded.
Mode 3 = 250 lm:
- In this mode the headlamp hardly got warm. Maintaining 93°F at the head of the headlamp and about 91°F around the battery tube (these were maximum values recorded throughout the whole test).
- At 7 hours and 8 minutes the headlamp flashed 3 times signaling that the voltage is in the "Warning Level". This was followed by the ON and OFF switch indicator light flashing once every second in a green yellow orange combination. According to Armytek the "Warning Level" is triggered when the battery voltage is 3.1 V. At this point the light level has not dropped. There is also a "Critical Level". According to Armytek the "Critical Level" is triggered when the battery voltage is 2.9 V.
- At 7 hours and 23 minutes light output drops to firefly mode 2. At this point the runtime test was concluded.
- Immediately after the test was finished the battery was removed and checked for voltage and temperature. The voltage was 3.15 V and the temperature was 89°F (for the battery). After about a 60 minute rest the battery voltage was about 3.20 V.
Mode 4 = 550 lm:
- 24 minutes into the test the headlamp feels fairly warm to the touch, but not hot.
- After about an hour the headlamp is very hot to the touch and maintains this temperature for the duration of the test. I used an infrared thermometer to measure the temperature. The hottest was 125°F at the head of the headlamp and about 111°F around the battery tube (these were maximum values recorded throughout the whole test).
- At 2 hours and 46 minutes the headlamp flashed 3 times signaling that the voltage is in the "Warning Level". This was followed by the ON and OFF switch indicator light flashing once every second in a green yellow orange combination. According to Armytek the "Warning Level" is triggered when the battery voltage is 3.1 V. At this point the light level has not dropped. There is also a "Critical Level". According to Armytek the "Critical Level" is triggered when the battery voltage is 2.9 V.
- At 2 hours and 59 minutes light output drops to firefly mode 2. At this point the runtime test was concluded.
- Immediately after the test was finished the battery was removed and checked for voltage and temperature. The voltage was 2.97 V and the temperature was 106°F (for the battery). After about a 60 minute rest the battery voltage was about 3.09 V.
Turbo = 1010 lm:
Starting temperature for the headlamp is 79°F both in the head and body (same temperature as in the test environment). In the table below you can see the rapid progression and the leveling off of the temperature during the runtime test.
| Minutes into the Runtime Test | Temperature at the Head | Temperature at the Battery Tube |
| | | |
| 00m | 79°F | 79°F |
| 01m | 96°F | NA |
| 03m | 117°F | NA |
| 05m | 130°F | NA |
| 10m | 150°F | 131°F |
| 15m | 165°F | 138°F |
| 20m | 169°F | 144°F |
| 30m | 175°F | 152°F |
| 1h 08m | 178°F | 158°F |
- 5 minutes into the runtime test the headlamp is uncomfortable to hold. At the 15 minute mark it is unbearable to hold.
- At 56 minutes the headlamp flashed 3 times signaling that the voltage is in the "Warning Level". This was followed by the ON and OFF switch indicator light flashing once every second in a green yellow orange combination. According to Armytek the "Warning Level" is triggered when the battery voltage is 3.1 V. At this point the light level has not dropped. There is also a "Critical Level". According to Armytek the "Critical Level" is triggered when the battery voltage is 2.9 V.
- At 1 hour and 8 minutes light output drops to firefly mode 2. At this point the runtime test was concluded.
- Immediately after the test was finished the battery was removed and checked for voltage and temperature. The voltage was 2.93 V and the temperature was 132°F (for the battery). After about a 60 minute rest the battery voltage was about 3.0 V.
- This headlamp has thermal protection built-in which is supposed to be triggered at 80°C or 176°F. When the thermal protection reaches what Armytek calls the "Critical Level" (80°C or 176°F ) the light output drops to 100 lm. During the whole runtime test the thermal protection did not activate.
Beam Shots:
So now that you know what modes this headlamp has and how long they will run for, what about the question, what do they look like? For Firefly 1, Firefly 2, and Mode 1 I had a friend volunteer to help me out. The next 3 photos were all taken at a distance of about 3.5 feet.
Firefly 1 = 0.5 lm:
Firefly 2 = 7 lm:
Mode 1 = 30 lm:
Night Hiking Shots:
These were taken during a night hike. The sky was clear and the moon was out. The fallen tree on the ground is about 30 feet long. I purposely took the pictures here as a helpful way to gauge distance.
Control:
Firefly 1 = 0.5 lm:
Firefly 2 = 7 lm:
Mode 1 = 30 lm:
Mode 3 = 250 lm:
Mode 4 = 550 lm:
Turbo = 1010 lm:
Last edited:
")


