Dynamo lights for dummies

find_bruce

Newly Enlightened
Joined
May 5, 2011
Messages
84
My commute is 10km each way in the city of Sydney, Australia. For the last 2 years I have been using various li-ion powered lights, both ubiquitous Chinese bike lights, flashlights & a triple XP-G from lux-rc. I have been particularly happy with my taillight, a red XP-C flashlight driven at 700 mA. It was so bright I added a deodorant ball as a diffuser
P3240018.JPG


Like many regular commuters though I started to get bored with remembering to recharge the batteries & have been toying with the idea of switching to dynamo lights. Of course this involved much reading here and elsewhere. Sure I could simply go out and buy all the bits, but I decided to assemble as much of it as I could by myself.

This is very much a work in progress, but I thought others might benefit from seeing what I have done, especially the mistakes I have made.

Dynamo This was the easy bit. Having heard good reviews about the dyno hubs from Shutter Precision I chose a PD-8. With Roger Musson's wheelbuilding book the wheel build was straightforward, apart from discovering I had entered the wrong figures into the spoke calculator & had to order new spokes.

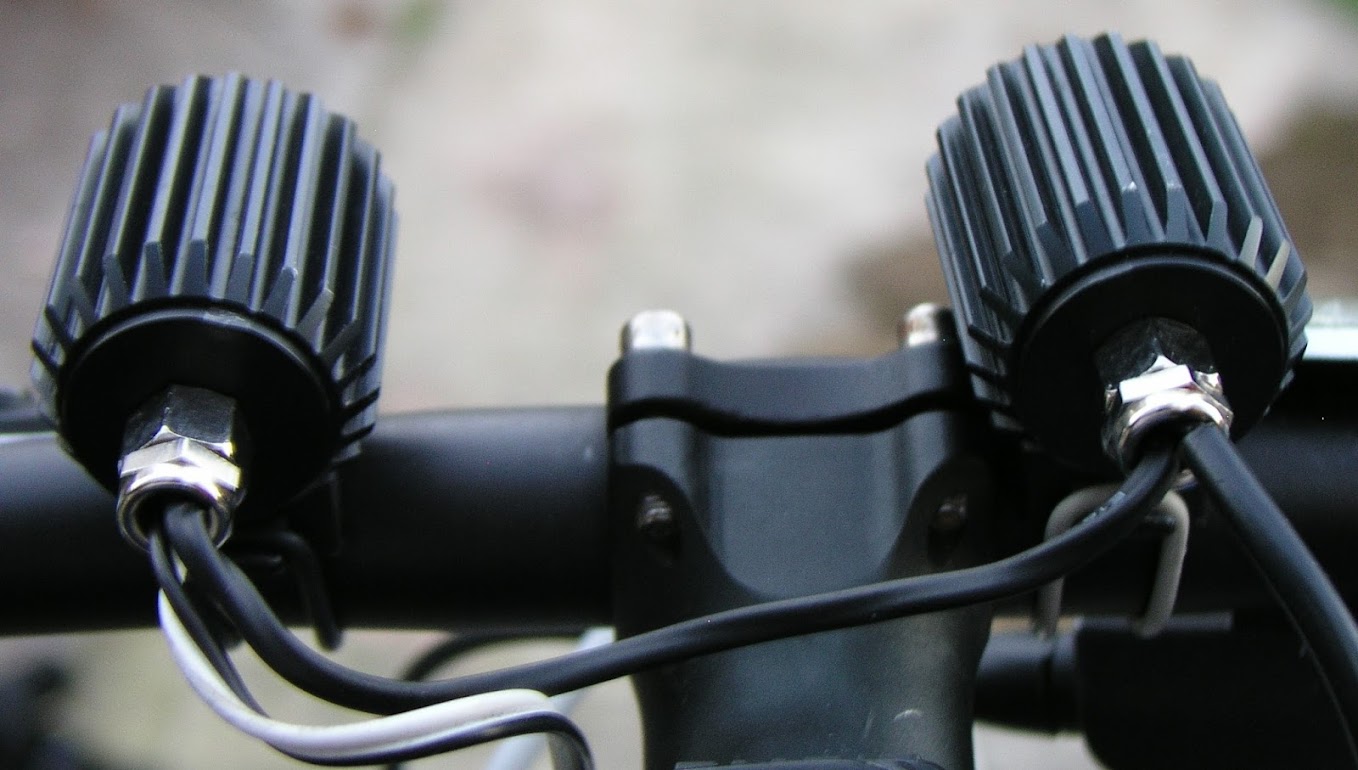
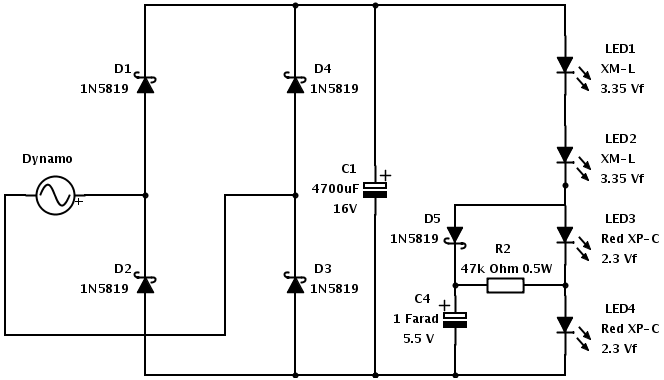
Lights like pretty much everyone considering building dynamo powered lights, I started with Martin's dynamo circuits. Without going into the tortured decision making process I initially settled on a 3 led set up with 2 x xml up front and a red xpc for the taillight. Running at 0.5A the cooling requirements are not high, but I happened to have 3 easy2led housings, so I used those. The only difference to the standard set-up is that I decided to run the taillight in series. My post-decision rationalisation is that I didn't want to reduce the power available to the front leds, I wanted the red led to operate at full power & the red led would comfortably handle the 0.5A of a dynamo.

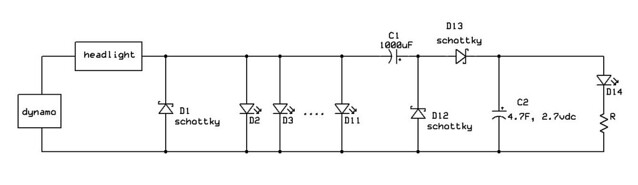
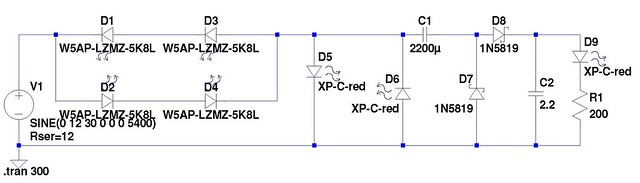
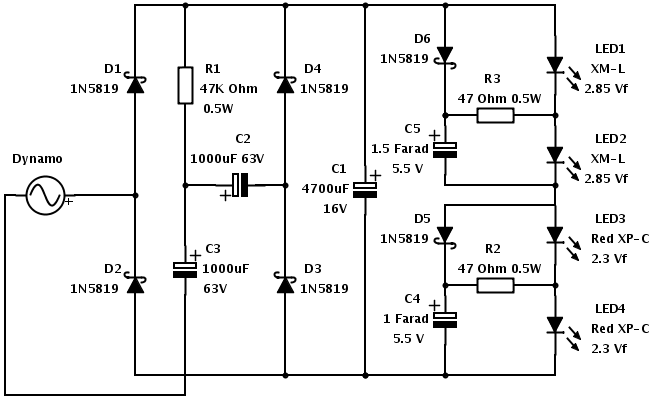
Standlights however had me stumped & I had all but given up. Then I read a couple of posts by SteveK the first of which got me reading the standlight thread & the second posted a simple standlight circuit. When I read this post by FrontRanger & went back to SteveK's circuit, I slowly started to understand. Based on these, I came up with this circuit.

Bike-2.png


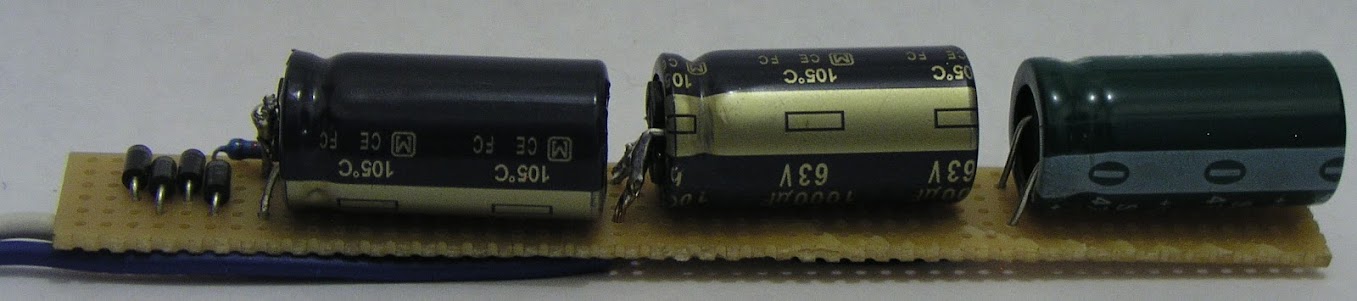
I didn't have all the necessary bits, but what I built over the weekend was

Bike+as+at+18+Jul+13.png


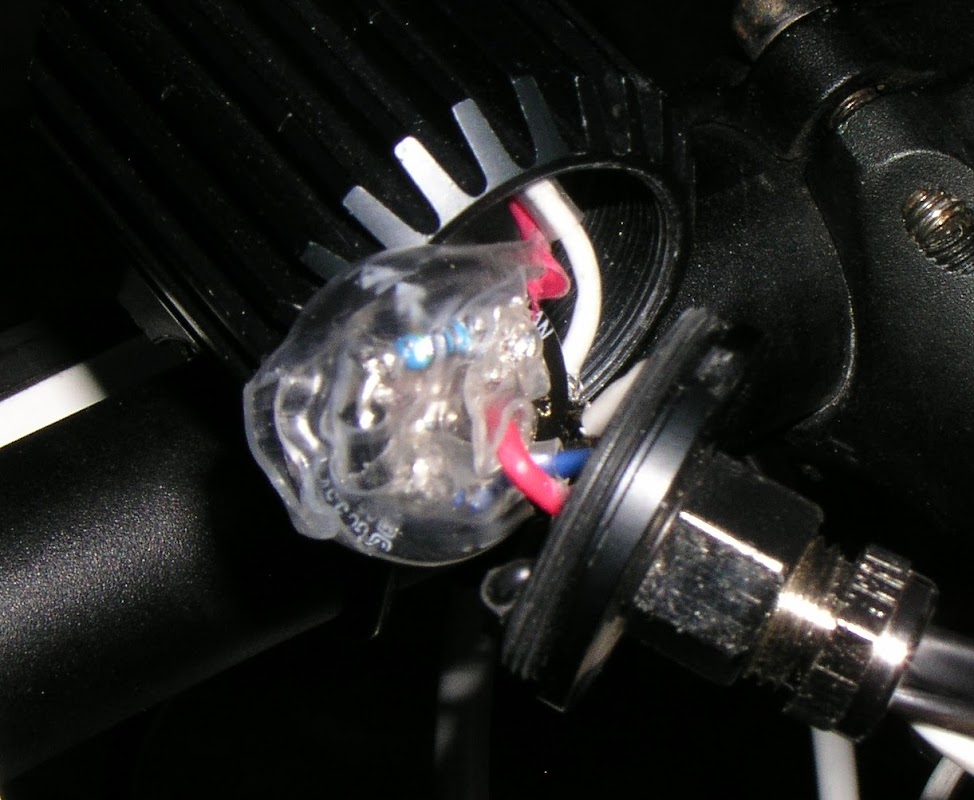
To fit 2 red LEDs in 1 easy2led housing, I took some brave pills & then picked up my aviation snips & simply cut off the "excess" aluminium star. Forgive the dodgy phone pic, but this was the result.

2+x+red+XP-C.JPG


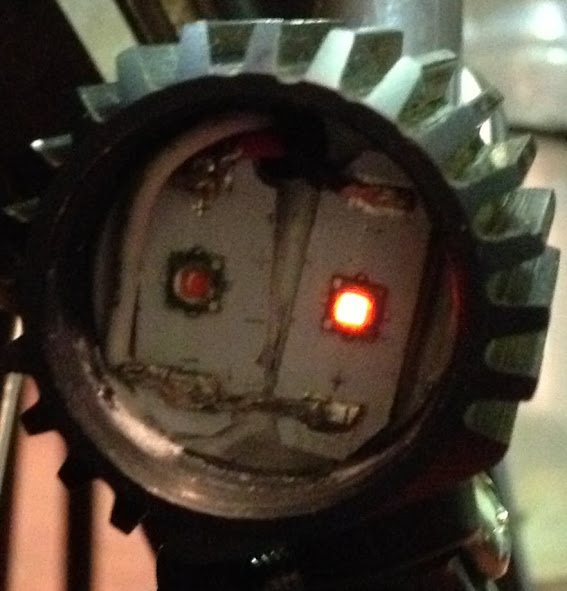
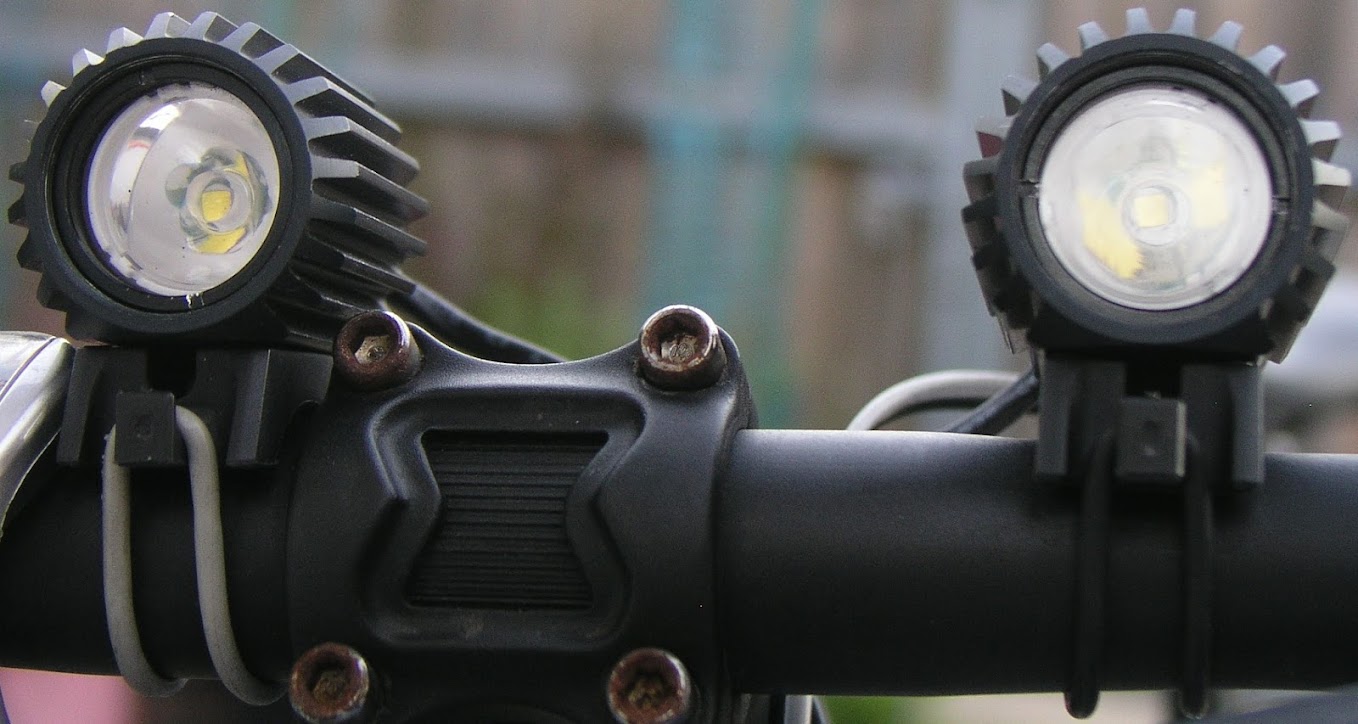
It works pretty much as you would expect. One XM-L uses a 30° optic while the other uses a 15° optic, giving a nice balance of flood & throw. With no doubling circuit & no tuning capacitors it doesn't emit much light below 10 km/h, but I don't spend much time at that speed & I have a battery powered helmet light in any event.

Znomit said "500mA through two red LEDs is crazy bright" & I can happily confirm that he is 100% correct. With my deodorant ball diffuser I can tell that the rear is working because of the red glow over the entire rear of the bike. I will see if I can come up with a safe and interesting way to take a picture of the rear light.

The observant will note that I have added one little letter to R2. Yep, I accidentally picked up a 47k ohm resistor instead of 47 ohm resistor :eek:. The result, as you would expect, is that as a standlight, LED4 emits a very dull glow, my maths suggests something like 0.00004 amps. On the plus side however that dull glow continues for a very long time, more than 10 hours :D – the above pic was taken about 6 hours after I stopped riding.

My mistake did however get me thinking about how the circuit worked & how the value of R2 affects it. After charging C4, I bypassed R2 with the result that LED4 glowed nice & bright. Of course when I spun the wheel, as you would expect LED3 did not light up & C4 would only charge to the Vf of LED4, something around 2.3v.

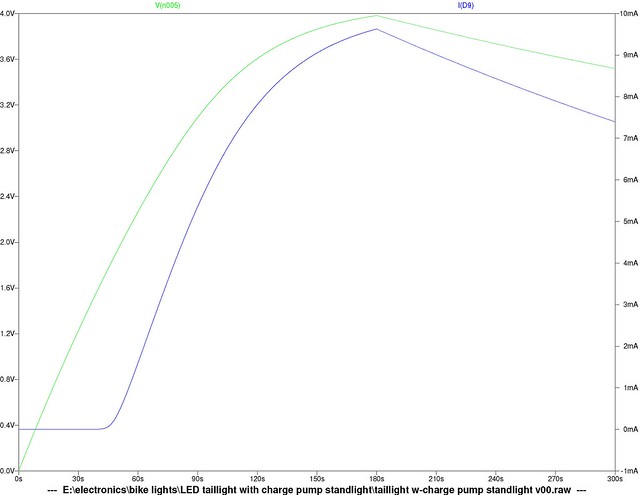
If I have it correct in my head now, what you are trying to achieve is a balance. As the resistance of R2 increases, when the dynamo is operating you will get a greater current flowing to LED3 and a higher charge to C4, however this will be at the expense of the current to LED4 when the dynamo is not operating. Both the higher charge of C4 and the lower standlight current to LED4 increases the length of time the standlight functions.

Hopefully over the weekend I will get some time to experiment with some different resistors 23.5, 47 & 94 ohm, to see what affect it has on the current at L4 and the useful standlight time.

The other thing I have noticed is that 2.5v supercaps are easy to come by and cheap and the Vf of red XP-C leds is 2.3V, so I have ordered a 2.5v 3.3F supercap to see how that performs as a standlight.

I look forward to your comments.
 

Steve K

Flashlight Enthusiast
Joined
Jun 10, 2002
Messages
2,786
Location
Peoria, IL
Looks like you've been having some fun! :)

How do you like the 30 and 15 degree headlight optics? And what are your riding conditions? My experience is mostly on dark rural roads, and beams that wide tend to put too much light close to me, thusly messing up my night vision and keeping me from seeing the road further away. For city riding, increasing the side visibility could be the right thing to do.

Picking the best value for R2 might take a bit of experimenting. 47k is probably too much, and 47 may be too small. It is nice to be able to fiddle with it until you get just what you want (or get tired of messing around).

Running two red LEDs in series with the headlight must indeed be crazy bright! I run a bunch of small 5mm red leds in parallel in my taillight, and have a somewhat complicated standlight composed of a nicad AA cell, a primitive charging circuit, and a boost switching power supply to drive 4 more 5mm red LEDs when stopped. I've sketched out a simpler standlight that uses a supercap, but never built it. .....
6361143099_2a74b76845_z_d.jpg


I may have to run a quick simulation to see if it is at all viable. Might be something for you to try out, if you want to get better light output at low speeds.

Again, congrats on the progress so far! I imagine you'll want to get the front standlight up and running soon too. It really is nice to have a decent standlight.
 

find_bruce

Newly Enlightened
Joined
May 5, 2011
Messages
84
Way more fun than simply paying money for something that works right first time :)

The 30 & 15 degree optics are ok for my riding - city streets, usually with street lights & lots of traffic. I would probably have a different set-up if I was riding on dark rural roads. The combined light is about the same intensity as car low beam headlights. One short section is downhill, no lights & I take that at 50+ km/h (30mph) & I think I have adequate vision. I have played around with all sorts of optics including elliptical & aspheric, but that was with battery powered lights running at around 1.4A so I might try some 5 & 10 degree optics to see how they go.

I couldn't help myself & before I went to work this morning I changed the resistor to 47 ohm. It may not be perfect, but it is much closer to the best value - visible in daylight, useful lighting for at least a couple of minutes. I should have some time on the weekend to mess around with it some more. I also have the rest of the components so I will be finish off the front lights & add the tuning capacitors. I might even have time to make it look all nice & presentable.
 

Steve K

Flashlight Enthusiast
Joined
Jun 10, 2002
Messages
2,786
Location
Peoria, IL
I threw together a simulation of my idea for a charge pump standlight for a taillight wired in series with the headlight. The concept is that it minimizes the voltage drop across the taillight, so allow good low speed performance of the light. The low voltage drop makes it difficult to store much charge in a supercap, so I used a charge pump to get the supercap voltage up to 4.4v or so.

the schematic:
9324478232_c426067d80_z_d.jpg


and the traces for the supercap voltage and the standlight LED current:
edit: the dynamo runs for 180 seconds, and then the standlight LED starts to drain the supercap. -end of edit-
http://www.flickr.com/photos/kurtsj00/9324477890/
9324477890_b74a99d675_z_d.jpg


my conclusions?
The simulation has the dynamo running at 30Hz, and is based on the Schmidt dynamo. The LED current maxes out at around 9 or 10mA. In my mind, that's not very great. You could increase it by reducing that 200 ohm resistor, which would reduce the time the standlight would run. You could increase the charge pump cap from 2200 to something larger, but that starts getting big. The supercap could be bigger too, with the caveat that it will take longer to charge up.

The basic limitation is the low frequency of the dynamo itself. A higher frequency would certainly help provide more current to the standlight circuit.

I do like the concept... the supercap is allowed to run down, instead of requiring a switch to enable to standlight as is required in my nicad powered standlights. The circuit also uses fairly ordinary parts, and is easily understood by hobbyists. By contrast, my nicad based standlights use a Zetex switching power supply that is a bit intimidating to the casual hobbyist. I'll have to keep playing around with ideas and see what can be done. It would be nice to come up with a simple, bright, and long running standlight that doesn't require the user to enable with a switch.
 

find_bruce

Newly Enlightened
Joined
May 5, 2011
Messages
84
"easily understood by hobbyists" you say - :thinking: I am still scratching my head about how the charge pump works.

Found some time for fun on the weekend, added cable glands, tuning capacitors & otherwise finished off the lights (for the moment anyway). After a bit of play, 47 ohm seemed to me to be about right for the value of r2 & r3. While 94 ohm gave a longer stand time, it is only 10 mA which as you say is not great. 23.5 ohm gives 40 mA but did not last long. 47 ohm started at 20 mA and gives good light, at least at the rear, for a couple of minutes.

Disappointing is the only way to describe the front standlight performance though - even at 40 mA, it was not particularly visible - I am still trying to figure out whether the difference is the LEDs or whether the spherical diffuser is more visible.

edit: maybe I was being a bit harsh, when fully charged when riding, the white led put out useful "be seen" light for a couple of minutes. While not as bright as the red, it is still functional.

It was also fun to play around with the 2.7V 3.3 farad super cap. Simply wired in parallel with a red XP-C gave a really bright standlight, for about 30 seconds. I had a couple of thoughts about extending the stand time (I haven't included the dynamo, rectifier, front headlights etc, just looking at the rear red)
Bike-options.png


If I am understanding things correctly, option 1 simply limits the current flow as a standlight, at the cost of the small voltage drop of the Schottky diode.

Option 2 is an attempt to extend the stand time by flashing. It also has the effect of reducing the standing current.
 
Last edited:

Steve K

Flashlight Enthusiast
Joined
Jun 10, 2002
Messages
2,786
Location
Peoria, IL
regarding the two options, there's a fundamental problem... the cap can only charge up to a few tenths of a volt less than the red led's Vf. As such, it'll never keep red led lit at more than a feeble glow. The upper red led provided the means to get the supercap charged above the lower led's Vf. The function of the schottky diode is mostly to keep it from discharging back into the headlight and dynamo, as well as to keep it from discharging through both red leds.

for option 2, there needs to be some method for limiting the current through the leds. Of course, it's possible that the supercap won't be charged up to a voltage high enough to forward bias both the flashing led and the taillight led (and this would assume the use of an upper red taillight led).

Making a good, simple standlight when using a single red taillight led is not easy. A lot of folks make do with putting a supercap across the led. I've gone the other route and used a nicad AA and boost converter. Actually, the goal might be to make a good standlight that's compact, regardless of the technology. I can see a lot of people looking for that sort of solution.
 

find_bruce

Newly Enlightened
Joined
May 5, 2011
Messages
84
Thanks Steve, it seems obvious when you put it like that. I am reasonably happy with the rear set up & the only reason for wanting to go to a single rear led is to assist with low speed performance.

I am not so happy with the front however. So I will think about that for a bit & see if I can figure out why it is less effective than the rear & what, if anything, I can do to improve it.
 

find_bruce

Newly Enlightened
Joined
May 5, 2011
Messages
84
I think I have figured out a problem with my front standlight set up. It may not be the only problem, but at least it should be a step in the right direction. I have used a figure for the XMLs as 3.35 Vf, which it is, at 3A. At 0.5A however an XML is only 2.85 Vf.

By my rough maths, instead of charging the super cap to 5.5V (2 x 3.35 - 2 x 0.6), I am only charging it to 4.5V (2 x 2.85 - 2 x 0.6). If I replace the 2 standard Si diodes (D6 & D7) with 1 Schottky diode, I should bump that back up to around 5.3V (2.85 + 2.85 - 0.4).

I am away for the weekend, but hopefully I will find some time in the next week or so to get a volt meter out & confirm these calcs & if so, make a couple of simple changes & see how that works out.
 
Last edited:

Steve K

Flashlight Enthusiast
Joined
Jun 10, 2002
Messages
2,786
Location
Peoria, IL
That's worth a shot. It's always good to check the actual circuit voltages and compare them to what you expect. Sometimes you find out that your assumptions were wrong, or there is some subtle behavior that you couldn't have anticipated. I've seen plenty of this in my designs.
 

find_bruce

Newly Enlightened
Joined
May 5, 2011
Messages
84
Small steps but in the right direction. First up I replaced the 15 and 30 degree optics with a couple of 10 degree optics - A useful increase in apparent light, and just enough spill to see off line. Of course I still have the helmet light if I need to look at anything in particular.

The next thing was to replace the 2 standard Si diodes (D6 & D7) with 1 Schottky diode & there has been a decent improvement in the standlight time. Not sure if I am fooling myself, but it appears brighter as well.

The other curious thing is that LED2 lights up at a lower speed than LED1 & I am trying to get my head around why. It seems that LED2 only drains the capacitor C5 down to about 2V. I am thinking though that it is a function of R3 diverting a small amount of current from LED1 rather than the capacitor giving some sort of boost.

The really scary thing is that having got reasonably close to what I am after, I keep thinking of ideas to try out on a breadboard to improve them. Still now that I have a functional set of lights I can take my time to tinker with the next set.
 

znomit

Enlightened
Joined
Aug 1, 2007
Messages
979
Location
New Zealand
The really scary thing is that having got reasonably close to what I am after, I keep thinking of ideas to try out on a breadboard to improve them. Still now that I have a functional set of lights I can take my time to tinker with the next set.

lovecpf
 

Steve K

Flashlight Enthusiast
Joined
Jun 10, 2002
Messages
2,786
Location
Peoria, IL
Small steps but in the right direction. First up I replaced the 15 and 30 degree optics with a couple of 10 degree optics - A useful increase in apparent light, and just enough spill to see off line. Of course I still have the helmet light if I need to look at anything in particular.

The tighter beam gives you the advantage of putting more of the energy out on the road in front of you where it helps, plus reduces the amount of light nearby that messes up with your night vision. Nice to know that I'm not the only one who likes the tigher beams. :)

The next thing was to replace the 2 standard Si diodes (D6 & D7) with 1 Schottky diode & there has been a decent improvement in the standlight time. Not sure if I am fooling myself, but it appears brighter as well.

makes sense. The cap will be charged up to a higher voltage, so it should be delivering more current to the LED.


The other curious thing is that LED2 lights up at a lower speed than LED1 & I am trying to get my head around why. It seems that LED2 only drains the capacitor C5 down to about 2V. I am thinking though that it is a function of R3 diverting a small amount of current from LED1 rather than the capacitor giving some sort of boost.

You might want to increase R3. LED1 relies on the voltage drop across the diode(s) and R3 to power it. When you changed from two silicon diodes to one schottky diode, you really reduced the voltage drop across them.
LED2 will only discharge the supercap down to the point where the current is close to zero. It does have the disadvantage that you aren't using the full amount of energy stored in the cap, but has the advantage that it does charge up faster.

The really scary thing is that having got reasonably close to what I am after, I keep thinking of ideas to try out on a breadboard to improve them. Still now that I have a functional set of lights I can take my time to tinker with the next set.
If you're lucky, you'll keep tinkering and thinking. It is kinda fun, and a chance to be creative. I'm rather pleased with my lights, but still think about things to improve. I'd like to eventually get a broken LED headlight from B&M. The goal would be to use their optics, but add my own electronics. Ought to be able to get a fair bit of power into it, and still have a good standlight.
 

find_bruce

Newly Enlightened
Joined
May 5, 2011
Messages
84
I got around to taking a few pics - still no beam shots though, haven't mastered riding & taking a pic at the same time.

The front lights


In the back of 1 housing, hidden by the shrink wrap is the 1.5 farad super cap (C5), a diode (D6) & resistor (R3)


The rear lights


The rectifier circuit etc

The rectifier circuit etc is on a small circuit board together with the other bits that don't fit in the light housings. This time I remembered to take a photo before covering it with shrink wrap :D Once wrapped it is hidden away in the steerer tube.


The current circuit looks like this


Znomit, thanks for your encouragement - your builds were some of the inspiration for mine.

SteveK, thanks again for your help. You have suggested increasing R3 before, which I have been stubbornly ignoring - once I get an idea it's a prisoner :) I have a spare commuter bike & so need a second set of lights - I will play around some more & try it again I promise :). It may be a while though cause (1) I am reasonably happy with the current set-up & (2) winter is almost over downunder - by the end of the month I will be riding home in twilight.

With li-ion powered lights I have preferred a wider beam to improve my visibility off axis - ie cars entering from a side street. With a dynamo limited to 0.5A, you want to make best use of the light you do have & the helmet mounted spot means I can still light em up if needed. As others have noted optics really are the one area where it's hard to find parts to DIY.

I have seen a couple of ideas, including replacing the emitters etc in a Phillips saferide (its seems the thread has been edited to remove the pics :scowl: the are still on the archived version) This build was a battery version, but you get the idea.

The other idea I like is Bandgap's
I eventually bought a Cyo to use as a 'dip' beam with a nice anti-dazzle cut-off and built my own +/-4deg light for a 'main' beam for when no one was in front of me. It works out pretty well. You can tap into the Cyo circuits and power its led or the 'main' led.

The other Steve
 

Steve K

Flashlight Enthusiast
Joined
Jun 10, 2002
Messages
2,786
Location
Peoria, IL
that turned out looking pretty good! Congrats!

I understand about the reluctance to change anything... especially when the project is wrapped up and in use. Tearing stuff off the bike, opening up the housing, digging through protective coatings, etc., all take time and effort, not to mention that you have to reverse the process when you are done! Better to wait and see if it annoys you enough to make you do it, or wait till the days get longer and you can afford to have the lights not operating for a day or two.
 

find_bruce

Newly Enlightened
Joined
May 5, 2011
Messages
84
Automatic switching methods

I am starting to get a clearer idea of where I want to improve things. While I am sure I could make some further improvements to the standlight circuit, that is not my priority. What I do want to achieve is (1) decrease the speed at which the front lights come on & (2) get more light at the front esp at speeds >25km/h or so.

(1) decrease the speed at which the front lights come on

A couple of things I can do here (a) replace the diode rectifier with an H bridge mosfet eg ZXMHC3F381N8. While this will be a small improvement, it is at the cost of removing the tuning & smoothing capacitors. (b) reduce the number of LEDs at low speed. Removing one of the rear leds would help. Given how well the rear standlight works, keeping both but switching them out at low speed would also work - eg below 10 km/h the only light at the rear would be the standlight.

(2) get more light at the front esp at speeds >25km/h or so

I have come across three possible ways to do this (a) add some LEDs & either short them out at low speed or use a voltage doubler (b) increase the current to the leds using tuning capacitors as per ktronic or (c) use a buck converter a la Joe Gross.

As I understand it, capacitors are only effective at a particular speed range which would necessitate switching between various capacitors as the speed changes. Next.

Using a buck converter is interesting – taskled's CC1A driver looks a likely candidate – max Vin 50V, 1A, 2V headroom and "if the input voltage drops lower, the driver will stop regulating and the output current will drop below the regulated value". Two efficiency issues though, with 3 leds, efficiency is 80%-90% & 4 leds @ 0.5A put out 5-10% more light than 2 x leds @ 1A. While using a micro processor to control the pwm looks very funky, it is beyond my current level of skill / knowledge.

So it seems for me the best option is adding leds. I have no interest in using a manual switch every time I get to a traffic light so would need to add a switching circuit. This is where I need some assistance.

Automatic switching methods

I have found a few different ways of automatic switching


I can understand how the missing pulse circuit works, and how changing the RC values affects the speed at which it switches in/out. The input side of things puts me off a bit though, both in terms of the number of components & the fact that I would be limited to copying Steve K's circuit without the skill to know how to adjust values if I encountered a flickering problem such as Steve had initially.

I am still trying to get my head around how all the different resistors in martin's circuit 12 affect the circuit. Again it is easy to copy, but I am struggling with how to adjust it if necessary.

I like the simplicity of using a zener diode as per yellow – I can understand simple. What are the drawbacks ? It seems to me there may be two:

  • There is no hysteresis, so if you are riding along at the change point, you may be regularly switching in and out. Carefully selecting the switch point so that there is minimal change in light output may minimise how annoying this is.
  • teetreetim reports that the zener switch over is temperature sensitive which affects the switch over point

Appreciate your feedback & suggestions
 

Steve K

Flashlight Enthusiast
Joined
Jun 10, 2002
Messages
2,786
Location
Peoria, IL
Re: Automatic switching methods

a quick look at the zener diode circuit... it appears to be trying to use the idea that if the dynamo current is above a certain level, then the dynamo is going fast enough to drive another LED or two. I'm not sure how the circuit deals with the fact that once the extra LED is switched in, the dynamo current will decrease.

The fact that the dynamo current is being measured via the LED forward voltage is just making it harder to get the circuit to work correctly. The forward voltage doesn't change much when the dynamo current changes. Using a zener doesn't help either, as zeners aren't exactly precision devices, and have their own set of temperature sensitivities that may or may not track with the temperature sensitivity of the LED forward voltage.

If anyone has actually built the circuit, has a year of experience with it, and has written about it, I'd like to see it. I have doubts that it can be made to work.

As far as my flickering problem... it can be avoided by using a conventional diode bridge rectifier.
 

find_bruce

Newly Enlightened
Joined
May 5, 2011
Messages
84
Re: Automatic switching methods

The forward voltage doesn't change much when the dynamo current changes. Using a zener doesn't help either, as zeners aren't exactly precision devices, and have their own set of temperature sensitivities that may or may not track with the temperature sensitivity of the LED forward voltage.
Thanks Steve - after reading your post, I went back and looked at the figures - In the current ranges we are looking at (0.15A - 0.5A), Vf for 2 x XM-Ls ranges from ~5.36V to ~5.66V @ 25°C (~5.3% variation due to current), dropping to ~5.11V to ~5.40V @ 85°C (~4.6% variation due to temperature). I then had a quick look at the specs for zener diodes - most have a 5% tolerance & the best specifications I found had a 2% tolerance, plus further variation in a temperature coefficient of 1.2mV/°C - ie exactly what you said.

If that was not enough, in thinking about it, a fourth downside occurs to me - the circuit is non-adjustable, meaning the only way I could achieve the ambition of "Carefully selecting the switch point" is by buying a whole bunch of diodes, preferably different manufacturers or at least batches, & madly swapping them till I find one at the range I want.

Makes that decision pretty easy

As far as my flickering problem... it can be avoided by using a conventional diode bridge rectifier.
For me one of the attractions of your circuit is avoiding the voltage loss of a conventional diode bridge rectifier :) None of the components are expensive & I guess if I run into problems on the breadboard it is easy enough to change the rectifier. I might even learn something :D
 

Steve K

Flashlight Enthusiast
Joined
Jun 10, 2002
Messages
2,786
Location
Peoria, IL
Re: Automatic switching methods

The combination of the mosfet bridge rectifier and the LEDs as loads seems to make the oscillations that cause the flicker inevitable. I don't recall how much fiddling around was required to properly squash the oscillations without making the mosfets turn on too slowly. It was very helpful to have an oscilloscope to troubleshoot the problem and find the solution. I don't know that I would recommend that someone try it themselves without an oscilloscope.

Fortunately, you don't have to use a simple mosfet bridge rectifier! Linear Technology recently came out with a circuit that senses the AC waveform and then drives a bridge rectifier made of 4 N channel mosfets...
http://www.linear.com/product/LT4320
I don't know anything about it beyond what is on their website, but it certainly sounds interesting.

And a quick comment on the zener diode circuit.. the circuit can be improved a bit by replacing the zener with a LM4041 adjustable voltage reference. Think of it as a low power zener that's precise and adjustable. I use one in my front standlight to set the nicad charging voltage.
 

find_bruce

Newly Enlightened
Joined
May 5, 2011
Messages
84
Re: Automatic switching methods

Should I be concerned that the LT4320 has a minimum input of 9V, given that I am looking to improve low speed performance & have a target of ~5.3V ?.

I will have a closer look at using an LM4041 - looks a bit more promising, I will need to get my head around how the value of the three resistors adjusts the voltage. Cheap so it is worth experimenting with.
 
Top