Neginfluence04
Newly Enlightened
- Joined
- Jul 19, 2013
- Messages
- 55
Getting started
First, you should assess your equipment. Point and shoot digital cameras will work ok but aren't ideal. You don't have a lot of control over the camera and what it's doing. Digital SLR's on the other hand, place a lot of flexibility into the hands of the user. If you are serious about taking a lot of studio or product photos, you should consider getting a digital SLR, as the better results will be imminently noticeable. I use a Nikon D70S with the standard 18-70mm kit lens. You don't need to spend a lot of money buying specialized lenses or anything like that - the kit lens, as you will see, generally works fairly well.
Second, you should consider the types of pictures you'll be taking. I enjoy studio shots where I can control lighting and the overall environment. This helps to ensure consistent, repeatable images which suit my purposes just fine. For the purposes of this posting, I'm going to talk exclusively about "studio" pictures. Don't use a flash! It kills the photo and makes it look just like a point and shoot consumer photo.
Your "Studio"
I've set up a small light box in my computer room. It looks like this:
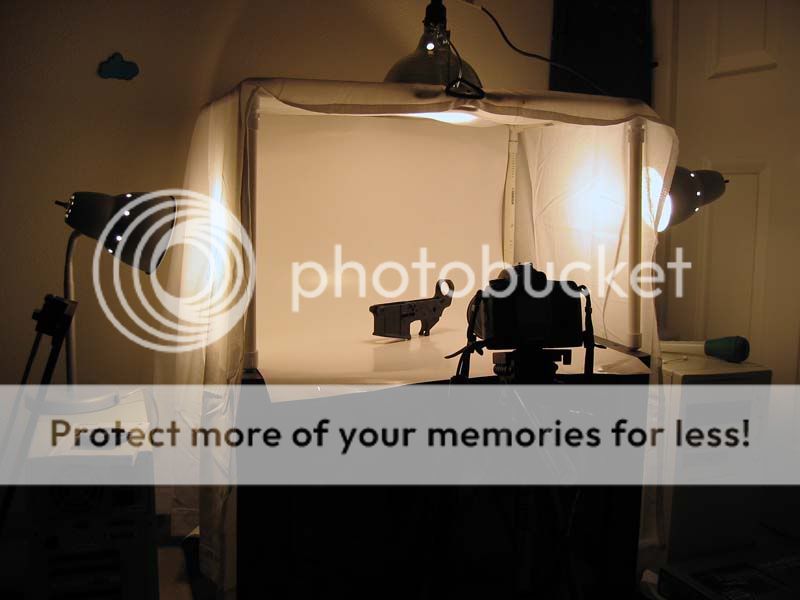
The light box is made up of PVC pipe, to form a box shape, then it is draped with an inexpensive white bed sheet to serve as a light diffuser. I then used an old calendar, flipped it over to the white glossy side, and taped it to the rear of the light box to form a ramp-like shape. This serves as the white background. Different colors can be used, as well as fabrics, if you so choose.
I purchased two small 60 watt lamps from Target at $5.00 each on sale. I am using a Home Depot clamp light to provide illumination from the top of the light box. For nearly all shots, you should consider using a tripod (as above) or somehow stabilize your camera to prevent camera shake. You don't need an expensive tripod, all you really need is one that will hold the camera without tipping over or dropping it, and allow you to make minor adjustments as needed. Make sure that wherever you put your light box, you close the drapes or blinds. This prevents excessive sunlight from leaking in, if you're taking pictures during the day. Else, take pictures at night, and you won't have to worry about this problem.
It is possible to take photos of objects without a light box, but you have less control over lighting and you can't soften it as much. I recommend light boxes for generally all small photo work.
Total cost for your lightbox studio above should be no more than $30 to $50.
Do you "need" professional studio lights? Well, you certainly could get some - Ken Lunde uses a set of Lowel lights as he's stated here before. What this does is gets him a known color temperature, which he can then set his camera to match. I've found that if you use incandescent bulbs (the standard round ones in most homes) and use the incandescent white balance on your camera, your photos generally will turn out ok.
Let's talk about how to set up your camera. I will cover two cameras - point and shoot, and digital SLR.
Your Camera Settings
Here are the settings I use on my Canon S400:
Here are the settings I use on my Nikon D70S:
Let's look at some samples!
Note: Gun above has been sold, so I don't have it any longer.

Your Post-Production Editing
All of my images are processed through Photoshop. Here are the steps I take:
Some General Tricks, Tips, and Hints
I've done enough home studio work to have learned a few more tricks, tips, and hints that I can share:
New for 2010: Getting White Balance Right
One thing I've noticed in my own photos and photos that other people take, it's often quite difficult to get a good white balance going without introducing a hue or color cast to your photos. Getting the right blend of reds and blues can be difficult, but not so much so if you know how to set your camera's white balance properly.
All cameras have some sort of "auto" white balance mode built-in. Unfortunately, this feature doesn't always work accurately, and subsequent photos may show yellow, blue, or reddish tints upon further review at your PC. The human eye sees "white" as "white" in nearly all types of light. Electronics, however, have to interpret the light source and use different built-in reference points to accurately reproduce shades of white. Since the "auto" feature doesn't always get this right, that's why you see colored tints appear in your pictures.
There are a many ways to fix this, but for now I'll cover my most recent method that seems to work for me. I went out and bought one of these:
Some of you professional guys might have purchased a similar product, called the Expodisc. I was going to do so until I noticed that this little device cost only $26 from Amazon instead of the $90 for an Expodisc. It is essentially a plastic "grey card" with two sides - a white reflective side, and a grey colored plastic backing side. What you do is set your SLR's white balance off of this disk under the lighting in which you wish to take pictures. Subsequent photos taken in that same lighting should look properly color balanced - not too blue, not too yellow, not too red.
Here's how I do this on my older Nikon D70s, possibly similar on other cameras as well:
1) Press the WB button
2) Thumbwheel over to "PRE" mode (release WB button)
3) Press and hold WB button until "PRE" starts flashing (release WB button)
4) Focus on and snap a picture of the Prolite Full Color & White Balance Disk, about an arm's length away, in the lighting conditions you are using
5) Camera will tell you "Gd" (good) or "No Gd" (no good). If you get "No gd" try again. Else, the camera will set its white balance off the disk using the lighting setup you've got, or the ambient lighting present.
Now, leaving your WB in the "PRE" mode, go snap some pictures of your intended subject. Let's look at some comparison images. For this test, I'll use my primary home defense gun as an example:
Above: Camera is on AUTO WB. Looks kind of yellow. Not too good.
Above: Camera was set to INCANDESCENT WB since this is the type of bulb I'm using in my light source. Looks better, but still has a bit of a tint to it. I'll try again, but this time using the white balance disk.
Above: Final try, this time the PRE WB was used and set off of the white balance disk. Looks much better now - no tinting, no casting, no odd colors. You can do any final adjustments as you wish in Photoshop, if needed.
NOTE that this method makes it really easy to get nicely color balanced photos no matter what kind of light source you have available. It could be fluorescent, incandescent, shade, sunlight, morning, evening, whatever - as along as you do a manual white balance adjustment, your images will come out great every time.
(By the way, that gun is NOT my primary home defense gun, I was only joking!
)
Enjoy! I hope this is helpful to others out there. Feel free to ask me any questions that you may have on how to do this for yourself.
Manual Mode instead of Aperture Mode - Some time ago, I figured out that in manual mode, I get to specify the shutter speed and the aperture. In the photography world, this is helps to determine the exposure - how much light gets into the camera's sensor and gets translated into an image. When taking multiple pictures of a single item (perhaps from different angles), you want the exposure to be the same across all of your photos. The best way to do this is to take control and to specify all of the settings yourself. If you don't, each time you fire the shutter, the camera is evaluating light data coming in through the lens, and it chooses a shutter / aperture setting to produce what it deems to be a good exposure. The key here is to take control and determine for yourself what you want your image to look like - hence why you're going to specify both shutter and aperture.
If you're taking a picture of a handgun, try starting with f/8 or f/11 as a start. For shutter speed, use the built-in light meter in your dSLR to help determine what the right setting is to use. I tend to pick a shutter speed that overexposes by about 1/2 to 1 stop, in order to give my photos a slightly brighter look. I adjust the shutter speed slower and slower until the built-in light meter indicates that my photo will be overexposed by 1/2 to 1 stop - that's when I take a sample photo to see how things are turning out.
Use RAW - Yeah, I was a JPG guy for a long time. However, after I started using Adobe Lightroom and playing around with the white balance settings, I figured out that taking pictures in RAW and then having the freedom to edit white balance completely in post-processing was just amazing. I now take nearly all of my light box photos in RAW, post-process, and then I'm good to go.
The only downside is that RAW takes up more space than JPG, but with storage being so affordable nowadays, I don't expect this will be a serious problem for anyone.
Camera remotes - In my original article, I talked about using a timer or using software on a PC to control the camera. I have since moved over to using a wired or wireless remote to fire the shutter. The timer was just taking too long to wait for, and it was getting annoying to set it up each time. Hooking up a remote or using a wireless remote is just easier overall. Obviously, if you don't have one, using the built-in timer will be the way to go.
Micro / Macro pictures - From time to time, you may have a need to take pictures of items VERY close up. This can be accomplished in a couple of ways.
With a point and shoot camera, look for this setting:
Choosing the macro setting on your point and shoot allows the camera to focus on something very close to the lens. This allows you to obviously get closer to your subject, thereby producing a much larger image of a relatively small object.
If you're using a dSLR, you can go out and buy a dedicated micro / macro lens. Nikon uses the term "micro" to describe these close-up lenses, whereas Canon uses the term "macro" to describe their offerings.
Here are some example micro lenses offered by Nikon (image credit goes to Ken Rockwell)
Now, suppose we wanted to take a picture of some snap caps. Without a micro or macro lens, most of our pictures will look similar to this:
Let's look at a sample taken with a Nikon micro lens:
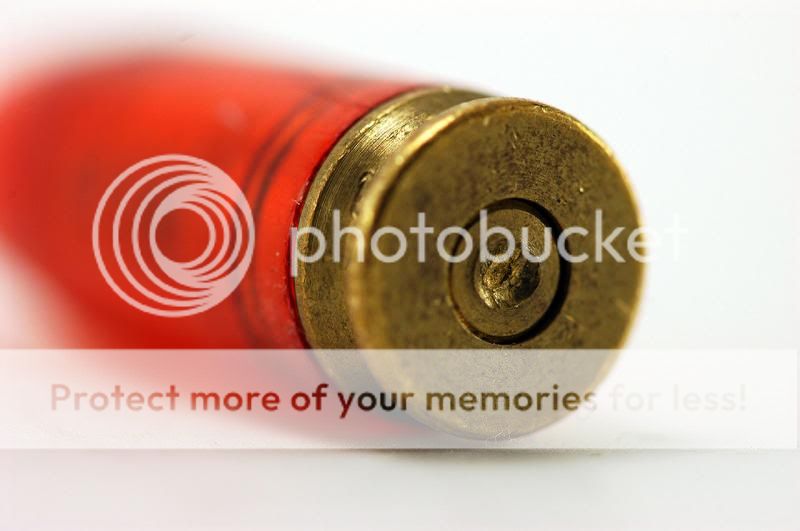
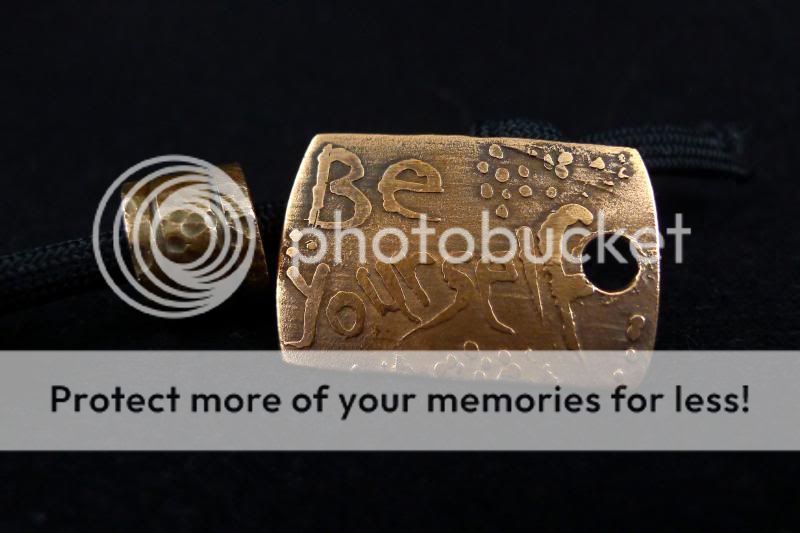
This is of course a close up image of a Pachmayr 9mm snap cap, the business end that takes all the beatings from firing pins. Notice you can see all the fine detail where the metal has been dimpled by repeated firing pin strikes. Also notice that micro lenses tend to have a very narrow depth of field, which is why not all of the snap cap is in focus. This effect can be leveraged artistically, if one is so inclined. Using a micro lens or your camera's macro setting will allow you to show off unique, distinct details of your favorite hobby items - for example, show off your new stippling work, engraving art, night sights, proof marks, rust spots, or blue job - just about anything that needs to be viewed up close and personal in order to be appreciated.
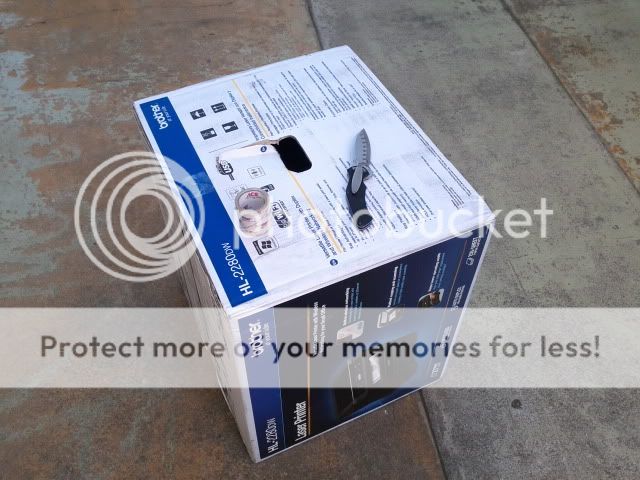
The box is around 24"x24"x20".
I first cut out the top and the front, leaving around 2"-3" around the edges.
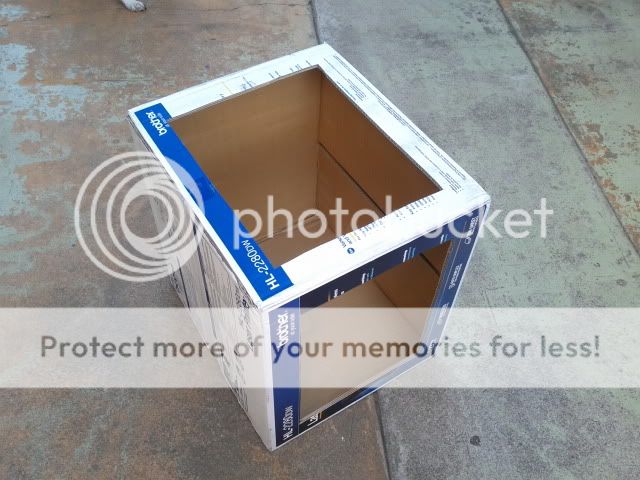
Then cut the paper to fit.
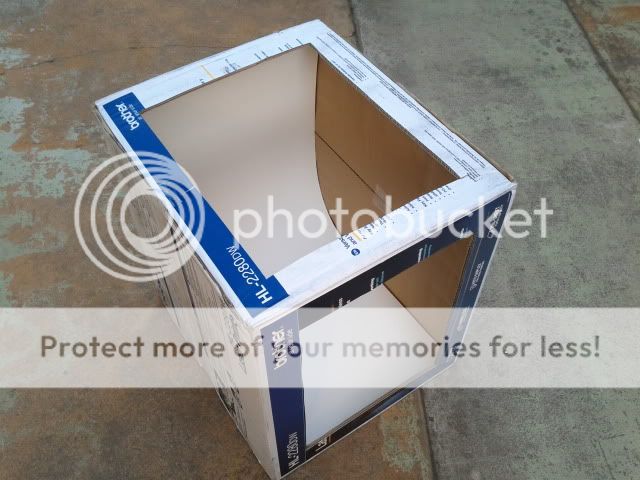
Once the paper was cut I cut windows in the sides. Also leaving 2"-3" around the edges.
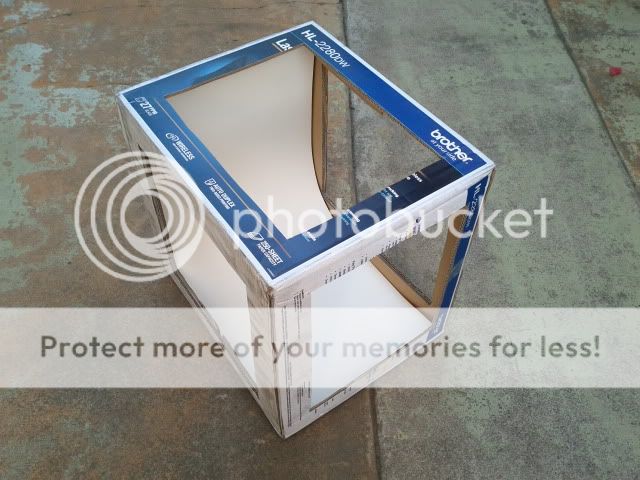
After I cut out the box I wrapped it with a white sheet. The front of the sheet can drop down to cover the front door.

Then cut a slit thru both the sheet and the box to attach the clamp light
First, you should assess your equipment. Point and shoot digital cameras will work ok but aren't ideal. You don't have a lot of control over the camera and what it's doing. Digital SLR's on the other hand, place a lot of flexibility into the hands of the user. If you are serious about taking a lot of studio or product photos, you should consider getting a digital SLR, as the better results will be imminently noticeable. I use a Nikon D70S with the standard 18-70mm kit lens. You don't need to spend a lot of money buying specialized lenses or anything like that - the kit lens, as you will see, generally works fairly well.
Second, you should consider the types of pictures you'll be taking. I enjoy studio shots where I can control lighting and the overall environment. This helps to ensure consistent, repeatable images which suit my purposes just fine. For the purposes of this posting, I'm going to talk exclusively about "studio" pictures. Don't use a flash! It kills the photo and makes it look just like a point and shoot consumer photo.
Your "Studio"
I've set up a small light box in my computer room. It looks like this:
The light box is made up of PVC pipe, to form a box shape, then it is draped with an inexpensive white bed sheet to serve as a light diffuser. I then used an old calendar, flipped it over to the white glossy side, and taped it to the rear of the light box to form a ramp-like shape. This serves as the white background. Different colors can be used, as well as fabrics, if you so choose.
I purchased two small 60 watt lamps from Target at $5.00 each on sale. I am using a Home Depot clamp light to provide illumination from the top of the light box. For nearly all shots, you should consider using a tripod (as above) or somehow stabilize your camera to prevent camera shake. You don't need an expensive tripod, all you really need is one that will hold the camera without tipping over or dropping it, and allow you to make minor adjustments as needed. Make sure that wherever you put your light box, you close the drapes or blinds. This prevents excessive sunlight from leaking in, if you're taking pictures during the day. Else, take pictures at night, and you won't have to worry about this problem.
It is possible to take photos of objects without a light box, but you have less control over lighting and you can't soften it as much. I recommend light boxes for generally all small photo work.
Total cost for your lightbox studio above should be no more than $30 to $50.
Do you "need" professional studio lights? Well, you certainly could get some - Ken Lunde uses a set of Lowel lights as he's stated here before. What this does is gets him a known color temperature, which he can then set his camera to match. I've found that if you use incandescent bulbs (the standard round ones in most homes) and use the incandescent white balance on your camera, your photos generally will turn out ok.
Let's talk about how to set up your camera. I will cover two cameras - point and shoot, and digital SLR.
Your Camera Settings
Here are the settings I use on my Canon S400:
- Manual mode. This allows you to adjust some of the settings below.
- White balance set to incandescent, or match it to your light bulb type.
- EV can be set to +1, or +2, depending on the subject matter. Dark objects look good if you EV +2 and Photoshop the brightness and contrast later. Setting EV brightens up an image, making dark colors contrast better against a white background. You'll need to experiment with this setting to suit your product photo needs.
- Flash turned off. Flash is the #1 enemy of good close up product photos, as it creates hot spots. Our goal is to produce consistent, even lighting, without washing out any particular part of the object being photographed.
- Use high resolution and lowest compression available. This will give you plenty of pixels to work with later, during post-processing.
- ISO 200, or as low as you can go.
- Use your LCD to gauge how the image will turn out before you snap the picture. Obviously, this will use up a lot of battery power unless you have an AC/DC adapter.
- Because these cameras often determine aperture on their own, you'll need to play around with the focus to make sure you are getting the right parts of your product in focus. This may require pressing the shutter button halfway to get the camera to focus, then looking at your LCD to ensure the image will turn out as you'd like.
Here are the settings I use on my Nikon D70S:
- Aperture mode. This setting allows me to pick the depth of focus as it relates to the product being photographed. Generally speaking, for items that have depth or are longer, I like to use a smaller aperture (a larger aperture number, such as f/22) to allow more of the item to be in focus at once. The downside is that the shutter must stay open longer, which necessitates a tripod and consistent, bright lighting. In aperture mode, the camera will choose the proper shutter speed to produce a properly exposed photo. You won't need to worry about picking a shutter speed. Often the f-stop I end up using is in the range of f/22 or higher.
- White balance set to incandescent, or match it to your light bulb type. I then tweak it to +3 for my light box setting. This is done with one of the parameter wheels on the camera. At a white balance setting of +3, this gives me a color temperature of 2700 Kelvin according to the Nikon D70S manual.
- EV can be set to +1, +2, +3, or anywhere in between, depending on your needs. Lighter objects tend to photograph better if you don't adjust this setting. Darker objects benefit from a higher EV as it helps wash out the background to white, creating a nice contrast. You should experiment a little to find out what setting works best for your subject material.
- Sharpening mode normal. You will do all of your sharpening in post-processing, which is ideal, as it gives you more control over your results.
- RGB color saturation set to as high as possible, this is my personal preference to give more vivid colors.
- Use high resolution and lowest compression available. RAW is good, but I generally just use low compression.
- ISO 200.
- Timer mode. This allows the shutter to fire without any camera shake, even on a tripod. This is the only way to get completely sharp images unless you have a remote or fire the shutter remotely. I also use Nikon software to trigger the shutter using my notebook PC, which helps tremendously.
- Tripod. A tripod is a must have for taking photos with a digital SLR.
- Manual focus. I let the camera auto focus first, then turn off auto focus to manually tune. For the duration of the session, I usually leave auto focus off.
- Remote control. I now mostly use Nikon Camera Control to remotely fire the shutter. This eliminates the need to use the timer mode, plus I can transfer images directly to my hard drive, skipping the memory card altogether. This saves time and allows me to instantly begin editing the photos I've taken. You can also name them anything you want automatically and track/reset the numbering scheme via software, which is helpful if you don't want to bump up the counter in the camera because the camera's image counter stays static while you are using the control software.
Let's look at some samples!
Note: Gun above has been sold, so I don't have it any longer.
Your Post-Production Editing
All of my images are processed through Photoshop. Here are the steps I take:
- Start with your full resolution image.
- Auto color, auto levels, auto brightness and contrast. Start with one function and examine your image. Do you like the results? If not, move on to the next and try again. Compare and contrast the results with these automatic functions of Photoshop. Typically, one of them will produce results that improve the image's appearance. If not, it's time to go manual.
- Brightness/contrast. I typically increase brightness by +25, and contrast by +10 or +15. This helps to wash out the white background and to contrast the product sharply against the background. The result typically suggests that the product simply "floats" in space on your website, assuming you are using a white background as well.
- Apply filter "sharpen image". This brings out the detail of your product a little. I usually don't over sharpen, as it makes your image turn out grainy.
- Resize for web viewing, if appropriate.
- Erase leftover artifacts. Sometimes the background doesn't always wash out. If this is the case, then I go through with the eraser tool and clean up the image a bit.
- Save or rename your final photo.
Some General Tricks, Tips, and Hints
I've done enough home studio work to have learned a few more tricks, tips, and hints that I can share:
- Sometimes you have to move or block light sources. The lights often are too bright, which calls for more diffusion. You should then use either another piece of fabric or a sheet of white paper to help diffuse the offending lamp even more. This helps eliminate hot spots on your product and allows for more even lighting. It is not always necessary to add a second diffuser, but if needed, you can use this trick to help.
- Timer mode is not always necessary on point and shoot cameras. If you are using a tripod, often that is enough to ensure the camera is stable. I generally recommend timer mode or remote triggering of the shutter for SLR cameras.
- Don't always rely on the LCD to show you your photograph results. You need to load the image onto a PC where you can then stare at the entire image in high resolution. Sometimes a portion of the photograph will be out of focus, or you'll see some lint or dust on your product. This is not always evident when you preview the image on your camera's LCD, so be sure you keep a computer handy to check out all of your work as you snap pictures.
- Keep a log of your work. Write down (or type up) what worked for you and what didn't. This is the only way you can really remember and document your progress, thereby enabling you to improve upon what you have already done. It will also help prevent you from making the same time consuming and frustrating mistakes twice, assuming you even bother to read your notes.
- Experiment. Not all settings work equally well for all subject matter. Try different settings and note your results. You may stumble across a fantastic setting and configuration for a particular product photo.
- Read as much advice as you can and share your results. This is the best way to learn quickly and helps give back to the overall community of amateur photographers.
- One problem I've noticed only is an issue when you use higher f-stop numbers (or a smaller aperture). If you have any dust on your sensor, you will get small black specks showing up in your photos. I've noticed this is a consistent problem for me, which then requires that I go clean the sensor by gently blowing air across it with a blower. At smaller f-stop numbers, dust typically does not show up, fortunately, because the shutter time typically is less and the sensor doesn't pick up on the dust.
New for 2010: Getting White Balance Right
One thing I've noticed in my own photos and photos that other people take, it's often quite difficult to get a good white balance going without introducing a hue or color cast to your photos. Getting the right blend of reds and blues can be difficult, but not so much so if you know how to set your camera's white balance properly.
All cameras have some sort of "auto" white balance mode built-in. Unfortunately, this feature doesn't always work accurately, and subsequent photos may show yellow, blue, or reddish tints upon further review at your PC. The human eye sees "white" as "white" in nearly all types of light. Electronics, however, have to interpret the light source and use different built-in reference points to accurately reproduce shades of white. Since the "auto" feature doesn't always get this right, that's why you see colored tints appear in your pictures.
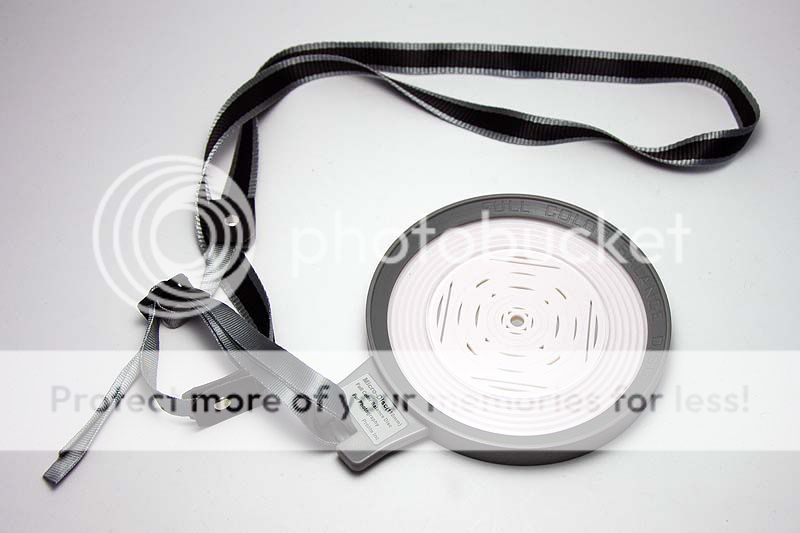
There are a many ways to fix this, but for now I'll cover my most recent method that seems to work for me. I went out and bought one of these:
Some of you professional guys might have purchased a similar product, called the Expodisc. I was going to do so until I noticed that this little device cost only $26 from Amazon instead of the $90 for an Expodisc. It is essentially a plastic "grey card" with two sides - a white reflective side, and a grey colored plastic backing side. What you do is set your SLR's white balance off of this disk under the lighting in which you wish to take pictures. Subsequent photos taken in that same lighting should look properly color balanced - not too blue, not too yellow, not too red.
Here's how I do this on my older Nikon D70s, possibly similar on other cameras as well:
1) Press the WB button
2) Thumbwheel over to "PRE" mode (release WB button)
3) Press and hold WB button until "PRE" starts flashing (release WB button)
4) Focus on and snap a picture of the Prolite Full Color & White Balance Disk, about an arm's length away, in the lighting conditions you are using
5) Camera will tell you "Gd" (good) or "No Gd" (no good). If you get "No gd" try again. Else, the camera will set its white balance off the disk using the lighting setup you've got, or the ambient lighting present.
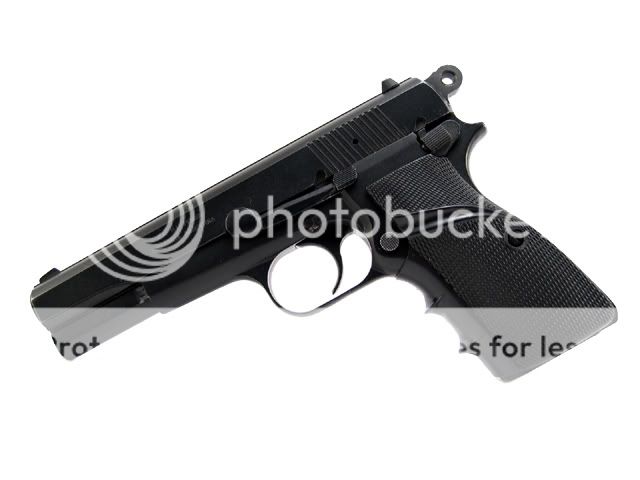
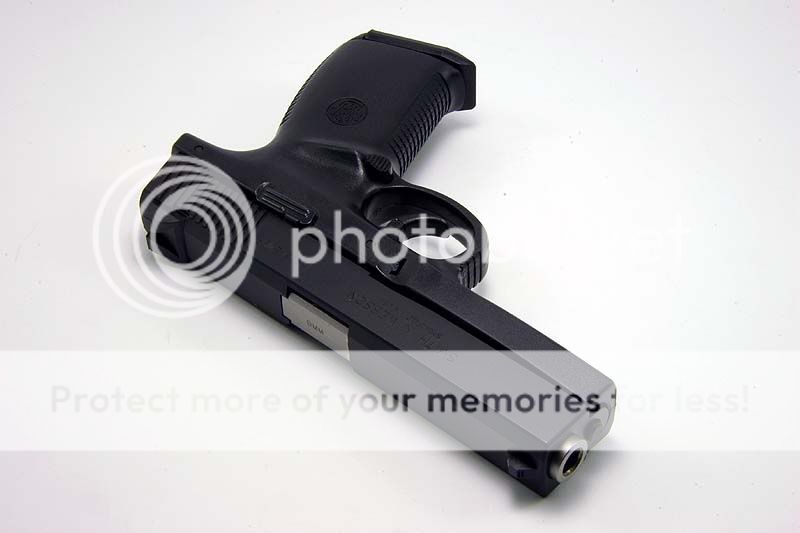
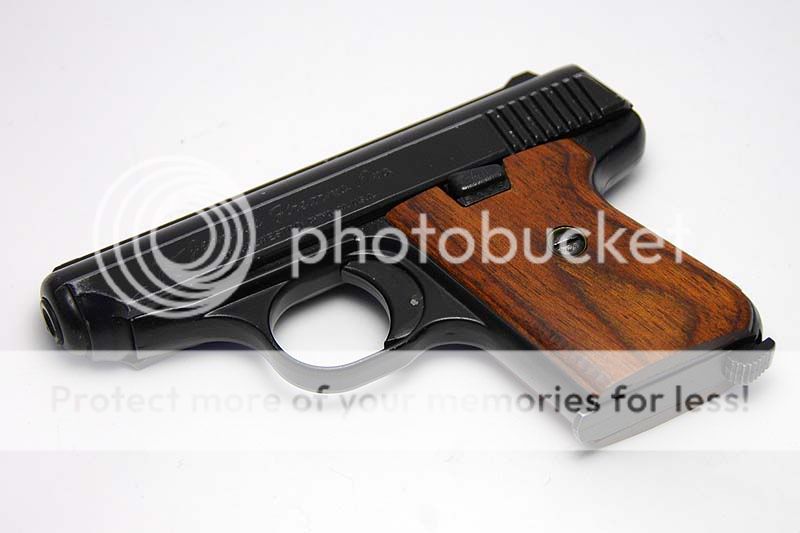
Now, leaving your WB in the "PRE" mode, go snap some pictures of your intended subject. Let's look at some comparison images. For this test, I'll use my primary home defense gun as an example:
Above: Camera is on AUTO WB. Looks kind of yellow. Not too good.
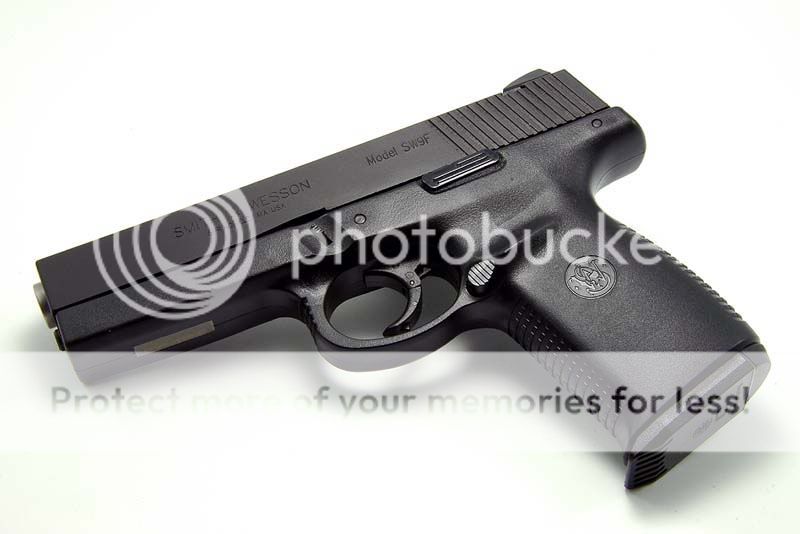
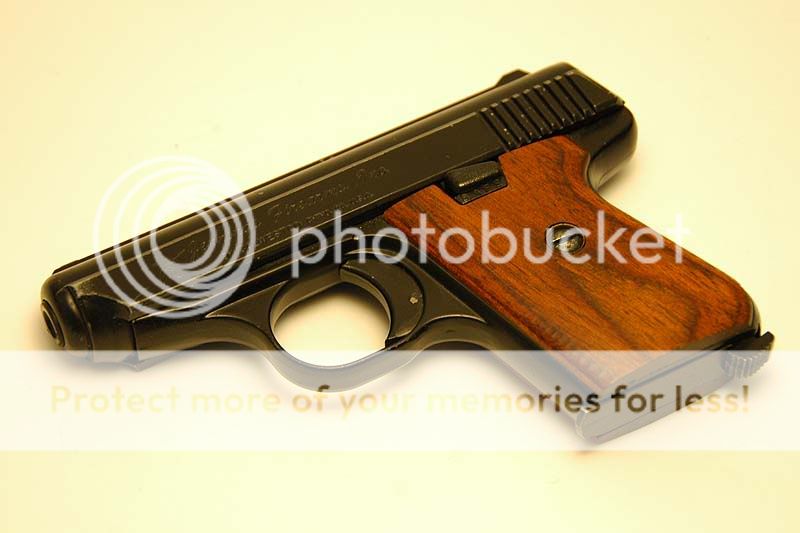
Above: Camera was set to INCANDESCENT WB since this is the type of bulb I'm using in my light source. Looks better, but still has a bit of a tint to it. I'll try again, but this time using the white balance disk.
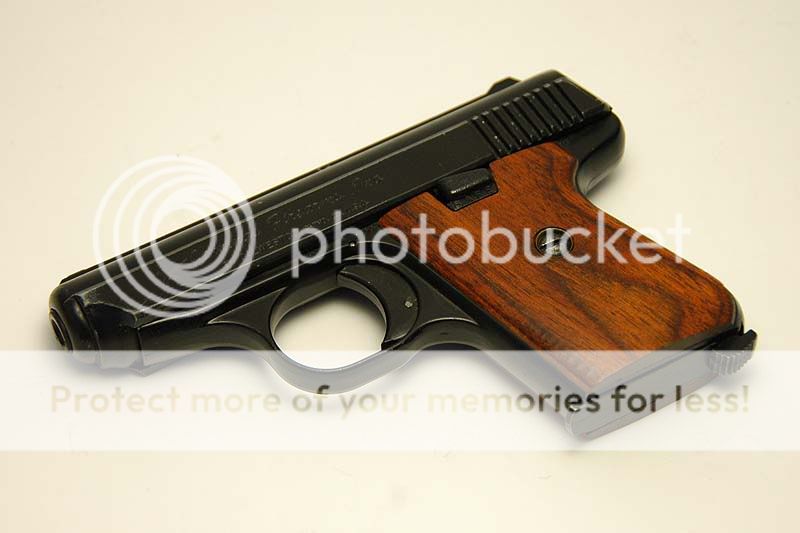
Above: Final try, this time the PRE WB was used and set off of the white balance disk. Looks much better now - no tinting, no casting, no odd colors. You can do any final adjustments as you wish in Photoshop, if needed.
NOTE that this method makes it really easy to get nicely color balanced photos no matter what kind of light source you have available. It could be fluorescent, incandescent, shade, sunlight, morning, evening, whatever - as along as you do a manual white balance adjustment, your images will come out great every time.
(By the way, that gun is NOT my primary home defense gun, I was only joking!
Enjoy! I hope this is helpful to others out there. Feel free to ask me any questions that you may have on how to do this for yourself.
Manual Mode instead of Aperture Mode - Some time ago, I figured out that in manual mode, I get to specify the shutter speed and the aperture. In the photography world, this is helps to determine the exposure - how much light gets into the camera's sensor and gets translated into an image. When taking multiple pictures of a single item (perhaps from different angles), you want the exposure to be the same across all of your photos. The best way to do this is to take control and to specify all of the settings yourself. If you don't, each time you fire the shutter, the camera is evaluating light data coming in through the lens, and it chooses a shutter / aperture setting to produce what it deems to be a good exposure. The key here is to take control and determine for yourself what you want your image to look like - hence why you're going to specify both shutter and aperture.
If you're taking a picture of a handgun, try starting with f/8 or f/11 as a start. For shutter speed, use the built-in light meter in your dSLR to help determine what the right setting is to use. I tend to pick a shutter speed that overexposes by about 1/2 to 1 stop, in order to give my photos a slightly brighter look. I adjust the shutter speed slower and slower until the built-in light meter indicates that my photo will be overexposed by 1/2 to 1 stop - that's when I take a sample photo to see how things are turning out.
Use RAW - Yeah, I was a JPG guy for a long time. However, after I started using Adobe Lightroom and playing around with the white balance settings, I figured out that taking pictures in RAW and then having the freedom to edit white balance completely in post-processing was just amazing. I now take nearly all of my light box photos in RAW, post-process, and then I'm good to go.
The only downside is that RAW takes up more space than JPG, but with storage being so affordable nowadays, I don't expect this will be a serious problem for anyone.
Camera remotes - In my original article, I talked about using a timer or using software on a PC to control the camera. I have since moved over to using a wired or wireless remote to fire the shutter. The timer was just taking too long to wait for, and it was getting annoying to set it up each time. Hooking up a remote or using a wireless remote is just easier overall. Obviously, if you don't have one, using the built-in timer will be the way to go.
Micro / Macro pictures - From time to time, you may have a need to take pictures of items VERY close up. This can be accomplished in a couple of ways.
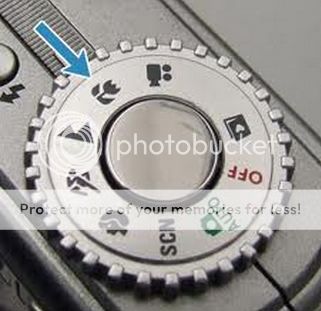
With a point and shoot camera, look for this setting:
Choosing the macro setting on your point and shoot allows the camera to focus on something very close to the lens. This allows you to obviously get closer to your subject, thereby producing a much larger image of a relatively small object.
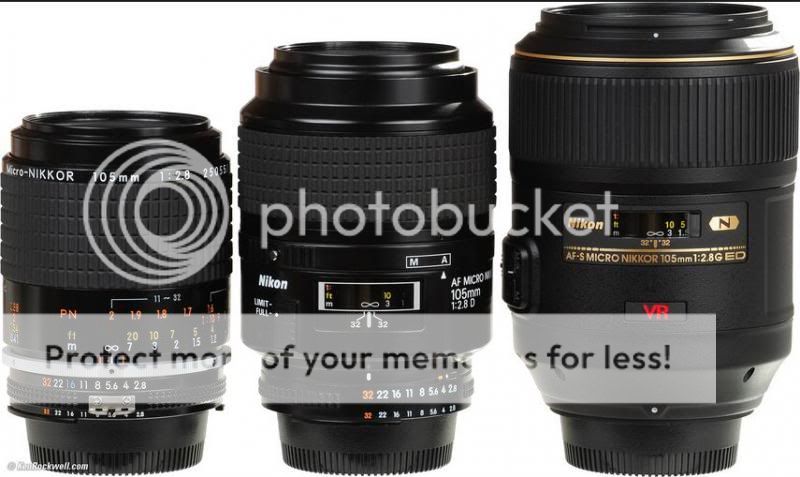
If you're using a dSLR, you can go out and buy a dedicated micro / macro lens. Nikon uses the term "micro" to describe these close-up lenses, whereas Canon uses the term "macro" to describe their offerings.
Here are some example micro lenses offered by Nikon (image credit goes to Ken Rockwell)
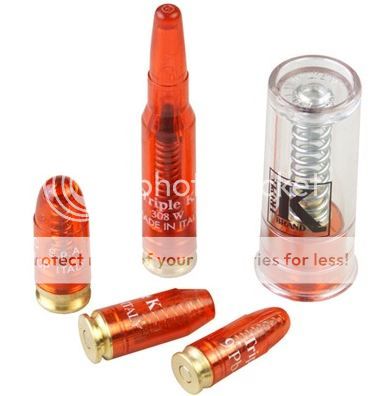
Now, suppose we wanted to take a picture of some snap caps. Without a micro or macro lens, most of our pictures will look similar to this:
Let's look at a sample taken with a Nikon micro lens:
This is of course a close up image of a Pachmayr 9mm snap cap, the business end that takes all the beatings from firing pins. Notice you can see all the fine detail where the metal has been dimpled by repeated firing pin strikes. Also notice that micro lenses tend to have a very narrow depth of field, which is why not all of the snap cap is in focus. This effect can be leveraged artistically, if one is so inclined. Using a micro lens or your camera's macro setting will allow you to show off unique, distinct details of your favorite hobby items - for example, show off your new stippling work, engraving art, night sights, proof marks, rust spots, or blue job - just about anything that needs to be viewed up close and personal in order to be appreciated.
The box is around 24"x24"x20".
I first cut out the top and the front, leaving around 2"-3" around the edges.
Then cut the paper to fit.
Once the paper was cut I cut windows in the sides. Also leaving 2"-3" around the edges.
After I cut out the box I wrapped it with a white sheet. The front of the sheet can drop down to cover the front door.
Then cut a slit thru both the sheet and the box to attach the clamp light

Last edited:
")