Attempt at UV HID Mag - failed

tomcat017

Enlightened
Joined
Jan 16, 2007
Messages
301
Location
NY, USA
Inspired by CPFers xpitxbullx and Burnt Retinas, I tried my hand at a UV version of the a 14W Mag HID (build by Mac). Obtained a 2" x 2" piece of Hoya U340 (not cheap stuff), and carefully and painstakingly ground it down to the size of the mag window. I fit it into the bezel, and it looked perfect.

IMG_7041_zps388fb1a0.jpg


IMG_7044_zpsf48c1570.jpg


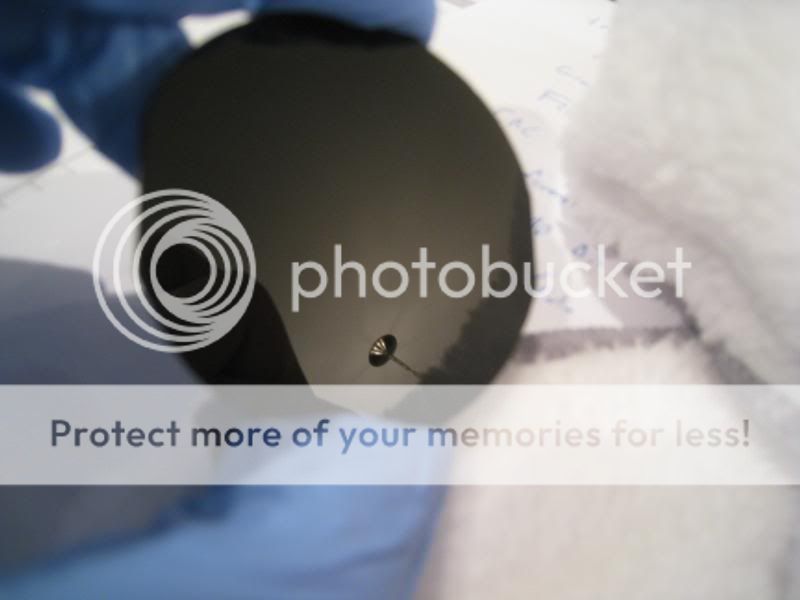
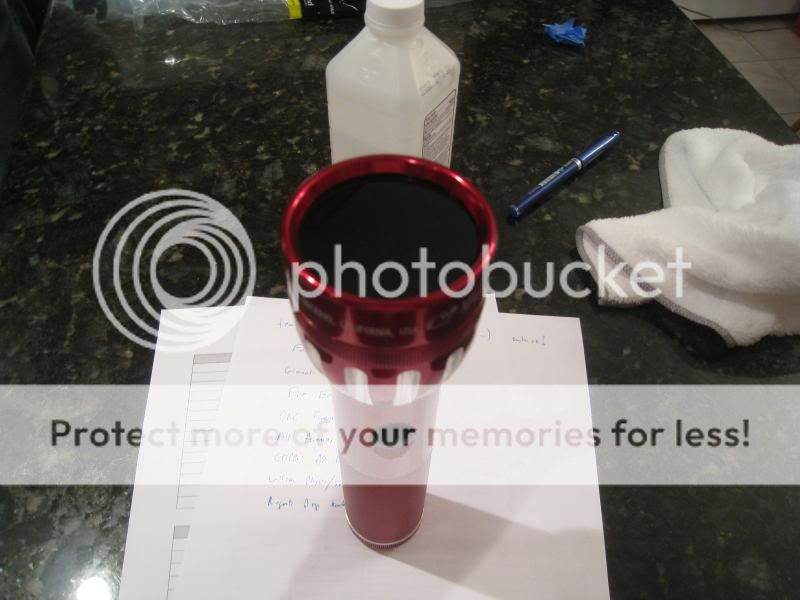
Fired it up, and it was amazing. UV was clearly fluorescing objects more than 40 feet away with negligible visible light output. I left it on for approximately 2 minutes, and then shut the light down. About 30 seconds after the light was turned off, I heard a pop and noticed a hairline crack across the window. After determining that there was nothing much to be done, I fired it up again for another 30 seconds. Initially, the output looked perfect. But as it ran (presumably, as the window heated up and expanded), the visible light began pouring it.

I'm not sure what went wrong. The threads by the CPFers listed above said that it worked just fine for extended runtimes. Initially after the crack, the window didn't feel all that hot. However, after another minute or so, the surface was fairly hot (could it really take this long for transfer by conduction to the surface of the window?). Now I'm trying to figure out what the problem was -- perhaps it was the sheer amount of heat produced by the blocked IR? Or perhaps the tolerances were too tight, and thermal expansion of the glass pushed it up against the bezel walls enough to crack it.

I'm not sure, but I don't think I can afford to experiment with it again :(
 

tomcat017

Enlightened
Joined
Jan 16, 2007
Messages
301
Location
NY, USA
And while you're reading...does anyone know if there are any viable LED-based solutions these days? In the past, they were way underpowered and ventured too far into the visible spectrum. I'm looking for a solid 320 - 380 nm range. Any CPFers out there who you guys would recommend to make a custom light if an LED solution is available?
 

PhotonWrangler

Flashaholic
Joined
Oct 19, 2003
Messages
14,457
Location
In a handbasket
Nice attempt! The problem has to be thermal expansion of the filter from the heat produced by absorbing the visible and IR wavelengths.

A related story -

A few years ago I stopped by a venue where they were setting up 3D video projectors for a sports event. They were using some pretty high lumen projectors with polarizing filters in front of the lenses. They were having trouble with the filters cracking, until someone came up with the suggestion of loosening the mounting clamps for the filters.

So it looks like your filter has to have some room to expand to keep it from cracking. Or you could try a piece of clear heat absorbing glass between the bulb and the UV filter. This type of glass was popular in slide projectors to prevent the bulb from melting the slides.
 

tomcat017

Enlightened
Joined
Jan 16, 2007
Messages
301
Location
NY, USA
@Andy, thanks - I'll hunt for a tread. If anyone has it handy, that'd be great.

@Photon - thanks for the feedback. I was sure it was the absorbance of the IR that was the problem (in fact, I considered using a more expensive Schott glass because it blocked the visible while allowing more IR out, but to save on cost and to obtain the optimal UV spectrum, I went with the Hoya). But you think it's definitely a thermal expansion issue, and not just that the glass is getting too hot, or changing temperatures too quickly, or has too large of a temperature gradient developing (outside to inside)? If so, I'd be willing to try again when I can afford to with more tolerances.

Toward your point - I tested the light again once the hairline crack developed. For the first 20 seconds or so of runtime (10 s of which were the HID warming up), I couldn't see any visible light leakage. However, 25 to 35 seconds into the run, the visible light output through the crack became substantial (enough to mask fluorescence, and clearly in the shape of the long crack in the window). The only explanation I have for that is thermal expansion of the crack itself. But we're talking massive expansion, in that case.

Given that the original glass is a 2" x 2" square, the edge length of the square is slightly less than proper the diameter of the window. As you can see in the photos, it is mostly circular, but has straight edges where there wasn't sufficient material to complete the proper contour. It didn't end up being an issue because the front of the bezel has a retaining lip which hides the missing glass.

But...that means there is already considerable tolerance on some sides of the window. In addition, because I have to sneak the window past the interior threads in the bezel, it was cut significantly smaller than its final resting place's diameter, and had a good amount of rattle. Until I tightened the bezel down. Do you think I need to leave it looser? I.e. it wasn't the absolute walls of the bezel that did it in, but the 'clampling' effect of the bezel holding the window against the reflector?

Also, I'm afraid that if I trim much more off of the window, it may begin to allow visible light through where it fails to completely cover the retaining lip. I'm not sure how much I have to play with. Do you guys think this is worth another try? And is there a better way to go about this? With the U340 being over $100 per shot, I'm hesitant -- but it worked so well...while it worked.
 

AndyF

Flashlight Enthusiast
Joined
Feb 19, 2013
Messages
1,102
Location
38.7296° N, 120.7985° W
I had to ask Dave (Nailbender) about the P60 drop in module directly since it is not listed at the Customlites website. He quote $60 + shipping. He only has single mode right now and it does require the use of primaries.

Your project looks interesting, keep us posted on how it progresses.
 

PhotonWrangler

Flashaholic
Joined
Oct 19, 2003
Messages
14,457
Location
In a handbasket
But...that means there is already considerable tolerance on some sides of the window. In addition, because I have to sneak the window past the interior threads in the bezel, it was cut significantly smaller than its final resting place's diameter, and had a good amount of rattle. Until I tightened the bezel down. Do you think I need to leave it looser? I.e. it wasn't the absolute walls of the bezel that did it in, but the 'clampling' effect of the bezel holding the window against the reflector?

I suspect it was the clamping effect. That's what was cracking those polarizing filters in the projectors. For the expense of that glass though, I'd look around for a piece of IR blocking glass to mate with it. Maybe you know someone who has a broken carousel projector in their attic? The IR blocking glass in those units works great.
 

tomcat017

Enlightened
Joined
Jan 16, 2007
Messages
301
Location
NY, USA
I had to ask Dave (Nailbender) about the P60 drop in module directly since it is not listed at the Customlites website. He quote $60 + shipping. He only has single mode right now and it does require the use of primaries.

Your project looks interesting, keep us posted on how it progresses.

Hey Andy - thanks for the info! Do you know the output specs on the dropin? Or if you don't think he'd mind, I'll PM Nailbender directly. Thanks for the help!
 

tomcat017

Enlightened
Joined
Jan 16, 2007
Messages
301
Location
NY, USA
I suspect it was the clamping effect. That's what was cracking those polarizing filters in the projectors. For the expense of that glass though, I'd look around for a piece of IR blocking glass to mate with it. Maybe you know someone who has a broken carousel projector in their attic? The IR blocking glass in those units works great.

Thanks again photon - I suspect you might be right. I actually thought about it while I was tightening the bezel, and ignored my better sense. But with the considerable side-to-side tolerance, and the asymmetric pattern of the crack (hairline on one side of the window, wider on the other) - that might be it.

I'll see if I can scavenge from a carousel projector - do they all have the IR blocking glass? and if so, where would it be located? Might be tough though, as there is barely enough clearance now between the HID bulb and the window. With an additional piece of glass in there, the bezel may not reach the threads. Also, any ideas on how to best attach it to the U340 glass? Just stack it? That would then prevent the U340 from getting hit with the IR, but wouldn't the clear IR-blocking glass heat up just as much, eventually cracking itself, or transferring the heat to the U340? And would that clear glass transmit the UV, or cut down on it unacceptably?

Added note: I powered it up again tonight. Within 30 seconds of runtime (especially after equilibration), the surface of the window was way too hot to touch with my hand. Pretty intense. The crack widens substantially under power, so I suspect considerable expansion. Next experiment will be to epoxy the window back together, and rest it on the surface of the bezel. I'll use a micrometer to measure expansion as it heats. I wish I had an IR thermometer to give you guys some temp readings, but I don't.

If I can get decent output, I may just cope with the narrow bandwidth and go with the LED. This is one of the coolest projects I've undertaken, and it looks plain mean too. But with quite the costly learning curve. :p
 

PhotonWrangler

Flashaholic
Joined
Oct 19, 2003
Messages
14,457
Location
In a handbasket
I'll see if I can scavenge from a carousel projector - do they all have the IR blocking glass? and if so, where would it be located? Might be tough though, as there is barely enough clearance now between the HID bulb and the window. With an additional piece of glass in there, the bezel may not reach the threads. Also, any ideas on how to best attach it to the U340 glass? Just stack it? That would then prevent the U340 from getting hit with the IR, but wouldn't the clear IR-blocking glass heat up just as much, eventually cracking itself, or transferring the heat to the U340? And would that clear glass transmit the UV, or cut down on it unacceptably?

The projector glass is closest to the bulb and I think it has a light greenish cast. It will get hot so you'd need an air gap between this and the UV filter. You might have to
find a way to extend the bezel to accommodate the added thickness. The glass will attenuate the UV a little bit - you might want to test this first by holding it in front of the flashlight while it's on to see if the attenuation is objectionable.

This is one of the coolest projects I've undertaken, and it looks plain mean too. But with quite the costly learning curve. :p

It IS very cool looking! A bright red flashlight with a black lens. Sort of looks like a sports car. :)
 

creyc

Enlightened
Joined
Aug 16, 2009
Messages
365
Location
Tampa, Florida
Keep in mind a piece of glass can take way more heat than your 14w bulb is able to dish out, so long as you've provided allowance for thermal expansion and the thermal gradient across the glass isn't so great as you mentioned. The glass will eventually melt, but if you're creating that much heat the light is probably toast anyway. :) Just getting the glass lens incredibly hot shouldn't be enough to cause it to crack.

Now the Hoya UV coating may have a temperature limit, I'm not sure. But by blocking much of that infrared energy with an IR lens and a small gap as mentioned will definitely help.
 

tomcat017

Enlightened
Joined
Jan 16, 2007
Messages
301
Location
NY, USA
Thanks guys. As far as the Hoya glass, I'm not sure it's coated - it almost looks consistent throughout. If it should be able to handle the heat, as you pointed out, then it must be the expansion that killed it.

Do you know if there is any chance that the thermal gradient could be an issue? Or is that safe to ignore?

I'll look into some IR glass, a way to get that in the beampath, and a means to manage its expansion.

I wish the original two members in the OP were still around CPF to comment on how they managed to make theirs work. Lost wisdom :p
 

FRITZHID

Flashlight Enthusiast
Joined
Jun 20, 2011
Messages
2,500
Location
Icelandic wastelands of Monico, WI
I built a 35w Stanley UV HID using the thick UV filter from a Magnaflux lamp, works very well, and is designed for the heat since the stock bulb is a 100w merc vapor. I increased the total UV output by very very carefully removing the UV blocking tube from around the hid bulb.
 

Tachikoma

Enlightened
Joined
Apr 6, 2007
Messages
487
I built a 35w Stanley UV HID using the thick UV filter from a Magnaflux lamp, works very well, and is designed for the heat since the stock bulb is a 100w merc vapor. I increased the total UV output by very very carefully removing the UV blocking tube from around the hid bulb.

Do you think this might be feasable too? http://www.candlepowerforums.com/vb...elp-for-an-UV-spotlight&p=4289811#post4289811

Also, how do you remove the UV blocking tube (?) from the bulb?
And finally, do you know any uv filter manufacturer that sells in Italy?
Thanks a lot ;)
 

evilc66

Enlightened
Joined
Jul 22, 2008
Messages
276
And while you're reading...does anyone know if there are any viable LED-based solutions these days? In the past, they were way underpowered and ventured too far into the visible spectrum. I'm looking for a solid 320 - 380 nm range. Any CPFers out there who you guys would recommend to make a custom light if an LED solution is available?

Best options for UV LEDs are from LEDEngin and Nichia. The Nichia LEDs are seriously expensive, and near impossible to get. LEDEngin you can get from Mouser and Newark. LEDEngin has 365nm LEDs in the LZ1, LZ4, LZC, and LZP pacakages. None are really what you would call cheap though, but that's true for all UV LEDs.
 

tomcat017

Enlightened
Joined
Jan 16, 2007
Messages
301
Location
NY, USA
Best options for UV LEDs are from LEDEngin and Nichia. The Nichia LEDs are seriously expensive, and near impossible to get. LEDEngin you can get from Mouser and Newark. LEDEngin has 365nm LEDs in the LZ1, LZ4, LZC, and LZP pacakages. None are really what you would call cheap though, but that's true for all UV LEDs.

thanks, evil. do you know of anyone who would be able to build a drop in or custom LED light using those emitters? Then again, as prices approach the $400 range, you might as well buy a professional mercury-discharge powered device.
 

jere

Newly Enlightened
Joined
Oct 5, 2013
Messages
11
Have you thought about using some kind of spacer that has some squish and heat tolerance? Maybe silicone? You could get more of a gap between the glass and the housing. I would think you should be able to find the rate of thermal expansion for that glass somewhere too. You might be able to do the math and take some temps and save some money.
 

evilc66

Enlightened
Joined
Jul 22, 2008
Messages
276
thanks, evil. do you know of anyone who would be able to build a drop in or custom LED light using those emitters? Then again, as prices approach the $400 range, you might as well buy a professional mercury-discharge powered device.

The LZP will probably be utter overkill in a handheld host like a Maglite, but the others would be easy enough to work with. The MCPCBs on those units are a little bigger than most, so you would have to take that into account. The LZ1 or LZ4 version would probably work pretty well in a Maglite with a decent reflector (won't be able to use TIR lenses with UV light).
 
Top