How do I use an AP1184T5 adjustable voltage regulator?

ncweiler

Newly Enlightened
Joined
Dec 2, 2013
Messages
3
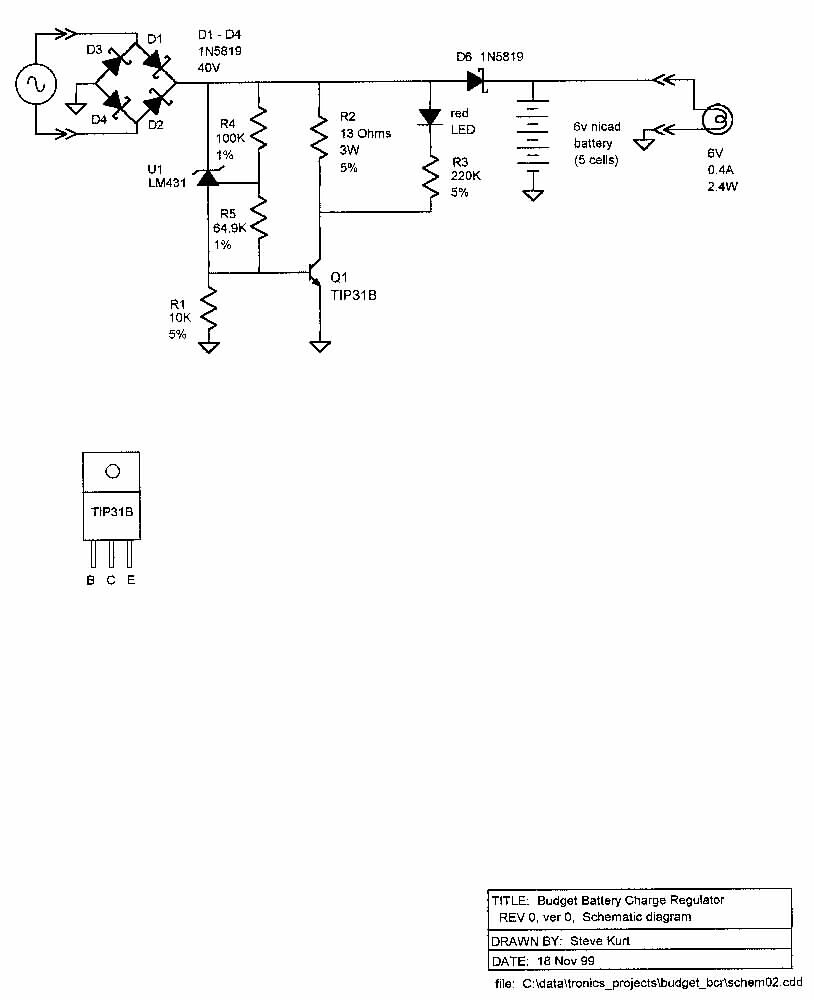
This is the circuit I am trying to build.
Dynamo (6V/3W AC) --> bridge rectifier (100V/4A) --> Capacitor (2200uF electrolytic, 35v) --> Capacitor (470uF tantalum, 16v) --> AP1184T5 (15V/4A DC) --> Capacitor (470uF tantalum, 16v) --> Battery Charger and lights

The circuit schematic and instructions for building it: http://www.techible.net/2012/06/bicycle-dynamo-usb-charger/

Datasheet for the voltage regulator: http://www.diodes.com/datasheets/AP1184.pdf
Look at page 3 of the datasheet for the circuit used to adjust the output voltage.

My problems are
1) Figuring out how to connect the Vin​ and the Vctrl​ pins.
2) Equation to calculate resistor values needed to output 13.5V or greater.

Problem 1)
Vin​: The input of the regulator
Vctrl​: This pin is the supply pin for the internal control circuit as well as the base drive for the pass transistor. This pin must always be higher than the Vout​ pin in order to regulate the device.

Can I simply connect the Vctrl​ pin to the Vin​ pin?

Problem 2)
I need the voltage regulator to output 13.5V DC or more. What resistor values do I need?

The equation
Code:
1.25 * (1 + R2/R1)
says R1 should be 1ohm and R2 10ohm. Is this the equation I should be using? The datasheet lists multiple equations, one is on page 3 in the middle and the other is on page 6 near the top.
 

Steve K

Flashlight Enthusiast
Joined
Jun 10, 2002
Messages
2,786
Location
Peoria, IL
some quick questions...
1. why are you designing the rectifier bridge and regulator for a 4 amp capacity when the dynamo can only produce 0.5 amps?
2. why do you need 13.5v out of the regulator?
3. did you notice that the regulator can only handle an input voltage of 16v? With a light load, many dynamos can produce more than 16v. You'll need to keep the dynamo loaded down sufficiently to keep its output voltage below this level.

I think that you may need to review the loads that you plan to attach to the dynamo, and then become familiar with the power and current capability of the dynamo.
 

ncweiler

Newly Enlightened
Joined
Dec 2, 2013
Messages
3
Thanks for the reality check. I never verified how many amps the hub dynamo could produce before I started to design the light circuit. :ohgeez: Back to the drawing board.
 

Steve K

Flashlight Enthusiast
Joined
Jun 10, 2002
Messages
2,786
Location
Peoria, IL
You could change to a 1A bridge rectifier, and consider a 7805 regulator instead of the one you've selected.

The only issue with using a regulator of this type is that with light loads, it will still be subjected to high voltages out of the dynamo at high speeds. The 7805 can handle input voltages of up to 35v, which isn't bad, but not entirely safe. The regulator can also get fairly warm too, depending on the load. You may need to provide heatsinking and exposure to some airflow. BTW, this is an issue for all linear voltage regulators, not just the 7805.

An alternative would be to use a shunt regulator instead of the series regulators such as the LM7805. I put together one for charging a 6v nicad battery a few years ago. It can be modified to produce a 5v output instead of the 6v output. It just takes a resistor change. It will still get warm too, but avoids the problems with high voltages by always placing a load on the dynamo.
5242793132_37bc5ea054_b_d.jpg
 

ncweiler

Newly Enlightened
Joined
Dec 2, 2013
Messages
3
After going back to the drawing board and more researching, I ended up with the following circuit:
Dynamo (6V/3W AC) --> bridge rectifier --> Capacitor (electrolytic) --> Capacitor (tantalum) --> LM7812C --> Capacitor (tantalum) --> 12v NiMH battery pack --> lights

Bench testing shows that it will easily handle all of my lights.

Parts list for circuit
Component
SourcePart Number
Bridge Rectifier (100V/1.5A)Radio Shack276-1152
Capacitor (2200uF 35v, electrolytic)Digi-KeyP5170-ND
Capacitor (0.47uF 35v, tantalum)Digi-Key718-1206-ND
LM7812C (+12v/1A)Radio Shack276-1771
Capacitor (0.33uF 35v, tantalum)Digi-Key399-9922-ND

The battery pack is 10 AA (1.2v, 2500mAh) rechargeable batteries wired in series.

The lights I'll be using are Sparkfun's LED Light Bars (Red, COM-12015, 54mA @ 12v) and some 10mm LEDs (80mA each, Sparkfun: COM-08862). Rough estimate says I should get about 5 hours of run time from the battery pack. The lights use about 270mA with all of them at full brightness.

Even though my goal was accomplished, I would still like to know how to use an AP1184T5 adjustable voltage regulator. I've never used a 5-pin voltage regulator before.
 

Steve K

Flashlight Enthusiast
Joined
Jun 10, 2002
Messages
2,786
Location
Peoria, IL
a few comments/questions:

1. I'm not sure that the tantalum cap on the output of the regulator is needed. The regulator doesn't care about it, and the nimh battery certainly doesn't care.

2. I'm not too sure that the tantalum cap on the regulator's input is needed either. The load isn't changing (unless there is more going on that what has been suggested), so a tantalum cap isn't needed to filter out voltage ripple.

3. for reference, a tantalum cap is an electrolytic cap. That 2200uF cap is an aluminum electrolytic cap.

4. Have you considered the charging requirements for a nimh battery? i.e. what trickle charge current it can handle and for how long? If the battery is nominally 12v, then charging it to 12v won't actually fully charge it. That will lead to a longer lifetime, but it will only have a partial charge.

5. How fast do you have to go in order to get 12v out of your dynamo, and what is the current output at different speeds? For a decent hub dynamo, I'd say that you'll need to go 12 to 14 mph to get at least 300mA to 400mA out at 12v.
edit: actually, due to the headroom requirements of the 7812, you'll need roughly 14v out of the dynamo. Well, adding the 1.4v required by the bridge rectifier, you'll need about 15.4v. You can save some of that voltage by changing to a bridge made of schottky diodes instead of silicon diodes.
 
Last edited:

Steve K

Flashlight Enthusiast
Joined
Jun 10, 2002
Messages
2,786
Location
Peoria, IL
Even though my goal was accomplished, I would still like to know how to use an AP1184T5 adjustable voltage regulator. I've never used a 5-pin voltage regulator before.

That regulator looks like it was intended for use in digital systems that use two different logic IC supply voltages. The control pin requires connection to a voltage higher than the output voltage.. see page 2 of the datasheet. This doesn't seem very useful in most applications.

To set the output voltage, see the paragraph titled "Output Voltage Setting" on page 5, and continued on page 6. The use of a resistor divider network in this way is very common, as is the 1.25v reference voltage. It's the same method that is used in the venerable LM317. The LM317 doesn't need a large output cap with low ESR, since it's not a low dropout regulator like the AP1184.
 

tomgopher

Newly Enlightened
Joined
Nov 27, 2011
Messages
12
I was going to DIY a regulator too, but ended up buying a variant of http://www.ebay.com/itm/Boost-Buck-...375?pt=LH_DefaultDomain_0&hash=item43b703d86f those can be had for ~$3 on ebay..do buck/boost(I prefer low current when bike stops/starts/going slow vs a steep voltage drop).

I literally used a simple diode rectifier bridge, connected to input of this board, set the voltage and attached a usb port on the output side. Seems to work great from limited testing so far.
 
Top