
ShineOnYouCrazyDiamond
Flashlight Enthusiast
The Tri-EDC is a powerhouse triple LED light that packs amazing punch for its size. The one limitation I find with the light is the available UI. I want more from a light than Low-Medium-High. Rather than just upgrading a driver I wanted to see if there was a way I could produce a light engine upgrade that was worthy of offering for sale.
I would like to present you with an upgrade light engine for Tri-EDC. This is a tellurium copper based light-engine with copper mPCB and a very flexible custom programmed 3.04A driver.
The key features of the light engine are:
- Tellurium copper body machined by Jeff Hanko.
- Noctigon triple copper mPCB with direct thermal path.
- 3.04A custom programmable driver.
- Carlco frosted narrow optic.
Jeff Hanko has produced a beautiful replica of the stock Tri-EDC light engine body. The choice of metals for best thermal management was copper, but it is highly reactive and long term oxidation of the contact surface was a concern. Tellurium copper is an alloy of copper with better machining properties and higher corrosion resistance. This is a solid chunk of metal with some good weight to it – it should allow the Tri-EDC to be pushed harder and longer at higher current levels.
Here are a few videos of how the parts were made:
http://youtu.be/GvWW6qTyg98
http://youtu.be/ihe-7NMNwdM
The Noctigon XP Triple is an advanced copper mPCB. The mPCB is made of solid copper, uses heavy copper traces and direct to copper bonding of the LED. This provides a direct thermal path for heat transfer. The LEDs are also aligned much more nicely on this mPCB so that they fit perfectly in the Carclo lenses.
The 3.04A custom driver is a NJANG 105C driver utilizing 8 x 380mA bin AMC7135 chips. The driver has been reprogrammed with the 'lucidrv' firmware by Dr.Jones. This firmware offers 16 levels of output, beacon, strobe, 2 mode groups with up to 7 modes per group, multiple memory options and a straightforward configuration menu. The programming instructions are posted further down in the thread and can also be found on his website http://drjones.dyndns.info. Although they look complicated at first glance, once I started to program a light I found it very easy to use and had the programming down within 10 minutes. At 3.04 Amps this driver is also more powerful than the stock 2.8 Amp driver. Please note: use only 18350 IMR cells with this drop-in.
Carlco frosted narrow triple optic. I've never been a huge fan of plastic optics. I find them to be very spotty with almost no spill. The frosted narrow version of the Carlco optic still gives a nice spot but has a bit of diffusion property that provides for a nice spill. For me, this optic changed my viewpoint on triples and made them really useful.
I am offering two different Cree LEDs in this run which are the XP-E2 and the XP-G2. Each LED is offered in several different tints. The XP-E2 gives a tighter spot with more throw and is offered in R2 and R3 flux bins. The XP-G2 gives a bigger spot which is not as bright as the XP-E2 in any one spot but has more total lumens.
The light engines are shipped with the default programming:
Group 1 - Moonlight Low, Low, Med, High, Strobe (Hybrid Memory)
Group 1 - High, Med (Normal Memory)
There are 13 light-engines available. The cost of the light engine is $90 each. Shipping is additional at $5 for CONUS orders and $10 for international.
1 - XP-E2 Cool R3 5700K wyldthng PAID SHIPPED
2 - XP-E2 Neutral R2 4000K H-nu PAID SHIPPED
3 - XP-E2 Neutral R2 4000K Barbarian PAID SHIPPED
4 - XP-E2 Neutral R2 4000K Mtbmurf PAID SHIPPED
5 - XP-E2 Neutral R2 4000K Colonel Sanders PAID SHIPPED
6 - XP-E2 Neutral R2 4000K JMP PAID SHIPPED
7 - XP-G2 R5-3C ~5000K LightJunk PAID SHIPPED
8 - XP-G2 R5-3C ~5000K eala PAID
9 - XP-G2 R5-5C1 ~4000K senna94 PAID SHIPPED
10 - XP-G2 R5-5C1 ~4000K emu124 PAID SHIPPED
11 - XP-G2 R5-5C1 ~4000K euroken PAID SHIPPED
12 - XP-G2 Q2 90+ Hi-CRI ~2700K Barbarian PAID SHIPPED
13 - XP-G2 Q2 90+ Hi-CRI ~2700K Colonel Sanders PAID SHIPPED
Please claim your light engine by number and send payment to SLONGTEMPS (at) GMAIL (dot) COM. Please use the purchase option and make sure your shipping address is correct as I will only ship to registered PP address. Also, please put the number of the light engine in the PP notes.
And now some pictures. I apologize for the quality as I only had my phone available at the time.
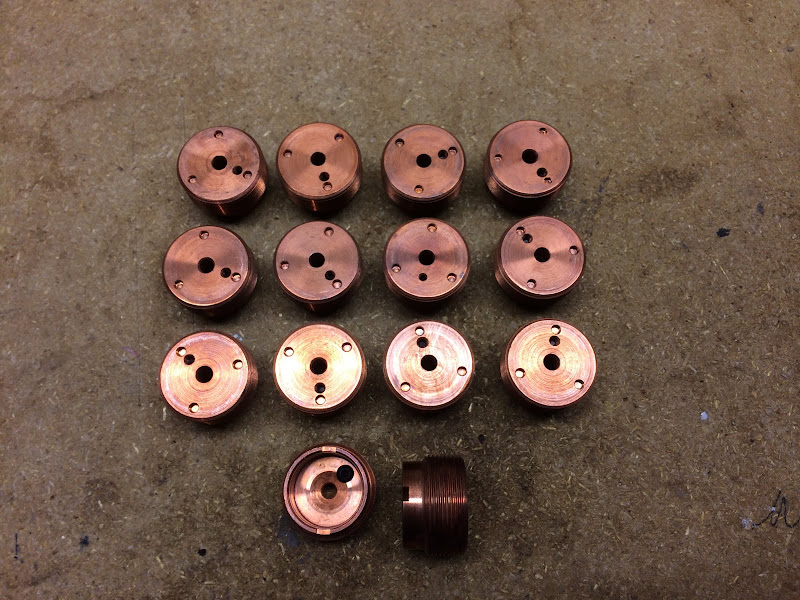
The copper light-engine bodies:
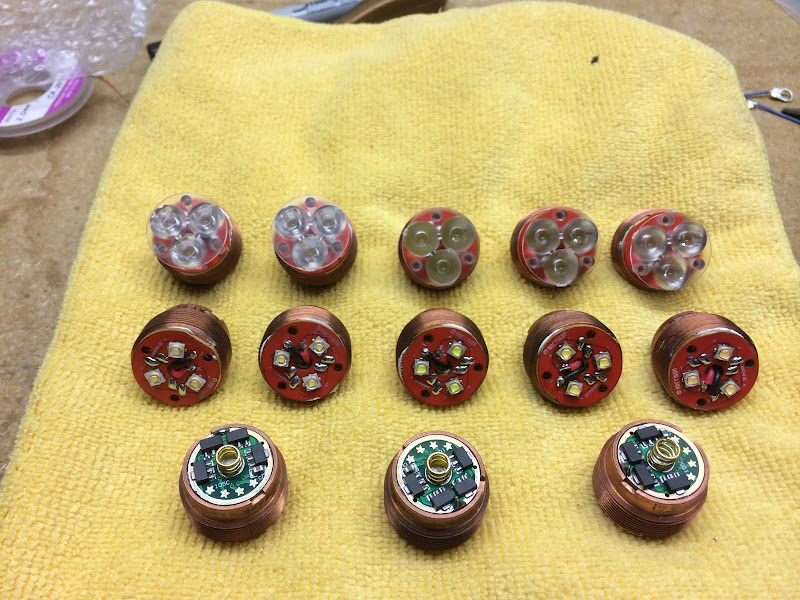
The Noctigon after re-flowing the LEDs. Solder flux has not yet been cleaned off.

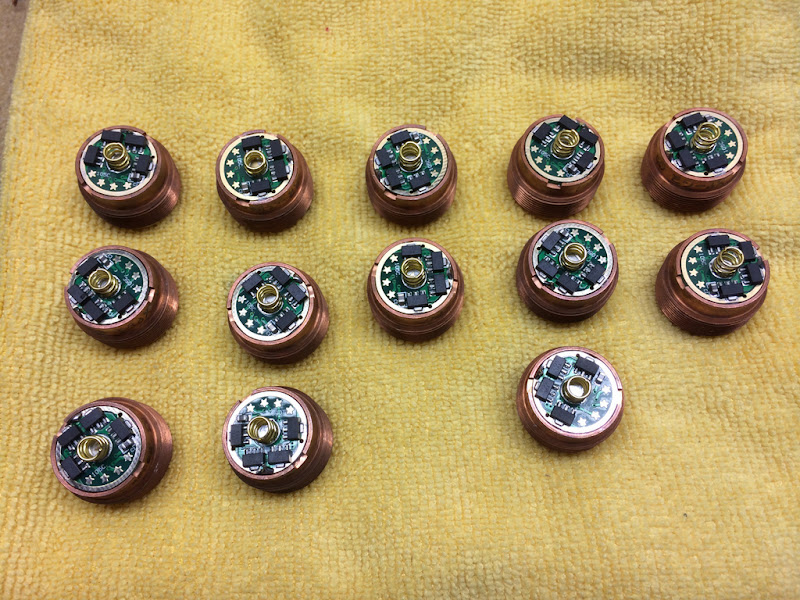
Completed driver installs:
Completed light engines with Carlco optic:
I would like to present you with an upgrade light engine for Tri-EDC. This is a tellurium copper based light-engine with copper mPCB and a very flexible custom programmed 3.04A driver.
The key features of the light engine are:
- Tellurium copper body machined by Jeff Hanko.
- Noctigon triple copper mPCB with direct thermal path.
- 3.04A custom programmable driver.
- Carlco frosted narrow optic.
Jeff Hanko has produced a beautiful replica of the stock Tri-EDC light engine body. The choice of metals for best thermal management was copper, but it is highly reactive and long term oxidation of the contact surface was a concern. Tellurium copper is an alloy of copper with better machining properties and higher corrosion resistance. This is a solid chunk of metal with some good weight to it – it should allow the Tri-EDC to be pushed harder and longer at higher current levels.
Here are a few videos of how the parts were made:
http://youtu.be/GvWW6qTyg98
http://youtu.be/ihe-7NMNwdM
The Noctigon XP Triple is an advanced copper mPCB. The mPCB is made of solid copper, uses heavy copper traces and direct to copper bonding of the LED. This provides a direct thermal path for heat transfer. The LEDs are also aligned much more nicely on this mPCB so that they fit perfectly in the Carclo lenses.
The 3.04A custom driver is a NJANG 105C driver utilizing 8 x 380mA bin AMC7135 chips. The driver has been reprogrammed with the 'lucidrv' firmware by Dr.Jones. This firmware offers 16 levels of output, beacon, strobe, 2 mode groups with up to 7 modes per group, multiple memory options and a straightforward configuration menu. The programming instructions are posted further down in the thread and can also be found on his website http://drjones.dyndns.info. Although they look complicated at first glance, once I started to program a light I found it very easy to use and had the programming down within 10 minutes. At 3.04 Amps this driver is also more powerful than the stock 2.8 Amp driver. Please note: use only 18350 IMR cells with this drop-in.
Carlco frosted narrow triple optic. I've never been a huge fan of plastic optics. I find them to be very spotty with almost no spill. The frosted narrow version of the Carlco optic still gives a nice spot but has a bit of diffusion property that provides for a nice spill. For me, this optic changed my viewpoint on triples and made them really useful.
I am offering two different Cree LEDs in this run which are the XP-E2 and the XP-G2. Each LED is offered in several different tints. The XP-E2 gives a tighter spot with more throw and is offered in R2 and R3 flux bins. The XP-G2 gives a bigger spot which is not as bright as the XP-E2 in any one spot but has more total lumens.
The light engines are shipped with the default programming:
Group 1 - Moonlight Low, Low, Med, High, Strobe (Hybrid Memory)
Group 1 - High, Med (Normal Memory)
There are 13 light-engines available. The cost of the light engine is $90 each. Shipping is additional at $5 for CONUS orders and $10 for international.
1 - XP-E2 Cool R3 5700K wyldthng PAID SHIPPED
2 - XP-E2 Neutral R2 4000K H-nu PAID SHIPPED
3 - XP-E2 Neutral R2 4000K Barbarian PAID SHIPPED
4 - XP-E2 Neutral R2 4000K Mtbmurf PAID SHIPPED
5 - XP-E2 Neutral R2 4000K Colonel Sanders PAID SHIPPED
6 - XP-E2 Neutral R2 4000K JMP PAID SHIPPED
7 - XP-G2 R5-3C ~5000K LightJunk PAID SHIPPED
8 - XP-G2 R5-3C ~5000K eala PAID
9 - XP-G2 R5-5C1 ~4000K senna94 PAID SHIPPED
10 - XP-G2 R5-5C1 ~4000K emu124 PAID SHIPPED
11 - XP-G2 R5-5C1 ~4000K euroken PAID SHIPPED
12 - XP-G2 Q2 90+ Hi-CRI ~2700K Barbarian PAID SHIPPED
13 - XP-G2 Q2 90+ Hi-CRI ~2700K Colonel Sanders PAID SHIPPED
Please claim your light engine by number and send payment to SLONGTEMPS (at) GMAIL (dot) COM. Please use the purchase option and make sure your shipping address is correct as I will only ship to registered PP address. Also, please put the number of the light engine in the PP notes.
And now some pictures. I apologize for the quality as I only had my phone available at the time.
The copper light-engine bodies:
The Noctigon after re-flowing the LEDs. Solder flux has not yet been cleaned off.
Completed driver installs:
Completed light engines with Carlco optic:
Last edited:
")

