Mod a Princeton Tec Switchback 2

jbbeer

Newly Enlightened
Joined
May 21, 2014
Messages
5
Hello all. This is my first post here. I found this site when searching for possible mods for my Princeton Tec Switchback 2. I haven't had much luck finding anybody who has done the same. What I wanted to do was to replace the leds in this light but I guess it is not that simple. Anybody done anything similar?

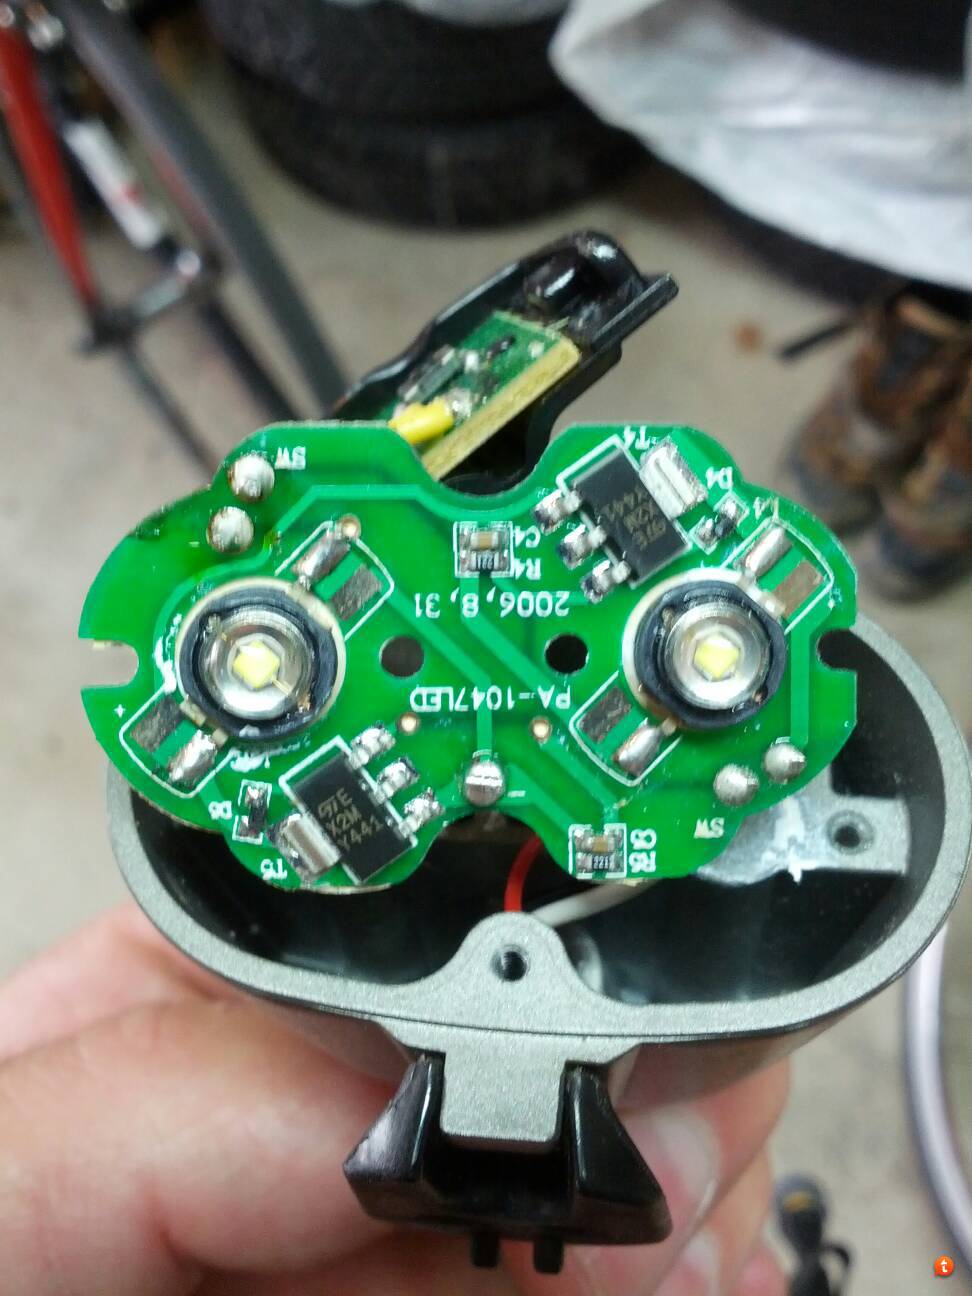
I have opened up the head unit and both leds are on a single board. Specs on this system are hard to come by, but I think that the leds are Luxeon III. I think I could remove the board entirely and fit two star leds in there instead but then the question is what do I do about a driver? There is not much space in there. And I have no idea what the battery is capable of. Or if cooling would be sufficient - the heatsink does not have a lot of contact area behind the leds.

Any suggestions are welcomed. I will post some pics to give an idea of what the housing looks like.
 

jbbeer

Newly Enlightened
Joined
May 21, 2014
Messages
5
As promised, here are the pics. One of the case behind the PCB (not too much space in there, the switch occupies the space on top) and one of the PCB holding the LEDs.

vena9u9a.jpg

8emyzeju.jpg
 

Steve K

Flashlight Enthusiast
Joined
Jun 10, 2002
Messages
2,786
Location
Peoria, IL
that looks like fun. :)

The LEDs do remind me of the Lux III's. Electrically, I suspect that you could drop a modern white LED in there and be just fine. The only difference should be a slightly lower voltage across the LED.

The new package style of LED might be a challenge. A star (a.k.a. MCPCB) would likely be the best option. It'll provide a suitable thermal path, easy contacts to wire to, and might get the LED in roughly the right position relative to the optics. You may have to cut the star down to size to fit in the same footprint as the Lux LEDs.

I am a bit curious about the circuitry. If I had to guess... I'd say that this uses linear current regulators. It looks like there is a medium sized transistor for each LED, and that might do the job. There would need to be more parts to make a proper current regulator, though. Perhaps these are actually current regulator IC's instead of transistors?

Overall, this shouldn't be a big challenge. Keep us informed of the progress!
 

jbbeer

Newly Enlightened
Joined
May 21, 2014
Messages
5
Thanks for the info Steve. The bit about the circuitry was lost on me though. I tried googling the transistors (X2M Y441) but I couldn't find any info.

As a direct replacement, I have only heard mention of the Seoul P4 being suitable. Other than that, I am not aware of any other emitter I could solder in place on the pcb. They all seem to be of a different configuration, without the leads coming off from each side. The P4 would be an improvement (I think?), but when compared to more modern leds, the improvement may not seem so drastic.

I am pretty sure I could fit a couple of led stars in there but I don't know of any drivers I could get to fit the small space.

My multimeter reads 5V coming from the battery. This seems low, doesn't it?
 

Steve K

Flashlight Enthusiast
Joined
Jun 10, 2002
Messages
2,786
Location
Peoria, IL
My main point regarding circuitry is that it shouldn't matter. As long as you replace these LEDs with ones that have basically the same relationship between voltage and current, the electrical aspects should work out. My main concern would be that these LEDs have a forward voltage of around 3v. For a Lux III, I would expect something close to 3.3v or 3.4v.

A modern LED will have a forward voltage, Vf, closer to 3.0v. This should work fine for any circuit that I would expect to see.
The modern LEDs typically can handle more current too, which won't affect anything.

The main issues will just be mechanical. You'll need to get the new LED in a position relative to the lens where things are properly focused, which is probably a matter of raising the LED off of the board. If you have to lower the LED, that would complicate things quite a bit.
Once you know how much you have to raise or lower the new LED, you'll have to do it while still maintaining a good thermal path for getting heat out of the LED.

minor issues:
1. transistor markings: a lot of parts nowadays don't have their part numbers on them. They may have part of the part number, or just a few characters that tell you what variant of the general part it is. As someone who started electronics when parts were much larger, I find it frustrating.
2. battery voltage: I don't know what battery you have, so I can't comment on the voltage. 5v is certainly enough to drive two white LEDs wired in parallel with a well designed linear current regulator. It's not particularly efficient, but that's a separate issue. A switching regulator would likely improve efficiency, but add cost.
 

jbbeer

Newly Enlightened
Joined
May 21, 2014
Messages
5
I've checked the output in the various light modes with a multimeter right on the led leads (am I doing this right? :p). I got 3.2V 950mA on high, 3V 420mA on med, and 2.9V 160mA on low. So I am guessing this should be good for any 3W led? Current draw isn't dependent on the led, right? It's the driver. I am new to LEDs!

What do I need to know about heat output? Should the mfr spec sheets tell me all I need to know?
 

Steve K

Flashlight Enthusiast
Joined
Jun 10, 2002
Messages
2,786
Location
Peoria, IL
Those currents and voltages seem pretty reasonable. Dropping in a newer LED should be fine (assuming that the LED is rated for the current, etc.).
The relationship of current to voltage for new and old white LEDs are very similar, except that the voltages for any given current will be slightly lower for the new LEDs.

The heat output for the new LEDs will be slightly less than for older LEDs at any given current. Not a significant difference. As long as you keep a thermally conductive path from the LED to the existing heatsink structure, you should be fine. "Thermally conductive" can be interpreted as being aluminum or copper (or gold or diamond, if you like), with very flat mating surfaces and the use of thin, thin layers of thermal grease or thermal adhesives.
 
Top