
idleprocess
Flashaholic
My parents are building a new shed. I was originally invited up for the "summer roofing clinic" (thanks, Dad) but we got rained out. Thankfully I had a backup plan...
The shed is 30' x 8' with a single window in the middle of a long side - so it's going to need lighting to be useful. Rather than install floros or incandescent lights, I volunteered to build some LED fixtures. This is an ideal application for LED tape fixtures - small space, lighting requirements aren't overly demanding, cycle times will be relatively short, and indoors (or it will be once the roof is fully complete).
I grabbed some LED tape from http://www.ledcityusa.com/]LED City USA (4000K 3528 package, high density: 18 LED's per foot if you're keeping track at home) and other sundries - aluminum bar, cable clamps, butt splices, 14 ga outdoor wire, outlet boxes, cable glands, cable staples, a lighted switch, a power outlet, a power supply, some 18ga/2 cable I can't use up fast enough, and some other things I'm probably forgetting.
I don't have exhaustive step-by-step photos, so there will be gaps in the process.
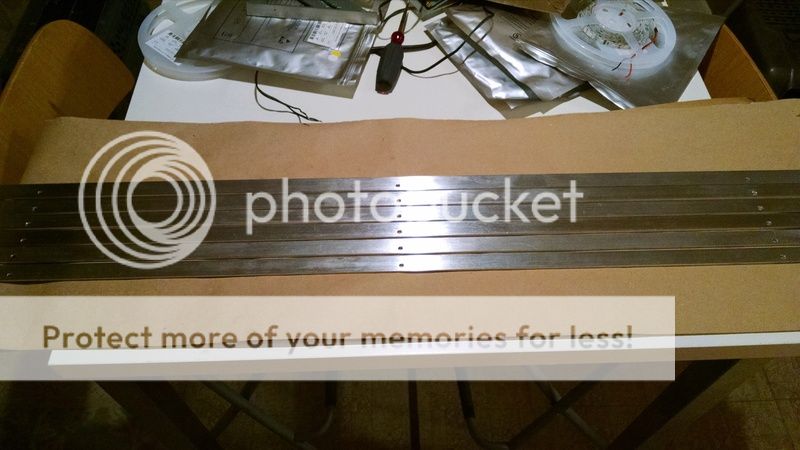
I probably spent more time prepping the aluminum than absolutely necessary - discovered that stainless steel pot scrubbers work wonders on stripping away that mill finish film plus the dings and scratches you inevitably come across on bar stock. I used a drill press to cut holes in the bar before mounting the LED tape assuming that the rafters would be spaced 16" on center. I learned later that assumptions are dangerous.

Obligatory "reel of LED tape" photo. The warmer tint on the inside is a result of the LED's being pressed up against the brown backing tape.
Astute observers will note that the completed fixtures are faintly visible to the left.
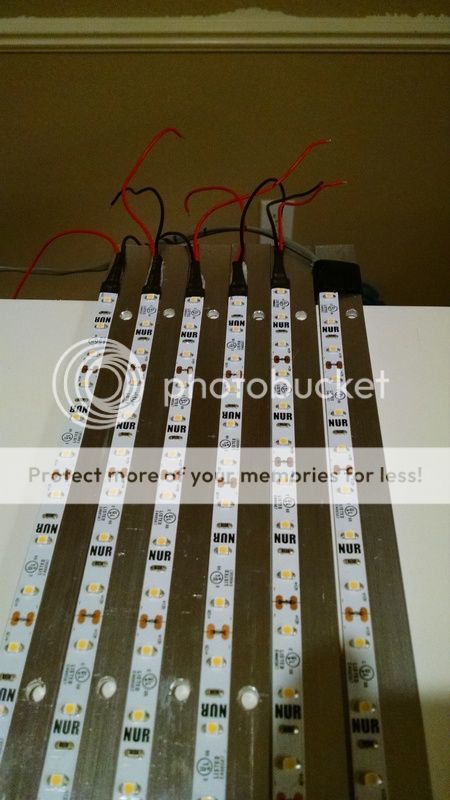
I swabbed the finished fixtures with rubbing alcohol, lined up the tape as best I could on the far side and applied it neatly as possible. Five of six had factory leads. The sixth one was a bit of a Frankenstein piece that tested my soldering theory of the bigger the blob the better the job.
After this photo was taken I added some of that terrible 18/2 cable to the end of the short ~4" factory leads since I wasn't entirely sure how I was going to run the wiring yet. I then applied copious amounts of electrical tape to strain-relieve the leads since they'd be hanging from a ceiling for some length of time during the installation process.
There are four 4' fixtures and two 3' fixtures. At about 120mA per foot and about 22 feet of LED tape, that's ~2.64 amps total. Power supply is 3 amps so I'm good to go.
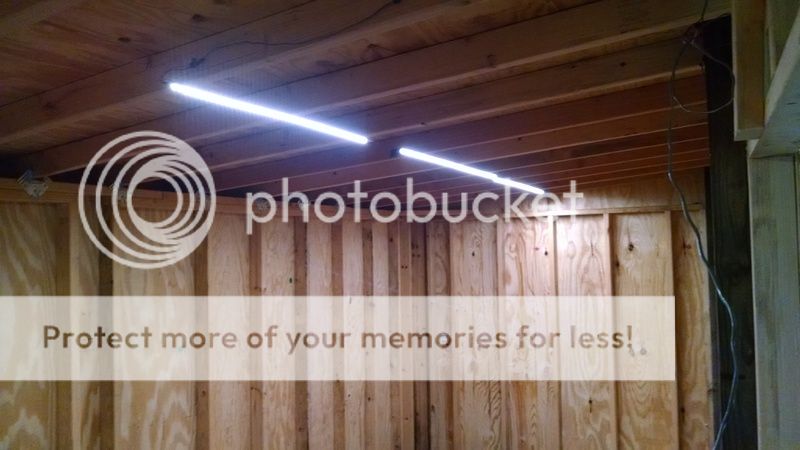
So now we skip forward to installation pictures at my parents house out of state. Here's the first half hung and lit up. Yes, I'm well aware that alignment isn't precise Let's just say that performing layout on the ceiling near the maximum extent of your reach has its challenges ... and hey it's a shed!
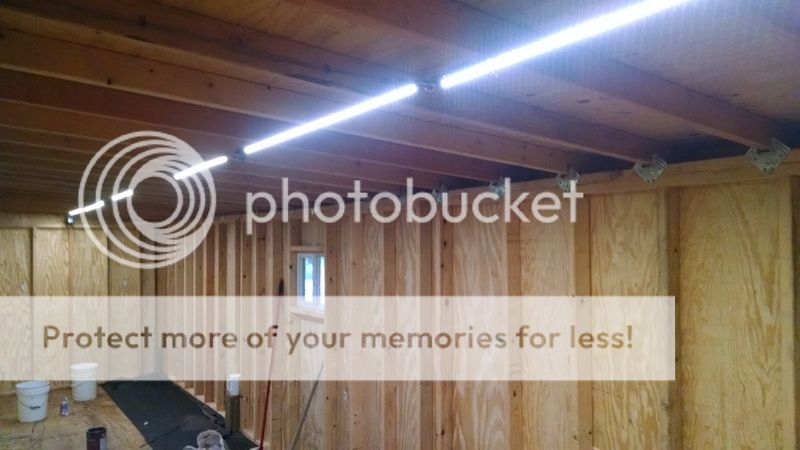
The entire array doing what's it's supposed to do. Note the buckets trying to prevent too much rainwater from soaking the floor - seems that weeks of just tar paper sitting somewhat loosely on the roof (being walked on and blown around a bit despite a number of weighs trying to hold it down) produced a number of drip spots.
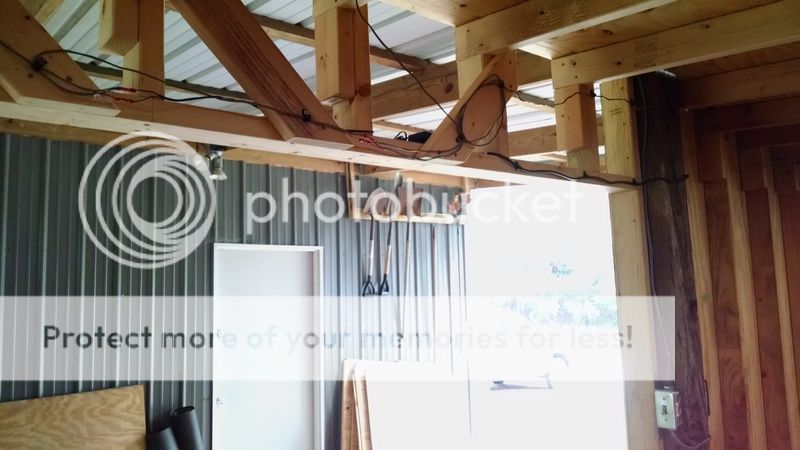
The DC wiring after being cleaned up. I had to take out some slack since I built in too much margin on both the fixture leads and the intermediate runs. The trusswork will eventually be enclosed by paneling once we fully finish the structure.
Not shown is the fun process of running the AC wiring from the shop. I had a choice between running it from a soon-to-be-replaced outdoor floodlamp fixture or running it a but further to split off the backside of one of the wall outlets in the shop; I chose the latter since there are plenty of times when you will want to access the shed without going into the shop.
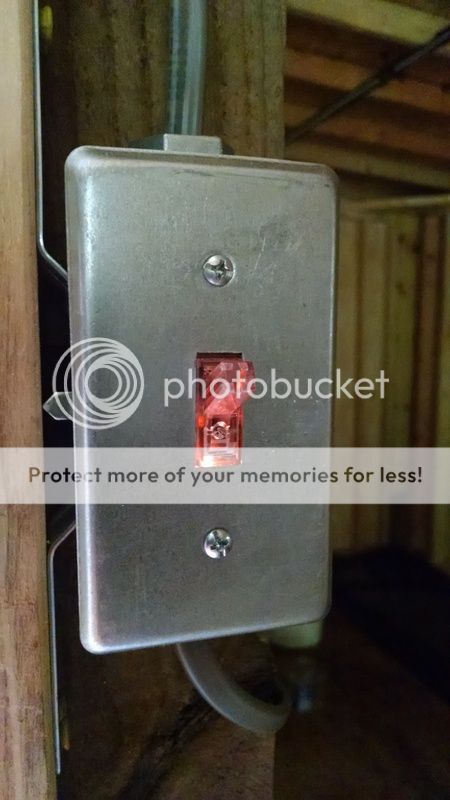
That lighted switch is going worth the extra few dollars - it's always going to be a little dark in there since the entrance is under a roof with the standalone shop blocking light on the other side.
the switch controls an outlet on the other side of the column that the power supply is connected to.
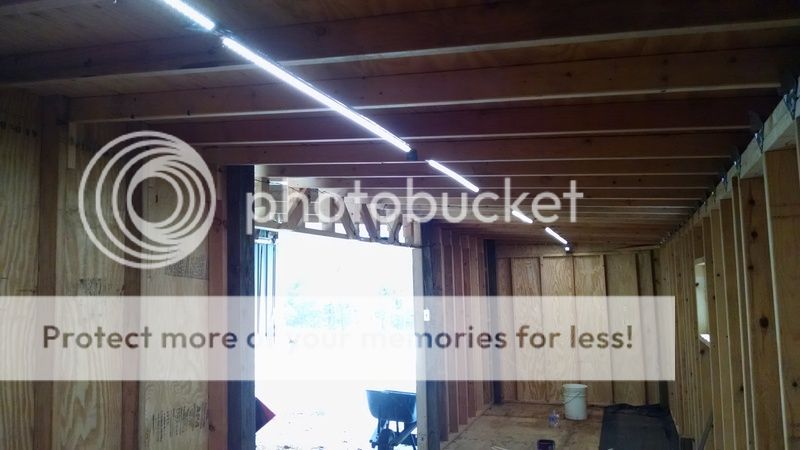
A job well done. It lights the space so much better than I was expecting it to.
All in all, probably cost more than just installing cheap T8 floros but still a satisfying weekend project.
The shed is 30' x 8' with a single window in the middle of a long side - so it's going to need lighting to be useful. Rather than install floros or incandescent lights, I volunteered to build some LED fixtures. This is an ideal application for LED tape fixtures - small space, lighting requirements aren't overly demanding, cycle times will be relatively short, and indoors (or it will be once the roof is fully complete).
I grabbed some LED tape from http://www.ledcityusa.com/]LED City USA (4000K 3528 package, high density: 18 LED's per foot if you're keeping track at home) and other sundries - aluminum bar, cable clamps, butt splices, 14 ga outdoor wire, outlet boxes, cable glands, cable staples, a lighted switch, a power outlet, a power supply, some 18ga/2 cable I can't use up fast enough, and some other things I'm probably forgetting.
I don't have exhaustive step-by-step photos, so there will be gaps in the process.
I probably spent more time prepping the aluminum than absolutely necessary - discovered that stainless steel pot scrubbers work wonders on stripping away that mill finish film plus the dings and scratches you inevitably come across on bar stock. I used a drill press to cut holes in the bar before mounting the LED tape assuming that the rafters would be spaced 16" on center. I learned later that assumptions are dangerous.
Obligatory "reel of LED tape" photo. The warmer tint on the inside is a result of the LED's being pressed up against the brown backing tape.
Astute observers will note that the completed fixtures are faintly visible to the left.
I swabbed the finished fixtures with rubbing alcohol, lined up the tape as best I could on the far side and applied it neatly as possible. Five of six had factory leads. The sixth one was a bit of a Frankenstein piece that tested my soldering theory of the bigger the blob the better the job.
After this photo was taken I added some of that terrible 18/2 cable to the end of the short ~4" factory leads since I wasn't entirely sure how I was going to run the wiring yet. I then applied copious amounts of electrical tape to strain-relieve the leads since they'd be hanging from a ceiling for some length of time during the installation process.
There are four 4' fixtures and two 3' fixtures. At about 120mA per foot and about 22 feet of LED tape, that's ~2.64 amps total. Power supply is 3 amps so I'm good to go.
So now we skip forward to installation pictures at my parents house out of state. Here's the first half hung and lit up. Yes, I'm well aware that alignment isn't precise
Let's just say that performing layout on the ceiling near the maximum extent of your reach has its challenges ... and hey it's a shed!
The entire array doing what's it's supposed to do. Note the buckets trying to prevent too much rainwater from soaking the floor - seems that weeks of just tar paper sitting somewhat loosely on the roof (being walked on and blown around a bit despite a number of weighs trying to hold it down) produced a number of drip spots.
The DC wiring after being cleaned up. I had to take out some slack since I built in too much margin on both the fixture leads and the intermediate runs. The trusswork will eventually be enclosed by paneling once we fully finish the structure.
Not shown is the fun process of running the AC wiring from the shop. I had a choice between running it from a soon-to-be-replaced outdoor floodlamp fixture or running it a but further to split off the backside of one of the wall outlets in the shop; I chose the latter since there are plenty of times when you will want to access the shed without going into the shop.
That lighted switch is going worth the extra few dollars - it's always going to be a little dark in there since the entrance is under a roof with the standalone shop blocking light on the other side.
the switch controls an outlet on the other side of the column that the power supply is connected to.
A job well done. It lights the space so much better than I was expecting it to.
All in all, probably cost more than just installing cheap T8 floros but still a satisfying weekend project.
Last edited: