
Introduction
This light was provided by Manker for review.
The Manker E14 II is a follow up to the E14 released about the same time one year ago. Like the original, it is available in Nichia 219 and Cree XP-G variants to satisfy users who prefer either high CRI or higher output.
For the E14 II, 219C and XP-G3 emitters are used, replacing the 219B and XP-G2 options in the original E14. The XP-G3 variant is reviewed here.
The most significant changes are that the switch moves to the side of the light from the tail, and built-in recharging is now included. The light also comes standard with 18650 and 18350 battery compatibility thanks to a clever battery tube design.
Here are the key review details in one table for the TL;DR folks:
Packaging
The E02 provided for testing is an engineering sample so it arrived in a plain brown box without any retail marking.
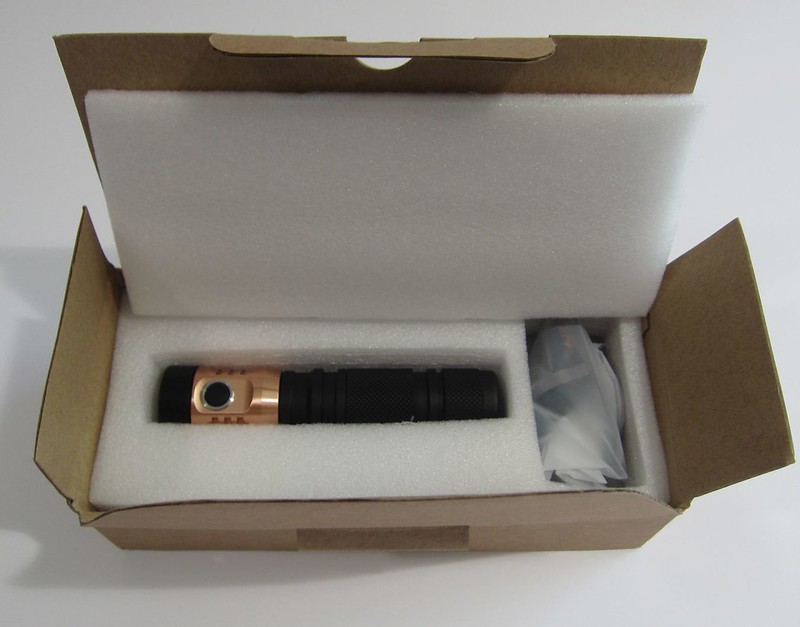
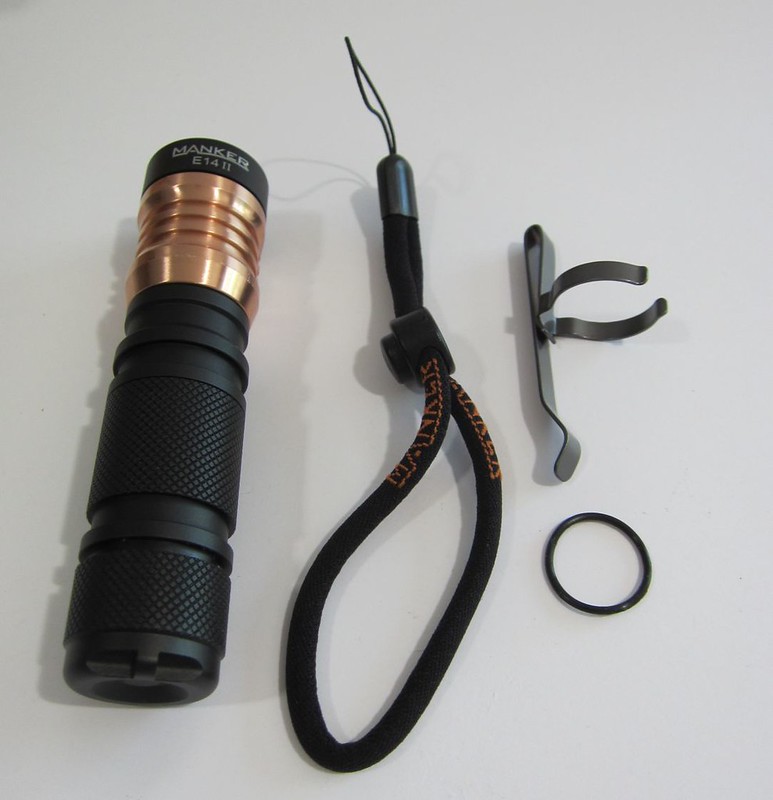
Opening the box, the E14 II is nicely protected by foam. An envelope contains a spare o-ring, lanyard, and pocket clip. No user manual accompanies this sample.
Design
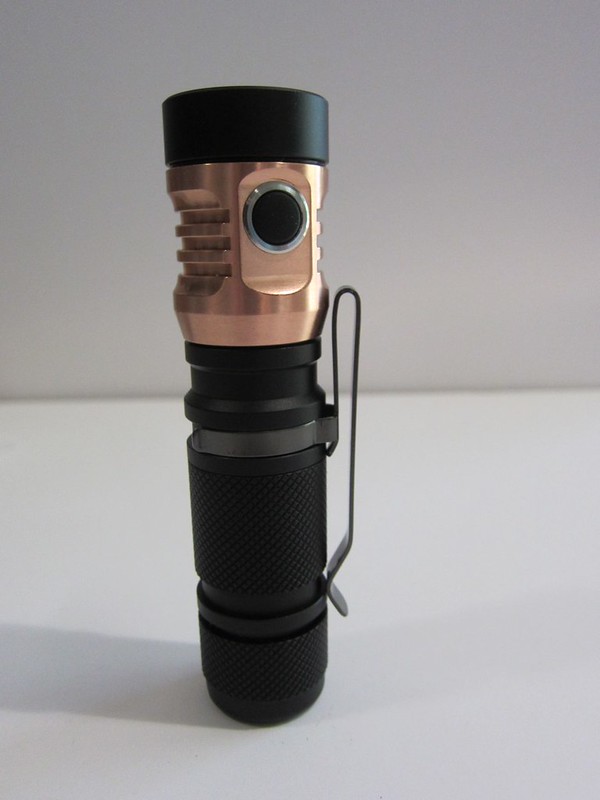
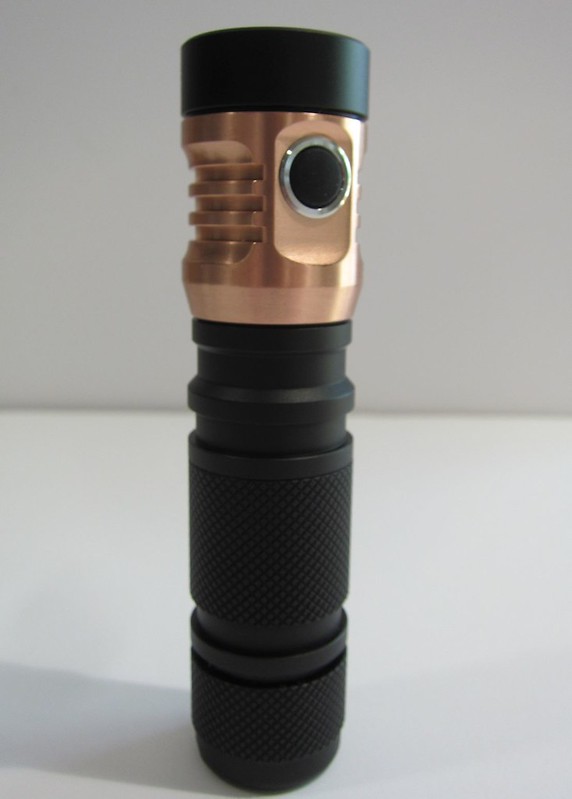
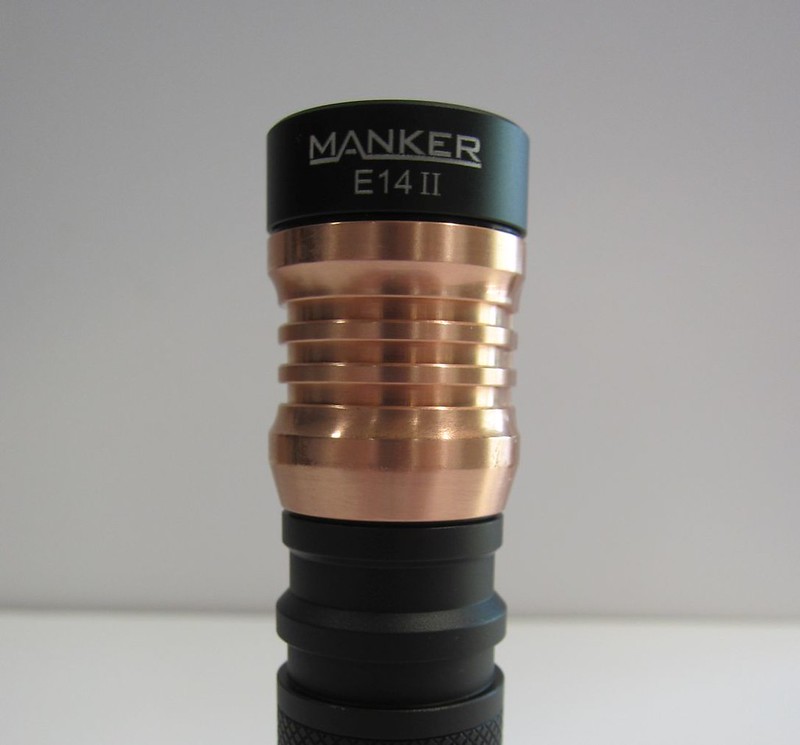
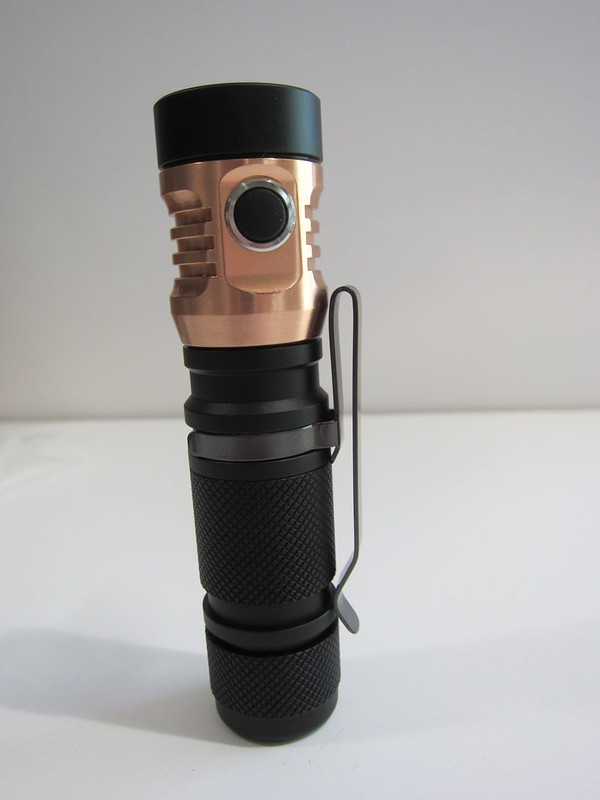
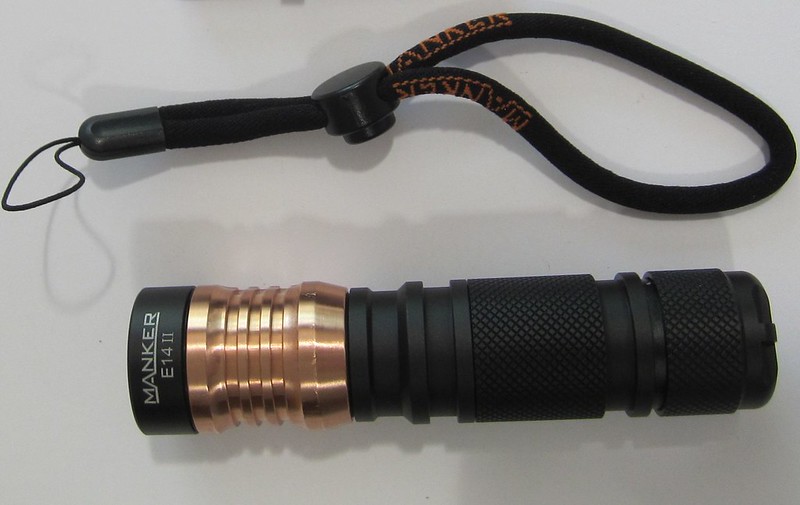
The Manker E14 II is a relatively compact single 18650-using flashlight. The defining feature is undoubtedly the large copper heatsink that goes from the star all the way to the exterior of the flashlight. The copper is very visible and even coated with a clear material to prevent a patina from developing.
It is 113 mm long with a width of 27 mm at the head. Weight without battery is 94 grams.
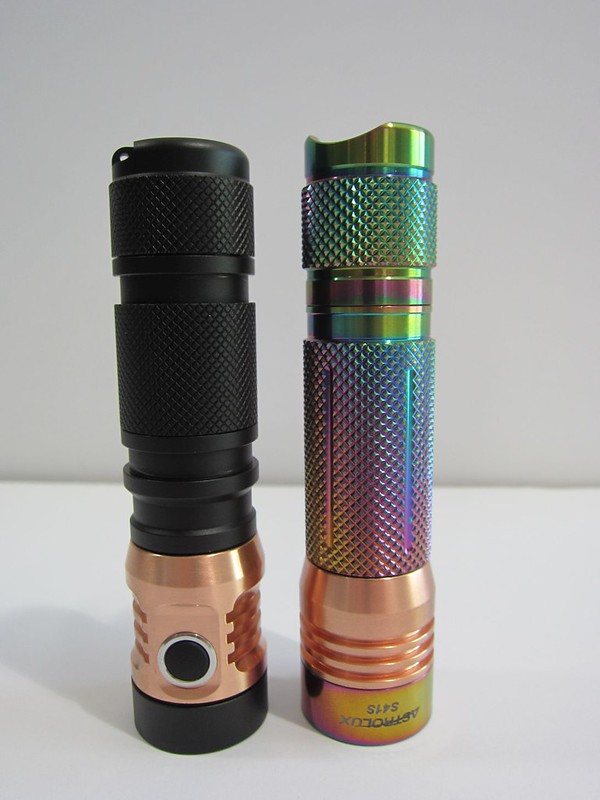
It is a small amount shorter than the original E14. Here it is next to an Astrolux S41S, which is a sister model of the original E14.
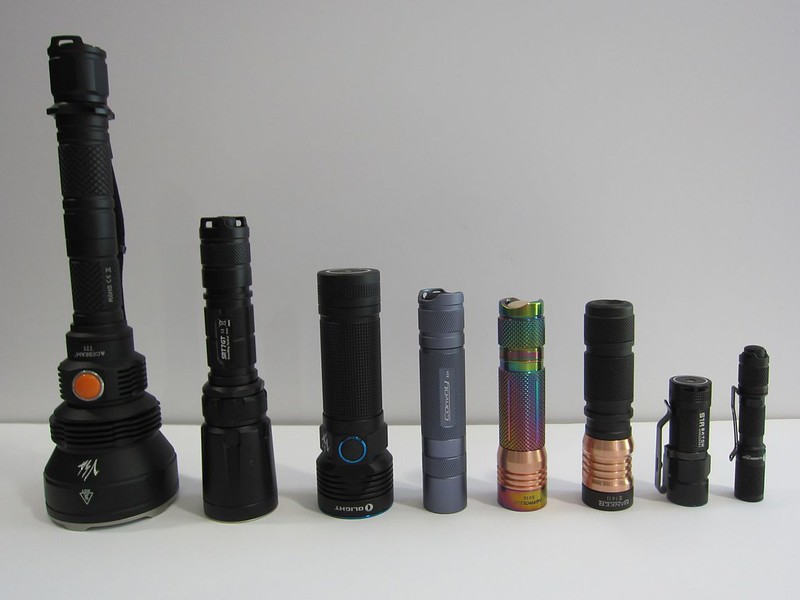
For additional size perspective, here is the E14 II with other lights.
L to R: Acebeam T21 (2x18650), Nitecore SRT7GT (18650), Olight R50P (26650), Convoy S2+ (18650), Astrolux S41S (18650), Manker E14 II (18650), Olight S1R (RCR123), Lumintop Tool (AAA).
The Manker name and E14 II model designation are engraved on the side of the bezel. Note that this is not simple printing/embossing – but actual engraving with the printing therein. It is clear and high quality.
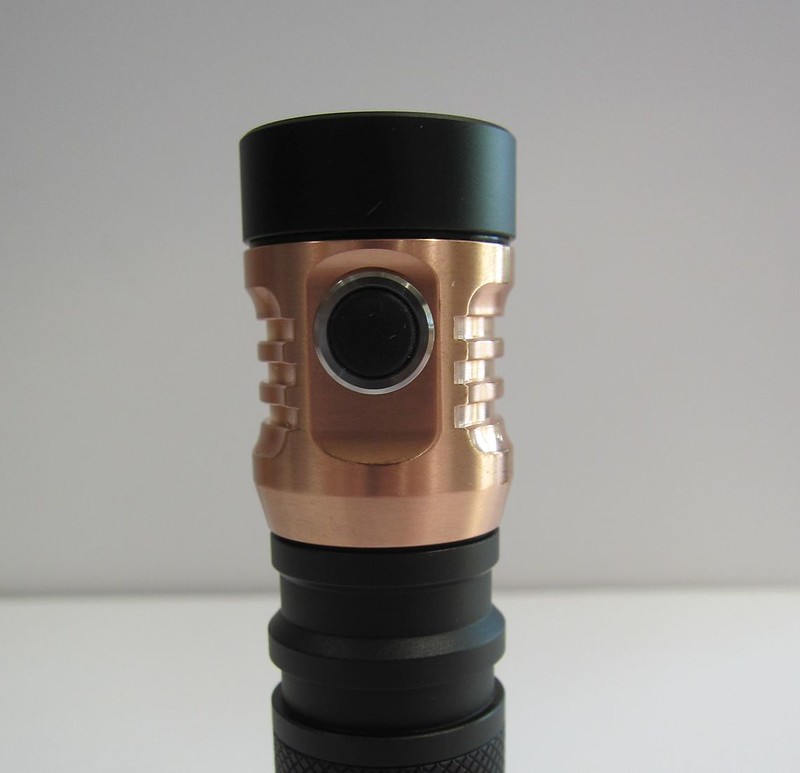
The copper heatsink has 2 fins that wrap around the light. They add a little bit of surface area for cooling, but also create variation around the diameter of the light so that the button is easier to find.
That switch is a simple black rubber circle. It is surrounded by a chrome-colored ring. It can be difficult to find in the dark as it lacks texture and size. The flat area around the button is not pronounced enough to add any anti-roll surface to the E14 II. It will freely roll on flat surfaces.
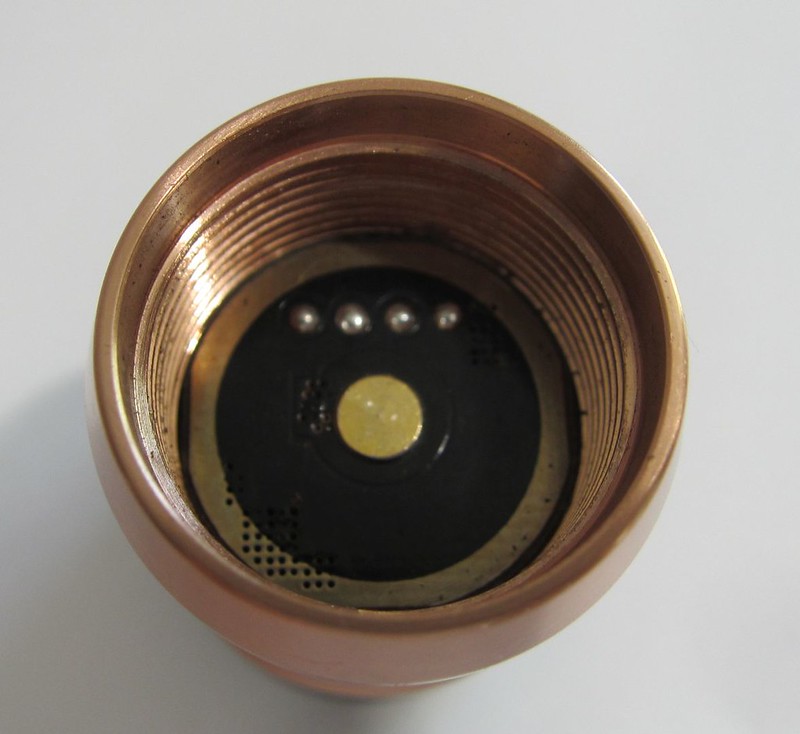
The bezel is a flat and black. It can be easily unscrewed for access to the optic and LEDs.
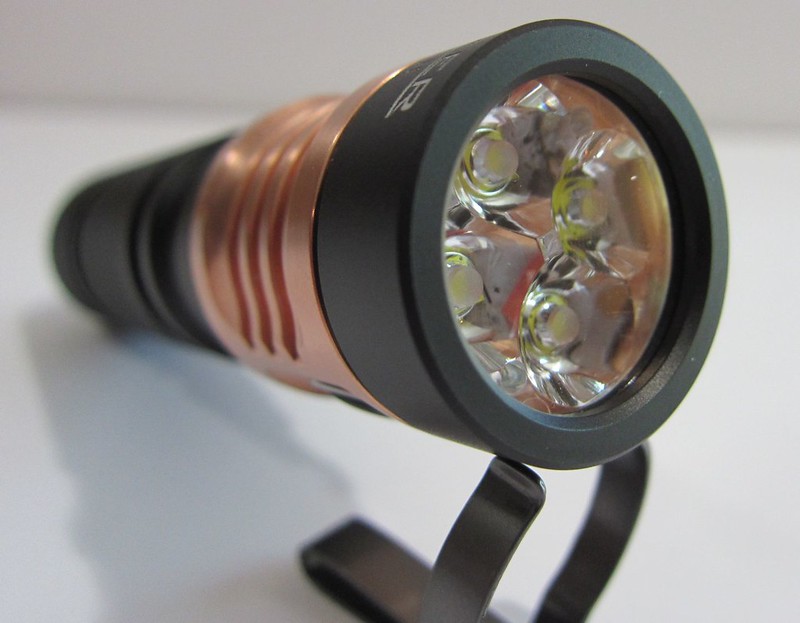
The 4 XP-G3 LEDs and are visible through the optic – as is the copper heatsink underneath.
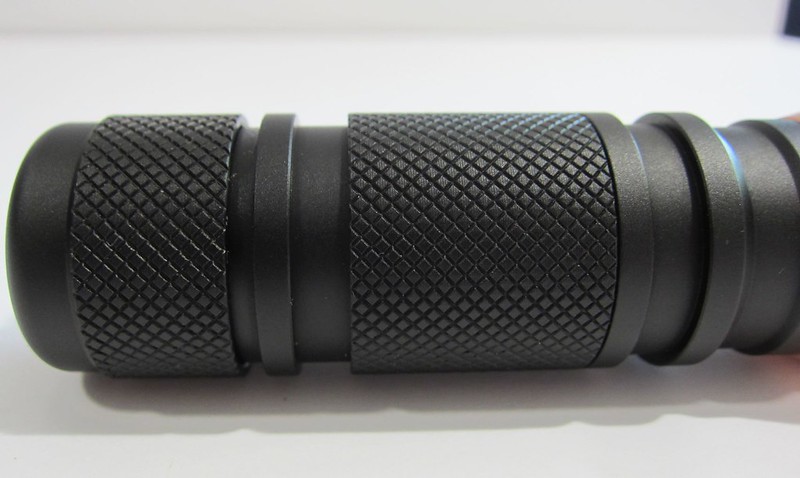
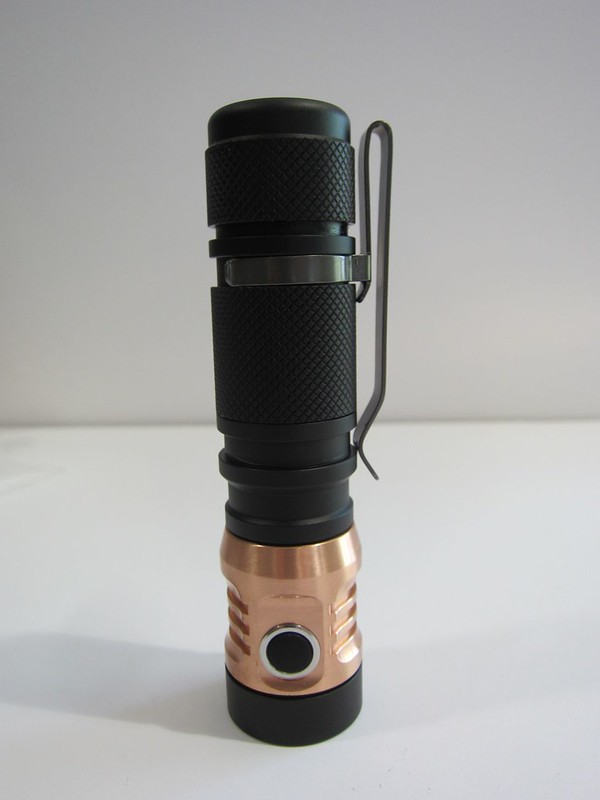
The battery tube's diamond pattern knurling is not overly aggressive. It has a nice micro-line pattern in the knurling.
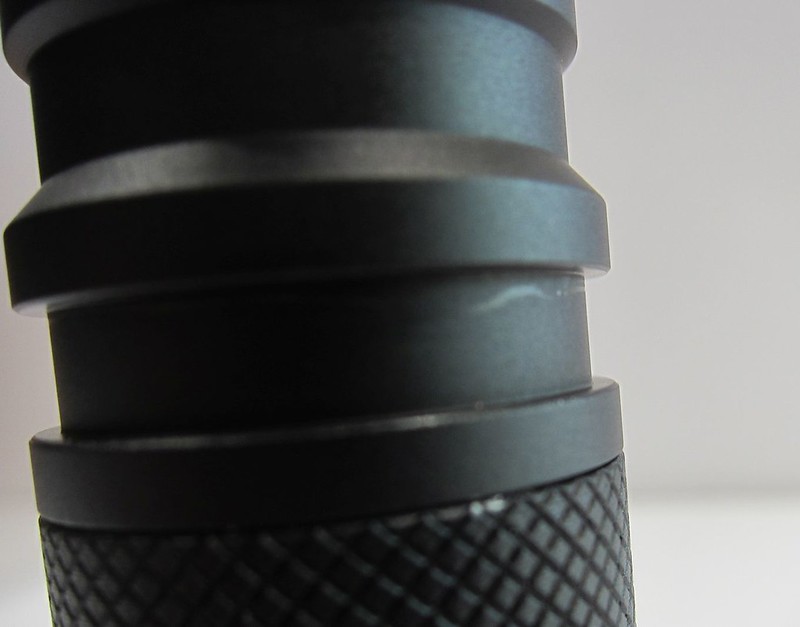
Between the knurling on the central part of the tube and the black fins toward the head is a hidden joint. If unscrewed, the central tube can be set aside, shortening the light to use an 18350 instead of 18650.
The tail has a very similar design (though larger) as the E11. It can easily tailstand and has a side cutout for lanyard attachment.
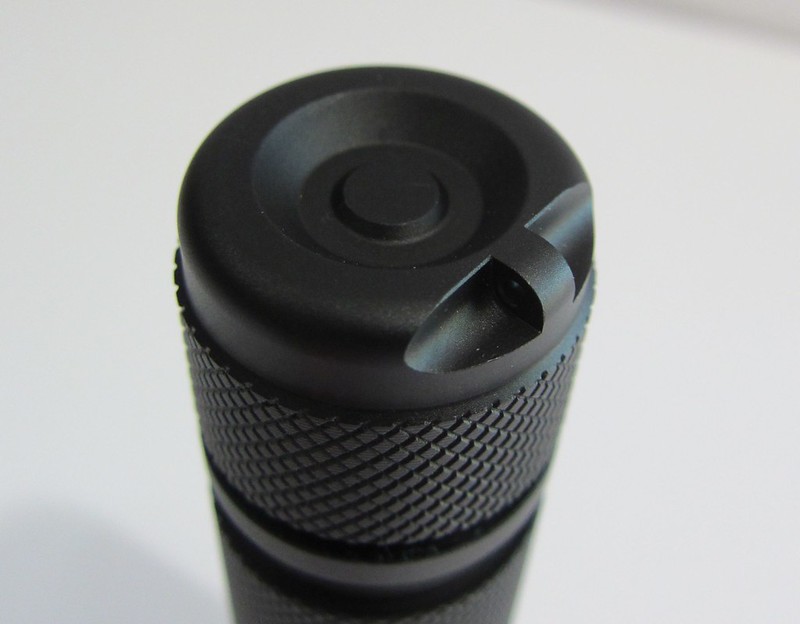
The tail threads are square cut and well-lubricated.
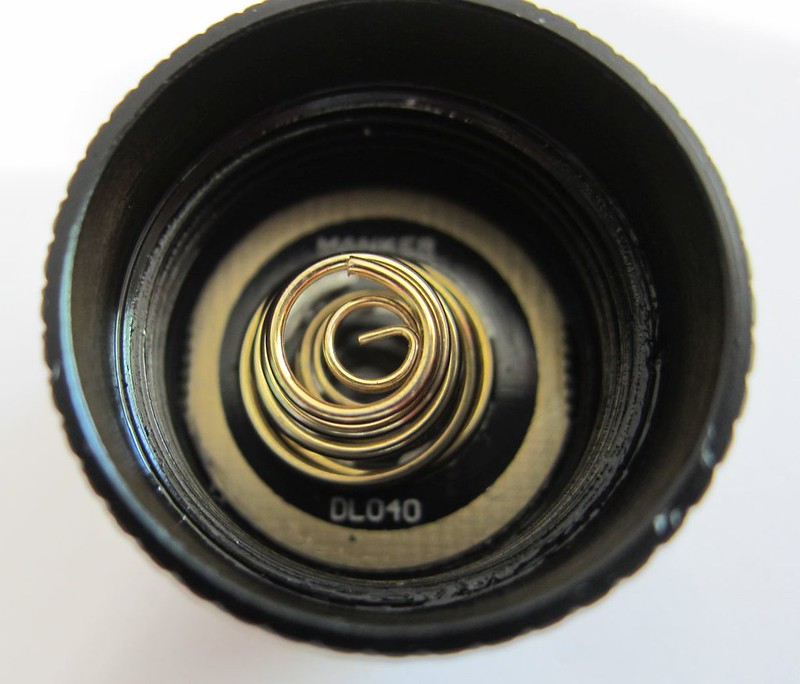
Inside the tail is a nested double spring. Both springs are gold colored. While functionally insignificant, I did notice that the two springs are not exactly in alignment.
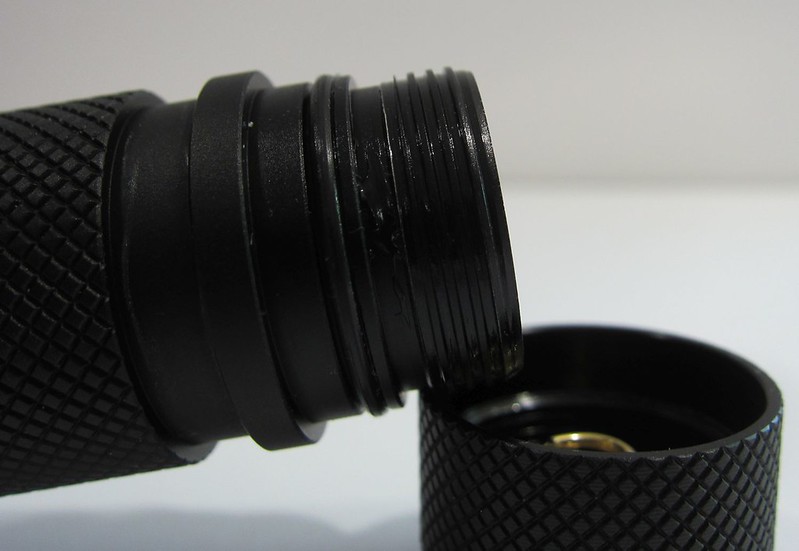
The head has a single post, no spring.
The head end threads are also square cut, but they lacked lubrication.
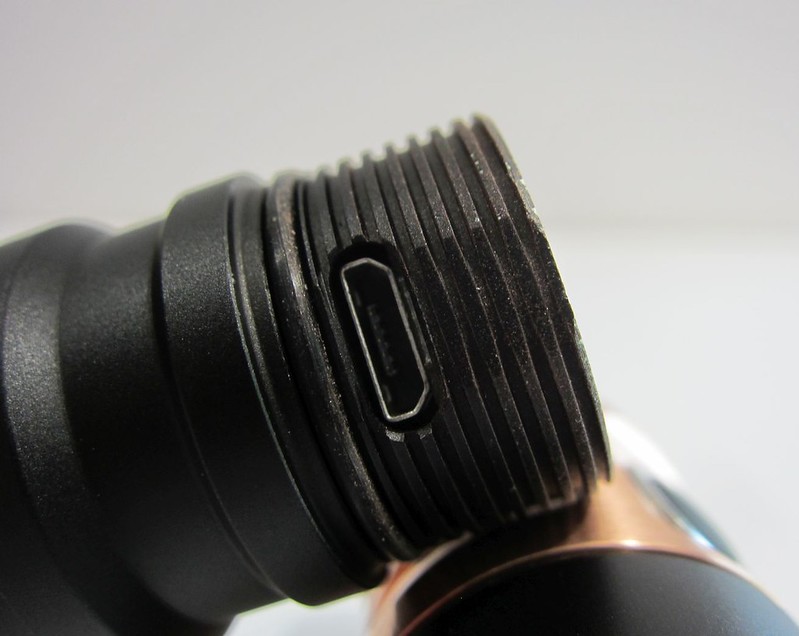
With the head removed, the micro USB charging port is visible.
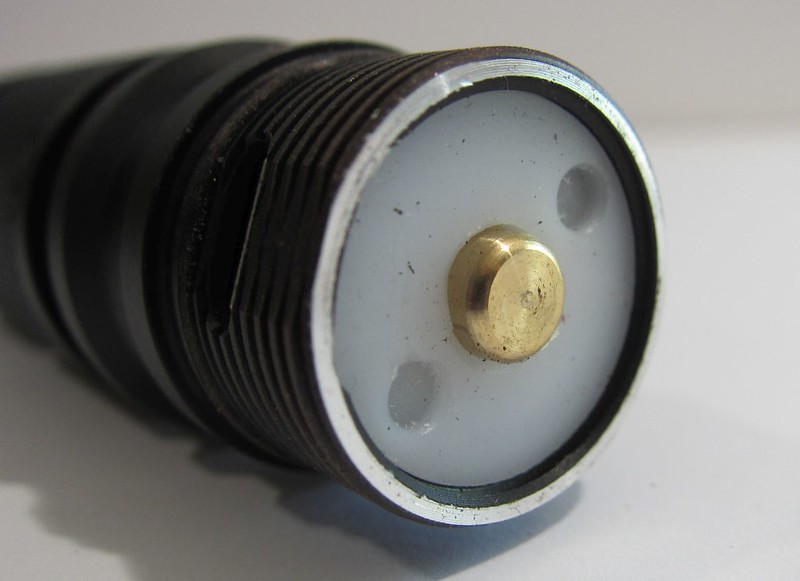
Looking at the head end of the battery tube, we see the single post surrounded by a plastic retaining ring. The post is backed by a spring.
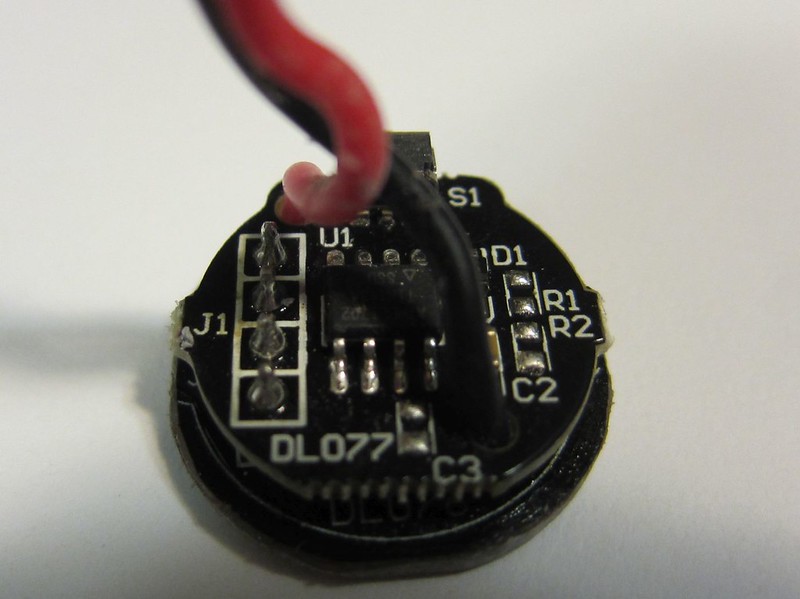
With the retaining ring removed, the charging circuitry is visible.
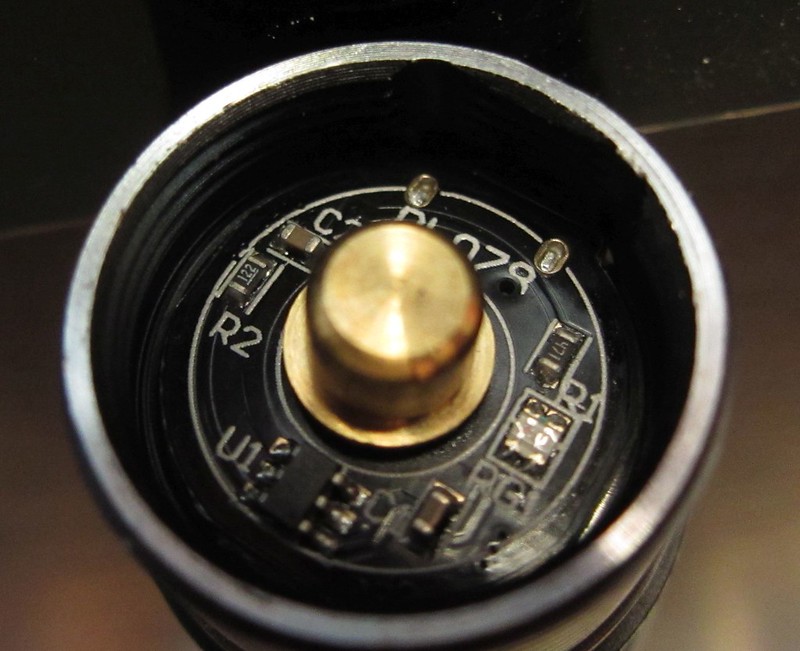
When the E14 II is charging, a red light will illuminate on the circuit board and shine through the translucent plastic retaining disk. I found that charging drew no more than 0.6A. This is a safe charging rate for all 18650 batteries – but is much slower than the 2A or greater charge rates that many are capable of.
The included pocket clip is pewter colored and can be attached head-up or head-down. It attaches securely but is not too difficult to remove when desired.
I did notice that the clip left marks from where it was attached.
The included lanyard is good quality and has Manker branding. It can also be cinched down, ensuring the lanyard doesn't slide off a wrist accidentally.
The attachment hole in the tail of the E02 is not very large relative to the lanyard. Threading it by hand is challenging; a paperclip or other narrow gauge rigid object is needed to thread the lanyard.
Performance
Make no mistake, the E14 II is a high performance flooder. The optics produce a hotspot of sorts, but the beam is quite dispersed overall. Observe the shape but not the color in this photo.
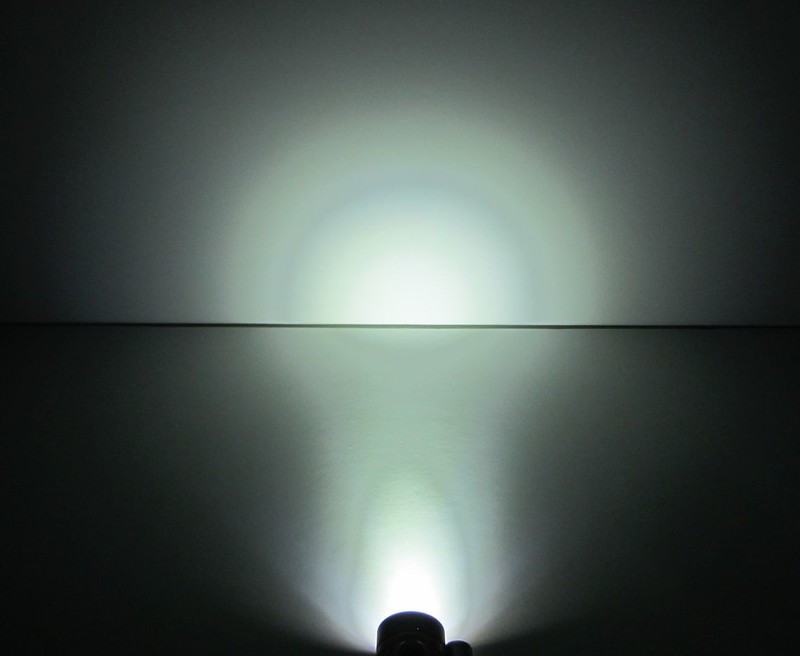
The XP-G3 emitters are cool white and the resulting beam is cool in temperature with some blue and green present.
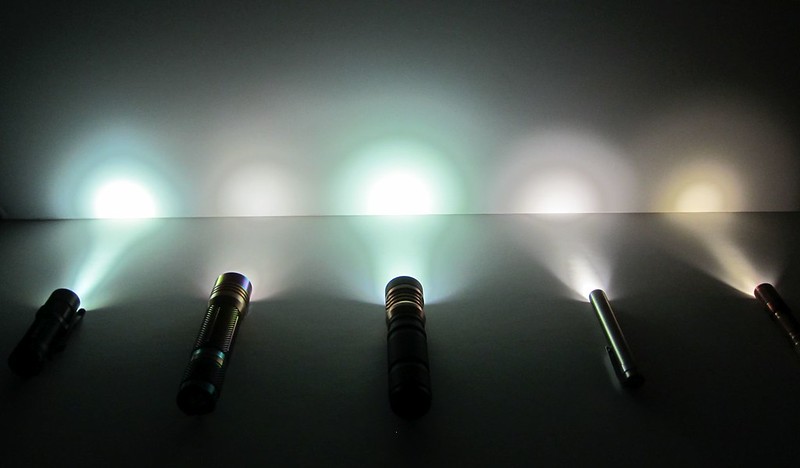
To demonstrate the relative color balance, here is the E14 II flanked by lights with emitters of various tints and temperatures
(L to R: Olight S1R with cool XM-L2, Astrolux S41S with neutral 219B, Manker E14 II with cool XP-G3, BLF348 with neutral 219B, and Lumintop Tool with warm 219B. As you can see, the E02 has the bluest spill.
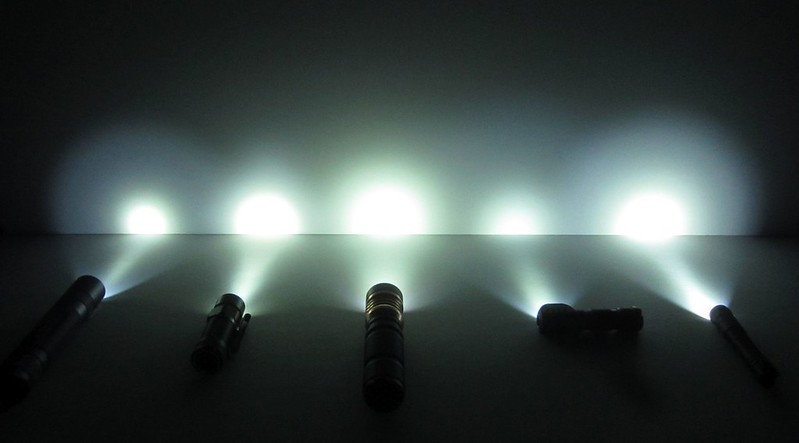
To provide relative perspective with other cool emitters, here it is with those only.
(L to R: Convoy S2+ with cool XM-L U2 1B, Olight S1R with cool XM-L2, Manker E14 II with cool XP-G3, Manker E02 with cool XP-G3, Orcatorch EA01 with cool XP-G2).
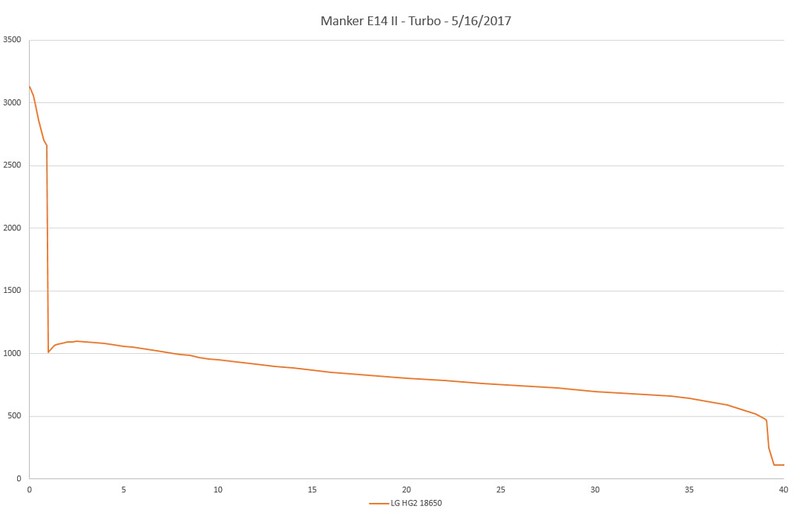
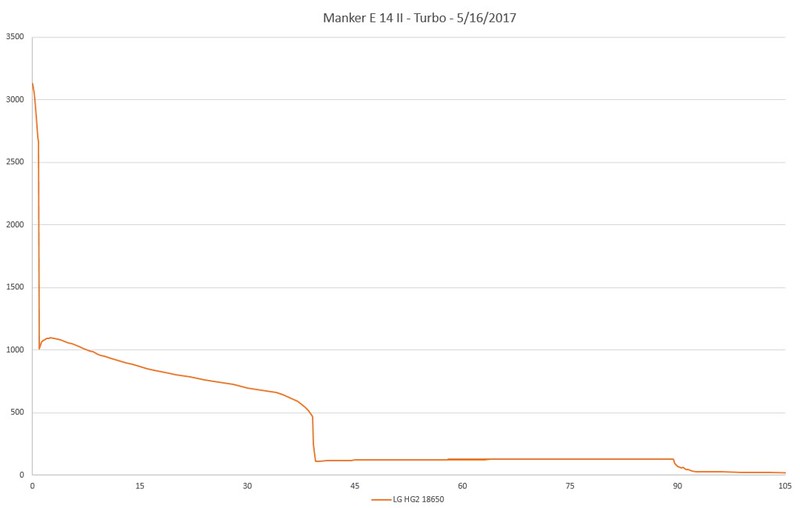
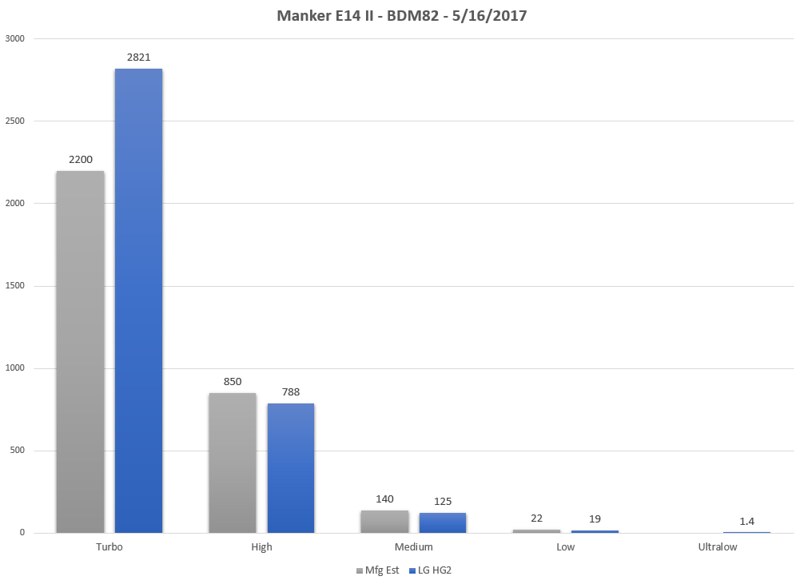
Manker rates the E14 II at 2200 lumens on Turbo. The sample I was provided for review dramatically exceeded that rating on my rig, clocking 2821 lumens using an LG HG2 unprotected cell. The E14 II maintained more than 2600 lumens until the 1 minute mark – at which time a stepdown reduced the output to a little less than 1100 lumens. Output slowly declined from there until the 39 minute mark, at which time it dropped from almost 500 lumens to about 120 lumens. It continued to drop and step down through the 3 hour mark, but ANSI runtime is based on output dropping to 10% - which happened at minute 39.
ANSI Test:
 Extended Test:
Turbo produces a great deal of heat. I measured the copper at over 150F! As the button isn't very large, it can be quite uncomfortable trying to turn the E14II off or down after the light has been on Turbo.
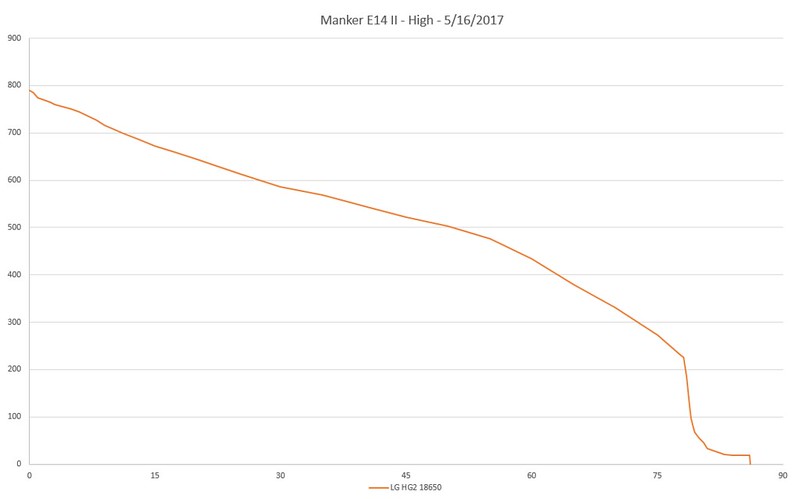
Manker rates High at 850 lumens. I found 788 in my testing. Output declined evenly from turn on through the first hour and 15 minutes or so, at which point output was down to about 275 lumens. By minute 79, output was under 80 lumens (<10% of original output per ANSI runtime test standard). It held on with reduced output until minute 86.
Manker rates Low at 22 lumens; I tested it at 19. Runtimes were not tested.
Finally, Manker rates the ultralow/moonlight mode at 1.4 lumen but notes that moonlight mode is programmable from around 0.1 lumen to 5 lumens.
I tested throw distance at 1.46 meters and the resulting candela was 10,828 - equivalent to 208 meters of throw. This exceeds Manker's 155 meter rating significantly.
I did not detect PWM on any modes using the "mirror test".
After all tests I found the battery at or above 2.8V; the overdischarge protection was effective.
It should also be noted that the light will flash when the batteries are getting extremely low, usually less than 15 minutes of runtime remaining.
Outdoor Beamshots
All photos taken with a Canon SD4000IS camera. 1/4" exposure, ISO800, Daylight white balance.
Approximate distances: White deck railing @ 15 ft., white fence in distance @ 75 ft., center of boat @ 100 ft.
Control shot:
Low:
Med:
High:
Turbo:
Interface
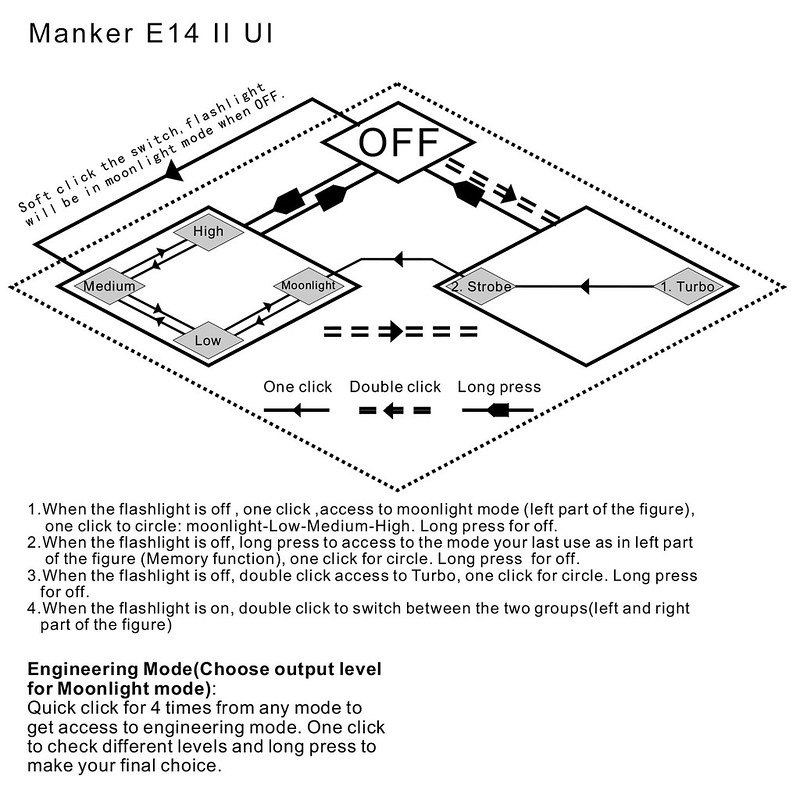
The E14 uses a familiar Manker interface. With a single click, it ramps from moonlight to Low to High and back down with subsequent button presses. A double-click is used to access Turbo and the other special modes. From off, a long press returns to the last used mode.
Moonlight/ultralow mode programming is said to be accessed with 4 fast presses; I found it took me more than that but it could have just been my speed. There are 10 steps in the moonlight mode options and they are fairly linear other than the top 3 that seem very close together.
The image above is from the Manker official product page http://www.mankerlight.com/manker-e...hargeable-flashlight-high-drain-18650-battery.
Problems
A problem was experienced with the switch within the first 2 days of hands-on use. The switch would press but nothing would happen. Manker communicated that they were aware of a problem with the switch installation that affected other engineering samples.
While unfortunate, this provided motivation to disassemble the light.
The bezel easily unscrews from the head. The lens and optic slide right out.
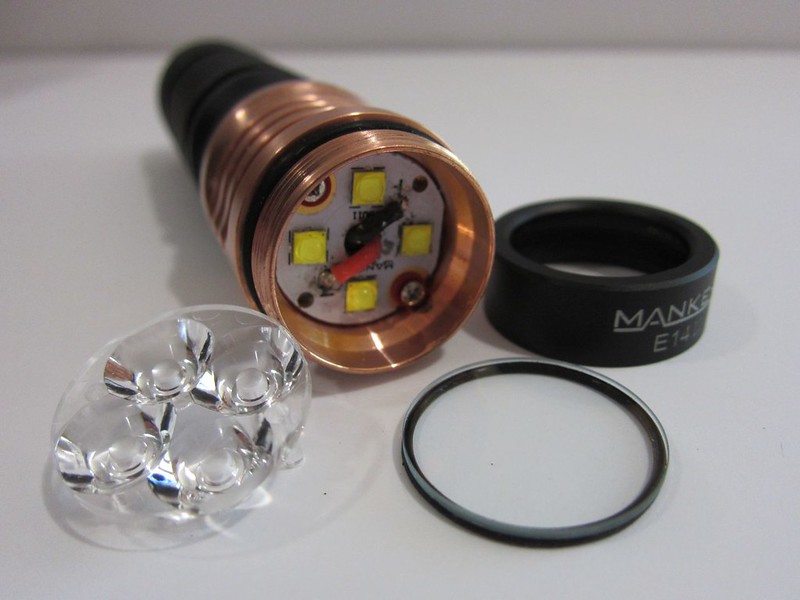
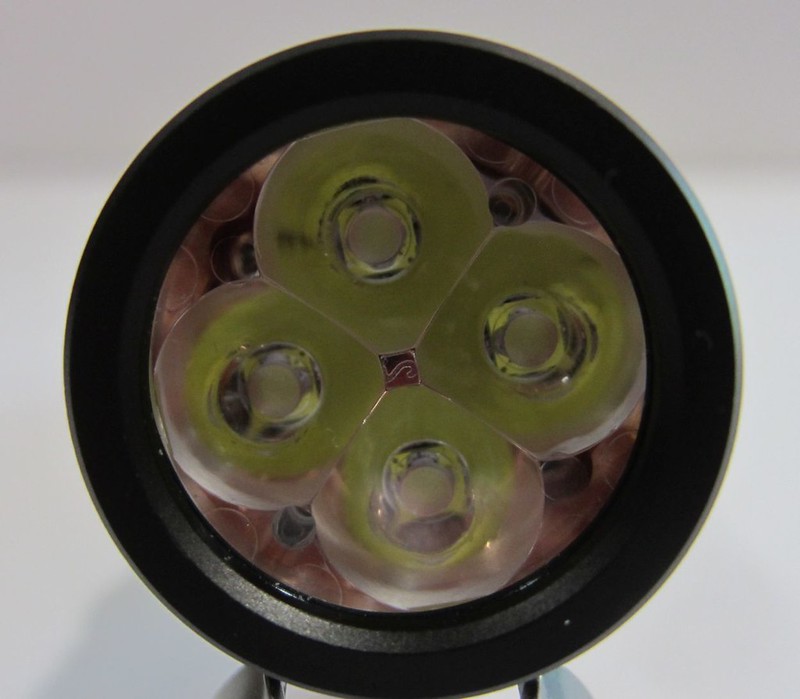
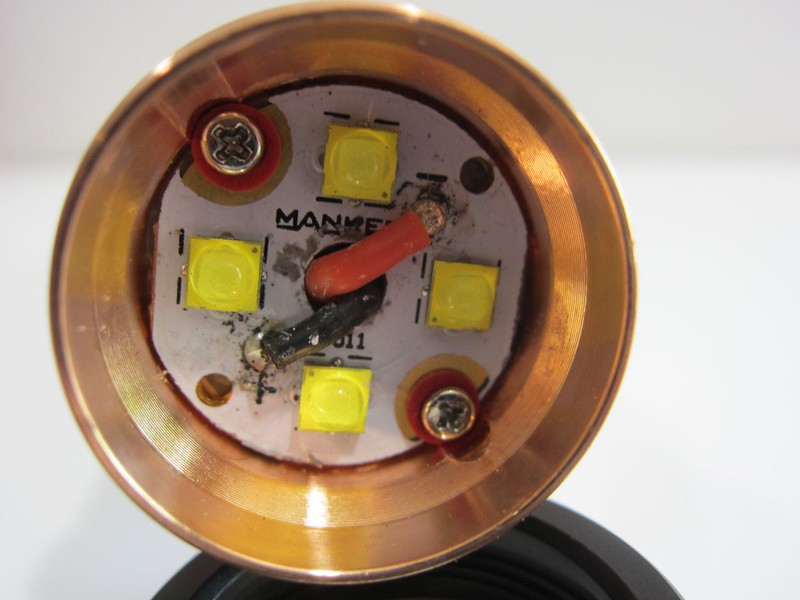
The 4 XP-G3 emitters are visible, mounted on a star secured by two screws. The screws have plastic washers. The lens and bezel could be attached without the optic to use the E14II in "mule mode."
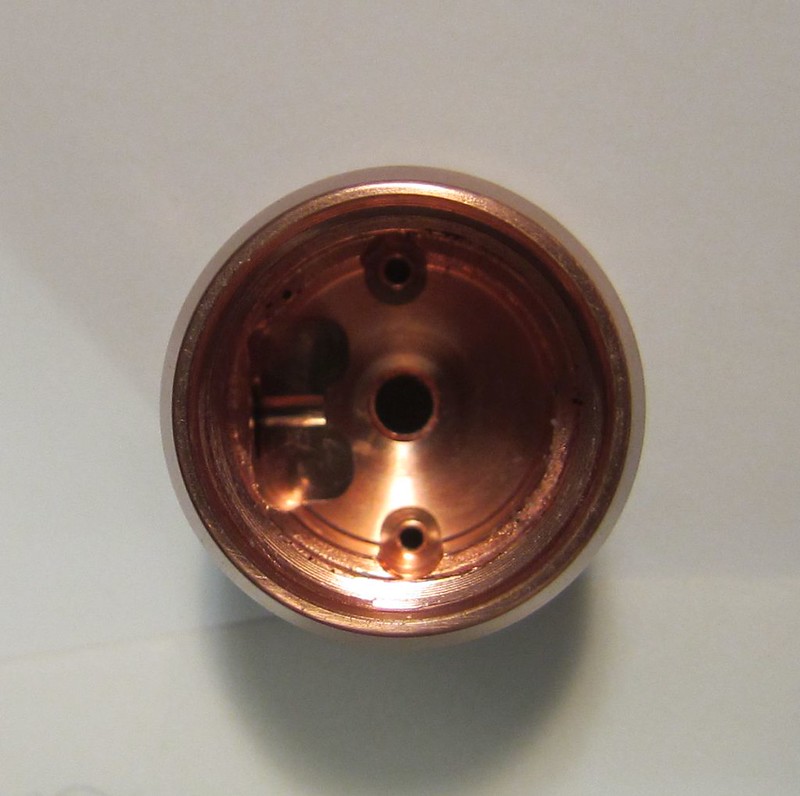
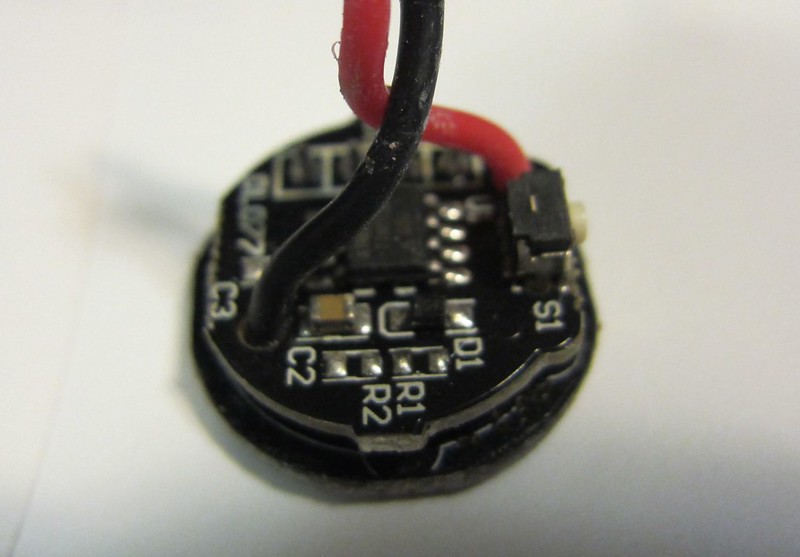
The wires run through the center of the star and down through the copper block. Here is the underside of the section, with the button and battery-side board removed.
The switch assembly removed from said copper block:
And the button (at right):
After removing all of the components (which required desoldering the star, I fit the battery board/assembly back into the copper block. It did require a specific angle to get the button right, and I noticed that only pressure is holding it in place. Therefore I would exercise caution with the head when the forward tube is removed.
Once reassembled, the E14 II worked great and without any further issue. Manker assures that this was a pre-production issue only.
Commentary
What a burner! 2800 lumens in a light this size is pretty incredible; it rivals the output of the much larger Nitecore TM03 (that when introduced was the highest performing factory-produced single 18650 light). The copper heatsink all the way through is a great way to manage the heat that 4 LEDs produce and it gives the E14 II a nice look, though it does cause the E14 II to get very hot.
Is it an upgrade to the original E14? That depends on what the buyer is looking for asthe tail switch will be preferred by some while the side switch will be preferred by others. Similarly, not everyone will use the built-in recharging as it is rather slow – but those that do use it will really appreciate that it is there.
The inclusion of pocket clip and lanyard is nice, as is the lack of visible PWM, the adjustable moonlight mode, and the native 18650/18350 flexibility. While the XP-G3 version was tested here, those that seek higher CRI and neutral colors should find the 219C versions desirable though the lumen count will be lower.
Meter: Dr. Meter LX1330B
Integrating "sphere": Homebuilt tube-style device calibrated on other known lights and test results. Numbers should be considered relative to each other and my other review figures but accuracy is in no way certified or guaranteed.
Camera: Canon SD4000IS
This light was provided by Manker for review.
The Manker E14 II is a follow up to the E14 released about the same time one year ago. Like the original, it is available in Nichia 219 and Cree XP-G variants to satisfy users who prefer either high CRI or higher output.
For the E14 II, 219C and XP-G3 emitters are used, replacing the 219B and XP-G2 options in the original E14. The XP-G3 variant is reviewed here.
The most significant changes are that the switch moves to the side of the light from the tail, and built-in recharging is now included. The light also comes standard with 18650 and 18350 battery compatibility thanks to a clever battery tube design.
Here are the key review details in one table for the TL;DR folks:
Packaging
The E02 provided for testing is an engineering sample so it arrived in a plain brown box without any retail marking.
Opening the box, the E14 II is nicely protected by foam. An envelope contains a spare o-ring, lanyard, and pocket clip. No user manual accompanies this sample.
Design
The Manker E14 II is a relatively compact single 18650-using flashlight. The defining feature is undoubtedly the large copper heatsink that goes from the star all the way to the exterior of the flashlight. The copper is very visible and even coated with a clear material to prevent a patina from developing.
It is 113 mm long with a width of 27 mm at the head. Weight without battery is 94 grams.
It is a small amount shorter than the original E14. Here it is next to an Astrolux S41S, which is a sister model of the original E14.
For additional size perspective, here is the E14 II with other lights.
L to R: Acebeam T21 (2x18650), Nitecore SRT7GT (18650), Olight R50P (26650), Convoy S2+ (18650), Astrolux S41S (18650), Manker E14 II (18650), Olight S1R (RCR123), Lumintop Tool (AAA).
The Manker name and E14 II model designation are engraved on the side of the bezel. Note that this is not simple printing/embossing – but actual engraving with the printing therein. It is clear and high quality.
The copper heatsink has 2 fins that wrap around the light. They add a little bit of surface area for cooling, but also create variation around the diameter of the light so that the button is easier to find.
That switch is a simple black rubber circle. It is surrounded by a chrome-colored ring. It can be difficult to find in the dark as it lacks texture and size. The flat area around the button is not pronounced enough to add any anti-roll surface to the E14 II. It will freely roll on flat surfaces.
The bezel is a flat and black. It can be easily unscrewed for access to the optic and LEDs.
The 4 XP-G3 LEDs and are visible through the optic – as is the copper heatsink underneath.
The battery tube's diamond pattern knurling is not overly aggressive. It has a nice micro-line pattern in the knurling.
Between the knurling on the central part of the tube and the black fins toward the head is a hidden joint. If unscrewed, the central tube can be set aside, shortening the light to use an 18350 instead of 18650.
The tail has a very similar design (though larger) as the E11. It can easily tailstand and has a side cutout for lanyard attachment.
The tail threads are square cut and well-lubricated.
Inside the tail is a nested double spring. Both springs are gold colored. While functionally insignificant, I did notice that the two springs are not exactly in alignment.
The head has a single post, no spring.
The head end threads are also square cut, but they lacked lubrication.
With the head removed, the micro USB charging port is visible.
Looking at the head end of the battery tube, we see the single post surrounded by a plastic retaining ring. The post is backed by a spring.
With the retaining ring removed, the charging circuitry is visible.
When the E14 II is charging, a red light will illuminate on the circuit board and shine through the translucent plastic retaining disk. I found that charging drew no more than 0.6A. This is a safe charging rate for all 18650 batteries – but is much slower than the 2A or greater charge rates that many are capable of.
The included pocket clip is pewter colored and can be attached head-up or head-down. It attaches securely but is not too difficult to remove when desired.
I did notice that the clip left marks from where it was attached.
The included lanyard is good quality and has Manker branding. It can also be cinched down, ensuring the lanyard doesn't slide off a wrist accidentally.
The attachment hole in the tail of the E02 is not very large relative to the lanyard. Threading it by hand is challenging; a paperclip or other narrow gauge rigid object is needed to thread the lanyard.
Performance
Make no mistake, the E14 II is a high performance flooder. The optics produce a hotspot of sorts, but the beam is quite dispersed overall. Observe the shape but not the color in this photo.
The XP-G3 emitters are cool white and the resulting beam is cool in temperature with some blue and green present.
To demonstrate the relative color balance, here is the E14 II flanked by lights with emitters of various tints and temperatures
(L to R: Olight S1R with cool XM-L2, Astrolux S41S with neutral 219B, Manker E14 II with cool XP-G3, BLF348 with neutral 219B, and Lumintop Tool with warm 219B. As you can see, the E02 has the bluest spill.
To provide relative perspective with other cool emitters, here it is with those only.
(L to R: Convoy S2+ with cool XM-L U2 1B, Olight S1R with cool XM-L2, Manker E14 II with cool XP-G3, Manker E02 with cool XP-G3, Orcatorch EA01 with cool XP-G2).
Manker rates the E14 II at 2200 lumens on Turbo. The sample I was provided for review dramatically exceeded that rating on my rig, clocking 2821 lumens using an LG HG2 unprotected cell. The E14 II maintained more than 2600 lumens until the 1 minute mark – at which time a stepdown reduced the output to a little less than 1100 lumens. Output slowly declined from there until the 39 minute mark, at which time it dropped from almost 500 lumens to about 120 lumens. It continued to drop and step down through the 3 hour mark, but ANSI runtime is based on output dropping to 10% - which happened at minute 39.
ANSI Test:
Turbo produces a great deal of heat. I measured the copper at over 150F! As the button isn't very large, it can be quite uncomfortable trying to turn the E14II off or down after the light has been on Turbo.
Manker rates High at 850 lumens. I found 788 in my testing. Output declined evenly from turn on through the first hour and 15 minutes or so, at which point output was down to about 275 lumens. By minute 79, output was under 80 lumens (<10% of original output per ANSI runtime test standard). It held on with reduced output until minute 86.
Manker rates Low at 22 lumens; I tested it at 19. Runtimes were not tested.
Finally, Manker rates the ultralow/moonlight mode at 1.4 lumen but notes that moonlight mode is programmable from around 0.1 lumen to 5 lumens.
I tested throw distance at 1.46 meters and the resulting candela was 10,828 - equivalent to 208 meters of throw. This exceeds Manker's 155 meter rating significantly.
I did not detect PWM on any modes using the "mirror test".
After all tests I found the battery at or above 2.8V; the overdischarge protection was effective.
It should also be noted that the light will flash when the batteries are getting extremely low, usually less than 15 minutes of runtime remaining.
Outdoor Beamshots
All photos taken with a Canon SD4000IS camera. 1/4" exposure, ISO800, Daylight white balance.
Approximate distances: White deck railing @ 15 ft., white fence in distance @ 75 ft., center of boat @ 100 ft.
Control shot:
Low:
Med:
High:
Turbo:
Interface
The E14 uses a familiar Manker interface. With a single click, it ramps from moonlight to Low to High and back down with subsequent button presses. A double-click is used to access Turbo and the other special modes. From off, a long press returns to the last used mode.
Moonlight/ultralow mode programming is said to be accessed with 4 fast presses; I found it took me more than that but it could have just been my speed. There are 10 steps in the moonlight mode options and they are fairly linear other than the top 3 that seem very close together.
The image above is from the Manker official product page http://www.mankerlight.com/manker-e...hargeable-flashlight-high-drain-18650-battery.
Problems
A problem was experienced with the switch within the first 2 days of hands-on use. The switch would press but nothing would happen. Manker communicated that they were aware of a problem with the switch installation that affected other engineering samples.
While unfortunate, this provided motivation to disassemble the light.
The bezel easily unscrews from the head. The lens and optic slide right out.
The 4 XP-G3 emitters are visible, mounted on a star secured by two screws. The screws have plastic washers. The lens and bezel could be attached without the optic to use the E14II in "mule mode."
The wires run through the center of the star and down through the copper block. Here is the underside of the section, with the button and battery-side board removed.
The switch assembly removed from said copper block:
And the button (at right):
After removing all of the components (which required desoldering the star, I fit the battery board/assembly back into the copper block. It did require a specific angle to get the button right, and I noticed that only pressure is holding it in place. Therefore I would exercise caution with the head when the forward tube is removed.
Once reassembled, the E14 II worked great and without any further issue. Manker assures that this was a pre-production issue only.
Commentary
What a burner! 2800 lumens in a light this size is pretty incredible; it rivals the output of the much larger Nitecore TM03 (that when introduced was the highest performing factory-produced single 18650 light). The copper heatsink all the way through is a great way to manage the heat that 4 LEDs produce and it gives the E14 II a nice look, though it does cause the E14 II to get very hot.
Is it an upgrade to the original E14? That depends on what the buyer is looking for asthe tail switch will be preferred by some while the side switch will be preferred by others. Similarly, not everyone will use the built-in recharging as it is rather slow – but those that do use it will really appreciate that it is there.
The inclusion of pocket clip and lanyard is nice, as is the lack of visible PWM, the adjustable moonlight mode, and the native 18650/18350 flexibility. While the XP-G3 version was tested here, those that seek higher CRI and neutral colors should find the 219C versions desirable though the lumen count will be lower.
Meter: Dr. Meter LX1330B
Integrating "sphere": Homebuilt tube-style device calibrated on other known lights and test results. Numbers should be considered relative to each other and my other review figures but accuracy is in no way certified or guaranteed.
Camera: Canon SD4000IS
Last edited:
 .
.