wquiles
Flashaholic
McE2S for C/M bodies - DIY guide included
EDIT: Since more and more folks are discovering this thread and have questions as to what the Shoope sells and how to put it together, I am re-writing this top post with detail instructions and reusing the photos that I posted later on this thread
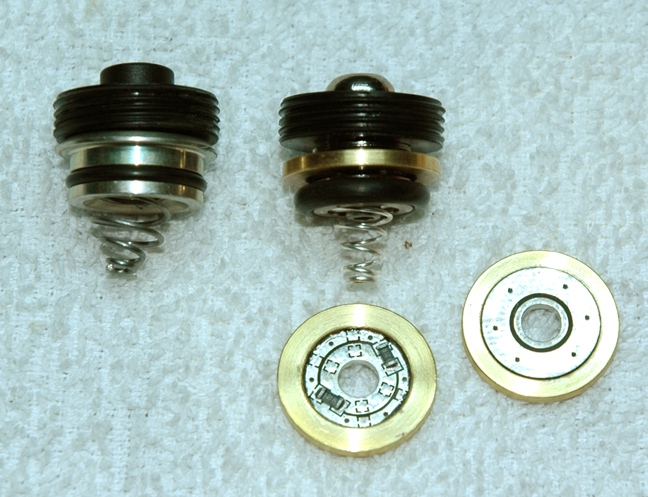
To start, let make sure that we use the same terminology. The stock complete, OEM switch on the left is the standard press-to-activate Surefire switch. This is what we are going to call through this DIY the "host". The assembled switch on the right side is what you buy from the Shoope and is what is going to replace the guts of the standard Surefire switch:

Again, just to be extra clear, this is what you are buying from the Shoope:


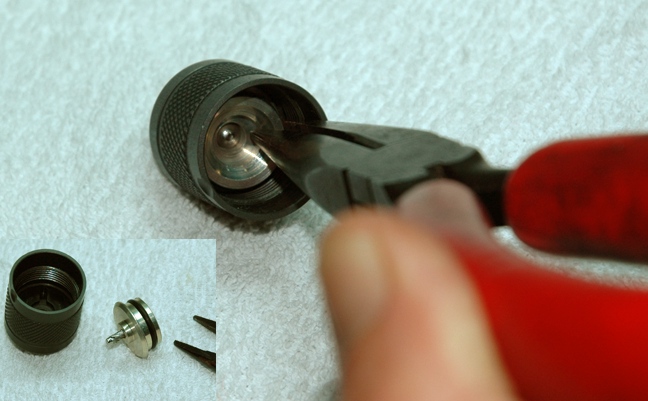
So we basically have to remove the OEM guts of the OEM host:
1) Remove the spring:

2) Pull out the core. Just grab very firmly and pull out with force:


3) We then remove the retaining ring. This simply unscrews out counter-clockwise. Some folks have reported that they have to heat up the part a little for this to start moving:


Once you are done, this is what it looks like (new guts on top)

4) Now you must enlarge the hole in the retaining ring. Just make it large enough that the new switch guts goes in but small enough that the o-ring can keep the guts from falling out:


This is how the new parts will go back into the host:


5) Put the outer rubber button back inside the host, screw the "modified" retaining ring back into the host, and finally press in the new guts into the enlarged hole in the retaining ring (if done properly, once "in" it should not fall out by gravity alone):

Here is what it looks like when you are done:

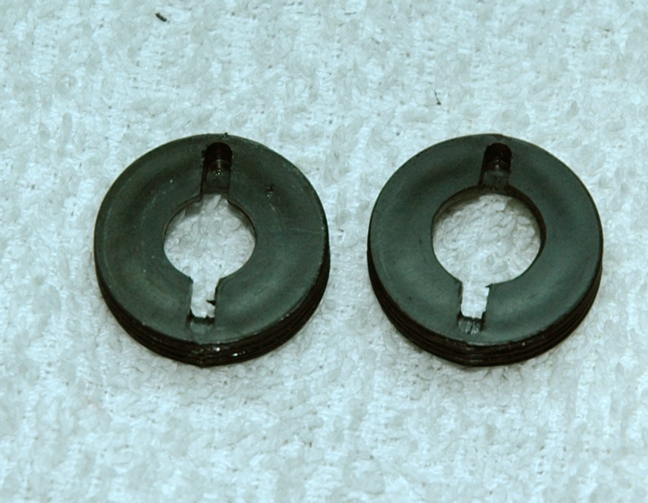
You should end up with some useless parts as shown here:

6) Pat yourself in the back for a job well done
7) Screw the new two-level "C" switch into your favorite LED-driven "C" or "M" host and have fun
Will
Oct 1st, 2005
****************************************************************
Don,
I saw in some older tread that you had made a small adapter ring out of aluminum that would allow your McE2S for "E" bodies to be fitted to "C" and "M" bodies switches. I respect that fact that there might not be enough business to justify making the adapter, but can you please share with me the dimensions of such ring so that I can at least make one for myself? Maybe others here would try to make their own as well /ubbthreads/images/graemlins/grin.gif
Thanks in advance,
Will
(who would love to have one of these on my current KL6 and future KL5!)
EDIT: Look towards the bottom of the tread for an evaluation I just posted of a prototype two-level switch for "C" bodies provided by no other than Don himself /ubbthreads/images/graemlins/happy14.gif
EDIT: Since more and more folks are discovering this thread and have questions as to what the Shoope sells and how to put it together, I am re-writing this top post with detail instructions and reusing the photos that I posted later on this thread
To start, let make sure that we use the same terminology. The stock complete, OEM switch on the left is the standard press-to-activate Surefire switch. This is what we are going to call through this DIY the "host". The assembled switch on the right side is what you buy from the Shoope and is what is going to replace the guts of the standard Surefire switch:
Again, just to be extra clear, this is what you are buying from the Shoope:
So we basically have to remove the OEM guts of the OEM host:
1) Remove the spring:
2) Pull out the core. Just grab very firmly and pull out with force:
3) We then remove the retaining ring. This simply unscrews out counter-clockwise. Some folks have reported that they have to heat up the part a little for this to start moving:
Once you are done, this is what it looks like (new guts on top)
4) Now you must enlarge the hole in the retaining ring. Just make it large enough that the new switch guts goes in but small enough that the o-ring can keep the guts from falling out:
This is how the new parts will go back into the host:
5) Put the outer rubber button back inside the host, screw the "modified" retaining ring back into the host, and finally press in the new guts into the enlarged hole in the retaining ring (if done properly, once "in" it should not fall out by gravity alone):
Here is what it looks like when you are done:
You should end up with some useless parts as shown here:
6) Pat yourself in the back for a job well done
7) Screw the new two-level "C" switch into your favorite LED-driven "C" or "M" host and have fun
Will
Oct 1st, 2005
****************************************************************
Don,
I saw in some older tread that you had made a small adapter ring out of aluminum that would allow your McE2S for "E" bodies to be fitted to "C" and "M" bodies switches. I respect that fact that there might not be enough business to justify making the adapter, but can you please share with me the dimensions of such ring so that I can at least make one for myself? Maybe others here would try to make their own as well /ubbthreads/images/graemlins/grin.gif
Thanks in advance,
Will
(who would love to have one of these on my current KL6 and future KL5!)
EDIT: Look towards the bottom of the tread for an evaluation I just posted of a prototype two-level switch for "C" bodies provided by no other than Don himself /ubbthreads/images/graemlins/happy14.gif
Last edited: