Goofy_Goober
Newly Enlightened
I made a post on Reddit about this light, but I'll describe it here. This is a 3D Maglite modified to use an Osram 64625 (or similar) halogen bulb paired with a PWM dimmer for brightness control. It's powered by 3x 26650s, but can also take 21700s.

There were a couple people interested in having a guide/parts list for this light, so I'll leave one here for anyone curious. This won't be terribly in-depth, so you can ask if you have any questions.
PARTS:
Lens: https://lumencraft.com/led-upgrades-for-maglite/56-glass-lens-for-maglite-94-transparent.html
Reflector: http://kaidomain.com/S006166-KD-M-g-OP-reflector-V3_1-15mm-Opening
The glass lens and aluminum reflector are needed to withstand the heat of the bulb, the stock plastic ones will melt pretty quickly. These are easy to change out, they just drop in. If you get a different reflector, make sure the opening is wide enough for the bulb.
Bulbs: I've used Osram 64625, 64623, and 62138, which are all 100 watts. The 64623 is a 2000 hour bulb with a nominal output of 2800 lumens and a temp of 3300K. You could probably drive it with 4 26650's if you wanted.
The 64625 is a 50 hour bulb with a nominal brightness of 3600 lumens and temp of 3450K. This is similar to the 64623, but trades lifespan for efficiency.
The 62138 is also a 50 hour bulb, but the filament is smaller, and oriented perpendicular to the base instead of parallel. This allows it to be focused much better and has a better beam shape.
Note that these bulbs will last substantially longer than rated when run at lower power.
Socket: https://www.candlepowerforums.com/threads/g6-35-ceramic-socket-by-fivemega-2.480924/
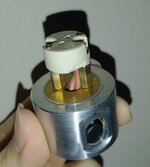
This is a GY6.35 ceramic socket with a brass base, which allows for any 12 volt GY6.35 bulb to be used. You will have to cut the bulb tower off of the switch assembly to install this, so this is a permanent modification. I found that the base slid down the barrel easier with some oil on it, but be aware that this part will heat up during use.
For reference on the switch modification, see this video:
For the switch, I soldered one wire to the negative contact and one the the top switch spring. Be careful to ensure these wires can't contact and cause a short circuit. I drilled a whole through the body of the flashlight on the side opposite to the switch, above the switch assembly but below the base of the head. It should be just big enough for all 4 wires. It would be a good idea to smooth down the sharp edges to prevent the wire insulation from being cut.
Dimmer: https://www.amazon.com/gp/product/B0BVR5G73J/?tag=cpf0b6-20
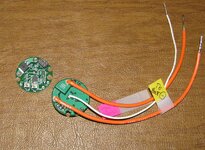
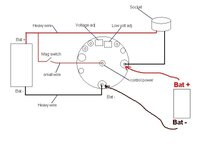
The dimmer is simply zip-tied to the body of the flashlight, 90 degrees offset from the switch. You could probably mount it more securely, but I haven't found it to be a problem. The wiring is pretty self-explanatory, the bulb is wired to the side that says "LED". + and - don't matter for this side since the bulb is just a glorified resistor. I used the dimmer on the lowest frequency to reduce losses, but you could use it on any frequency. Even at 800 HZ, the switching is vastly too quick for there to be any sort of flickering. The filament can't cool enough in 1/800th of a second for any change in brightness. The only issue with this dimmer is that you can hear the PWM as a soft buzzing at the selected frequency, I haven't found any way to prevent this.


Tail Spring: https://lumencraft.com/led-upgrades-for-maglite/62-shorty-tail-spring-for-d-cell-maglite.html
With the stock tail spring, there won't be enough room for the batteries. This short tail spring is recessed in the tail cap, and takes the place of the spare bulb (which won't be needed). You will need to use a dremel or sandpaper to remove the anodizing inside the tailcap. I found that this spring would heat up substantially with full-power use, so I soldered a piece of solder wick between the top and bottom of the spring to "bypass" the spring. I also applied carbon conductive grease to the bottom of the spring to improve the connection.
 (Yes, I made a mess with the grease)
Batteries: 26650 batteries are thinner than Ds, so you will need some sort of spacer. I used 1" SCH 40 pipe. The tolerances on the inner diameter are very close, so I'd recommend taking a 26650 and checking if it fits. I found that some pipes in the same batch would work, some wouldn't. I've also used 21700s, however, these are longer so the lengthwise fit is very tight. I wrapped them with wire to get them to fit inside the pipe.
Positive Contact: https://www.amazon.com/dp/B09YCQC2YF?tag=cpf0b6-20
Flat top batteries won't touch the positive terminal on the underside of the switch assembly, so one of these it needed to make contact. I found that they weren't needed between cells, even though they are flat top.
OTHER COMMENTS: The batteries together have a nominal voltage of 11.1 volts, with a max voltage of ~12.5 volts. Additionally, depending on what batteries you use, there will be a voltage sag of 0.6-1.2 volts at full power due to internal resistances. This means you will likely get less than the rated bulb output. Despite that, this light is still brighter than my car's high beams, so it's not that big of an issue.
At full power, the head & socket will heat up substantially, and the body near the switch will get too hot to hold after several minutes. There's no thermal regulation, so you'll just have to feel when it gets too hot.
There were a couple people interested in having a guide/parts list for this light, so I'll leave one here for anyone curious. This won't be terribly in-depth, so you can ask if you have any questions.
PARTS:
Lens: https://lumencraft.com/led-upgrades-for-maglite/56-glass-lens-for-maglite-94-transparent.html
Reflector: http://kaidomain.com/S006166-KD-M-g-OP-reflector-V3_1-15mm-Opening
The glass lens and aluminum reflector are needed to withstand the heat of the bulb, the stock plastic ones will melt pretty quickly. These are easy to change out, they just drop in. If you get a different reflector, make sure the opening is wide enough for the bulb.
Bulbs: I've used Osram 64625, 64623, and 62138, which are all 100 watts. The 64623 is a 2000 hour bulb with a nominal output of 2800 lumens and a temp of 3300K. You could probably drive it with 4 26650's if you wanted.
The 64625 is a 50 hour bulb with a nominal brightness of 3600 lumens and temp of 3450K. This is similar to the 64623, but trades lifespan for efficiency.
The 62138 is also a 50 hour bulb, but the filament is smaller, and oriented perpendicular to the base instead of parallel. This allows it to be focused much better and has a better beam shape.
Note that these bulbs will last substantially longer than rated when run at lower power.
Socket: https://www.candlepowerforums.com/threads/g6-35-ceramic-socket-by-fivemega-2.480924/
This is a GY6.35 ceramic socket with a brass base, which allows for any 12 volt GY6.35 bulb to be used. You will have to cut the bulb tower off of the switch assembly to install this, so this is a permanent modification. I found that the base slid down the barrel easier with some oil on it, but be aware that this part will heat up during use.
For reference on the switch modification, see this video:
For the switch, I soldered one wire to the negative contact and one the the top switch spring. Be careful to ensure these wires can't contact and cause a short circuit. I drilled a whole through the body of the flashlight on the side opposite to the switch, above the switch assembly but below the base of the head. It should be just big enough for all 4 wires. It would be a good idea to smooth down the sharp edges to prevent the wire insulation from being cut.
Dimmer: https://www.amazon.com/gp/product/B0BVR5G73J/?tag=cpf0b6-20
The dimmer is simply zip-tied to the body of the flashlight, 90 degrees offset from the switch. You could probably mount it more securely, but I haven't found it to be a problem. The wiring is pretty self-explanatory, the bulb is wired to the side that says "LED". + and - don't matter for this side since the bulb is just a glorified resistor. I used the dimmer on the lowest frequency to reduce losses, but you could use it on any frequency. Even at 800 HZ, the switching is vastly too quick for there to be any sort of flickering. The filament can't cool enough in 1/800th of a second for any change in brightness. The only issue with this dimmer is that you can hear the PWM as a soft buzzing at the selected frequency, I haven't found any way to prevent this.
Tail Spring: https://lumencraft.com/led-upgrades-for-maglite/62-shorty-tail-spring-for-d-cell-maglite.html
With the stock tail spring, there won't be enough room for the batteries. This short tail spring is recessed in the tail cap, and takes the place of the spare bulb (which won't be needed). You will need to use a dremel or sandpaper to remove the anodizing inside the tailcap. I found that this spring would heat up substantially with full-power use, so I soldered a piece of solder wick between the top and bottom of the spring to "bypass" the spring. I also applied carbon conductive grease to the bottom of the spring to improve the connection.
Batteries: 26650 batteries are thinner than Ds, so you will need some sort of spacer. I used 1" SCH 40 pipe. The tolerances on the inner diameter are very close, so I'd recommend taking a 26650 and checking if it fits. I found that some pipes in the same batch would work, some wouldn't. I've also used 21700s, however, these are longer so the lengthwise fit is very tight. I wrapped them with wire to get them to fit inside the pipe.
Positive Contact: https://www.amazon.com/dp/B09YCQC2YF?tag=cpf0b6-20
Flat top batteries won't touch the positive terminal on the underside of the switch assembly, so one of these it needed to make contact. I found that they weren't needed between cells, even though they are flat top.
OTHER COMMENTS: The batteries together have a nominal voltage of 11.1 volts, with a max voltage of ~12.5 volts. Additionally, depending on what batteries you use, there will be a voltage sag of 0.6-1.2 volts at full power due to internal resistances. This means you will likely get less than the rated bulb output. Despite that, this light is still brighter than my car's high beams, so it's not that big of an issue.
At full power, the head & socket will heat up substantially, and the body near the switch will get too hot to hold after several minutes. There's no thermal regulation, so you'll just have to feel when it gets too hot.


