Techjunkie
Enlightened
As always for me, this is a poor man's project so most of the parts are home made, with the exception of the KD reflector and glass lens, and the Kiu high temp socket. (I have plans and parts for a home made one of those but it will not debut in this project.) If you've seen my first hotwire, you'll recognize that the host and basic idea have been recycled here, but significantly improved upon.
This as-yet-to-be-named (suggestions welcome) torch I've built is not easily identifiable as anything other than a stock Mag 3D from the outside, but on the inside, it packs 16 Duracell Pre-Charged AA batteries and an Osram Halostar Starlite bulb, 64458-S.
That bulb is pretty high up on Lux's Most Powerful list (currently #4 - the DeathBlaster), and according to Lux's incandescant bulb tests, cranks out over 8000 Lumens (11,000 theoretical) when driven as it is here, to >200 Watts. Props to Lux for all his hard work. I'd probably have lost interest in different hotwire possibilities by now, if not for his charts.
The batteries have only been stripped and re-wrapped because their original shrink wrap was so badly damaged by threaded rods in an un-bored host. They're also a bit dented/crushed from a previous experiment which ended badly. I wonder if the tailcap wouldn't screw on all the way if I bought new batteries. --edit: no longer a concern since adding the foam as a spring :--
To make room for the width of the 16 rechargeable AA batteries in a 4x4 stack, the host has been honed out, not bored. To make room for the length (the real challenge), the base of the bulb/switch assembly has been trimmed within one or two mm of the switch contact and the whole switch assembly sits a few mm higher than usual with the switch button off center, a few mm north of usual. I had to trim the top side and length of the button somewhat, to keep the rubber boot from forcing the switch into the momentary-on position. (Almost burned my fingers figuring that one out.) The tailcap has also been trimmed (sanded) to reduce how far it extends into the flashlight.
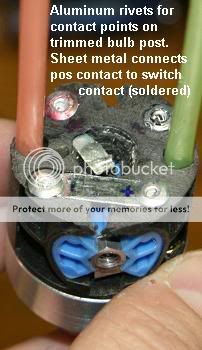
There is not a single contact spring throughout the entire flashlight (there's no room). All the contacts are constructed of rivets and sheet metal, and the flashlight body is not part of the circuit. The pos and negative termination points of the battery "pack" are embedded in the base of the switch/bulb assembly.
I'll let the captions in the pictures do the rest of the explaining rather than run on here.


For my next project, I'll be running a 24V super-bulb in a stock-looking 4D host on 20 AA batteries. The shame of it is, unless I discard the 150W bulb I've got ready for that project, it wont be brighter than this 3D, but it will run longer. (Maybe I'll try a 250W bulb instead.)
Now to name them...
This as-yet-to-be-named (suggestions welcome) torch I've built is not easily identifiable as anything other than a stock Mag 3D from the outside, but on the inside, it packs 16 Duracell Pre-Charged AA batteries and an Osram Halostar Starlite bulb, 64458-S.
That bulb is pretty high up on Lux's Most Powerful list (currently #4 - the DeathBlaster), and according to Lux's incandescant bulb tests, cranks out over 8000 Lumens (11,000 theoretical) when driven as it is here, to >200 Watts. Props to Lux for all his hard work. I'd probably have lost interest in different hotwire possibilities by now, if not for his charts.
The batteries have only been stripped and re-wrapped because their original shrink wrap was so badly damaged by threaded rods in an un-bored host. They're also a bit dented/crushed from a previous experiment which ended badly. I wonder if the tailcap wouldn't screw on all the way if I bought new batteries.
To make room for the width of the 16 rechargeable AA batteries in a 4x4 stack, the host has been honed out, not bored. To make room for the length (the real challenge), the base of the bulb/switch assembly has been trimmed within one or two mm of the switch contact and the whole switch assembly sits a few mm higher than usual with the switch button off center, a few mm north of usual. I had to trim the top side and length of the button somewhat, to keep the rubber boot from forcing the switch into the momentary-on position. (Almost burned my fingers figuring that one out.) The tailcap has also been trimmed (sanded) to reduce how far it extends into the flashlight.
There is not a single contact spring throughout the entire flashlight (there's no room). All the contacts are constructed of rivets and sheet metal, and the flashlight body is not part of the circuit. The pos and negative termination points of the battery "pack" are embedded in the base of the switch/bulb assembly.
I'll let the captions in the pictures do the rest of the explaining rather than run on here.


For my next project, I'll be running a 24V super-bulb in a stock-looking 4D host on 20 AA batteries. The shame of it is, unless I discard the 150W bulb I've got ready for that project, it wont be brighter than this 3D, but it will run longer. (Maybe I'll try a 250W bulb instead.)
Now to name them...
Last edited:


 :bow:
:bow:

 I'll let the batteries decide.