WadeF
Flashlight Enthusiast
After getting a CL1H v2.0 and various modules I was excited to hear about a CL1H v3.0. Now, normally one might be annoyed that they bought a light only to have an improved version come out, but I was actually excited because I have extra modules so now I have another great host for them! As easy as it is to change modules and reflectors with Dereelight's system I thought it would be nice to have my v2.0 set up with an OP reflector and the 5-stage module, and the v3.0 set up with a 3-stage module and a SMO reflector. Of course I can re-configure them any which way any time I want.
At first glance it's not much different than the CL1H v2.0. Upon closer inspection it appears to be finished nicer than my v2.0, but only slightly since the v2.0 is also very well finished.
The real changes are on the inside. My one concern with the v2.0 was the thin o-rings. The v3.0 has thicker o-rings, and more of them! Like the DBS there are two o-rings at each connection, and one around the glass lens. I think this is the same on the v2.0, but there is a plastic (teflon?) threaded retaining ring that holds the tailcap in place. This should great a good seal for the tailcap, which on some lights is usualy the weak link where water enters. This light should be very water tight! If it feel into a bucket of water I wouldn't be concerned at all.
Operation is the same as the v2.0 and DBS. Forward clicky tail switch, momentary on, twist the body and head to change modes with the 2-stage pill installed, etc.
Also heat sinking should be improved as the pill fits snuggly into the base of the head. At first I thought I had to unscrew the pill from the head, but I just had to give it a harder pull with the reflector screwed in and it popped right out.
Included with the light are spare o-rings, a spare switch (just incase), and a lanyard. Of course it all comes in the regular Dereelight black box that is a nice way to store everything. Of course mine is stored in my pocket, night table, etc.
Enough talk, time for some pictures! As always, you can click on each image to view a larger version, and you can zoom in more when you view the images on Google's Picasa web album site. This is where I turn into a copy and paste zombie:
Here's how things look when you open the box! Always a fun box to open!

Here's the light, looks familiar if you have a v2.0. The notches around the bezel's front, side, and the notches around the base of the head where it meets the body are a bit smaller than v2.0:

Another view, showing the clip. The clip is removeable, but I REALLY like this clip. I keep the light clipped in my left front pocket, and even in semi-tight jeans it's comfortable. You can even clip it on the outside of your pocket and light the ground around you. Did this once (v2.0) when nature called and I had to enter a dark porta-potty and it worked a little too well. I never want to see a porta-potty pit light up like that again. :sick2:

Side view. The "Dereelight" logo, model #, ser# look a bit nicer on the V3.0. The finish on this is flawless from what I can see. It feels great in the hand, and the clip's ring helps secure my grip on the light.

Closer shot to show more detail:

I currently have the 3-stage Q4 module installed (Have 3-stage Q5's on order), with a SMO reflector. You can actualy see a bit of me and my digital camera in the reflector.

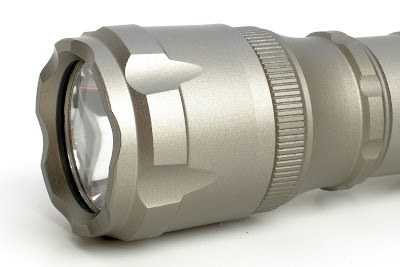
Close up view of the bezel, sorry for the bits of dirt on the white background, I might take them out later in Photoshop.

Just a fun shot of the Cree Q4:

Picture of the tailcap, GITD tail switch cover installed. Tail switch cover can be replaced with a low profile black to allow the light to tailstand!

Here we have the head/bezel, body, and tailcap seperated. Notice the double black o-rings on each end of the body! Like the other Dereelights, nice deep threads. Mine came smooth, but I clean and re-lube just to be sure. I put a little Nylogel on the o-rings.

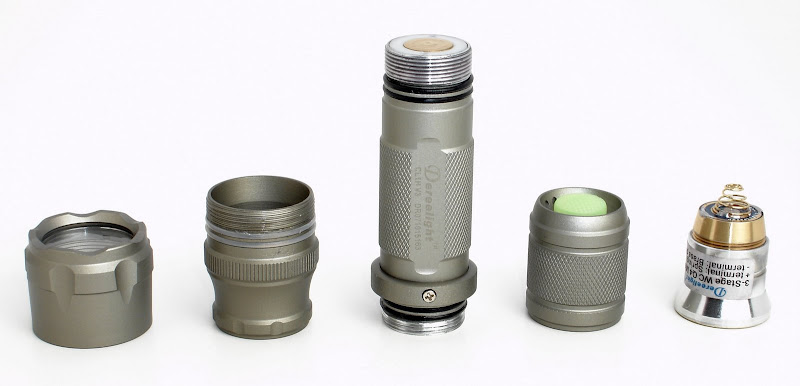
Going bigger with this one, hope it doesn't mess up anyone's browser. This is the CL1H with the head apart as well. You have the bezel, the protective glass window is secured in place with a threaded retaining ring and an o-ring infront of the glass to seal it. Notice the double o-rings on the head where the bezel screws onto. I coated these with Nylogel as well. The 3-stage module is on the far right with the SMO reflector attached the brass pill. I like the way Dereelight is now labeling their pills. I made the mistake of putting my 2-stage in, thinking it was the 5-stage, and I had the battery oriented for the 5-stage and quicky fried the 2-stage. Glad it's the cheapest of the bunch, so I quickly ordered a replacement. Of course it was my mistake, so I purhased a new one and didn't try to get it repaced.

This is the inside of the base of the head. This is where the pill and reflector sit inside. With the V3.0 the pill makes a snug fit into the base to improve heat syncing.

Close up of the CL1H's head.

Close up of the bezel:

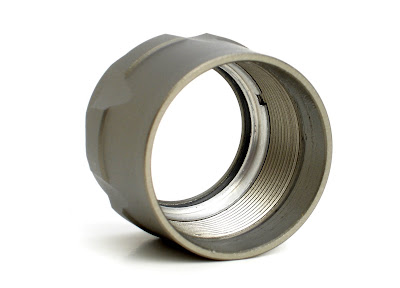
Close up of the inside of the bezel.

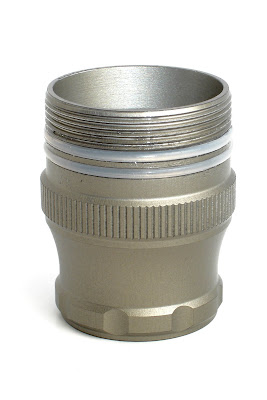
May have to re-shoot this one, the top treads are a bit out of focus! Close up of the body tube:

Inside of the battery tube. Dereelight added a longer spring to improve contact.

Here is the 3-stage WC Q4 module (pill and reflector). There were soe issues with the early 3-stage pills, but Dereelight has found the issue and corrected it. The new pills will be Q5's!

This is looking into the head with the pill installed.

That's it for pictures for now. I don't have beam shots yet, but they would be the same as the CL1H V2.0. I will take beam shots when I get a Q5 pill. I will probably add some other pictures of the CL1H V3.0 out and about. If anyone wants me to photograph any specific parts, let m know. I should add shots of the inide of the tail cap, such as shots of the switch, etc.
I love my CL1H v2.0 so I love the v3.0 as well knowing it has had improvements made to the seals, heat syncing, and contacts.
Alan at Dereelight apprecaites feed back on his products and is always doing what he can to improve on them. I think at this point some people would like to see improvements made with the switch. I love the way the switch operates, but some question the reliability, longevity, and some may have experienced some problems. Dereelght has been including spare switches incase someone has a problem.
I wouldn't let the switch issue stop me from buying the light and enjoying it. I know if a better switch becomes available it's as easy as replacing the switch that's in the tailcap, or just purchasing a new tailcap with the new switch.
I have the CL1H v2.0, v3.0 and a DBS and they all use the same switch. All of mine have been working fine.
BTW, the 3-stage module only works with 18650's. I use AW's protected 18650's.
That's all for now. Questions welcome.
At first glance it's not much different than the CL1H v2.0. Upon closer inspection it appears to be finished nicer than my v2.0, but only slightly since the v2.0 is also very well finished.
The real changes are on the inside. My one concern with the v2.0 was the thin o-rings. The v3.0 has thicker o-rings, and more of them! Like the DBS there are two o-rings at each connection, and one around the glass lens. I think this is the same on the v2.0, but there is a plastic (teflon?) threaded retaining ring that holds the tailcap in place. This should great a good seal for the tailcap, which on some lights is usualy the weak link where water enters. This light should be very water tight! If it feel into a bucket of water I wouldn't be concerned at all.
Operation is the same as the v2.0 and DBS. Forward clicky tail switch, momentary on, twist the body and head to change modes with the 2-stage pill installed, etc.
Also heat sinking should be improved as the pill fits snuggly into the base of the head. At first I thought I had to unscrew the pill from the head, but I just had to give it a harder pull with the reflector screwed in and it popped right out.
Included with the light are spare o-rings, a spare switch (just incase), and a lanyard. Of course it all comes in the regular Dereelight black box that is a nice way to store everything. Of course mine is stored in my pocket, night table, etc.
Enough talk, time for some pictures! As always, you can click on each image to view a larger version, and you can zoom in more when you view the images on Google's Picasa web album site. This is where I turn into a copy and paste zombie:
Here's how things look when you open the box! Always a fun box to open!
Here's the light, looks familiar if you have a v2.0. The notches around the bezel's front, side, and the notches around the base of the head where it meets the body are a bit smaller than v2.0:
Another view, showing the clip. The clip is removeable, but I REALLY like this clip. I keep the light clipped in my left front pocket, and even in semi-tight jeans it's comfortable. You can even clip it on the outside of your pocket and light the ground around you. Did this once (v2.0) when nature called and I had to enter a dark porta-potty and it worked a little too well. I never want to see a porta-potty pit light up like that again. :sick2:
Side view. The "Dereelight" logo, model #, ser# look a bit nicer on the V3.0. The finish on this is flawless from what I can see. It feels great in the hand, and the clip's ring helps secure my grip on the light.
Closer shot to show more detail:
I currently have the 3-stage Q4 module installed (Have 3-stage Q5's on order), with a SMO reflector. You can actualy see a bit of me and my digital camera in the reflector.
Close up view of the bezel, sorry for the bits of dirt on the white background, I might take them out later in Photoshop.
Just a fun shot of the Cree Q4:
Picture of the tailcap, GITD tail switch cover installed. Tail switch cover can be replaced with a low profile black to allow the light to tailstand!
Here we have the head/bezel, body, and tailcap seperated. Notice the double black o-rings on each end of the body! Like the other Dereelights, nice deep threads. Mine came smooth, but I clean and re-lube just to be sure. I put a little Nylogel on the o-rings.
Going bigger with this one, hope it doesn't mess up anyone's browser. This is the CL1H with the head apart as well. You have the bezel, the protective glass window is secured in place with a threaded retaining ring and an o-ring infront of the glass to seal it. Notice the double o-rings on the head where the bezel screws onto. I coated these with Nylogel as well. The 3-stage module is on the far right with the SMO reflector attached the brass pill. I like the way Dereelight is now labeling their pills. I made the mistake of putting my 2-stage in, thinking it was the 5-stage, and I had the battery oriented for the 5-stage and quicky fried the 2-stage. Glad it's the cheapest of the bunch, so I quickly ordered a replacement. Of course it was my mistake, so I purhased a new one and didn't try to get it repaced.
This is the inside of the base of the head. This is where the pill and reflector sit inside. With the V3.0 the pill makes a snug fit into the base to improve heat syncing.
Close up of the CL1H's head.
Close up of the bezel:
Close up of the inside of the bezel.
May have to re-shoot this one, the top treads are a bit out of focus!
 Close up of the body tube:
Inside of the battery tube. Dereelight added a longer spring to improve contact.
Here is the 3-stage WC Q4 module (pill and reflector). There were soe issues with the early 3-stage pills, but Dereelight has found the issue and corrected it. The new pills will be Q5's!
This is looking into the head with the pill installed.
That's it for pictures for now. I don't have beam shots yet, but they would be the same as the CL1H V2.0. I will take beam shots when I get a Q5 pill.
I love my CL1H v2.0 so I love the v3.0 as well knowing it has had improvements made to the seals, heat syncing, and contacts.
Alan at Dereelight apprecaites feed back on his products and is always doing what he can to improve on them. I think at this point some people would like to see improvements made with the switch. I love the way the switch operates, but some question the reliability, longevity, and some may have experienced some problems. Dereelght has been including spare switches incase someone has a problem.
I wouldn't let the switch issue stop me from buying the light and enjoying it. I know if a better switch becomes available it's as easy as replacing the switch that's in the tailcap, or just purchasing a new tailcap with the new switch.
I have the CL1H v2.0, v3.0 and a DBS and they all use the same switch. All of mine have been working fine.
BTW, the 3-stage module only works with 18650's. I use AW's protected 18650's.
That's all for now. Questions welcome.
Last edited:


