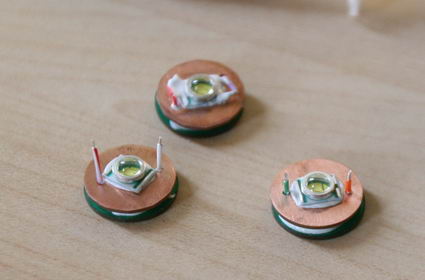
having trouble soldering an xr-e emitter

longleg

Newly Enlightened
Joined
Dec 13, 2005
Messages
64
Location
Oslo, Norway
as stated in the title - i'm having trouble attaching wires to the two "solder-zones" on top of the xr-e emitter. i don't know if my soldering iron is contaminated, if i'm not using the correct heat etc etc, or if its just my mediocre solderings-skills that are causing it...

i've soldered K2 emitters before, and that was no problem at all, but the xr-e are giving me a headache. is this even doable?
 
So far I had no problem.
I did some here: http://candlepowerforums.com/vb/showthread.php?t=149122

If you're using a metal reflector, be sure to insulate the pos [+] wire/solder joint
and the contacts on the base of the emitter itself.

In my pics, you will also see, I also try to solder in the corners as far as possible
from the dome. I little epoxy might also help to insulate...

Regarding soldering, try using a new tip if it has been used a lot already, also, don't try cleaning by sanding it. I think more tips can be fond on Google :)

Cheers !
 
I understand and have similar probs.
The XR-E package is simply too good in removing the heat.
You have to be much longer on the wire and contacts to get the temperature needed, often the heatsink is barely grippable after soldering.

Use a more powerful iron (mine is 15 W for everything, but I will try the 100 next time I solder the Crees)
 
Regarding iron-wattage, I have a Weller 12w and so far it does a good job at soldering and desoldering. According to the specs, it's able to do 700F. Remember, the leds have maximum (rated) time and temperatures at which these can be soldered safely... Cheers !
 
Clean the tip of your soldering iron and re-tin it. You want it to look perfect as even smallest amount of contamination will give you grief. Double check it to make sure the tip is tight if it screws into the iron.

I've found that a tiny bit of flux applied to the solder pads with the tip of a toothpick before hand makes soldering the wires to the pads much, much easier.

My iron is switchable between 15 and 30 watts and I've found the 30 watt setting works better than the 15 watt setting when soldering wires onto the emitter pads.
 
One more thing...

I made the mistake to pot the emitter in place on a PXR heatsink before wiring them... :ohgeez: Bad idea!

My soldering iron could barely melt the solder. The heatsink was doing it's job, very very well and that made it a PITA to solder.

Newt time, I'll wire the emitters before potting them on a heatsink
 
well, no, not really. The slug that is epoxied to the heatsink is not connected the the pads.

You have to pot the emitter before soldering because you have to make sure the slug is insulated before soldering...

Then you trip the wires and strip eough to solder....

That is how I do it at least...

IMG_6329c_resize.jpg
 
I do this: Snipe the corners making sure you cut through the via's. I usualy only do this on the postive side, as most heatsinks are negative connected anyways, and I'm using just one emitter.

Then pre tin the led before mounting it. After it's mounted, I tin the wire, and then solder them on. You can also solder wires beforehand, but then you gotta make sure the wire doesn't pullup the led as the epoxy hardens.
 
Maybe the heatsink mass makes a difference. Epoxied to a PXR heatsink (big chuck of copper), I could really hardly melt the solder.

Also, I cut the emitter's corner so I'm not worried about insulation.

bombelman said:
well, no, not really. The slug that is epoxied to the heatsink is not connected the the pads.

You have to pot the emitter before soldering because you have to make sure the slug is insulated before soldering...

Then you trip the wires and strip eough to solder....

That is how I do it at least...

IMG_6329c_resize.jpg
 
tino_ale said:
One more thing...

I made the mistake to pot the emitter in place on a PXR heatsink before wiring them... :ohgeez: Bad idea!

My soldering iron could barely melt the solder. The heatsink was doing it's job, very very well and that made it a PITA to solder.

Newt time, I'll wire the emitters before potting them on a heatsink

AHA! the emitter was actually lying on an aluminium-profile while soldering. guess i'll try with a piece of wood etc. :whistle:

thanks for all the hints guys!
will post up pics when the bikelight is done
 
longleg said:
..and voila!!

i placed the emitters on a piece of wood instead, and the soldering went 100% :)

Longleg, I was having troubles soldering Cree emitters myself. I am glad to here you are having better luck now and I am as well.:) Thanks as always guys for the tips and advice!:goodjob:

Ken
 
The trick to soldering to a good heatsink (eg Cree XRE) is to tin your XRE connection and the wires first then joining the two parts afterward.

The following will "help" with the process, presented in no particular order.

1. Higher wattage iron (40+Watts). More power mean it's better able to maintain the temperature at the tip.

2. If you have a low wattage solder iron, increase the temperature setting. This will buy you a little more heat and ultimately more time. On my good old Weller WD2002 I set it to 700*-750*.

3. Use solder flux. If none available use solder with large flux core eg. Kester 66/44. "66" indicate regular (~3% weight) flux, and "44" indicates the rosin activated core. The no-clean (245 or 275) core flux doesn't work as well.

4. Tin you contact (XRE pads & mating wires), it will help make the connection.

5. Try to get it in "ONE SHOT", if you keep the iron on too long all the flux will be gone then you'll be in trouble.

Hope this helps.
Jonathan
 
Top