How to tell difference between 1w and 3w leds

Chocablock

Newly Enlightened
Joined
Feb 13, 2014
Messages
4
Bought some generic Chinese bead LEDs in 1w and 3w but the bags spilled and they got mixed together. There suppose to use 300mA for the 1w and 700mA for the 3w and the drivers I have run the same. I have red green blue and cool and warm whites in both wattage. They run 2.4v for the reds and 3.6v for everything else. Ive put them on my power supply but the amperage they pull is all over the place.

Any easy way to tell them apart? Appearance is identical, no markings.
24o55ps.jpg
 

RetroTechie

Flashlight Enthusiast
Joined
Oct 11, 2013
Messages
1,007
Location
Hengelo, NL
Welcome here, Chocablock! :wave:

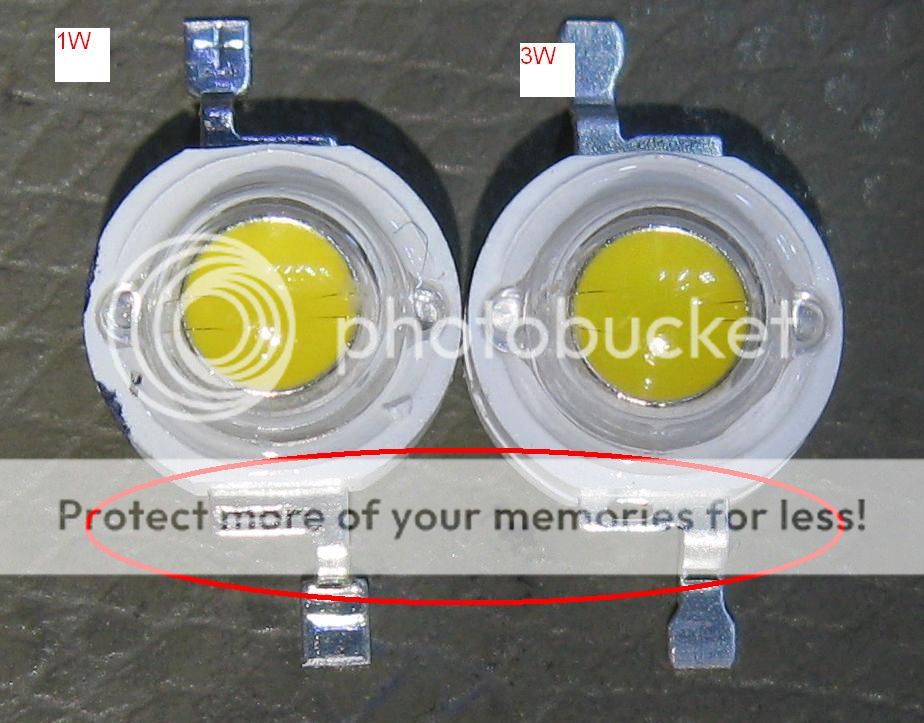
Difference between these 1W and 3W LEDs is mostly likely in their marketing... and how you cool them.

You see, there's physical limits here you can't get around. In use, there will be a voltage over that LED, a current through it, the product (called Watt) is partly converted into light, the remainder (the bulk of those Watts) becomes heat.

It could be that some LEDs are more efficient, so a larger % goes out as light and less heat remains. But since most of those Watts are turned into heat anyway, differences between LEDs in this regard aren't that big.
It could be that the substrate of one LED conducts heat much better than another, so it can get rid of heat easier. Or can tolerate a higher operating temperature. But again: for halfway similar LEDs, such differences won't be that big.

So if they're made from the same materials, with similar dimensions, then the power they can dissipate WILL be similar. Regardless what supplier says! One manufacturer might be conservative and market these as 1W, while another might do tests with optimally cooled specimens, and market them as 3W. Is that substrate ceramic? Then you can probably get away with >3W if the LED is stuck onto a thick copper plate with cooling paste between ceramic and copper. Is that substrate plastic? Then even 1W might be too much no matter how the LED is cooled. So provide proper cooling, ramp up the power gradually, measure, feel (temperature), calculate, and watch the LED's behavior carefully. And maybe you can find a datasheet for a similar built LED somewhere, to support your findings with some numbers (thermal resistance for die -> substrate, and substrate -> ambient, for various cooling methods, is what you're looking for).

Ive put them on my power supply but the amperage they pull is all over the place.
The amperage they "pull" ? :duh2: If you mean you put 'm on a constant voltage source: better not do that, it's a good way to burn LEDs fast. Always use some way to control the current through the LED. For example a series resistor, or a dedicated LED driver.
 

RoGuE_StreaK

Enlightened
Joined
Apr 15, 2010
Messages
615
Location
Brisbane, Australia
Probably as retrotechie said, but if there's a vague chance that there are different sized dies under the phosphor blob (ie. smaller die for 1W, larger for 3W) then perhaps it will show up if you run a very small current through it and take a macro photo; the die might light up enough to show it's shape/size enough to differentiate them.

I've never done this before, don't know if it'll actually work, I just have a vague recollection of people using methods somewhere along those lines to take die shots.
 

Chocablock

Newly Enlightened
Joined
Feb 13, 2014
Messages
4
Thank you both! Lots of good information. Im an absolute newbie at this and this has given me alot of insight.

It did occur to me that there might have been only a slight difference between the 2 as there indistinguishable by (my) slight alone. As far as substrate there stainless on the bottom and Ill be mounting them on the 20mm aluminum star heatsinks. Btw when i mounting them to the heat sinks i just used some cpu thermal paste as its all I had, is that okay?

I will try the macro shot, thats a very clever idea. i actually was playing around with my camera and macro lens and took some close ups but it never occur to me to try a measurement, thanks for the tip!

going to try heat testing them tomorrow, I just have to figure out how to put my power supply into CC mode now.
The thing im concerned with most is heat as these are being mounted inside a plastic aquarium hood with light ventilation a few inches above the water.
After there mounted to the heatsink would hot glueing the back of the sink to the plastic build alot of heat you think? Is there a better way to non permanently mount them?
 

RoGuE_StreaK

Enlightened
Joined
Apr 15, 2010
Messages
615
Location
Brisbane, Australia
CPU thermal paste should be adequate, don't know of you could solder the stainless bottom to the star, never looked into soldering stainless.
Stars shouldn't really be considered heat sinks as such, more as intermediary heat spreaders; you should really then be mounting these to a big chunk of metal, which acts as the sink/dissipator. How much space do you have free? A common method is to grab some cheap aluminium channel and mount the stars inside this, could screw them on with some CPU paste under, then hot glue the channel to the plastic. Have to keep an eye on the glue to make sure it doesn't get hot enough to re-melt.

If things get too toasty, decrease the amount of current you are supplying.
 

Brlux

Enlightened
Joined
Jan 28, 2003
Messages
400
Location
Mesa, AZ
I know this is an old post but in case someone else stumbles upon it. I have been buying quite a lot of the Chinese bead LEDs and for me the 1W have a - sign stamped in the lead right as it enters the LED package. On the 3W it is a cutout in the lead that slightly resembles a - sign. O heck I took a picture. The Die of the 3W is also larger so under very low current ( < 1mA)you can visually see the difference in die size.


Bead%20LED.jpg
 

Brlux

Enlightened
Joined
Jan 28, 2003
Messages
400
Location
Mesa, AZ
Since I did not know a more appropriate place to put it. I am adding some die shots of the 3W vs 1W LEDs to this thread. I will start off by saying I had not expected much from these LEDs but am actually very impressed with them. They have very consistent color from one LED to the next, the quality of light is actually very good, and the efficiency is extremely good. I have used some of these Neutral Whites (the seller is calling them 4000-4500K) to upgraded some older flashlights that had SSC P4s and Luxeons in them and it is a huge improvement as far as brightness and light quality is concerned. If you are looking for upgrade a light that is designed to use a original Luxeon 1w, 3W, K2 or SSCP4 this may be the best thing I have found in this particular LED form factor. They are also insanely inexpensive, I got my 1W for $0.08 each delivered and 3W under $0.17 each delivered in quantity 100. Here is the eBay link where I ordered but it may not be active when you check it.

The problem with these as with most grey market Asian products is that there is next to no documentation or information available on the product. I was unable to get anything resembling a data sheet out of the seller but he did say they use epileds and forepi dies. I don't know which one is which but where is what I found tearing some of them down.

1W%20Neutral%20White.jpg

Neutral White 1W

3W%20Neutral%20White.jpg

Neutral White 3W

1W%20Warm%20White.jpg

Warm White 1W

3W%20Warm%20White.jpg

Warm White 3W

Would love if someone could tell me which die was which manufacture. Interesting that the 3W warm die is notably larger than the 3W neutral die.
 
Last edited:

Brlux

Enlightened
Joined
Jan 28, 2003
Messages
400
Location
Mesa, AZ
Another observation with these LEDs is that they have fairly long and thin bond wires. Which causes problems for driving with high current. I have found that at around 1.8A the bond wires on these LEDs will vaporize making the LED non functional. The die seems to be able to handle more than this but the packaging (Bond Wire) leaves a lot to be desired, You are obviously experiencing a fair amount of voltage drop across the bond wires prior to the vaporization. Someone correct me if I am wrong but the bond wires appear to be gold thread.
 
Top