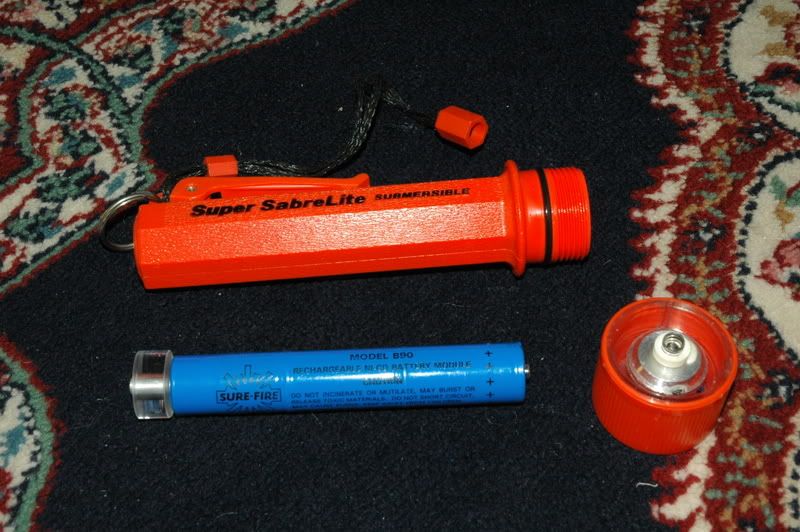
Reviving an old Pelican Super SabreLite

PCC

Flashlight Enthusiast
Joined
Oct 28, 2007
Messages
2,326
Location
Sitting' on the dock o' The Bay...
My cousin gave me his old Pelican Super SabreLite the other day. It's pretty old as it does not have the same shape as the current one nor does it have the vent on the side for pent up gasses. This light takes 3 C cell batteries. I do not have any C cell batteries nor anything that takes them nor do I want to buy C cell batteries just for this one flashlight so I decided to try putting the SureFire B90 battery from my 9N into this light. The only problem is that the B90 is a little bit shorter than 3 C cells would be so I made a spacer out of some one inch plexiglass rod and a piece of 1/4 inch aluminum rod I have laying around. Initially, both pieces were made longer than needed then I trimmed them down until it worked. I now have a nice little incandescent flashlight to use until the incan bulb burns out then I'll see if I can mod it to LED for increased run time.

Something I noticed about this flashlight is that it would appear that it was designed to be used with the batteries installed positive side down as the battery contact deep inside the flashlight has a piece of foam taped on to it, preventing the negative side of the battery from making contact with the contact, completing the circuit. I've mounted the B90 battery positive side up with the spacer making contact with the negative side of the battery, completing the circuit. I suppose I can drop the battery into the light positive side first then put the spacer on before installing the bulb assembly but I would need to shorten the spacer some more as I intended for the spring of the center contact of the bulb assembly to wrap around the positive pole of the battery, which looks like the positive terminal of a 9V battery. I'm guessing that this light is not as bright as it would be had I installed 3 C cell batteries but the light I am getting now is quite nice and is certainly bright enough for my needs.

I guess I need to make a few 2400MAh stick packs for these two lights, now! I have a bunch of brand new Sanyo 2400 Ni-Cads laying around collecting dust from my RC days.

Here are a few pictures:
DSC_9110.jpg

DSC_9111.jpg

DSC_9112.jpg

DSC_9115.jpg


Anyone else out there with an earlier model Pelican Super SabreLite? Anyone mod one?
 
I have a flashlight very similar to yours. It was one of the series of flashlights from Browning firearms Co. I think it was manufactured for Browinig by Pelican. It is identical to yours, except it has been updated with the catalyst pellets on the lamp module to absorb any gas venting from the cells, and has the valve. Mine is black. Everything on mine is enterchangeable with the Pelican Supersaber. I use to think that this was a totally awesome light. It is tough, but that's about it. I would like to mod it to something much brighter, maybe hotwire on the incan line. I dont think that a non metal light is a good host for anything high output on the led line because of heat issues and nuking the emmitter. Now that you have started this thread, maybe both of us can do something that really rocks with these old beaters!
 
The only issue I have with this light is that the bulb and lens assembly is integrated, which makes mods more difficult to do. Yeah, this one has the little catalyst module in the lamp assembly, too.

I just took this light outside and, holy smokes, this thing is a thrower! I don't know if I'm getting more current flow to the filament due to the reduced internal resistance from the Ni-Cad batteries but this thing is both bright and has a tight beam. This is one of three lights that I have that'll light up the trees at one end of my block enough for me to notice it. The other two are a MagLED with SSC P4 and the other a Brinkman Q-Beam, which is a corded 12V sealed beam lantern.

One of the things I thought of is to use a D36 lamp assembly and modify it to fit this light, possibly with an aluminum adapter in there but the lack of thermal management is cause for concern. I did consider the SureFire P60L because it has built-in thermal protection but the reflector is only 26.5mm in diameter, which I do not like. Maybe I can swap the pill with one from a D36 LA?

Maybe I'll just keep this light the way it is but what's the fun in that?
 
Mine is a good thrower too. Not much spill at all. Im interested in what you end up doing with yours to get some ideas for mine.
 
Mine is a good thrower too. Not much spill at all. Im interested in what you end up doing with yours to get some ideas for mine.
This series of Pelican lights have a very narrow beam. Tons of throw with little spill because they are designed to be used in the water. Put you Super SabreLite under water and the throw spill tends to balance out due to the diffusion of the water. Very bright either way. Make sure your o-ring is in good condition and properly lubricated.

Mark
 
I realised that this is a light that is intended to be used in or near water. Unfortunately, I don't know how to swim so I will not be testing the seaworthiness of this light any time soon. My children may, though.

I'm going to work on two solutions for this light: one keeping the stock incandescent assembly and try to improve on the run times (more MAh!!!) and the other will probably be LED and will sacrifice the tight beam pattern but will have more lumens and even longer run times. The first one will be easy as I'll just need to get NiMH C cells or better sub-C cells. The second one will involve some mods and making stuff on the mill.

Does anyone know if the current Super SabreLite bulb assembly will work with this old one? It should but I figured that I should ask, just in case.
 
Probably explains why mine has "Submersible" on the side of it.

This series of Pelican lights have a very narrow beam. Tons of throw with little spill because they are designed to be used in the water. Put you Super SabreLite under water and the throw spill tends to balance out due to the diffusion of the water. Very bright either way. Make sure your o-ring is in good condition and properly lubricated.

Mark
 
Something I noticed about this flashlight is that it would appear that it was designed to be used with the batteries installed positive side down.


As far as I am aware, these SabreLites has always been positive down. The new ones has a battery tray that will only work with positive down.


Anyone else out there with an earlier model Pelican Super SabreLite? Anyone mod one?


I do have several of the older 'SabreLite' models. It looks like you have the newer body style with the older type head for yours is labeled 'Super SabreLite' like the current models. You also have the 2nd generation lamp assembly (almost full aluminum).


Here are a few pics of the old type 'SabreLites' I have. Some with the original box. The 3 top ones are current models.


SabreLites.jpg


See - no "Super" label...


BlueSabreLite.jpg


No foam cushion on the positive contact side...

Innards.jpg


Label inside body...

Sticker.jpg


These were rated at 2000' wheres the new ones are rated a mere 500'. Like we go down that deep anyways.


2000FeetRated.jpg


To the best of my knowledge, here are the lamp assemblies that were made for the SabreLites...


Gen 1 - plastic reflector...

OldLampStyle.jpg


Gen 2 - almost full aluminum...

2ndGeneration.jpg


Gen 3 (current) - stamped and chromed sheet metal...

Current.jpg


As far as LED upgrades, Pelican does make the "Recoil" version of the SabreLite. The head is available as an option. The LED is mounted towards the window/lens and shines into the reflector. Modding an existing aluminum lamp assembly to an LED would be a nice project.


Here is a pic of the larger "Recoil' head. A smaller one is now made...

RecoilHead.jpg


It is an impressive square beam and a tight one at that for it does throw.


Njoy...
 
Last edited:
Thanks, qarawol! That is great information!

I'm not sure but it seems like we have similar vintage lights. I don't know why this light is a "Super" compared to yours but that's the way I got it and I don't know any of the history of it. If I had to guess, I would say that my cousin bought this light back in the late '80's or early '90s when he worked in a knife store. A lot of his customers were law enforcement and emergency workers who required the more unusual lights and that's what they recommended to him.

The sticker showing to install the batteries positive side down is gone and I only noticed that it was positive side down because I decided to look inside the tube instead of just dumping batteries in there and trying to figure out why I'm not getting light.

The reflector on my light is somewhat dull. It's like it has a fine layer of dust on it instead of being shiny chrome but the "dust" won't wipe away. I'm sure that this really cuts down on the amount of light making it downrange. When the bulb blows I'll look into polishing the reflector to see if that helps it any. If it does polish out I can try my hand at converting it to LED.

I might get that optional LED head but I need to confirm that it will fit and work with this older model before committing the money to it. I still need to buy a new lamp assembly, eventually.
 
Well, the bulb blew so this light had been shelved for the last few weeks. I took advantage of a sale on the CPM and bought a Dereelight 1SM Q5 WC D26 module with the orange peel reflector. It should arrive any day now. I ran a piece of Delrin through the mill and made a shim for the front of the module. This is so that the module will be centered and the aluminum reflector itself will not make contact with the plastic lens, preventing it from being scratched. I will make an aluminum collar for the body of the D26 module to act as a negative contact and as a heatsink but I'll do that after the module arrives. I'm hoping to be using this light by this weekend, depending on when the module shows up.

- Pictures -
DSC_9204.jpg


DSC_9207.jpg


DSC_9208.jpg


DSC_9210.jpg
 
The Dereelight 1S WC Q5 D26 drop-in finally showed up. Thanks go out to FlashCrazy for going above and beyond in getting this to me despite the USPS losing the first one.

I made a heatsink for this drop-in in addition to the collar shown above. Unfortunately, the SureFire B90 battery shown above is failing and only puts out 2.6V when fully charged (it's supposed to put out 3.9V). The drop-in has a low voltage cutoff at 2.8V so it won't light up with this battery pack. I guess it's time to put a battery pack together.

DSC_9226.jpg


You can see that the height of the D26 is close to the original reflector assembly but is a little bit short. That's okay because installing the batteries backwards (negative side down instead of positive side down) will require using a magnet on the first battery, which will raise the battery stack. I need to get a different drop-in that can handle more voltage than this one, though.
 
Last edited:
This thread caught my eye quick. Its been something ive been trying to do for a while. My Super SaberLite had been my old standby for most tasks before I got into LED's. The sub-hour run time was just never enough for me tho. I am VERY interested to what you find here. I might try that Recoil head if i can find one cheap enough.
 
That light has been sitting in a drawer for over a year collecting dust. My current plans for it are to make a tower for a Cree XP-G and run it with a Sandwich Shop BB Nexgen 500mA driver using the original reflector. This will require that only two cells be used and I plan on getting two C NiMH batteries to run in it. The excess space will be taken up with a heatsink. This should be good for around 100 lumens and run times will be measured in hours. I just need to get off my lazy rear and do it.
 
I just wanted to post that I've started converting this light to LED, finally! It's been, what, two years since I got it. LOL!

So far I've taken apart the stock second generation reflector, bored out the hole from 7.7mm to about 9.2mm. I then made a copper tower that will go through this hole and an XM-L T6 mounted to a datiLED 8mm MCPCB will be attached to the end of the tower. I've made an extension out of aluminum that will attach to the copper heatsink and will hold a Sandwich Shoppe BB Nexgen 500. I still have some machining to do on the copper heatsink then I can solder everything up and try it.
 
Very interesting. I have a Pelican Super SabeLite and it has to be one of the first. I've had it for years. The clip broke off years ago, but it still works with the original bulb. Fortunately, when I put it away years ago, I took the batteries out. The idea of making it rechargeable is great!
 
Okay, so, I've finished this little project. The end result: a big, floody beam on two NiMH C cells. In a pinch I can drop two alkaline C cells in there and it will run for a long time. On two NiMH C cells I measured just under 400mA of current draw, which will give me over 10 hours of continuous run time. It's only putting out around 75 lumens or so, which is less than I had thought that I would get, but, it's not all that bad. It could be that the NiMH cells that I used are not exactly fresh off the charger. I think that it would make more light if I used a pair of fresh alkalines or freshly charged NiMH cells. The floody beam is the result of using an XM-L with its large die.

Enough with the talk, here are the pictures:
These are the parts that make up this light.
DSC_2919-1.jpg


Here are the reflector and the heatsink/tower module:
DSC_2926-1.jpg


Here's the reflector and heatsink assembled:
DSC_2921-1.jpg


Finally, here's what it looks like assembled, from the business end:
DSC_2924-1.jpg
 
So, a little bit over a month later and this light has been great. I don't use it often, but, it does come out to play once in awhile. The last time the batteries were charged were a day or two before I brought it to bigC's house so it's got the long run times down. I ran it for an hour last night just to see how hot the heatsink would get and it only got warm, around 120 degrees F. I'm really happy with the way this light has turned out.

This morning I had an epiphany: the stock aluminum reflector from a SureFire M3 (Z46) might fit. I compared it to the stock alumimum reflector and found that it is pretty close. The M3 reflector is slightly smaller in diameter and shallower, but, it has a nice OP surface and the reflective coating is intact. I'm guessing that I'll gain both OTF lumens and a better looking beam by using this reflector instead of the one that I did. Despite being happy with the light so far, being the tinkerer that I am I cannot leave well enough alone so this light will be getting a new lamp assembly made for it in the next few weeks. Stay tuned...
 
PCC;

I'm pretty sure I met you and saw this light at the Dark Sucks CPF get-together. It's cool to have seen the light, and now catch up on all the stuff you've done to it over the years. As always, your work is both excellent and creative.

I look forward to seeing you on the night hike.

-John
 
Top