I posted earlier about this project that i was going to do involving spelling out a name with LED lights. I was going to use PCB to hold each LED in place where i need it, but then i discovered that PCBs are also used to connect each LED to one another. If i am going to spell a name, then i will have several LEDs in the same column that i do not want being associated with one another electrically speaking. will having them in the same column on a PCB link them in series/ parallel with one another? (I don't fully understand how PCBs connect LEDs to one another)
You are using an out of date browser. It may not display this or other websites correctly.
You should upgrade or use an alternative browser.
You should upgrade or use an alternative browser.
using PCB for LED project
- Thread starter dolfan907
- Start date
 Help Support Candle Power Flashlight Forum
I posted earlier about this project that i was going to do involving spelling out a name with LED lights. I was going to use PCB to hold each LED in place where i need it, but then i discovered that PCBs are also used to connect each LED to one another. If i am going to spell a name, then i will have several LEDs in the same column that i do not want being associated with one another electrically speaking. will having them in the same column on a PCB link them in series/ parallel with one another? (I don't fully understand how PCBs connect LEDs to one another)
you can cut the traces and use insulated wires to connect across them if you need to. I used some board with nothing but holes in it and larger copper wire to connect the LEDs and hold them in place.
uk_caver
Flashlight Enthusiast
If you were going to use stripboard (or Veroboard - not sure of standard US names), you could use the strips to make connections easier.
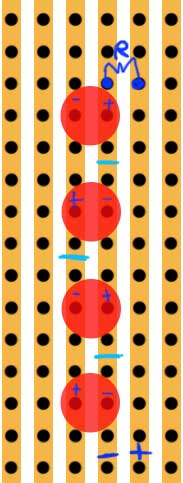
For instance, if you have the strips running up the board, you can use them to connect a column of LEDs in series, if you have the LEDs with leads in horizontally adjacent holes (so all the LEDs in a column are connected to the same pair of strips), but you flip the polarity of alternate LEDs in a column, and cut alternating strips between alternating rows.
In the picture below, the LED polarities are marked, and the cyan lines are cuts in the tracks.

Power connections are shown at the bottom, and a series resistor R is shown bridging two tracks at the top.
Strips can be cut very effectively with a dremel cutting disc, particularly a used one which has worn down to a small diameter, which makes it much easier to make cuts without touching anything nearby.
For instance, if you have the strips running up the board, you can use them to connect a column of LEDs in series, if you have the LEDs with leads in horizontally adjacent holes (so all the LEDs in a column are connected to the same pair of strips), but you flip the polarity of alternate LEDs in a column, and cut alternating strips between alternating rows.
In the picture below, the LED polarities are marked, and the cyan lines are cuts in the tracks.

Power connections are shown at the bottom, and a series resistor R is shown bridging two tracks at the top.
Strips can be cut very effectively with a dremel cutting disc, particularly a used one which has worn down to a small diameter, which makes it much easier to make cuts without touching anything nearby.
