
3rd_shift
Flashlight Enthusiast
www.taskled.com has the d2dim circuit.
But what to do with it?
Well how a bout putting it in a c cell led maglite!")
But how?
This is for intermediate to advanced modders.
So grab your electronics tools and some 24 - 26 gauge wire.
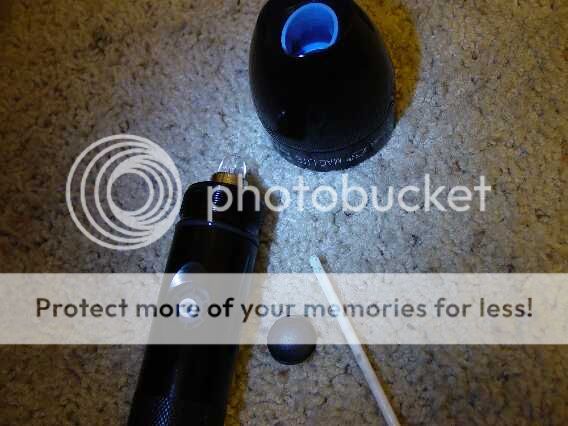
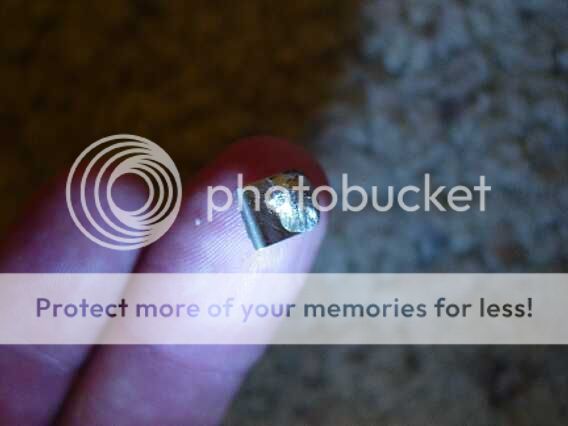
1st pry out the maglite rubber with something that won't damage it.
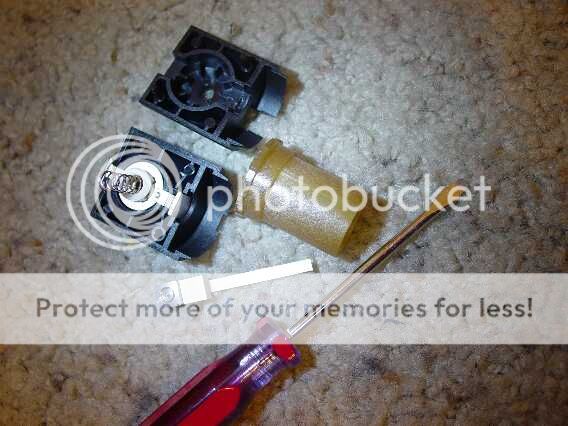
Take off the mag head and tail leaving just the tube.
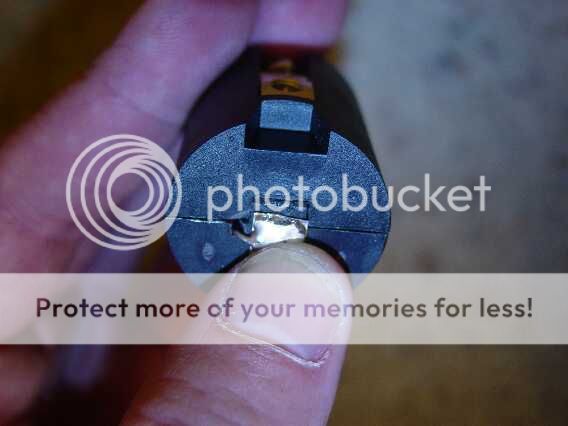
Put a 5/64ths allen wrench right down in the switch (white part that was under the rubber boot) and turn counterclockwise until it loosens and the switch assembly falls right out.
This is what you will have on the deck.
See that little brass roller that looks like the same 5/64ths allen wrench will fit?
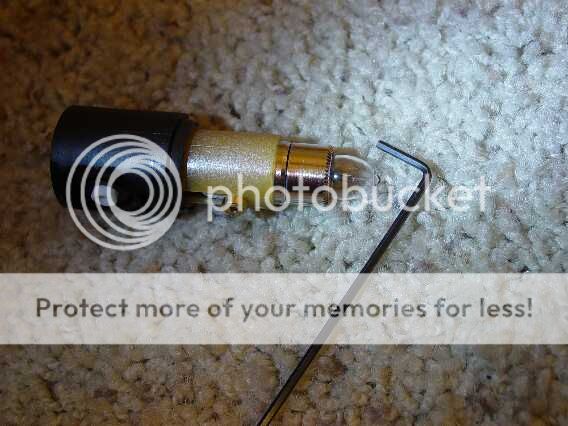
Go ahead and take that out with the wrench and you will have this disassembly.
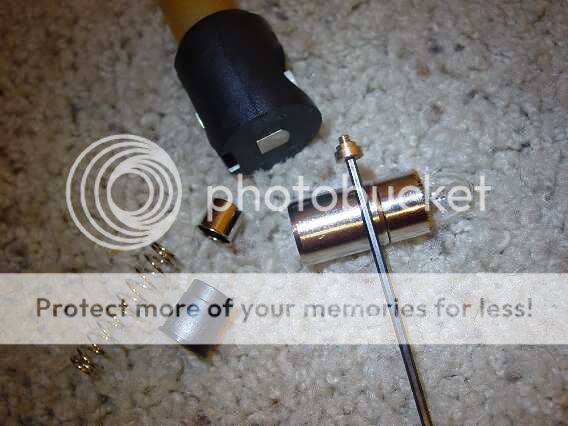
The amber colored plastic also needs to go bye-bye.
Pry the switch assembly apart with a sharpened baby flathead screwdriver as shown and work it around the switch assembly until both halves come apart.
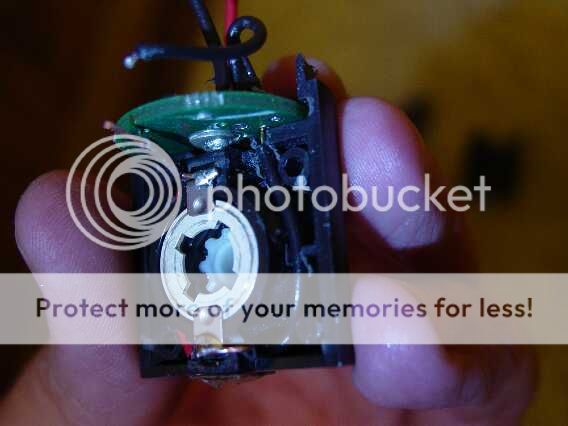
Well, look what we have here...
The secret inner workings of a maglite c cell switch!
Under the little 1 inch spring and TWO teeny brass metal parts is this little plastic doober with four wings.
Those locking "wings" have got to go bye-bye in order for this switch to become a momentary only (signalling) in order to work with the d2dim.
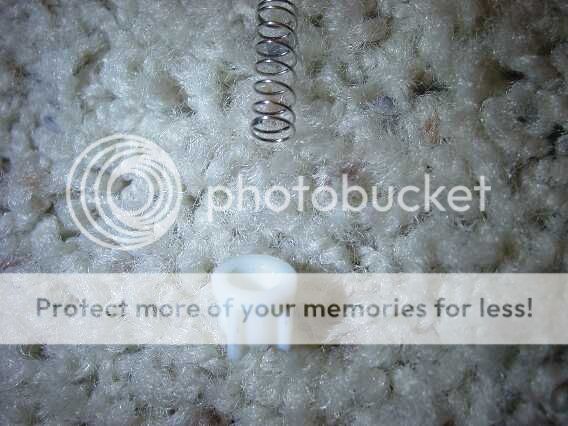
There, nice and smooth all the way around.
When back together, this is a momentary only (signalling) switch!
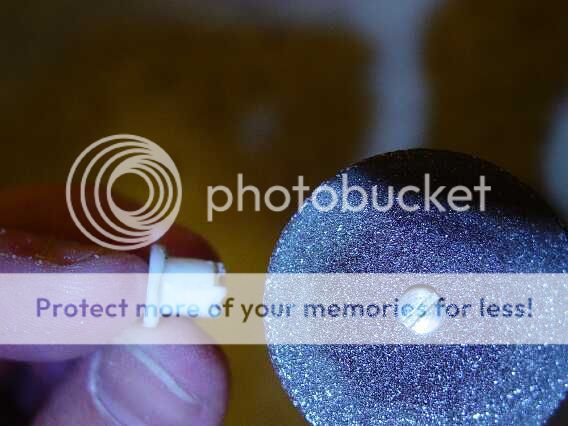
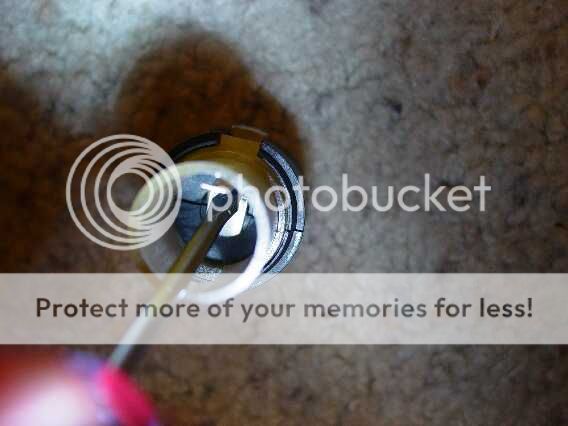
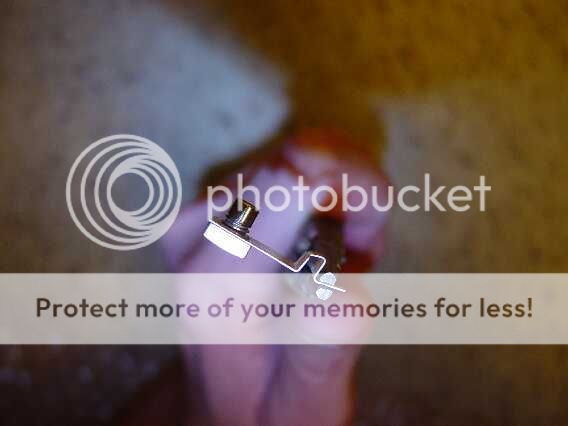
See those little metal contact tabs below holding the center half inch rotator "disc" in place?
Thier 1/4 inch extension tabs on the "exterior" of the assembly contacting the battery (+) and the bulb (+) need to be sheered right off.
I left them in there and sheered them off with the dremel using the plastic body to hold them still.
This is to isolate the now momentary switch to be on the (-) side, where the georges80 D2dim does all of it's magic.
Here is one of the sheered tabs.
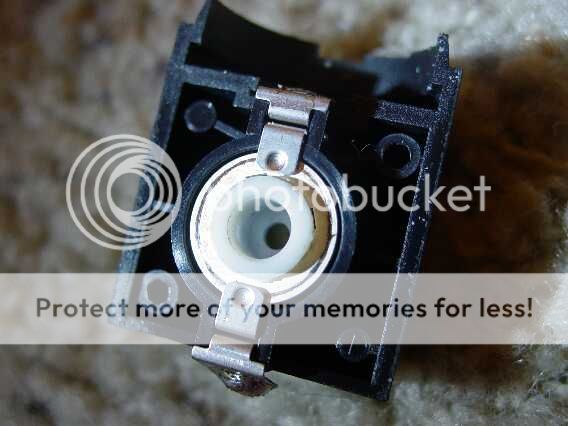
Pull out the clipped rotator disc tabs with needlenose pliers, pull out the rotator disc, it's coil spring and put plenty of contact grease in the place where the rotator disc was.
When done, put the rotator disc it's spring and the clipped tabs back in.

The negative contact strip now needs some work.
Bend it just like so.. with the needlenose pliers.
So that it will fit just like this.
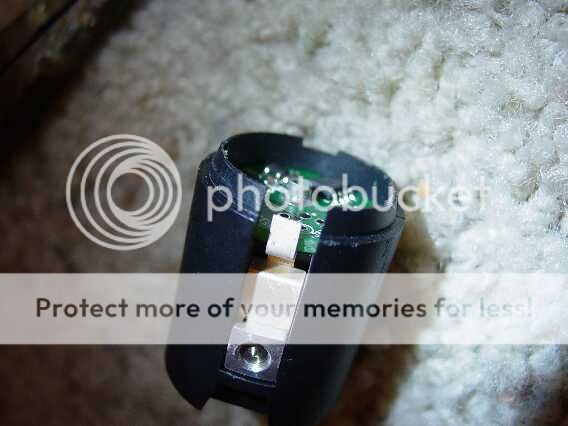
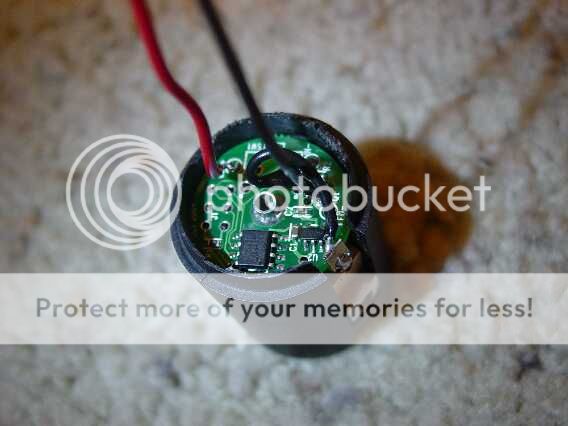
WoW! look at this... The D2Dim fits right in there, where the amber plastic bulb tower was!
If you don't want to mount it this way, that's fine as this is the harder and "neater" way to do it that leaves room in there for other stuff like 5 watt block type resistors or other circuitry you may have in mind.
Now take a close look here.
The red (+) wire was run straight through from bottom to the top and soldered right to the "battery contact" of the D2dim.
The other end of the wire now has one of the clipped 1/4 inch metal parts from earlier soldered onto it.
Here is another view below of the south end of the switch assembly showing the soldered on (+) battery contact.
Remember, it no longer goes through the switch circuit anymore as you can see by the way I'm pulling on it.
It now just leads right to the fat, (+) part of the D2dim board.
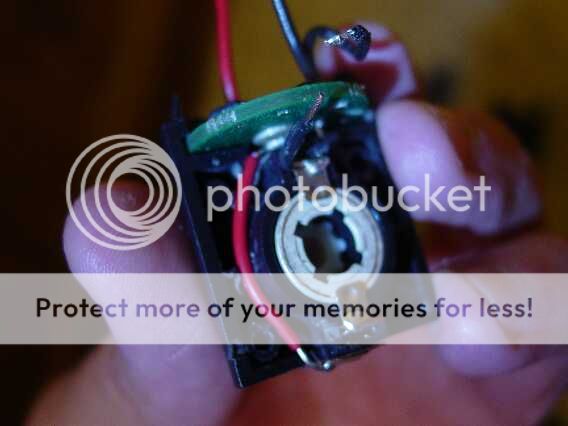
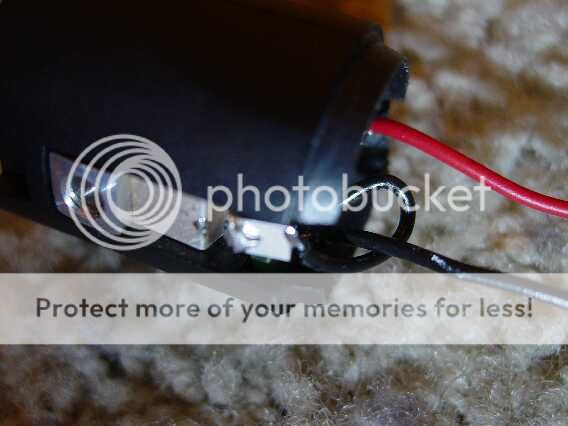
Here is a better view of the (-) wiring.
Now pay attention..
Notice the half inch piece sticking straight out of the upper switch contact tab?
That is the switch (-) feed coming in under the board from the metal (-) tab.
The return wire from the lower switch contact from underneath goes into SW1 hole next to IN-, not LED+ on the board.
There has been quite a bit of channeling done with the Dremel to make room for the wires to all lay in there.
make them as big as you need them to run your wires, but be sure the switch body has enough plastic left to stay strong.
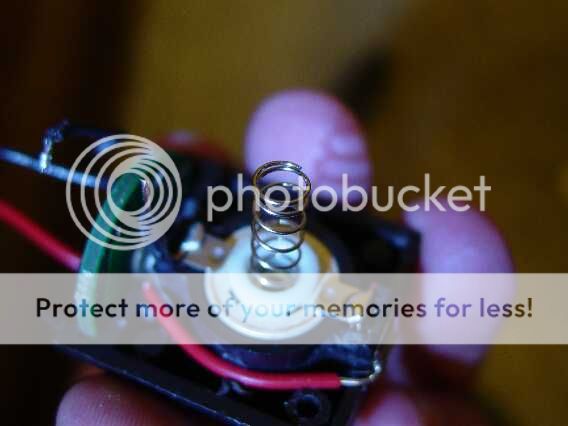
Now put your trimmed little plastic piece back in along with the 2 teeny little brass pieces (washer goes 1st) and the 1 inch spring.
Here comes a fun part.
If the 2 halves dont come together ALL the way and they MUST, Then you have a little more custom channeling, deburring and wire fitting to do.
Don't give up. With patience and care, it will all go right in there and come together.
Call it a night if you must and try again the next day.
Got it together?
Ok, Your negative supply wires now need to be soldered to the (-) tab.
Switch feed (-) on the bottom and general (-) in on the top.
At this point, you are now ready to put this back into your led modded c cell light and cross your fingers.
Here is another view.
I'm tired just from posting this and will later show this going back into a 4c (3X 18650) 4X4 watt Direct drive 600+ lumen R/O maglite
But what to do with it?
Well how a bout putting it in a c cell led maglite!
But how?
This is for intermediate to advanced modders.
So grab your electronics tools and some 24 - 26 gauge wire.
1st pry out the maglite rubber with something that won't damage it.
Take off the mag head and tail leaving just the tube.
Put a 5/64ths allen wrench right down in the switch (white part that was under the rubber boot) and turn counterclockwise until it loosens and the switch assembly falls right out.
This is what you will have on the deck.
See that little brass roller that looks like the same 5/64ths allen wrench will fit?
Go ahead and take that out with the wrench and you will have this disassembly.
The amber colored plastic also needs to go bye-bye.
Pry the switch assembly apart with a sharpened baby flathead screwdriver as shown and work it around the switch assembly until both halves come apart.
Well, look what we have here...
The secret inner workings of a maglite c cell switch!
Under the little 1 inch spring and TWO teeny brass metal parts is this little plastic doober with four wings.
Those locking "wings" have got to go bye-bye in order for this switch to become a momentary only (signalling) in order to work with the d2dim.
There, nice and smooth all the way around.
When back together, this is a momentary only (signalling) switch!
See those little metal contact tabs below holding the center half inch rotator "disc" in place?
Thier 1/4 inch extension tabs on the "exterior" of the assembly contacting the battery (+) and the bulb (+) need to be sheered right off.
I left them in there and sheered them off with the dremel using the plastic body to hold them still.
This is to isolate the now momentary switch to be on the (-) side, where the georges80 D2dim does all of it's magic.
Here is one of the sheered tabs.
Pull out the clipped rotator disc tabs with needlenose pliers, pull out the rotator disc, it's coil spring and put plenty of contact grease in the place where the rotator disc was.
When done, put the rotator disc it's spring and the clipped tabs back in.
The negative contact strip now needs some work.
Bend it just like so.. with the needlenose pliers.
So that it will fit just like this.
WoW! look at this... The D2Dim fits right in there, where the amber plastic bulb tower was!
If you don't want to mount it this way, that's fine as this is the harder and "neater" way to do it that leaves room in there for other stuff like 5 watt block type resistors or other circuitry you may have in mind.
Now take a close look here.
The red (+) wire was run straight through from bottom to the top and soldered right to the "battery contact" of the D2dim.
The other end of the wire now has one of the clipped 1/4 inch metal parts from earlier soldered onto it.
Here is another view below of the south end of the switch assembly showing the soldered on (+) battery contact.
Remember, it no longer goes through the switch circuit anymore as you can see by the way I'm pulling on it.
It now just leads right to the fat, (+) part of the D2dim board.
Here is a better view of the (-) wiring.
Now pay attention..
Notice the half inch piece sticking straight out of the upper switch contact tab?
That is the switch (-) feed coming in under the board from the metal (-) tab.
The return wire from the lower switch contact from underneath goes into SW1 hole next to IN-, not LED+ on the board.
There has been quite a bit of channeling done with the Dremel to make room for the wires to all lay in there.
make them as big as you need them to run your wires, but be sure the switch body has enough plastic left to stay strong.
Now put your trimmed little plastic piece back in along with the 2 teeny little brass pieces (washer goes 1st) and the 1 inch spring.
Here comes a fun part.
If the 2 halves dont come together ALL the way and they MUST, Then you have a little more custom channeling, deburring and wire fitting to do.
Don't give up. With patience and care, it will all go right in there and come together.
Call it a night if you must and try again the next day.
Got it together?
Ok, Your negative supply wires now need to be soldered to the (-) tab.
Switch feed (-) on the bottom and general (-) in on the top.
At this point, you are now ready to put this back into your led modded c cell light and cross your fingers.
Here is another view.
I'm tired just from posting this and will later show this going back into a 4c (3X 18650) 4X4 watt Direct drive 600+ lumen R/O maglite
Last edited: