How do I get the head of my Fenix E1 apart for SSC install?

Turbo DV8

Flashlight Enthusiast
Joined
Jul 5, 2006
Messages
1,464
Location
Silicon Valley
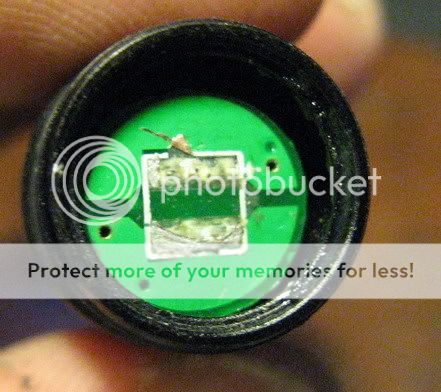
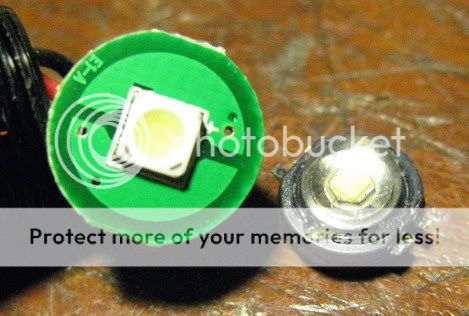
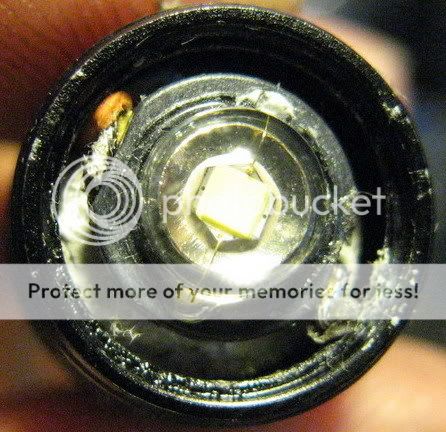
Got the light, got the SSC. Now, the head appears to be two pieces, but how do I get the two pieces apart? Thanks.
 

thezman

Enlightened
Joined
Dec 26, 2005
Messages
408
Location
PA
I had to heat mine to break the glue bond. It was the hardest Fenix I ever took apart.
 

Turbo DV8

Flashlight Enthusiast
Joined
Jul 5, 2006
Messages
1,464
Location
Silicon Valley
thezman said:
I had to heat mine to break the glue bond. It was the hardest Fenix I ever took apart.

Thanks. How did you heat it? How did you grip the parts? Is it correct that the two halves of the head "simply" unscrew once the bond is broken?
 

Norm

Retired Administrator
Joined
Jun 13, 2006
Messages
9,512
Location
Australia
I just put mine in front of a fan heater and held the head with a strap wrench. It was still very stiff to unscrew.
Norm
 

thezman

Enlightened
Joined
Dec 26, 2005
Messages
408
Location
PA
I know this is going to make some of you guys shudder, but I heated mine with one of those small butane pencil torches. It's easy to direct a bunch of heat right where you want it. ( I am a brave soul and had no problems using the torch, but I won't recommend this method to people because there is the potential for damage if you can't control the heat.)

After it was good and warm, I quickly wrapped rubberbands around the two parts that needed separated and twisted them apart.

It took a couple heat and twist cycles before the glue gave up, but I had to get rid of that little blue demon that was installed by Fenix.

I put a SSC UWOH in mine and it is a most excellent AAA light.
 

Krit

Enlightened
Joined
Dec 4, 2003
Messages
751
Location
Thailand
I can open the E1's head and se that Fenix use little glue only and I use only small locking pliers with leather guard.

Now I see that there is 2 part of circuit board, one is inside with coil and another one is couple with nichia emitter.

I think that I can trim the circuit and push it inside the body. The nichia will be remove out, might dramage. I will make small plate of heatsink to fit the body and sit the 1 watt emitter on top.

IMG_5119.jpg


IMG_5123.jpg


From this picture show that luxeon emitter is much shorter than nichia emitter and the E1 head might have more spcae from body when ture it back.

IMG_5125.jpg


Do you have more links to mod it with another way? Thanks.....Turbo DV8 for joining with your thread.
 

Krit

Enlightened
Joined
Dec 4, 2003
Messages
751
Location
Thailand
I trim circuit board, remove nichia and make new heatsink and put new emitter. I think SSC can di like this.

IMG_5167.jpg


IMG_5205.jpg
 

Turbo DV8

Flashlight Enthusiast
Joined
Jul 5, 2006
Messages
1,464
Location
Silicon Valley
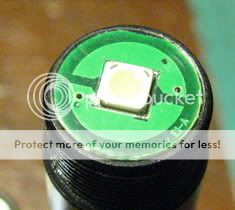
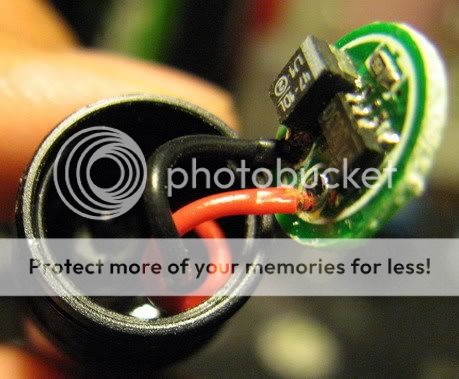
I also bypass the stock resister for get more current for emitter.

Great pics, except for the one of the new imitter installed. Are you able to provide clearer pictures of the installed emitter and also the heatsink? Thanks.
 

Krit

Enlightened
Joined
Dec 4, 2003
Messages
751
Location
Thailand
I have not all step pic.

I cut small thin of aluminnium plate and attached on stock circuit plate. Wire wires and glue with artic alumina, becareful not too close for avoid shot circuit positive and negative..

The new emitter can not stand on top of the body. Clearance is not suit enough.

IMG_5168.jpg


I by pass this resistor for get more current to emiitter. This picture I trim circuit's edge already.

IMG_5166-2.jpg
 
Last edited:

Turbo DV8

Flashlight Enthusiast
Joined
Jul 5, 2006
Messages
1,464
Location
Silicon Valley
Tonight I tried to separate the head. I heated it as much as I dare with my heat gun, and then, using those rubber grippy thingies you use to get a good grip on jar lids, tried to twist the two halves apart. Riiiiiiiight! I also tried gripping it with locking pliers with protective cushions, but no luck. Regarding using locking pliers or anything else which is able to exert enough pressure to deform the bottom half of the head... how do you dare use any force on the smooth half of the head without deforming the then metal? I thought of screwing the entire head back onto the body, so at least it could not grossly deform, but... how to heat the head up then put it all together and get your grippy stuff and pliers and such all in place and have the head still be even remotely hot? Damn, I have the emitter ready to go, but I'm already crippled at the gates!
 

Turbo DV8

Flashlight Enthusiast
Joined
Jul 5, 2006
Messages
1,464
Location
Silicon Valley
Doubt he has a Lathe so check this thread for a cheaper tool to buy that will take the heat and grip to get that stubborn little sucker open. ;)

https://www.candlepowerforums.com/threads/146949


So would you put that Bionic Wrench over the knurled head, or the smooth section just below the head? What would I hold the other half with? Or would I need two wrenches? What did you use to prevent scratching?
 

kenster

Flashlight Enthusiast
Joined
Nov 6, 2005
Messages
2,095
Location
San Antonio, Texas
So would you put that Bionic Wrench over the knurled head, or the smooth section just below the head? What would I hold the other half with? Or would I need two wrenches? What did you use to prevent scratching?

Click in the link I posted earlier and look at post #17. The light is an Lop not an E1 but they look basically the same. Grabbed right on the knurling for one side. The other I grabbed as close to the seam between the two parts I could trying to make sure the driver board was underneath the wrench to help support the Alumunim from crushing.

About these Bionic Wrenches which come in black and a Knickel plated vesions. I have the black and they have worked fantastic for me. Another member recently bought some of the Knickel plated version and he stated he had troubles with them gripping and they slipped scratching the light. I think that was due to the Knickel plating but I am not sure????? Anyway, I am thrilled with my Bionic Wrenches and someone else isn`t too thrilled with thiers, I guess. Thought you should know both.;)

Ken
 
Last edited:

Turbo DV8

Flashlight Enthusiast
Joined
Jul 5, 2006
Messages
1,464
Location
Silicon Valley
Click in the link I posted earlier and look at post #17. The light is an Lop not an E1 but they look basically the same.


Thanks. Is your wrench the 6", 8" or 10" version, and what is it's maximum working diameter? They list metric sizes, but I think that applies to the size of a nut. That is, a 10mm nut, but the maximum diameter of that nut will be greater than 10mm. So I need to know which size wrench you have and the farthest it will open, and I can go from there.

The difference between the nickel and black seems to be only aplicable to the handle material. The pawls appear to be the same silver material, so I don't think that the difference in grip is attributable to the "color" of the handle. Maybe one specimen is more tempermental than the next. There's always ways to increase friction. The 360 degree exertion of force is the secret ingredient.
 

kenster

Flashlight Enthusiast
Joined
Nov 6, 2005
Messages
2,095
Location
San Antonio, Texas
Thanks. Is your wrench the 6", 8" or 10" version, and what is it's maximum working diameter? They list metric sizes, but I think that applies to the size of a nut. That is, a 10mm nut, but the maximum diameter of that nut will be greater than 10mm. So I need to know which size wrench you have and the farthest it will open, and I can go from there.

The difference between the nickel and black seems to be only aplicable to the handle material. The pawls appear to be the same silver material, so I don't think that the difference in grip is attributable to the "color" of the handle. Maybe one specimen is more tempermental than the next. There's always ways to increase friction. The 360 degree exertion of force is the secret ingredient.

I have all three sizes. I use either the 6" or 8" on an Lop, I think??? It was longer ago than yesterday and I have mofified all kinds of lights so I don`t recall which??? Sounds like you don`t know much about wrenches and nuts & bolt and I don`t don`t fell like typing out an explanation so........... If you click the link you will find everything you need including a link to the manufacturer. Standard and Metric sizes are all listed for minimum and maximum of each size wrench.
 
Last edited:
Top