Basic Dremel/Boring Question

AFAustin

Flashlight Enthusiast
Joined
Oct 10, 2004
Messages
1,800
Location
outside of Austin, TX
I have a 2008 version Inova T1 and T2, and I love them. I have been frustrated, though, by the narrow body tubes. As a dedicated rechargeable guy, I have been wanting to fit a 17670 in them, but even an unprotected one is a bit tight. Actually, one will slide in OK, but getting it out is very difficult.

I picked up a Dremel 10.8v li-ion model on sale recently, but have no prior experience with Dremels. I am wondering if I should try to bore out the body tubes a tad to accomodate the 17670 cells? How difficult is this for a Dremel novice? Would an 8193 wheel grinder do the job? (One came with my kit and it fits nicely inside the Inova tubes): http://www.amazon.com/dp/B00004UDJH/?tag=cpf0b6-20

Any advice would be appreciated.
 

Frank_Zuccarini

Newly Enlightened
Joined
May 16, 2006
Messages
153
I'm no expert, and ultimately no help, but I think that if using a Dremel it would be nearly impossible to bore out a flashlight body in an incremental, uniform way. This is not a simple operation.

Frank
 

LukeA

Flashlight Enthusiast
Joined
Jun 3, 2007
Messages
4,399
Location
near Pittsburgh
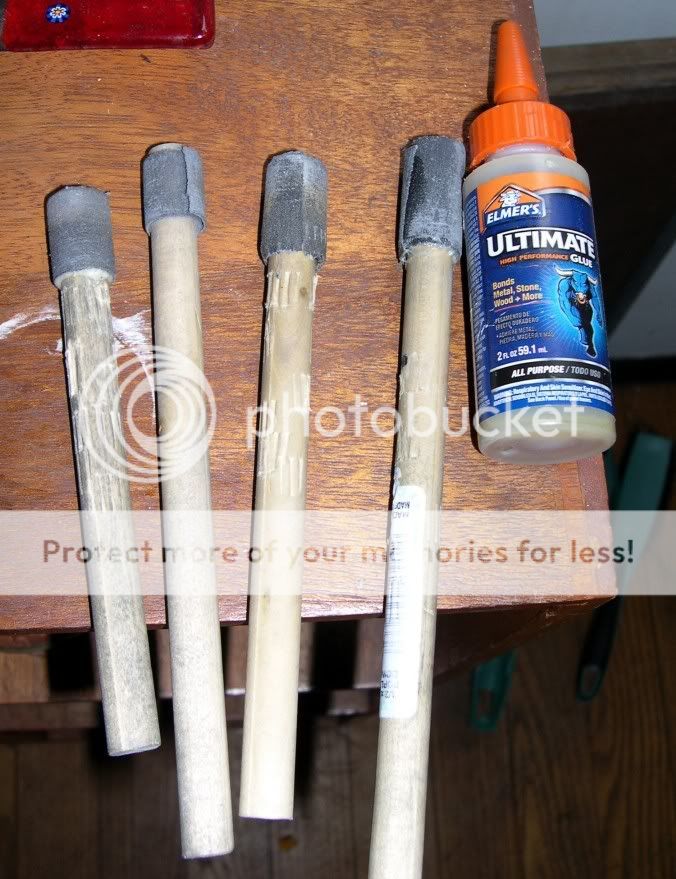
I would get a close fitting dowel, wrap it in sandpaper (150 grit or so) and do it by hand. If the cell fits already, there's not too much more material to remove.

I don't know if those brake hones will fit. The smallest one is a little bigger than the tube's ID. The brake hone bore is typically suggested for Mags.

I thought the question was pretty interesting. :whistle:
 

precisionworks

Flashaholic
Joined
Apr 19, 2007
Messages
6,623
Location
Benton Illinois
Boring can be done with a boring bar on a lathe:

lathfg12.gif


It can also be done with a boring head in a mill:

p25_02.jpg


If there isn't too much material to remove, a reamer can be used. The one shown below is adjustable to cover a limited size range:

Adjustable_Hand_Reamers.jpg


For tubes that are already finish machined, the reamer is often the easiest tool to use. The one shown above is meant to be hand driven, meaning that a lathe or mill is not needed. If you plan to enlarge more than one tube, an adjustable hand reamer is well worth the small cost. Most industrial suppliers carry a selection like this one:

http://www.icscuttingtools.com/catalog/page_194.pdf
 

GPB

Enlightened
Joined
Mar 5, 2008
Messages
597
Location
42.58 N 70.84 W
if it goes in now, perhaps you can just use it as is, and make yourself a human centrifuge to get the cell out. Stick the light into something like a sock to catch the cell.....then spin your arm around as fast as you can while holding onto the light and the battery should slide out of the light and into the sock. ( I had put some tape on a battery to keep it from rattlinng and this was how I got it out )
 

winston

Enlightened
Joined
Jan 13, 2007
Messages
294
Location
Just above DC
+1 to the dowel/sandpaper approach. It takes forever, but it's next to impossible to go too far.
Some pictures, if you will, of my crude implements:
0299.jpg

0294.jpg

Good luck!
-Winston
 

Aircraft800

Flashlight Enthusiast
Joined
Apr 24, 2007
Messages
1,487
Location
DFW Texas.
I wonder if they make a Dowel Pin Reamer in that size? They make precision holes, but that adjustable reamer that precisionworks spoke of may just be the ticket. I guess it all depends on how many times you are going to use it, if it is a one-shot deal, then the dowel wrapped in emery cloth winston used may be all you'll need.
 

Lunal_Tic

Flashlight Enthusiast
Joined
Jul 29, 2004
Messages
2,875
Location
The Wilds of Tokyo
I also have the Li-ion Dremel and think it's great however for this job I'd really look elsewhere. I've really messed up projects that were just too big for a Dremel, this sounds like it might be one of them.

-LT
 

Fallingwater

Flashlight Enthusiast
Joined
Jul 11, 2005
Messages
3,323
Location
Trieste, Italy
Actually, if you can remove the battery tube from the light, something like a round file and a lot of patience would probably give a decent, if somewhat uneven, result.
 

AFAustin

Flashlight Enthusiast
Joined
Oct 10, 2004
Messages
1,800
Location
outside of Austin, TX
Many thanks, gentlemen---lots of creative suggestions there. I'll probably try one (or more) and will post my results.

Thanks again.
 

precisionworks

Flashaholic
Joined
Apr 19, 2007
Messages
6,623
Location
Benton Illinois
The best tool for the job is called a chucking reamer, available in increments that increase by 1/64". The drawback for many users is the need for a lathe or drill press that can run a slow spindle speed.

The adjustable hand reamer is a close second, although it's slower. To use, coat the inside of the tube with lubricant (Tap Magic or other cutting fluid) & coat the reamer blades also. Expand the reamer until it will just no longer enter the tube. Turn the reamer while pressing forward so that the tool advances slightly with each turn of the handle. After the first pass, clean the inside of the tube & check for battery fit, then repeat until the size is correct.

Reamers, if sharp & well lubricated, leave a beautiful finish.
 

Hooked on Fenix

Flashlight Enthusiast
Joined
Dec 13, 2007
Messages
3,132
Don't ruin your light with the Dremel. Just do what I did. Take a piece of bailing wire and feed it through the holes in the positive contact of the 17670 cell. Twist the ends together and lay the loop around the + contact. You want it to lay flat right around the positive contact and cut off the excess wire past the twists. If you do it right, you will have a spot to grab the battery and pull it out of the tube. Mine works fine charging with the wire in it. If done right, it's a simple fix. I did this with an AW 1600 mA protected cell. I had to twist the battery in the tube for a while to get it to fit better and take off the sticker, but it worked in my 2007 Inova T1. There was no way I was going to use that light with 1.5 hour runtime without a rechargeable option after I got the 2008 version. Now I get about an hour before it starts dimming and about 1.5 hours until it gets dim. I didn't want to waste a light with a flawless beam, great tint, and perfect fit in the hand with good grip.
 

FlashKat

Flashlight Enthusiast
Joined
Mar 18, 2006
Messages
2,364
Location
Anaheim, CA.
How to do it with a wood dowel and emery cloth:
1- Get a 1/2" diameter wood dowel. 6" length
2- Cut a slot down the middle about 2" deep.
3- Rip the emery cloth in 2" wide strips.
4- Fold the strips in half and slide the middle of the emery cloth strip down the slot, then wrap around and insert into flashlight body. (Note- you may have to cut the length of the emery cloth strip until you get the right length to fit inside of the body).
5- Insert wood dowel in a 1/2" drill and start honing using WD-40 as a lubricant on the emery cloth.
This way works as a butterfly style honing which takes off the material fairly even.
I would get a close fitting dowel, wrap it in sandpaper (150 grit or so) and do it by hand. If the cell fits already, there's not too much more material to remove.

I don't know if those brake hones will fit. The smallest one is a little bigger than the tube's ID. The brake hone bore is typically suggested for Mags.

I thought the question was pretty interesting. :whistle:
 

NigelBond

Newly Enlightened
Joined
Jan 25, 2005
Messages
133
Location
ON Canada
I wanted to do this once but didn't. The plan I came up with was to use a sand paper flap wheel with a dremel. Looks like this http://www.widgetsupply.com/page/WS/PROD/dremel-sanding-flap-wheel/BAP40 Get a flap wheel slightly larger than the hole fold it tight and force it in. The advantage as i see it, is that you can get a much more even sanding on the entire circumference by holding it more or less centered in the hole.
 

AFAustin

Flashlight Enthusiast
Joined
Oct 10, 2004
Messages
1,800
Location
outside of Austin, TX
Again, thanks for so many imaginative replies. Seems there are lots of different ways to approach this.

In the meantime, playing around with it a bit more, it looks as though the problem is not with the main body of the cell---it goes in and out OK (though tight). The problem is that the cell has a small ridge about 3mm long at the + end, and I think that is what is causing the cell to get stuck. So, if I use one of the hand sanding methods suggested above, and concentrate my efforts just at the very end of the tube, I may have some luck. This is made much easier by the odd Inova design of + end towards the tailcap---obviously the near end of the tube is much easier to access and work on.

But, alas, the final twist---the T2's tailcap switch has gone on the fritz and I can't seem to get it functioning properly again. So, I guess I may be finding out soon how well Inova tends to their lifetime warranty.....:sigh:

Thanks again for all the great suggestions (and one good pun, e2x2e).
 

AFAustin

Flashlight Enthusiast
Joined
Oct 10, 2004
Messages
1,800
Location
outside of Austin, TX
Well, let me provide the double happy ending to this little thread. First of all, I received a new T2 tailcap from Inova and all is well with that issue. A big thanks to Dot in C/S and to Inova (and Cheer posted).

As to the 17670 fit issue, surprisingly (to me at least), that seems to have solved itself. I guess my struggles with inserting and removing the cells a few times managed to compress the protruding ridge at their end enough so that the cells can now actually be removed in a fairly "normal" fashion. :) So I am indeed a happy camper, with my T2 plugging along contentedly on a 17670 cell.

I'm not a bit sorry I started this thread, though. The many varied and creative means of resolving this issue were educational for me, and I will no doubt be refering back to this thread when another "boring" issue arises.

Thanks again to all. :bow:
 

Latest posts

Top