35W Torch/Lamp 2D M*g mod + 12Led engine

mpf

Enlightened
Joined
Oct 2, 2005
Messages
228
I have recently completed a 35W 10 Cree XR-E 2D M*g mod torch / lamp combination with a build in battery charger.
35WTorch_Lamp_html_425a7e47.jpg


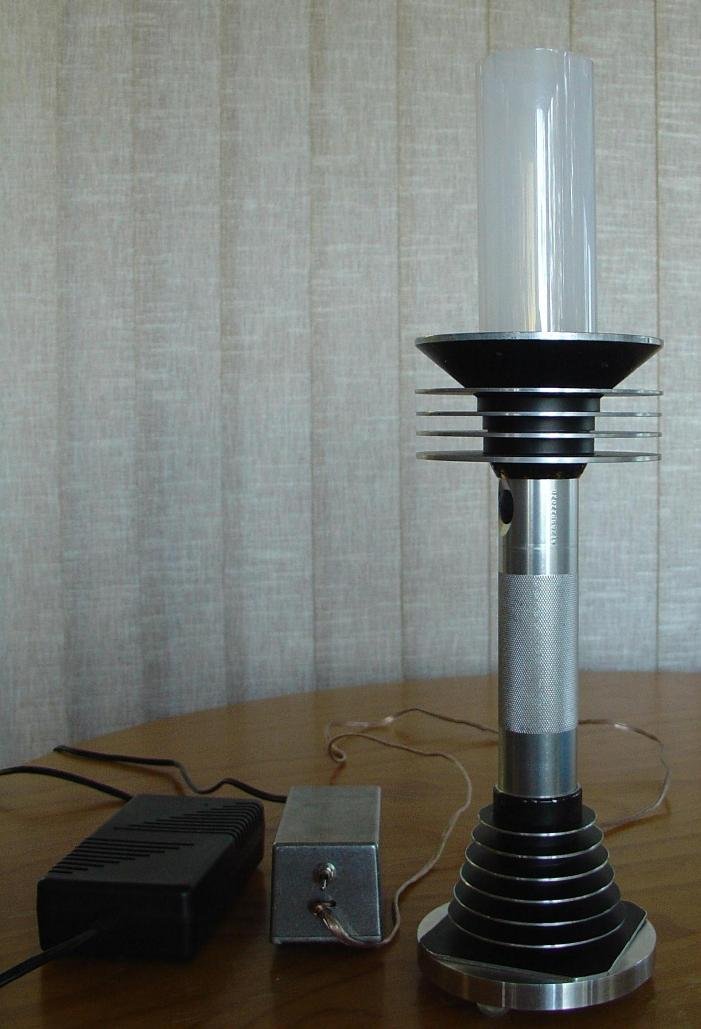
The full details can be found here http://www.forward.com.au/35WTorch_Lamp/35WTorch_Lamp.html

The features are
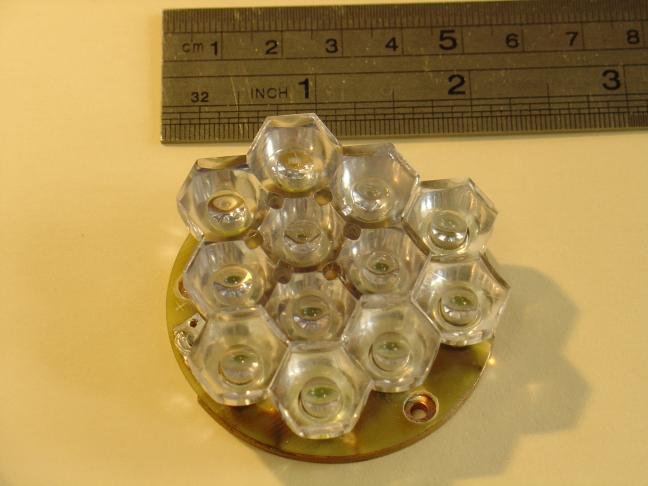
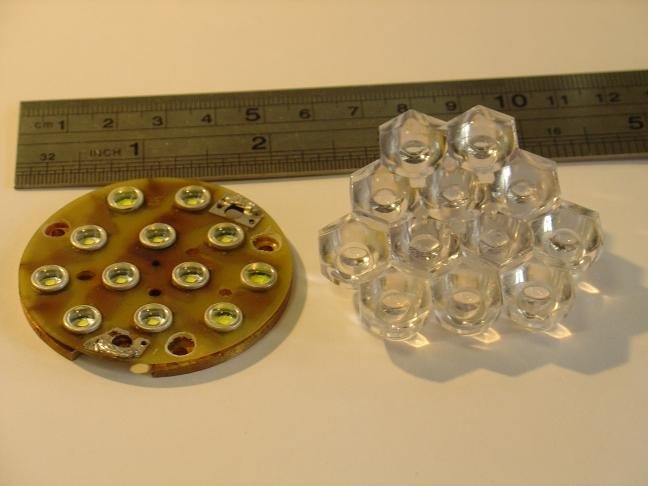
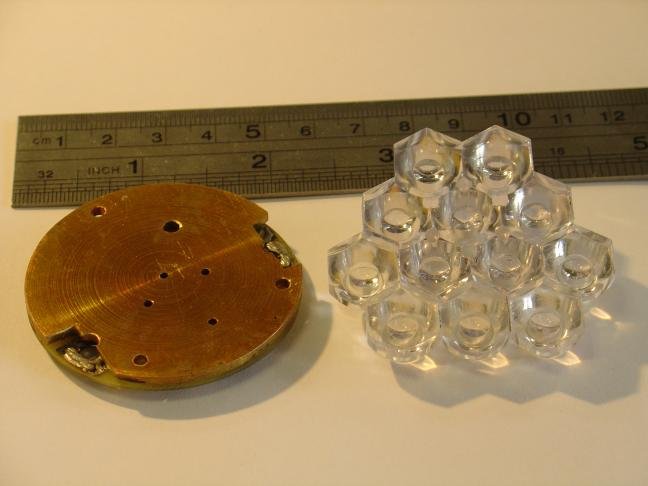
- 10 Cree XR-E leds, P4's ~1700 lumens
- Ultra clear lens
- Runtime as battery torch ~25mins minimum to >24hrs maximum
- Runtime as mains powered lamp unlimited.
- Built-in delta-T cut-off charger.
- Torch powered by a 6 x Eneloop AA soldered battery pack, electrically isolated while running as a mains powered lamp.
- Variable light levels in 12 logarithmic steps from 1.5% to 100% current, brightness approximately doubles each two steps.
- Momentary Full Brightness function.
- Lockout function.
- Low battery voltage cut-off.
- Zero Off Current (ZOC) micro-processor controller. Batteries are electrically isolated from the controller 20sec after the torch is turned off. This ensures the shelf life of charged torch is only limited by the low self-discharge of the Eneloop cells (approximately 85% charge remaining after 1 year).
- Internal heat pipe to transfer heat to the tail fins.
 
Last edited:

Nos

Enlightened
Joined
Dec 21, 2007
Messages
461
Location
Germany
Re: 35W Torch/Lamp 2D M*g mod

omg, what a masterpiece, im impressed .... especially by your heatpipe system :grin2:, does it work well?
 

lumenlover2

Newly Enlightened
Joined
Apr 5, 2008
Messages
141
Re: 35W Torch/Lamp 2D M*g mod

BEAMSHOTS please with all you existing lights in comparison (just dreaming):crackup:
 

mpf

Enlightened
Joined
Oct 2, 2005
Messages
228
Re: 35W Torch/Lamp 2D M*g mod

omg, what a masterpiece, im impressed .... especially by your heatpipe system :grin2:, does it work well?

Well you can feel the tail fins getting hot but overall the head temperature is only reduced by 5deg C so I don't think the result is worth the effort and machanical inconvenience. Next prototype will just add more fins to the head instead.
matthew
 

M@elstrom

Flashlight Enthusiast
Joined
Oct 1, 2007
Messages
2,218
Location
Sunraysia, Australia
Re: 35W Torch/Lamp 2D M*g mod

It's certainly very unique! perhaps like something off of a Sci/fi movie set? :D

Kudos to you for building it! :thumbsup:
 

mpf

Enlightened
Joined
Oct 2, 2005
Messages
228
Re: 35W Torch/Lamp 2D M*g mod

It's certainly very unique! perhaps like something off of a Sci/fi movie set? :D

Kudos to you for building it! :thumbsup:

One of our visitors said is was like the eye piece from a Dalek (aka Dr Who)
matthew
 

smopoim86

Enlightened
Joined
Apr 2, 2008
Messages
327
Location
Knoxville, TN
Re: 35W Torch/Lamp 2D M*g mod

Very interesting. On the second you might try vertical fins instead of horizontal. I'm sure it would be harder to machine, but they should allow for more effective passive cooling.

Daniel
 

mpf

Enlightened
Joined
Oct 2, 2005
Messages
228
Re: 35W Torch/Lamp 2D M*g mod

Very interesting. On the second you might try vertical fins instead of horizontal. I'm sure it would be harder to machine, but they should allow for more effective passive cooling.

Daniel
The fins are "optimized" for use as a torch. When used as a lamp you don't have to hold it.
Even with this finning when used as a torch on maximum brighness it gets too hot to hold after 15mins. Fortunately because it is so bright you would normally only run at about 50% power which also doubles the batteries' runtime to just under 1hr. 100% power is always instantly available by just pressing switch and stays at 100% power as long as the switch is held down. The torch returns to it normal setting when the switch is released.
To turn the torch off a quick click is used.
matthew
 

Norm

Retired Administrator
Joined
Jun 13, 2006
Messages
9,512
Location
Australia
Re: 35W Torch/Lamp 2D M*g mod

Some more detailed photos of the LED array would be great to see.
Norm
 

mpf

Enlightened
Joined
Oct 2, 2005
Messages
228
Re: 35W Torch/Lamp 2D M*g mod

Some more detailed photos of the LED array would be great to see.
Norm
The 10Led engine is a bit messy, thermal epoxy to the copper heatsink and leds wired from the top.
Below are some photos of the new 12Led engine (42Watts) which uses a pcb to connect the leds and then surface solders the leds to the heatsink (using solder paste and a heat gun and a multimeter with temperature reading.). The heat sink is the bolted to the plate pressed into the head.

This will be the basis of prototype no 2 which will be built from scratch rather then trying to mod a m*g (although the 12led engine will still fit inside a 2D M*g head).

Complete 12Led engine
12LedComplete.JPG


Here is the led pcb and lenses

12LedFront.JPG


Here is the copper heat sink. The three holes on the outside are for mounting bolts. The extra hole, top centre, is for the charging indicator led to shine through. This is a hand made pcb so the plated through holes are done with wire. Hence the need to cut away copper heat sink to prevent shorting out the on the wire that connects supply terminals to the top of the pcb.
12LedBack.JPG


matthew
 
Last edited:

Norm

Retired Administrator
Joined
Jun 13, 2006
Messages
9,512
Location
Australia
Re: 35W Torch/Lamp 2D M*g mod

Thanks Matthew great pics, nicely done.
Norm
 

mpf

Enlightened
Joined
Oct 2, 2005
Messages
228
I am still working on it. (Actually not working on this one, but the next one using the copper disk mounting for the leds
https://www.candlepowerforums.com/threads/200800).
Still coding the built in battery charger. Got side tracked building a bluetooth connection to the torch.

However found a problem with that design. The copper disk that holds the leds expands at a different rate to the pcb that makes the connections to the leds.

Result: One leds connection has open circuited. Althought it on the edge of the board there is just not enough room the get in the try and resolder it, which would require heating the whole copper disk up as well.

So I will do some thing different for the next design.

The lamp/torch shown here had the leds glued to a copper block with flying leads between the leds. I burnt out a led when I shorted one of bare leads so I wanted to get away from that design.
 
Last edited:

HarryN

Flashlight Enthusiast
Joined
Jan 22, 2004
Messages
3,977
Location
Pleasanton (Bay Area), CA, USA
Hi - nice build up.

I use a slightly different approach to moving heat from the LED to the heat spreader. I attach a short round cylinder (rod) of copper or Al to the bottom of each LED thermal pad. (usually with a thermal adhesive). These "thermal pad extenders" go through a hole in the PCB and down to a large thermal "heat sink / spreader" and into the body.

This lets you keep the connections on the top of the board and still get a great thermal path - better than thermal vias, that is for sure. The trade off is that it is a bit of a pain to cut small copper cylinders flat and square.

I first used this on my CR2 based "Breeze" light and the LED never gets hot at all. Of course, that was only 5 watts per LED.

Thanks for sharing the build.

HarryN
 

mpf

Enlightened
Joined
Oct 2, 2005
Messages
228
great idea, My father and I toyed with a similar idea for the next torch. I decided making the cylinders would be a pain, so I went with stars. That build is not finished yet so no results yet
 
Top