
Amnesia Wes
Newly Enlightened
- Joined
- Oct 11, 2006
- Messages
- 7
I made this for an OLight T-10, that does not have the option of a crenellated strike bezel. The flashlight is quite a bargain at $60 with 190 lumens on a single CR123 battery and even has a 'disorienting' strobe, which I like a lot. The brightness, a strike bezel and the strobe should give me the few seconds I might need to make a hasty exit, if necessary.:wave:
First, measure the outside diameter of your flashlight head.
Secondly, make or have made, a 'bushing' with the inside diameter slightly smaller than the 'outside' diameter of your flashlight. (You'll see why later.)
Make the outside diameter 1/4" larger than your inside diameter. This will give you a 'wall-thickness' of 1/8".
Make the bushing 3/4" long.
Not having the equipment to make this bushing, I had EDC member MattW, make it for me. (As you can see, he does excellent work.):twothumbs
Since the bushing will require some hand work, choose a metal that is easy to file, such as aluminum, brass or bronze. I decided to go with brass.
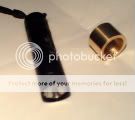
Photo 1: You will see my T-10 OLight, (which is run by a single CR123A battery), alongside the bushing. Put a piece of masking tape over the lens for protection.
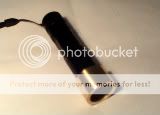
Photo 2: This is why you want the bushing slightly smaller than your flashlights head. Hone the inside of the bushing with emory cloth until you get a perfect snug fit, then epoxy the bushing to your flashlight's head, leaving at least half it's length past the head.
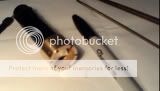
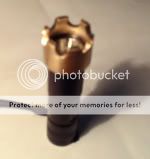
Photo 3: Mark the end of the bushing with 6 equa-distance marks, (this will be used as guides for your file work).
Photo 4: Take a small round, rat's tail file, and notch the end of the bushing. First use a 1/8" dia. file, then go up to a 1/4" dia. file. (The reason why you use a smaller diameter file first, is because a round file will have a tendency to 'walk' away from your marked area, especially since it's a flat surface. On a flat surface, a 'thinner' or small diameter file will be easier to start and control than a larger file.)
After you've got it started with the smaller file you can 'graduate' to a larger file since it now has a 'groove' to follow, to make the relief area larger.
"Deburr" any sharp edges with the emory cloth, then take off the masking tape from the lens and blow out any debris.
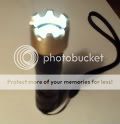
Photos 5,6,7,8: Shows the finished product.
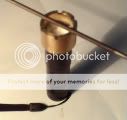


Although my el cheapo eBay camera doesn't show it well, the Black and Gold combination, looks very nice.
Now here's the important part, lol...
When the Officer asks how the Bad Guy got his face all bloody, say:
"Gee Officer, it was all so fast, I really don't know what happened."
"All I know is, this guy comes running up to me yelling: 'Hold on, hold on, let me 'holler' at you for a while'."
"The next thing I know, he runs right into my flashlight. Uh...yes Officer, several times. Then he takes off crying! Now that's my story; and I'm sticking to it..."
Wes.
First, measure the outside diameter of your flashlight head.
Secondly, make or have made, a 'bushing' with the inside diameter slightly smaller than the 'outside' diameter of your flashlight. (You'll see why later.)
Make the outside diameter 1/4" larger than your inside diameter. This will give you a 'wall-thickness' of 1/8".
Make the bushing 3/4" long.
Not having the equipment to make this bushing, I had EDC member MattW, make it for me. (As you can see, he does excellent work.):twothumbs
Since the bushing will require some hand work, choose a metal that is easy to file, such as aluminum, brass or bronze. I decided to go with brass.
Photo 1: You will see my T-10 OLight, (which is run by a single CR123A battery), alongside the bushing. Put a piece of masking tape over the lens for protection.
Photo 2: This is why you want the bushing slightly smaller than your flashlights head. Hone the inside of the bushing with emory cloth until you get a perfect snug fit, then epoxy the bushing to your flashlight's head, leaving at least half it's length past the head.
Photo 3: Mark the end of the bushing with 6 equa-distance marks, (this will be used as guides for your file work).
Photo 4: Take a small round, rat's tail file, and notch the end of the bushing. First use a 1/8" dia. file, then go up to a 1/4" dia. file. (The reason why you use a smaller diameter file first, is because a round file will have a tendency to 'walk' away from your marked area, especially since it's a flat surface. On a flat surface, a 'thinner' or small diameter file will be easier to start and control than a larger file.)
After you've got it started with the smaller file you can 'graduate' to a larger file since it now has a 'groove' to follow, to make the relief area larger.
"Deburr" any sharp edges with the emory cloth, then take off the masking tape from the lens and blow out any debris.
Photos 5,6,7,8: Shows the finished product.
Although my el cheapo eBay camera doesn't show it well, the Black and Gold combination, looks very nice.
Now here's the important part, lol...
When the Officer asks how the Bad Guy got his face all bloody, say:
"Gee Officer, it was all so fast, I really don't know what happened."
"All I know is, this guy comes running up to me yelling: 'Hold on, hold on, let me 'holler' at you for a while'."
"The next thing I know, he runs right into my flashlight. Uh...yes Officer, several times.
Then he takes off crying! Now that's my story; and I'm sticking to it..."Wes.
Last edited by a moderator: