L1 cree head opened (optics side) frosty and non frosty reason...

manoloco

Enlightened
Joined
Dec 29, 2006
Messages
690
Location
Lima, Perú
L1 cree head opened, general L1 head (optic side) info, fixing and upgrade to R2

I bought a couple of weeks ago a used failing SF L1 for a low price, so i figured this will be a good opportunity to fix it and learn a little bit about it.

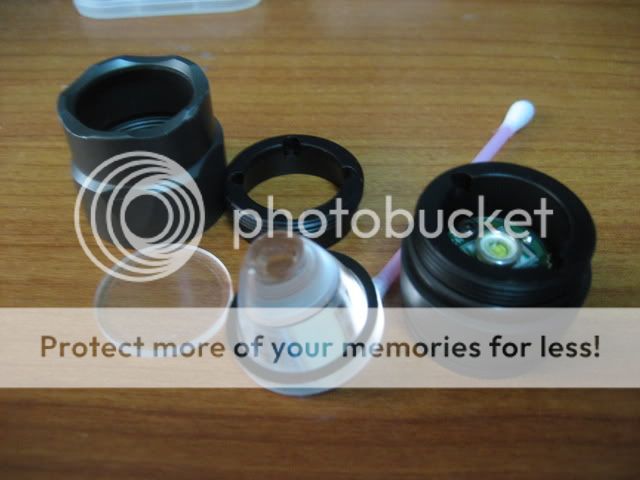
the light was working but had a very low output compared to a regular cree L1, the beam was weird too, so, i opened the head, due to use.

The head had tiny scratches and a little gouge on one of the scallops, nothing serious or very noticeable though and looks ok.

before opening the head it was obvious this cree led was a failing due to output, but its the rareness of the beam that was intriguing me, looking at the business end i saw something wrong with the optics, and i thought, they could be cracked.

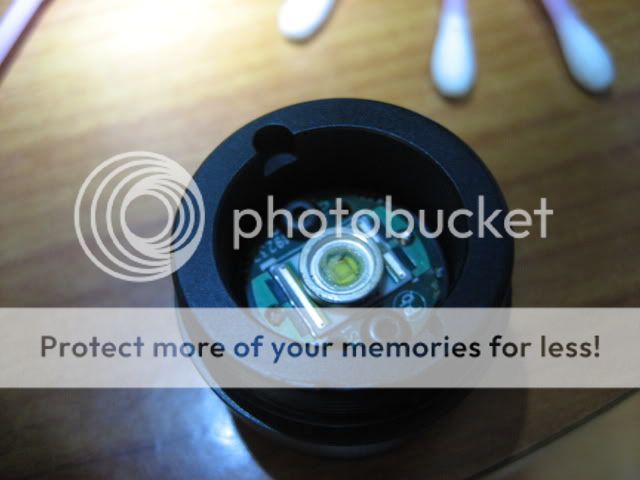
After opening i saw what the problem was: the dome of the led came off, the optics had a tiny scratch on the side where it makes contact with the led, probably made in factory while being assembled with the led dome interfering, but who knows...

another interesting thing i found is the reason why some people have frosty windows and non frosty windows, i dont know if this has been spotted before but theres a thin film between the pyrex window and the optics, this thin film is kind off sticky to the pyrex window, and is what has the frosty texture you see in the business end of some L1 crees, i guess if you want every bit of output and throw but dont care for any artifacts or spill, you can just take out this film.

another thing i tried is use the light without any optics, what effectively makes it a mule, very interesting, and very useful, also makes the beam completely artifact free. its like having a mini lightbulb in your hand.

so i took the interfering dome off and im currently waiting for the cree R2s i ordered, but i could only find stars, can anyone help me with this?, what i would like to know if the emitter will be easy to take off the star and place on the pcb from the failing led, and how should i do it. i have been searching and havent found complete info.

here are some pics:

Picture003.jpg


Picture008.jpg


Picture011.jpg
 
Last edited:

Ty_Bower

Flashlight Enthusiast
Joined
Feb 18, 2004
Messages
1,193
Location
Newark, DE
The board which Surefire uses to mount the Cree emitter is pretty thin, and probably an odd size. I've been told your best bet might be to remove the old Cree off the Surefire board and reflow solder a new emitter on.

This is going to be a delicate process. Temperature control will be critical. Too hot and you'll damage the board, not hot enough and the old Cree won't come off.

It would be easier to just mount a new star, but I'm not sure what is going to fit correctly. Let us know what works.
 

manoloco

Enlightened
Joined
Dec 29, 2006
Messages
690
Location
Lima, Perú
Thanks for the info Ty!, i havent tried reflow soldering before, everything i have done has been basically manual, however i have seen toasters being used to reflow solder, what do you use to do it?
 

manoloco

Enlightened
Joined
Dec 29, 2006
Messages
690
Location
Lima, Perú
Federal LG:

If you open the head the rest is easy, however the spill film has a layer of a liquid between it and the pyrex window, i assume its to leave air and/or improve the pass of light (counteracting the texture by filling the spaces) you will have to clean it from the window, if you decide to put the film back you will have to clean that too, but like i said you will be missing that liquid layer and the film definitely deforms if cleaned not gently.

the usual methods of opening surefire heads work perfect:

Put head inside thick bag on boiling water with as little air in the bag as possible; this is to soften the adhesive on the threads, after a few minutes take it out and use a pair of strap wrenches to open it, have the strap wrenches preset to the size you will need so you can operate as quickly as possible, and use thick gloves, my L1 head opened counterclockwise (while the window looks away from me)

inside the top part of the head (where all the optics are housed) you will find a retaining ring with four notches that you can twist counterclockwise too use a needle nose plier to take it out, this will free all optic related parts, you will find them in this order:

-retainig ring
-gasket
-optics
-textured film (what you want to take off)
-liquid layer (extremely thin and fluid, bubbles will probably form when you disassemble, between the film and the window, but no problem when cleaned and the film is taken out)
-pyrex window

be careful not to damage anything in the process and have fun!


Nanotech17:

i think with the narrow beam of the L1 it wont be much of a problem, but dont take my word for it.

With the thin film out, some of the spill could be lost, leaving more hotspot, which means artifacts will be less visible too, but who knows, i havent tried it yet, will do when my R2 arrives, the current led on this head without a dome makes a horrible beam, with very low output, only works great when used mule style (no optics).
 
Last edited:

nanotech17

Flashlight Enthusiast
Joined
Jul 31, 2006
Messages
2,150
Location
N 03°13.884° / E 101°29.329°
yeah,the gut and the LED looks the same as my E2L gut.
i did open my KX2 head ( the E2L ) and replace the circuit with 1A and replace the optic with McGizmo 19mm XRE reflector - nice flood & spill + good throw + brighter.
I just wonder how to take out the whole emitter that attached on the pcb.
I have unscrew those 2 screws but the glue is so hard to take the pcb off.
But the stock Cree P4 is doin' ok so far :whistle: and perform to the maximum with the 1A driver :naughty:

DSC00308Custom.jpg
DSC00309Custom.jpg
 
Last edited:

1996alnl

Enlightened
Joined
Oct 10, 2008
Messages
649
Interesting that the Cree LED was failing on this light.
I thought these things never burn out...

Take care
 

CM

Flashlight Enthusiast
Joined
Sep 11, 2002
Messages
3,454
Location
Mesa, AZ
Interesting that the Cree LED was failing on this light.
I thought these things never burn out...

Take care

The LED didn't "burn out". The dome was not secured. Totally different problem.
 

Bullzeyebill

Flashaholic
Joined
Feb 21, 2003
Messages
12,164
Location
CA
The LED didn't "burn out". The dome was not secured. Totally different problem.

Sort of like my Cree'd Chameleon, the dome unsecured itself when I was trying to make an optic fit using a smaller head. Optic brushed the dome and off it came. Doesn't really fit back on either.

Bill
 

Bullzeyebill

Flashaholic
Joined
Feb 21, 2003
Messages
12,164
Location
CA
yeah,the gut and the LED looks the same as my E2L gut.
i did open my KX2 head ( the E2L ) and replace the circuit with 1A and replace the optic with McGizmo 19mm XRE reflector - nice flood & spill + good throw + brighter.
I just wonder how to take out the whole emitter that attached on the pcb.
I have unscrew those 2 screws but the glue is so hard to take the pcb off.
But the stock Cree P4 is doin' ok so far :whistle: and perform to the maximum with the 1A driver :naughty:
_______________________________________________________________________________________________________

How did you know it was a Cree P4?

Bill
 

jzmtl

Flashlight Enthusiast
Joined
Dec 4, 2006
Messages
3,123
Location
Montreal, Canada
What's the diameter of the board used to mount emitter? Cree xre seems to come in different sized round base like THIS one. DX has other sizes but only in P4 bin.
 

manoloco

Enlightened
Joined
Dec 29, 2006
Messages
690
Location
Lima, Perú
That diameter would fit, 16mm is what i measured in the L1, but i want an R2 in there...:thinking: and a not soo cool tint.

does anyone know of someone or someplace that sells R2s on 16mm MCPCBs that ships internationally at a good price?

i would still like to try desoldering the led from the surefire MCPCB and solder the one i take out of the star in there, any recommendations for that or for homemade reflow soldering?

Gunga: will definitely post it here man, let us know when you get that warm light working ;)
 
Last edited:

jzmtl

Flashlight Enthusiast
Joined
Dec 4, 2006
Messages
3,123
Location
Montreal, Canada
Well at least now we know they do come that way from factory, just have to find someone sells one.

Also, can you buy a star and just cut it down to fit, or would the base be too thick?
 
Last edited:

manoloco

Enlightened
Joined
Dec 29, 2006
Messages
690
Location
Lima, Perú
i havent taken out the pcb yet until my 2 stars arrive, but comparing it to other stars it seems stars are too thick, thats why im aiming to take out the emitters and replace the one on the pcb, also i have seen thin pcbs on the shoppe, thats my next bet, but if i could solder the one in the shoppe why not use the one i already have here.

i will try it manually with a 50w soldering iron unless i can find a method to effectively reflow solder at home
 
Top