DIY How to build a p7 mag 2C for under $30.
Mods I was not sure if this belongs in the homemade lights section or here. So feel free to move it if needed.
The goal of this build was to make a 2 C Mag with a P7 for as cheap and easy as I could.
I am no electronics expert, just a few builds under my belt. So if you see something I have done wrong, don't hesitate to set me straight.
Parts needed.
Mag lite. I love the 2 C I think it is absolutely the perfect size in a hand held light.
From dealxtream sku 14413 ($27)
2 18650 lith ion batteries (I recommend AW protected)
Or the soon to be released AW 26500 (c size) protected
Now you have 3 options for the tail cap.
Buy the 26500.
Orv if running 18650's I highly recommend you buy a Mag C ring Kit from Download on CPF
https://www.candlepowerforums.com/threads/178764 It will save you alot hassle and is only $22 shipped.
------
If you don't want to spend the money.... I am including directions on how to do this without the kit.
A piece of 1/2" Flexible PVC Pipe found in the sprinkler isle at Home Depot ($1)
Made by Orbit marked 1/2" x 24" Flexible PVC Pipe
You will need a Split ring (like for keys), some bare wire, and a piece of camping sleeping pad or other piece of dense foam.
--------
Other misc parts, wire, solder, soldering tool, multimeter, Thermal adhesive, a few basic tools, allen wench a pair of pliers, razor blade, wire strippers/clipper, a dremel tool or hack saw.
On with the build!
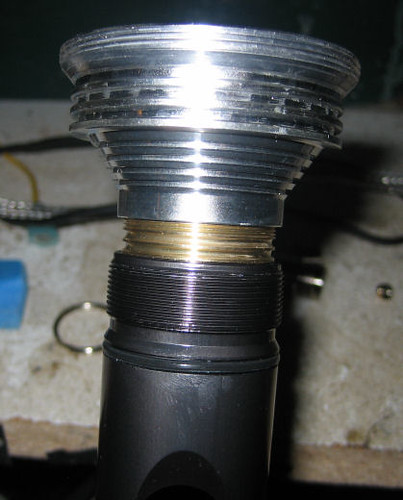
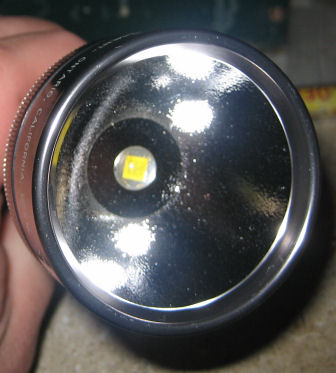
Here is one slight problem that needs to be addressed. The drop in fits just fine, but sits too tall for the bezel to screw down with a lens installed.
You can either, run it without a lens, spend a few minutes with a dremel tool to take about 2mm off of the top of the "drop in", or have a friend with a lathe do it (that is my pick)
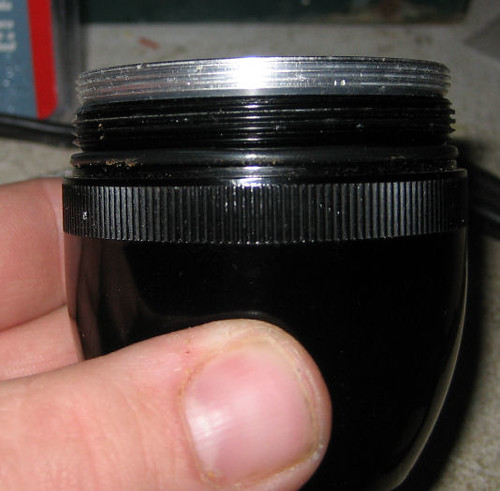
The drop in fits just about perfect inside the mag C body (new and old) almost as tight as a heat sink. A bit of thermal adhesive and you probably wont even have to use aluminum foil as a shim. Unless you leave the light running for a real long time (over 5-10 mins) I wouldn't even bother.
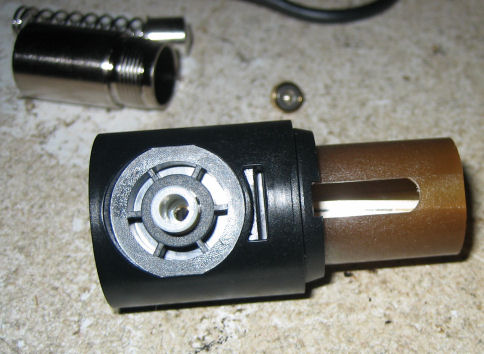
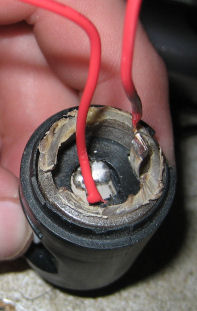
First step is to take your light apart. I wont go into too much detail here. Just pop off the button cover insert your allen key, and back the screw out. Slide the switch out the rear of the body. Then take that same allen key, and remove the other screw on the switch that slides up and down.
Now break out the dremel and cut off the top half of the switch. Remove the negative strip from the switch (just slides right out) before you make the cut. .
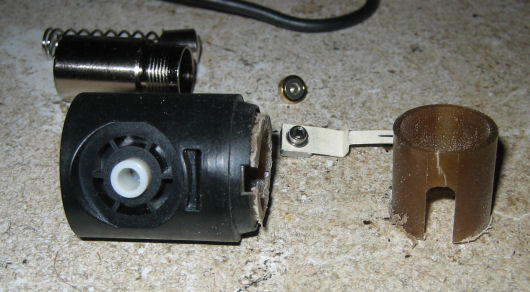
You are going to solder the positive wire to the center piece of metal and the negative wire to the strip that is standing up here.
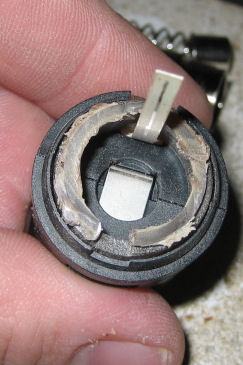
Trim the negative strip down about flush with the top of the now cut off switch. and solder away.
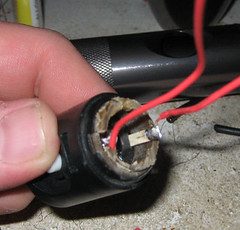
OK Now reinstall the switch into the light. Make sure that you get it aligned correctly, and that the screw is centered properly in the detent. That is what makes the negative side of the switch work.
Ignore this part if running 26500, you will keep everything stock.
On to the tail cap!
Again I recommend the mag kit from download.... but here you go anyway.
You need to find a split ring that fits into the recess that the origional mag spring sits in. Shouldn't be too hard I found it at home depot in the key section.
Take several pieces of bare wire and loop them through the split ring.
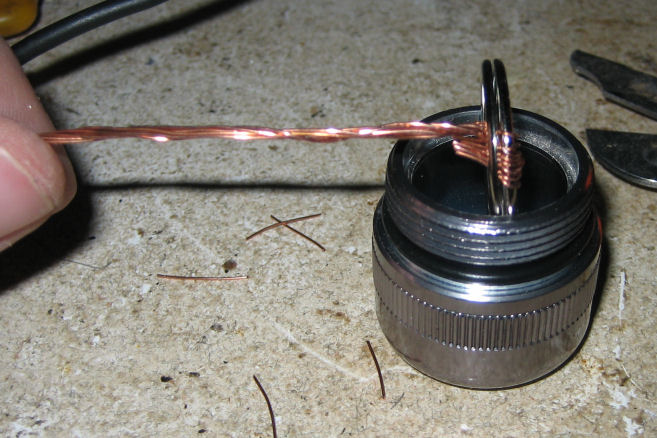
Then take the piece of dense foam, and cut it to fit in the bottom of the tail cap. This will need to be rather thin. You will have to play with this a bit depending on th 18650's you are using. It is what adjusts the tension on the batteries.
Now bend your wires down, and cut them to length. So it looks something like this.
VERY VERY VERY IMPORTANT, make sure that the batteries do not rub against the bare wire that is looped around the split ring. If it rubs through the shrink wrap it will cause a short circuit and other very dangerous side effects (like batteries exploding)

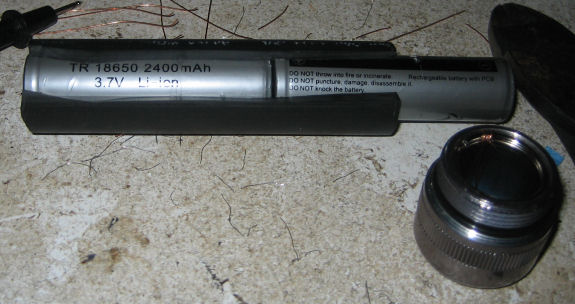
Now on to the battery tube.
Cut a length of the pipe, so that it sits just under the threads inside the flashlight body.
Split the tube down the side, and it will be absolutely perfect for fitting the batteries with no rattle, and no worry if your batteries are hitting the positive contact of the switch correctly.
Now I always test when I am at this juncture of a build. It will save alot of time troubleshooting if you just hook your multimeter up to the bare wires out the front of the light now.
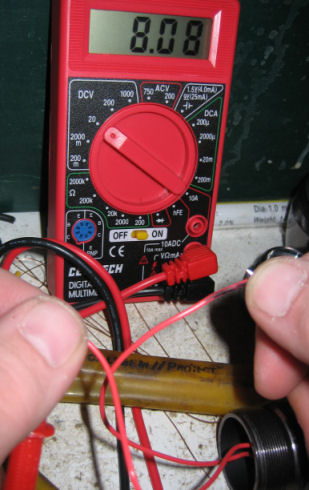
So now we know that our soldering on the switch was fine, and our battery and tail cap mod is working as well.
So if we don't get light after soldering that together then we know it was either the driver installed on the "drop in", the LED, or our solder job.
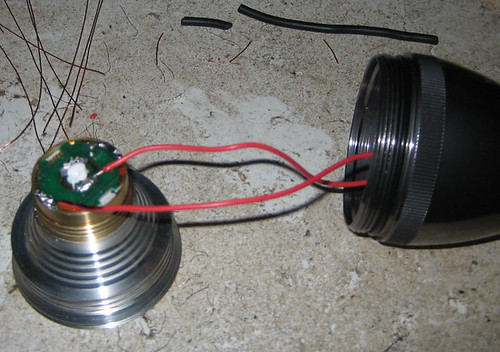
So go ahead and screw the head onto the body and solder your connections together. The drop in comes with a spring attached to the base, but I went ahead and de-soldered it because it was not needed.
When using the same color wire, mark the negative side with a bit of black sharpie, so I don't solder it wrong on accident. I left my wires kinda long here, I know I will have to take it apart again so that I can just buzz it down a tad on the lathe so I can install a lens.
Now hit the switch!!!! Just for a second though to make sure it works. If it lights up go ahead and poke all your wires into the body. Apply your thermal adhesive around the outside of the drop ins base, and screw down the bezel. (notice the gap between the bezel and the rest of the head, due to the height of the drop in)
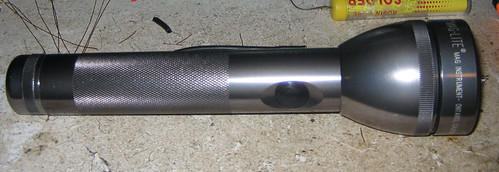
Now go enjoy your light!!!
If there is anything that you have questions let me know.
Total build time was around an hour, and that included a trip to radio shack because I was out of wire.
Hope you enjoyed it,
Bill
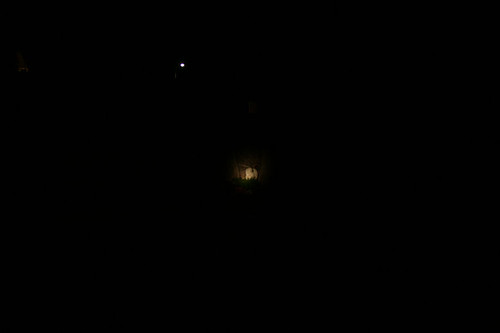
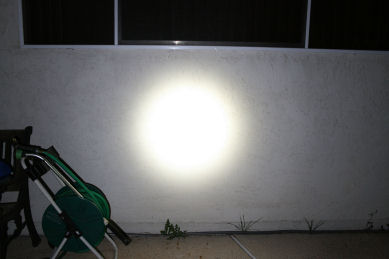
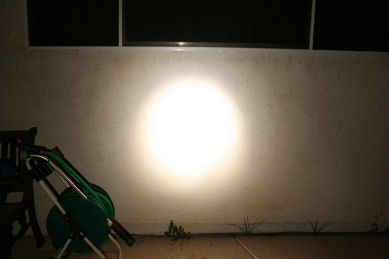
Beam shots to follow shortly.... Have to wait till it is dark out.
Mods I was not sure if this belongs in the homemade lights section or here. So feel free to move it if needed.
The goal of this build was to make a 2 C Mag with a P7 for as cheap and easy as I could.
I am no electronics expert, just a few builds under my belt. So if you see something I have done wrong, don't hesitate to set me straight.
Parts needed.
Mag lite. I love the 2 C I think it is absolutely the perfect size in a hand held light.
From dealxtream sku 14413 ($27)
2 18650 lith ion batteries (I recommend AW protected)
Or the soon to be released AW 26500 (c size) protected
Now you have 3 options for the tail cap.
Buy the 26500.
Orv if running 18650's I highly recommend you buy a Mag C ring Kit from Download on CPF
https://www.candlepowerforums.com/threads/178764 It will save you alot hassle and is only $22 shipped.
------
If you don't want to spend the money.... I am including directions on how to do this without the kit.
A piece of 1/2" Flexible PVC Pipe found in the sprinkler isle at Home Depot ($1)
Made by Orbit marked 1/2" x 24" Flexible PVC Pipe
You will need a Split ring (like for keys), some bare wire, and a piece of camping sleeping pad or other piece of dense foam.
--------
Other misc parts, wire, solder, soldering tool, multimeter, Thermal adhesive, a few basic tools, allen wench a pair of pliers, razor blade, wire strippers/clipper, a dremel tool or hack saw.
On with the build!
Here is one slight problem that needs to be addressed. The drop in fits just fine, but sits too tall for the bezel to screw down with a lens installed.
You can either, run it without a lens, spend a few minutes with a dremel tool to take about 2mm off of the top of the "drop in", or have a friend with a lathe do it (that is my pick)
The drop in fits just about perfect inside the mag C body (new and old) almost as tight as a heat sink. A bit of thermal adhesive and you probably wont even have to use aluminum foil as a shim. Unless you leave the light running for a real long time (over 5-10 mins) I wouldn't even bother.
First step is to take your light apart. I wont go into too much detail here. Just pop off the button cover insert your allen key, and back the screw out. Slide the switch out the rear of the body. Then take that same allen key, and remove the other screw on the switch that slides up and down.
Now break out the dremel and cut off the top half of the switch. Remove the negative strip from the switch (just slides right out) before you make the cut. .
You are going to solder the positive wire to the center piece of metal and the negative wire to the strip that is standing up here.
Trim the negative strip down about flush with the top of the now cut off switch. and solder away.
OK Now reinstall the switch into the light. Make sure that you get it aligned correctly, and that the screw is centered properly in the detent. That is what makes the negative side of the switch work.
Ignore this part if running 26500, you will keep everything stock.
On to the tail cap!
Again I recommend the mag kit from download.... but here you go anyway.
You need to find a split ring that fits into the recess that the origional mag spring sits in. Shouldn't be too hard I found it at home depot in the key section.
Take several pieces of bare wire and loop them through the split ring.
Then take the piece of dense foam, and cut it to fit in the bottom of the tail cap. This will need to be rather thin. You will have to play with this a bit depending on th 18650's you are using. It is what adjusts the tension on the batteries.
Now bend your wires down, and cut them to length. So it looks something like this.
VERY VERY VERY IMPORTANT, make sure that the batteries do not rub against the bare wire that is looped around the split ring. If it rubs through the shrink wrap it will cause a short circuit and other very dangerous side effects (like batteries exploding)
Now on to the battery tube.
Cut a length of the pipe, so that it sits just under the threads inside the flashlight body.
Split the tube down the side, and it will be absolutely perfect for fitting the batteries with no rattle, and no worry if your batteries are hitting the positive contact of the switch correctly.
Now I always test when I am at this juncture of a build. It will save alot of time troubleshooting if you just hook your multimeter up to the bare wires out the front of the light now.
So now we know that our soldering on the switch was fine, and our battery and tail cap mod is working as well.
So if we don't get light after soldering that together then we know it was either the driver installed on the "drop in", the LED, or our solder job.
So go ahead and screw the head onto the body and solder your connections together. The drop in comes with a spring attached to the base, but I went ahead and de-soldered it because it was not needed.
When using the same color wire, mark the negative side with a bit of black sharpie, so I don't solder it wrong on accident. I left my wires kinda long here, I know I will have to take it apart again so that I can just buzz it down a tad on the lathe so I can install a lens.
Now hit the switch!!!! Just for a second though to make sure it works. If it lights up go ahead and poke all your wires into the body. Apply your thermal adhesive around the outside of the drop ins base, and screw down the bezel. (notice the gap between the bezel and the rest of the head, due to the height of the drop in)
Now go enjoy your light!!!
If there is anything that you have questions let me know.
Total build time was around an hour, and that included a trip to radio shack because I was out of wire.
Hope you enjoyed it,
Bill
Beam shots to follow shortly.... Have to wait till it is dark out.
Last edited:
")