My Personalized EagleTac M2C4 (lots of pictures, 56k be aware!)

adsl_keeki

Newly Enlightened
Joined
Dec 8, 2006
Messages
7
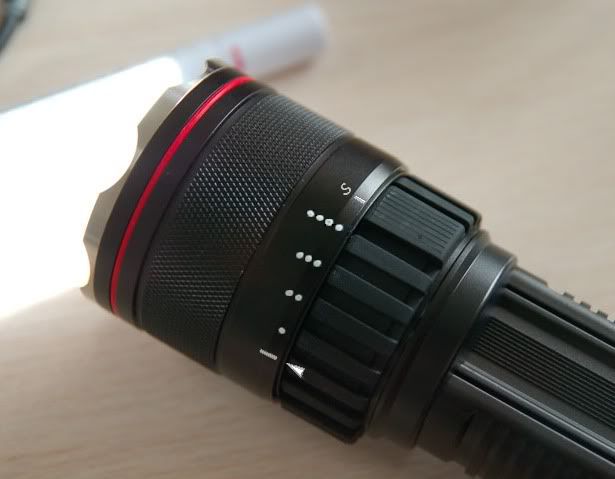
My EagleTac M2C4 arrived last week. It's my first EagleTac and I am pretty satisfied with my purchase. Here are some modifications I have done on her to make it the "Perfect M2C4" for me.:devil:
By reading the post by richardcpf, you can tell the light is controlled by remote sensors. I adjusted the second sensor slightly to increase the separation of the turbo mode. I also noticed you can change the mounting position of the circuit board (counter-clockwise from the original position) to reduce the separation of the strobe mode.:tinfoil:


I also put some markings on the light to tell me what level I am currently at. I also did a 30 minutes water-proof test (see below).


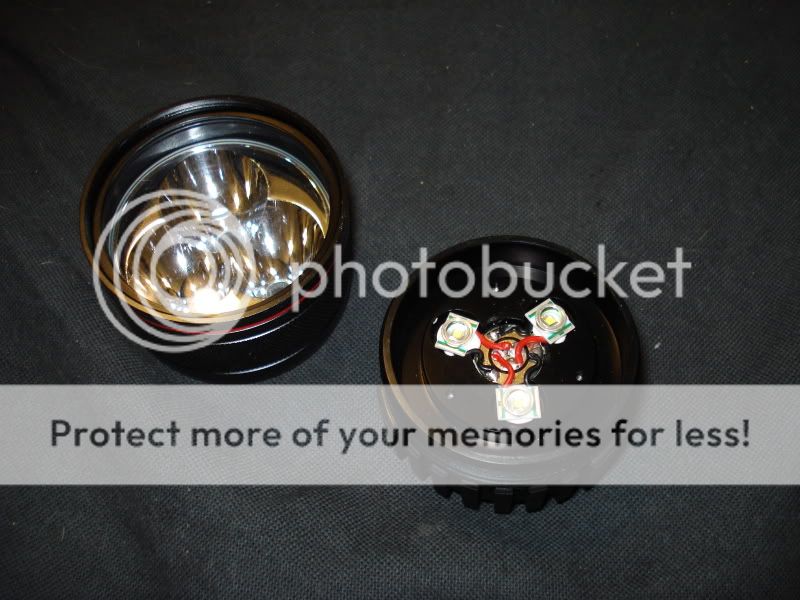
Remove the three screws at the bottom of the head
75650336.jpg


64687218.jpg


The circuit
96798577.jpg
http://img43.imageshack.us/img43/5135/96798577.jpg

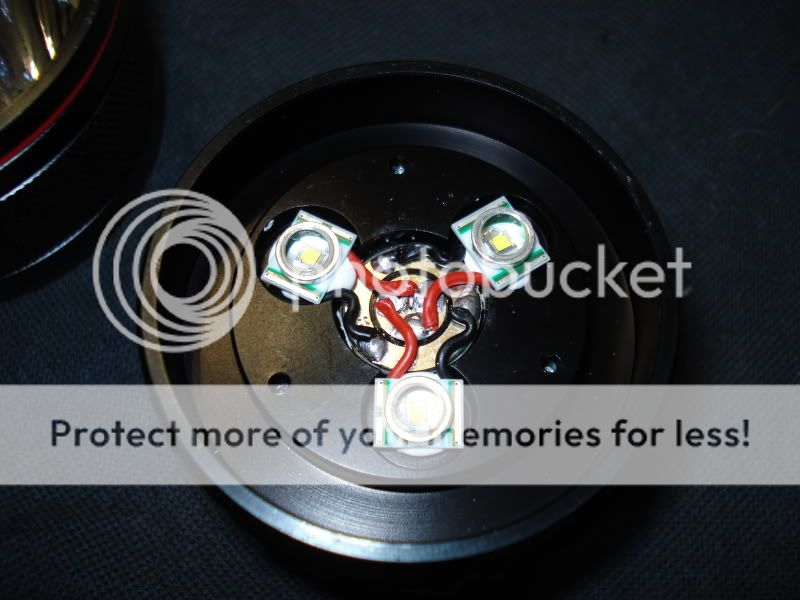
The sensor. I solder the sensor back to its original position (approximately) in this picture

57851750.jpg
http://img42.imageshack.us/img42/8963/57851750.jpg

Unsolder it and move it to the center position.
21814765.jpg
http://img40.imageshack.us/img40/8866/21814765.jpg

Mount here to reduce the strobe separation. Or doing reverse to increase the separation

35984038.jpg
http://img196.imageshack.us/img196/7806/35984038.jpg

Now put everything back together

83011038.jpg
http://img38.imageshack.us/img38/9026/83011038.jpg

I did these markings inspired by nakahoshi

Turbo
96996917.jpg
http://img36.imageshack.us/img36/4465/96996917.jpg

High
39096582.jpg
http://img35.imageshack.us/img35/2970/39096582.jpg

Med
32455366.jpg
http://img188.imageshack.us/img188/6875/32455366.jpg

Low
73864186.jpg
http://img51.imageshack.us/img51/8485/73864186.jpg

Here are the some washers that I just got in the mail from EagleTac. It solves the waterproof issue of these lights.
48027472.jpg
http://img43.imageshack.us/img43/1483/48027472.jpg
31870825.jpg
http://img42.imageshack.us/img42/8859/31870825.jpg

Body tube with the screws and washers. I also tighten the screws at the back of the body tube just to make sure.

96234419.jpg
http://img40.imageshack.us/img40/6179/96234419.jpg

Waterproof testing in the washroom
75245154.jpg
http://img39.imageshack.us/img39/9272/75245154.jpg
18529234.jpg
http://img38.imageshack.us/img38/9176/18529234.jpg

No leakage found after 30 minutes

13797705.jpg
http://img36.imageshack.us/img36/559/13797705.jpg


:D
 
Last edited:

chrisWELD

Newly Enlightened
Joined
Aug 19, 2004
Messages
169
Location
Reading, Britain
Thanks for the mod - or should I say - FIX instructions. :thumbsup:

I think alot of people are going to want to do this to solve the easy-strobe :sick2: issue everyone is having.

Only thing is whether this will void the lifetime warranty which was part of EagleTac's deal...?

To be honest, in light of the easy-strobe and some people's extreme annoyance with this issue, it would be proper customer service if Eagletac took this on the chin and state formally that this fix does NOT void the warranty. :poke:

Us early adopters shouldn't have to pay a price for being first to stump up for pre-orders and the first batch of orders. Better than us all demanding they do a recall... :poke:
 

EagleTac

Newly Enlightened
Joined
Aug 26, 2008
Messages
25
Location
WA
Hi

Someone forwarded us this page. Very interesting and useful DIY.

Just a tip: When adjusting the sensor, keep soldering time in two to three seconds. The sensor is a SMT type (designed to withstand soldering heat). It's made of a glass tube and protective plastic cover.

Warranty applies as long as you do not break anything.

Thanks

Nicole
 
Last edited:

AardvarkSagus

Flashlight Enthusiast
Joined
Jun 14, 2006
Messages
1,474
Location
Lower Left side of the Mitten
Excellent! I was hoping something like this would eventually crop up! I might have to give it a try myself. Now off to find some stuff to practice my soldering on first. No way am I trying it on this light with my current skillset. Have to improve things a bit first. I might have to apply to ET for a couple of those O-rings as well to bolster Waterproofing.
 

houtex

Enlightened
Joined
Mar 7, 2007
Messages
896
Location
houston,tx
CanI just remount the board? I don't have the equipment nor the abilty and just plain afraid to resolder my light but would like it if strobe was further away.
 

Ogg Vorbis

Newly Enlightened
Joined
Jan 25, 2007
Messages
147
Location
West Yorkshire, England
Excellent Pictures!

Can't wait to get mine now, Would it in theory be possible to remove the Strobe sensor from the circuit, and dissable the strobe mode all together?

Dan
 

Ogg Vorbis

Newly Enlightened
Joined
Jan 25, 2007
Messages
147
Location
West Yorkshire, England
Only thing i'm thinking is that there will be a gap in the sensors, which may act as an 'OFF' stage if there is nothing there to turn on?

Maybe the tracks for the strobe could be isolated, and the sensor then wired in parallel with the Turbo sensor, making it near impossible to miss it!

Dan
 

brightnorm

Flashaholic
Joined
Oct 13, 2001
Messages
7,160
For those not technically inclined (like me) I found a quick "fix". If you want to immediately get into turbo, deliberately
hit strobe than instantly back off to turbo or high. I tried it a few times and it really works. It works best if the selector ring turns easily.

I also did a ceiling bounce comparison between the M2C4, M2XC4 (6000K), and the Wolfeyes Storm 780. http://www.light-reviews.com/we_storm/review.html

Regardless of the lumen ratings, the M2XC4 and the Storm were both noticeably brighter than the M2C4. The Storm and M2XC4 were roughly equal in brightness.

BTW, is there any way to ease the resistance on the selector ring?

Brightnorm
 
Last edited:

Glock27

Enlightened
Joined
Dec 18, 2008
Messages
484
Location
Central Missouri
Nicole,
Thanks for posting an official EagleTac response!

The above picture sure explains any variation of distance between levels! Mine were soldered much "straighter".

Could you elaborate what changes are being done for M2 water resistance?

Is it just the small O-rings for the 8 screws? Could you list the size? I could pick some up locally.

Great light...I am very pleased to own one.
G27
 
Last edited:

ntalbot

Enlightened
Joined
Jan 7, 2005
Messages
204
Location
California, CA
Can the strobe be disabled completely?
If so, when you move the ring selector to the strobe position will the flashlight turn off or stay in turbo?
Thanks.
 

Glock27

Enlightened
Joined
Dec 18, 2008
Messages
484
Location
Central Missouri
I would also like to know about the magnetic switches and circuitry they feed. Would a powerful enough magnet or multiple magnets be able to activate more than 1 level at the same time and overdrive the LED(s) or smoke the board?
I started worrying about that when I used a single rare earth magnet to hit each switch one at a time.
G27
 

1dash1

Enlightened
Joined
Apr 26, 2008
Messages
620
Location
Hilo, Hawaii
You could also line up the markings the opposite way around:


The advantages of doing so:
- The markings can be lined up perfectly (not limited by the indentations in the power ring).
- The markings on the head are less prone to wear than the power ring, so should last longer.
- If one wants to remove the markings later, it might be easier to remove the multiple level markings from the head (metal) than from the rubberized power ring.

An elegant way of labeling the power levels would be to use a PTouch or Dymo plastic labeler (white letters on black tape) around the entire circumference of the head, like Milkyspit labels his creations, with just small tick marks on the beveled portion of the head.

Note: This is a photoshopped picture of the earlier posted image. For illustration purposes only.
 
Last edited:

StandardBattery

Flashlight Enthusiast
Joined
Sep 2, 2007
Messages
2,959
Location
MA
I used a label maker and did a little temporary labeling. Something is needed, but I'm not sure how best I can do it. I didn't mark off or strobe, I didn't feel the need to.

eagletacm2xc4levellabel.jpg
 

nakahoshi

Flashlight Enthusiast
Joined
Feb 22, 2006
Messages
1,083
Location
Dulles VA
Hey cool!

I inspired something!

Thanks for the credit:wave:

I used a silver sharpie, and it worked really good on the selection ring


I have some pictures of the Inside of the M2(x)

Please, don't try this at home! You wont be able to get it back!!!

DSC01815.jpg

DSC01816.jpg


Figure these pictures would be good for this thread, to see all of the insides.


Also, Is there a sensor for the strobe that could be removed? I wouldnt mind doing that! Thanks for these awesome pictures!!!


-Bobby
 

gsxrac

Enlightened
Joined
Nov 16, 2008
Messages
946
Location
USA, VA
6 post and youve already dismantled and modified a brand new light? Im pushing 400+ and ive... uhh... changed a buncha batteries? lovecpf
Ohh yea And Ive just gotten my nyogel so I cleaned and relubed threads. I think that qualifies me as a semi-professional? :thumbsup:

But on another note I didnt want one of those eagletac's but now im seriously concidering one!
 
Top