
Al Combs
Enlightened
- Joined
- Jul 2, 2007
- Messages
- 872
When I upgraded my Fenix P2D to a Q5 emitter from Cutter a few years back, I saved the old P4 emitter. I thought someday I would find a use for it. I got the idea from an AlexGT thread some months back. When the night light in our bedroom burned out, with no spare bulbs on hand I remembered that P4. I took the burned out 4 watt bulb and wrapped it up with a folded over paper towel. I cinched up a vice-grip around the bulb, opened the jaws and tightened an extra half turn and then closed, pop. There were only a few extra shards sticking up that were easy to break off with a needle nose pliers. That was my new LED host.
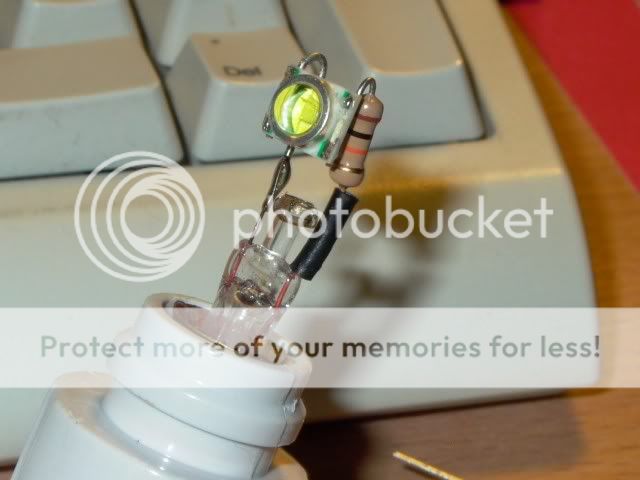
There is ≈ 57 volts where the resistor is soldered to the bulb's central filament stalk. If you were grounded and touched that part of the circuit, you'd get the full 120 volts. I covered the resistor leg with heat shrink tubing. Everything else is relatively low voltage. Or at most a low current shock potential. The night light socket is polarized. I even checked the outlet with one of those yellow things that has the three neon bulbs in it. So the resistor lead on the bulb side is the only thing that represents any real danger. I know some people will say it's unsafe to have anything plugged into a wall outlet with bare wires sticking out. Well we have no pets or kids. I'm not seeking UL approval. Nor am I trying to sell anything. And if you don't fell comfortable with all this, or don't have some understanding of electricity and the limited risk here, by all means don't build one. That liquid rubber stuff you dip pliers into to give them a new set of handles would probably work well. If you happen to have some handy. But this is just a novelty item displayed here for your curiosity. I thought if an XR-E can last 50 or 100K hours in a flashlight, at these low levels it should last forever. Whew, I'm glad I got all that out of the way.

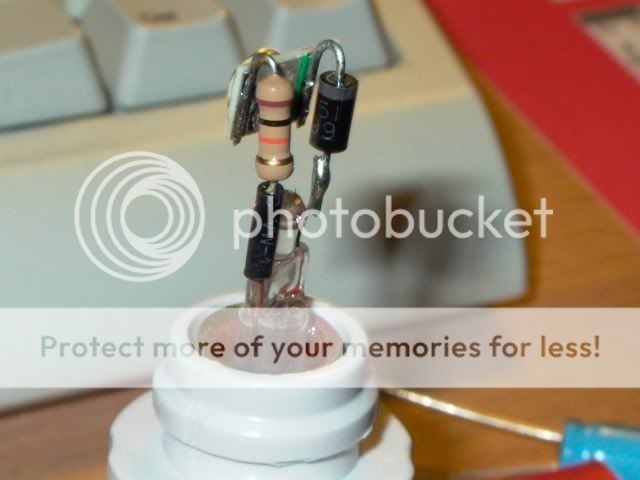
A resistor is a horribly inefficient regulator. But at such a low power level, what does that really matter? I was off to the local Radio Shack right up the road. A package of 10K ohm half watt resistors and a package of rectifier diodes was all I needed. I figured if the diode was only allowing 60 volts through, and if the LED used around 3 volts, then the resistor would absorb about 57 volts. That's an efficiency rating of just over 5%.:sick2:
But it's actually very little power. If there were no LED in the circuit at all, a 10K ohm resistor would draw a little over 1/3rd of a watt in series with a diode and 120 volts. So I thought a half watt resistor would be enough. I touched the resistor after it had been running for about 10 minutes. It was burning hot. I Arctic Alumina epoxied a pre-1982 penny onto the resistor and diode. The diode wasn't hot at all, that was just for mechanical support. The penny was still hot, but not so hot I couldn't touch it. A short historical note, some pennies made in 1982 and all those made after that date are 97.5% Zinc with a copper coating. Zinc is a fairly terrible conductor of heat. So use an old penny. Or better yet get a 1 watt resistor.
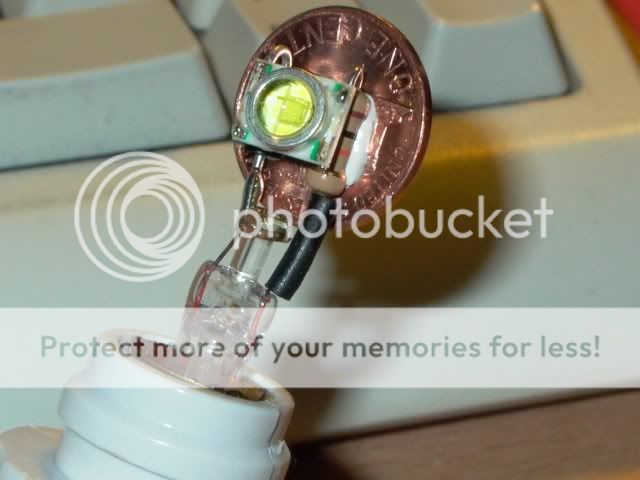

The use of the penny as a heat sink had an added benefit. When you walk into the room it looks just like a total Solar eclipse. The light on the front of the penny is not the camera's flash. It's the reflection of daylight coming from a room on the south side of the house. The camera's spot meter read the light from the LED reflecting off the wall. To give you an idea of how bright it is.
Here's an interesting note on PWM. I have a Fenix L0D. I thought from using the L0D on low and the annoyance factor of its PWM dimming, that I would have a problem with this light. I can't notice the flickering effect at all unless I put my hand right next to it and move it rapidly. Using the L0D on low, all I have to do is turn my head slightly and everything it's pointed at flickers. Considering my half wave LED light night light is 60hz and the L0D's PWM frequency is 100hz, that surprised me. The only sense I can make of that is this night light has a 50% duty cycle. I'm guessing the L0D's duty cycle is much less than 50% on low.
I bought a 100µF capacitor hoping to cure the PWM problem I didn't realize I wasn't having. If it was in the circuit or not I couldn't see any difference in either the flickering of my hand moving rapidly back and forth in front of the LED or in the LED's brightness level. OK so I'm no electronics expert. My DMM measurement was 2.59 volts and 5.39 ma with the capacitor alligator clipped into the circuit. With the capacitor out of the circuit the current level was the same but the voltage dropped to about 1.5 volts. I have a cheap $20 meter that doesn't do RMS measurements. Since the 2.59 volts with the capacitor is more in line with what I was expecting, I'm guessing that's correct.
So how well does it work? Much brighter than I was expecting. It's has a slightly blueish tint. That's to be expected from the low voltage level I'm using. It draws less than half a watt. But it's much brighter than 2 of those little 1/4 watt neon bulb night lights. It's not quite as bright as the 4 watt bulb it's replacing. But for me that's a good thing. The old 4 watt bulb it's replacing was always a little too bright. As long as I can make my way to the bathroom in the middle of the night without breaking my neck, I'm happy.
Thanks for looking.:wave:
There is ≈ 57 volts where the resistor is soldered to the bulb's central filament stalk. If you were grounded and touched that part of the circuit, you'd get the full 120 volts. I covered the resistor leg with heat shrink tubing. Everything else is relatively low voltage. Or at most a low current shock potential. The night light socket is polarized. I even checked the outlet with one of those yellow things that has the three neon bulbs in it. So the resistor lead on the bulb side is the only thing that represents any real danger. I know some people will say it's unsafe to have anything plugged into a wall outlet with bare wires sticking out. Well we have no pets or kids. I'm not seeking UL approval. Nor am I trying to sell anything. And if you don't fell comfortable with all this, or don't have some understanding of electricity and the limited risk here, by all means don't build one. That liquid rubber stuff you dip pliers into to give them a new set of handles would probably work well. If you happen to have some handy. But this is just a novelty item displayed here for your curiosity. I thought if an XR-E can last 50 or 100K hours in a flashlight, at these low levels it should last forever. Whew, I'm glad I got all that out of the way.
A resistor is a horribly inefficient regulator. But at such a low power level, what does that really matter? I was off to the local Radio Shack right up the road. A package of 10K ohm half watt resistors and a package of rectifier diodes was all I needed. I figured if the diode was only allowing 60 volts through, and if the LED used around 3 volts, then the resistor would absorb about 57 volts. That's an efficiency rating of just over 5%.:sick2:
But it's actually very little power. If there were no LED in the circuit at all, a 10K ohm resistor would draw a little over 1/3rd of a watt in series with a diode and 120 volts. So I thought a half watt resistor would be enough. I touched the resistor after it had been running for about 10 minutes. It was burning hot. I Arctic Alumina epoxied a pre-1982 penny onto the resistor and diode. The diode wasn't hot at all, that was just for mechanical support. The penny was still hot, but not so hot I couldn't touch it. A short historical note, some pennies made in 1982 and all those made after that date are 97.5% Zinc with a copper coating. Zinc is a fairly terrible conductor of heat. So use an old penny. Or better yet get a 1 watt resistor.
The use of the penny as a heat sink had an added benefit. When you walk into the room it looks just like a total Solar eclipse.
The light on the front of the penny is not the camera's flash. It's the reflection of daylight coming from a room on the south side of the house. The camera's spot meter read the light from the LED reflecting off the wall. To give you an idea of how bright it is.Here's an interesting note on PWM. I have a Fenix L0D. I thought from using the L0D on low and the annoyance factor of its PWM dimming, that I would have a problem with this light. I can't notice the flickering effect at all unless I put my hand right next to it and move it rapidly. Using the L0D on low, all I have to do is turn my head slightly and everything it's pointed at flickers. Considering my half wave LED light night light is 60hz and the L0D's PWM frequency is 100hz, that surprised me. The only sense I can make of that is this night light has a 50% duty cycle. I'm guessing the L0D's duty cycle is much less than 50% on low.
I bought a 100µF capacitor hoping to cure the PWM problem I didn't realize I wasn't having. If it was in the circuit or not I couldn't see any difference in either the flickering of my hand moving rapidly back and forth in front of the LED or in the LED's brightness level. OK so I'm no electronics expert. My DMM measurement was 2.59 volts and 5.39 ma with the capacitor alligator clipped into the circuit. With the capacitor out of the circuit the current level was the same but the voltage dropped to about 1.5 volts. I have a cheap $20 meter that doesn't do RMS measurements. Since the 2.59 volts with the capacitor is more in line with what I was expecting, I'm guessing that's correct.
So how well does it work? Much brighter than I was expecting. It's has a slightly blueish tint. That's to be expected from the low voltage level I'm using. It draws less than half a watt. But it's much brighter than 2 of those little 1/4 watt neon bulb night lights. It's not quite as bright as the 4 watt bulb it's replacing. But for me that's a good thing. The old 4 watt bulb it's replacing was always a little too bright. As long as I can make my way to the bathroom in the middle of the night without breaking my neck, I'm happy.
Thanks for looking.:wave:
 Maybe the diffuser shield that goes over the bulb would make things a bit safer, although you'll lose your eclipse.
 Your Home Depot light looks exactly like one they carry in my local store. Maybe I'll look into that.
