Akoray 106 disassembly pics

Deathyak

Newly Enlightened
Joined
Mar 16, 2009
Messages
37
Location
Madtown WI
My driver died. D*** I really like that one.
The day before my GBA died while I was trying to mod some radioshack LEDs into it.

My macbook's fan is making a plastic clicking sound. NO EFING WAY I'M OPENING THAT. lol

Anyways, thought I'd post some pics. I kinda used a screwdriver which was not the right tool.
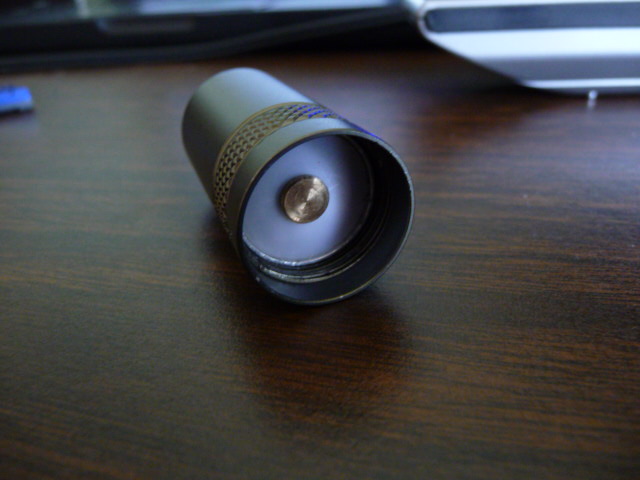
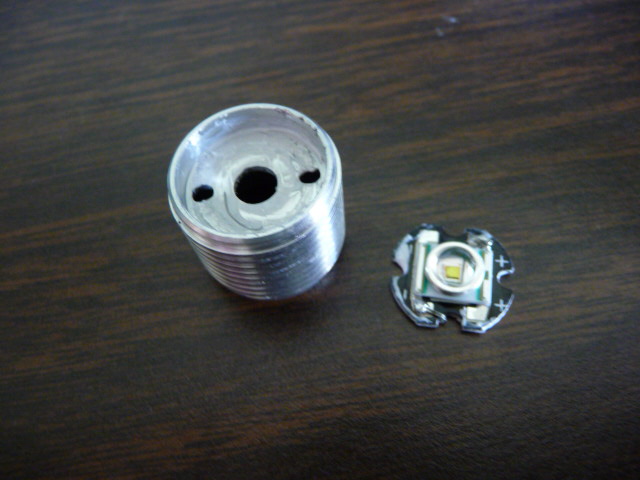
Head:
3822270806_6a5194669b_o.jpg


I grabbed the driver pill with a pair of jeweler's pliers and pulled it out. its attached to the LED behind the alluminum piece you see. I ripped the wires out trying to get it out but whatev. I need a new driver anyways.

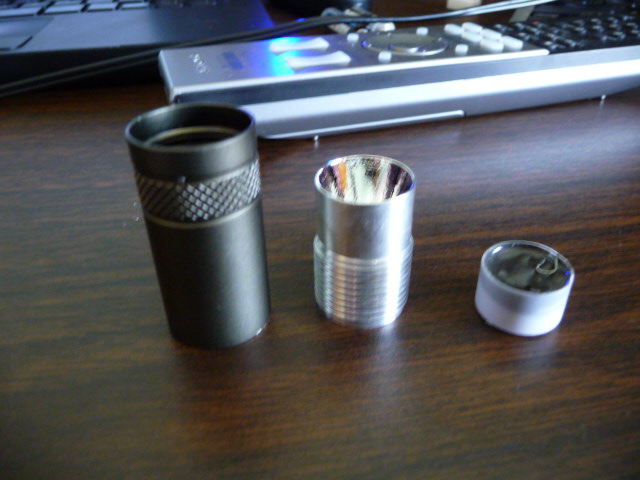
Note threads on reflector/driver housing: Counterclockwise to take out.
3821464363_9214d88609_o.jpg

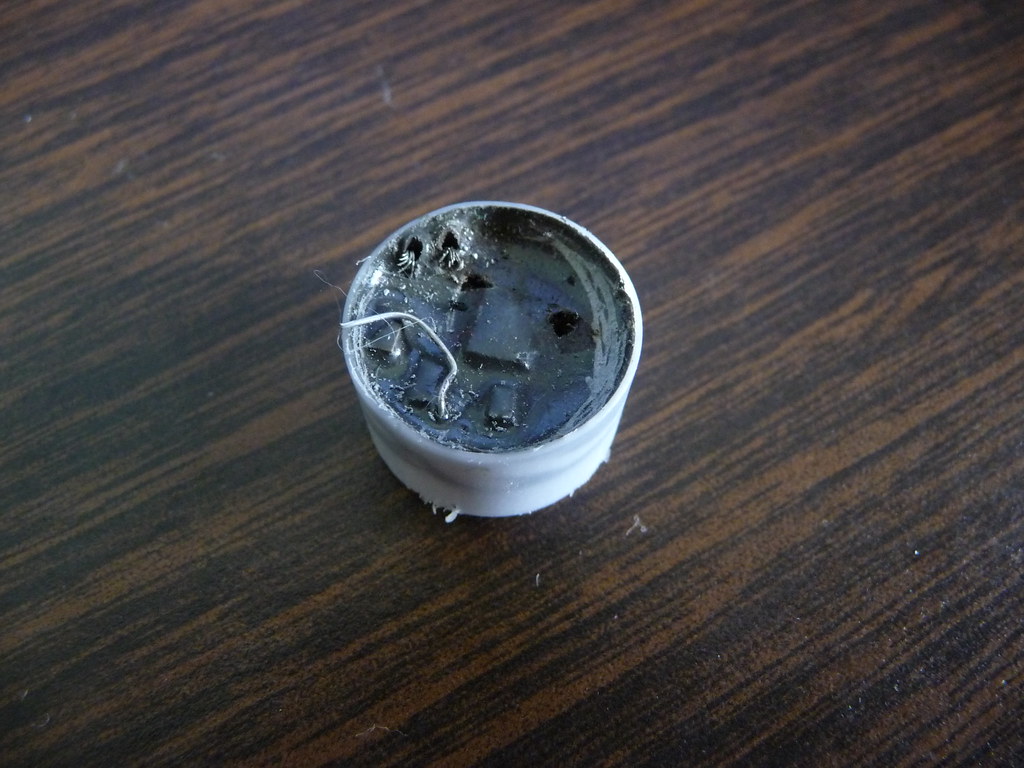
Yes the driver is covered in expoxy.

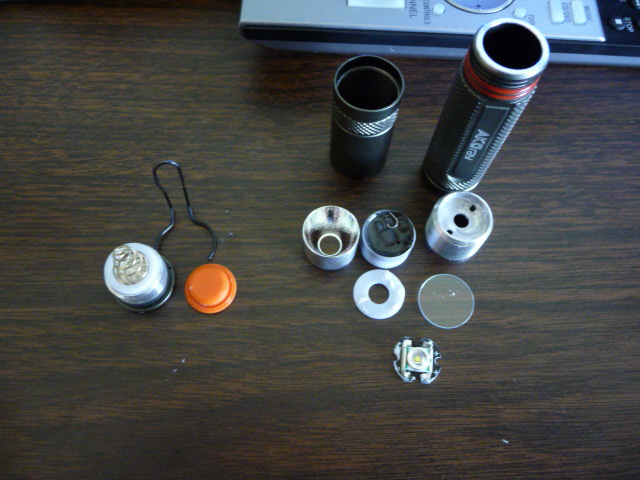
sans reflector (just pulls off):
3822271150_2779a36f20_o.jpg


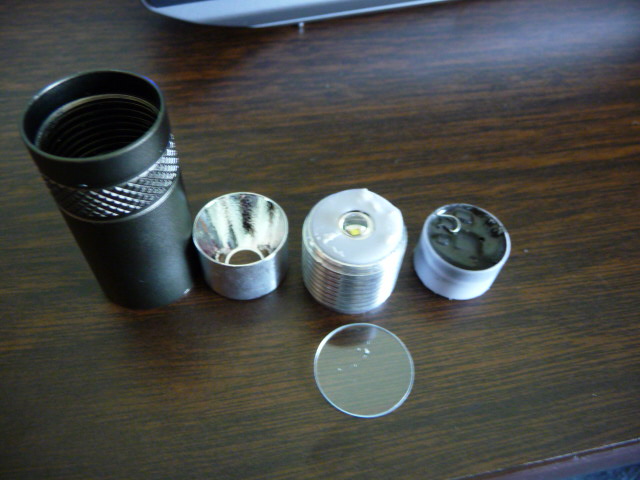
Theres a small plastic ring around the LED. I jammed a screwdriver in it and pulled it out. (Wrong way again lol)
3822271320_fc4d8d4954_o.jpg


Full disassembly:
3821464983_8caaa5905f_o.jpg


Anyone know of a similar driver? I liked the multi-programmable modes.
 

Deathyak

Newly Enlightened
Joined
Mar 16, 2009
Messages
37
Location
Madtown WI
Well cheaping out has really screwed me here.

I can't get the driver out of that plastic. It appears to be epoxied on both sides.

I can't convert this to direct drive because my 14500s are unprotected. If it shorts, well goodbye hand.


Perhaps I'll convert it to use them cheapie radioshack LEDs i have sitting around here...
 

mmmflashlights

Enlightened
Joined
Mar 24, 2007
Messages
345
I can't get the driver out of that plastic. It appears to be epoxied on both sides.

Considering that the driver's shot, surely you can get it 'out' one way or another. Put it in a drill press and just drill through it, put it in some boiling water and see if the epoxy softens, etc. Or just forget about the simple plastic sleeve and replace it, if necessary, with something similar.

Regarding a similar circuit, I suspect that something similar with multi-level programming is available, though probably at a cost almost as high or higher than the entire light itself. Last time I was looking for an advanced multi-level circuit, they tended to be very pricey except for the DX and KD options, and I don't know of any circuits similar to this sold at either place. My suggestion would be this - http://www.dealextreme.com/details.dx/sku.7882 - not programmable, but it does have an adjustable output voltage to the LED, which does give some control over each setting's output. Also pretty efficient and supports both AA & 14500. Or this one - http://www.dealextreme.com/details.dx/sku.7880 - only supports AA and doesn't have adjustable voltage, but has a 'lower low' 4th output mode and is easier to install IMO vs. the other circuit.
 
Last edited:

txg

Newly Enlightened
Joined
Jun 2, 2009
Messages
38
is it possible to remove the driver without ripping off the wires?

It seems like a nice idea to mod this light with an xp-g when they become available...should make it a real killer...
 

J_C

Enlightened
Joined
Oct 14, 2007
Messages
309
A close-up shot of the driver might help. Did the wire tear right where it enters the epoxy?

If so, I wonder if a dremel tool could remove enough epoxy to gain access to the wire so you could solder a new piece of wire on.

For clarification, do you feel that if you had unsoldered the wire from the LED heatsink (round "star") before prying the driver out, that removing the driver could be done without causing damage?

One last thought - Some types of epoxy are sort of crumbly when pressure is applied, if you gripped the top of the epoxy blob (not the PCB end if you can tell which is which) with pliers or put just that end in a vice and applied a lot of pressure, it "might" fracture apart without damaging anything on the board, or at least leave part of the board intact if you are inclined to solder replacement parts on. If nothing else it might be of interest to others what luck you have with further disassembly since the 106 is becoming a fairly popular light.
 
Last edited:

old4570

Flashlight Enthusiast
Joined
Feb 15, 2009
Messages
2,902
Location
Melbourne - Australia
Ooooh man ..

Big hole , = punch out the driver , its dead , so if you damage it / break it who cares .. Upside down flat head nail that fits through the hole , and smack it with a hammer . :whistle:
 

Deathyak

Newly Enlightened
Joined
Mar 16, 2009
Messages
37
Location
Madtown WI
is it possible to remove the driver without ripping off the wires?

It seems like a nice idea to mod this light with an xp-g when they become available...should make it a real killer...

Yes, it is possible, but it will be a little hard. I twisted the wires together and tried to pull the reflector assembly straight out. (that's why the wires broke and why I posted this) The reflector assembly screws in pretty tightly, but it is possible. I'm thinking spring loaded pliers perhaps? If all else fails, you could cut the wires close the the LED, and splice them.

3843652970_d4386ff76b_b.jpg


Closeup as requested. Note attempts to scrape epoxy off. I tried re-soldering but I'm just not that good at it.

After measuring, the metal driver housing appears to be 16mm. I may try that 17 mm one and grind it down with a dremel. Also I found a magnet sitting around that would fit the vertical distance. Direct drive could be an option, but I want something that'll last longer than 20 minutes lol. If that doesn't work, DX has a luxeon UF 501B for $10. Could try doing an emitter swap in the p60.
 

Deathyak

Newly Enlightened
Joined
Mar 16, 2009
Messages
37
Location
Madtown WI
A close-up shot of the driver might help. Did the wire tear right where it enters the epoxy?

If so, I wonder if a dremel tool could remove enough epoxy to gain access to the wire so you could solder a new piece of wire on.

For clarification, do you feel that if you had unsoldered the wire from the LED heatsink (round "star") before prying the driver out, that removing the driver could be done without causing damage?

One last thought - Some types of epoxy are sort of crumbly when pressure is applied, if you gripped the top of the epoxy blob (not the PCB end if you can tell which is which) with pliers or put just that end in a vice and applied a lot of pressure, it "might" fracture apart without damaging anything on the board, or at least leave part of the board intact if you are inclined to solder replacement parts on. If nothing else it might be of interest to others what luck you have with further disassembly since the 106 is becoming a fairly popular light.

I'll try this later. I didn't think of using my dremel for that. Vice method will probably just end with the plastic cracking but I'll try it.

For absolute clarity I will say no. Because the plastic driver sleeve is nearly flush with the housing around it, there is no foreseeable way to remove the driver/reflector/emitter without pulling out the driver pill first. You could do it and leave the wires intact and running through the smaller holes above and to the emitter. Then twist out the reflector housing and then remove the plastic ring and unsolder the emitter. Again, the plastic ring is slightly recessed, and I had a hard time getting it out with a large screwdriver. I suppose you could in theory use a small drill bit to drill through the plastic and pry up. To answer your question simply: No because of the way its made you can't take it apart in that order. It doesn't just drop in.

If you're still confused, I could photoshop some pics to show what it would look like if you really were opening it for the first time.
 

kramer5150

Flashaholic
Joined
Sep 6, 2005
Messages
6,328
Location
Palo Alto, CA
After measuring, the metal driver housing appears to be 16mm. I may try that 17 mm one and grind it down with a dremel....

I tried trimming a multi mode 17mm board down to 15.5mm for a Romisen RC-C3 mod. No dice:sigh: I just ended up killing a couple perfectly boards and a good little EDC.:sigh:

I think you might be able to get it to work, if you grind the pill a little so that way you don't need to grind the DC-DC board as much as I did.

Good Luck!!
 

Deathyak

Newly Enlightened
Joined
Mar 16, 2009
Messages
37
Location
Madtown WI
Its a little bigger than 16 mm and I may be able to remove a few threads from the pill. It'd leave a bit of space, but the body could screw in farther.

If I do it, I'll post how it works out. Thanks!
 

J_C

Enlightened
Joined
Oct 14, 2007
Messages
309
Trim a driver too far and you probably sever the ground ring around the edge, but then it might be possible to solder on a few jumper wires to (re)complete the grounding or whatever other trace that is gone.

Looking at my 106, it appears there is enough travel on the rear spring that if you just reinstalled the pill as it was originally, with the driver epoxy blob left out, you would still have room to set a new driver board under the pill instead of inside of it, I mean just the rim of the driver PCB under it with the componentry inside. If you can do that, it should have enough room for up to a 18mm board as the edges of the pill are very thin on the bottom. If there still isn't enough clearance it looks pretty easy to sand a millimeter off the bottom of the pill. Edit: I wrote up to 18mm but actually it would need be very close to 18mm in order to not wiggle back and forth in the head tube, or else it would need something like epoxy to fasten it to the bottom of the pill which might be a good idea either way.

About disassembly, I was referring to prying up the insulating white ring around the LED on the top, then unsoldering the wires there. I pried on it earlier but was using the wrong tool and couldn't get it up.

I just pried on it again, this time using a soldering tool similar to a bent dental pick (like a thick needle on the end) I was able to stab into the white plastic on the side and pry it out, exposing the two solder pads on the LED.

Seems the LED is only held down by a blob of heatsink grease. Well that and tightening the pill into the light so the reflector presses against it.
 
Last edited:

J_C

Enlightened
Joined
Oct 14, 2007
Messages
309
3843652970_d4386ff76b_b.jpg


Closeup as requested. Note attempts to scrape epoxy off. I tried re-soldering but I'm just not that good at it.

I don't know if I could solder it or not, but I'm pretty good at soldering so I'll suggest what I would do.

Take some rubbing alcohol and a small paint-brush and use them to clean the area. Put a drop of soldering flux on each wire end where it's severed. Use an iron and solder just to make a solder blob around the exposed wire - don't worry about connecting another wire just yet. Make the solder blob big enough it sits above the level of the epoxy a little.

Now prep your replacement wire, twist and tin the stripped ends with solder. Lastly, heat the solder blob you made while slipping the tinned wire into it. IMO, the flux is the key to getting a good pool of solder on it. I'd probably finish up by adding a blob of epoxy around the solder joint just to reinforce it a bit, if there is enough clearance to do so without making the driver capsule too tall.
 
Last edited:

Deathyak

Newly Enlightened
Joined
Mar 16, 2009
Messages
37
Location
Madtown WI
IMO, the flux is the key

Honestly, thanks. I forgot about using flux and tinning. This is what happens when you learn to solder in school and then quickly learn to weld.

Someone on DX's forums claimed that it was in "unprogrammed mode" so if I can get it resoldered, I'll try reprogramming it. If its dead, new driver time.

EDIT:
After further research on wiring drivers, I'm not even going to try re-soldering this driver. I'll just leave the old pill off, and solder the negative grounding ring to the metal sleeve.
 
Last edited:

Deathyak

Newly Enlightened
Joined
Mar 16, 2009
Messages
37
Location
Madtown WI
OK bought the driver, attempted to solder it, first attempt=soldering fail. Plastic washer didn't fit.

Wait a few weeks, sits on desk. Resoldered, put it all together, and turns out either the driver's dead or the wires it came with are dead. Wires feel fine, I'm guessing its the driver. *sigh*

I suppose I could get the nKoray and pull the LED+driver from that and put it in the better Akoray body. Or I could get one of the green Luxeon UF 501s and a r2 drop in. I think I may just do that or one of the trustfires.

I'd really like to see a light made by "coverfire"

Edit: tested wires, no... the replacement driver's dead too.
 
Last edited:

J_C

Enlightened
Joined
Oct 14, 2007
Messages
309
? Or just get a driver board and dremel out the bottom of the pill till it sits flush with the lip of the pill, and of course drill a couple holes downward from the top where you slip the wires through to the LED.

IIRC, it does have a spring in the tail cap so one of the cheap flat drivers of the appropriate diameter from DX should work.

Wait a minute, somehow I was thinking that driver epoxy blob was epoxied into the metal pill but it isn't is it? No dremeling needed then...
 

ohbobva

Newly Enlightened
Joined
Nov 14, 2009
Messages
5
I've got one of these (K-106) from DX. Washed and dried it with the laundry and now it doesn't work. I assume the pill got water in it or the bouncing around in the dryer killed it. If anyone wants it for a mod or parts shoot me a message.
 

Hack On Wheels

Enlightened
Joined
Nov 4, 2007
Messages
774
Location
Canada
I've got one of these (K-106) from DX. Washed and dried it with the laundry and now it doesn't work. I assume the pill got water in it or the bouncing around in the dryer killed it. If anyone wants it for a mod or parts shoot me a message.

With only 2 posts so far, PMs probably don't work for you yet... I'd be interested in the 106 though.
 
Top