Help replacing switch in JetBeam Jet lll Pro ST

bondr006

Flashlight Enthusiast
Joined
Apr 30, 2007
Messages
2,107
Location
Cary, NC - Land of the CREE
Hey all,

I want to replace the reverse clickie in my Jet lll Pro ST with a forward clickie, but I cannot figure out how to take the switch out. I cannot see any way to unscrew the innards. Can someone please guide me through the procedure? Thanks...

JetlllProswitch.jpg
 

csshih

Flashlight Enthusiast
Joined
Sep 21, 2008
Messages
3,950
Location
San Jose, CA
see those holes? insert pins or something, and rotate the red disc counterclockwise.
 

bondr006

Flashlight Enthusiast
Joined
Apr 30, 2007
Messages
2,107
Location
Cary, NC - Land of the CREE
see those holes? insert pins or something, and rotate the red disc counterclockwise.

That was what I tried, and then was prompted to ask for help here. When I tried to rotate the red disc....it won't budge, and the holes want to strip out. I am afraid I will break it. :shrug:
 

bondr006

Flashlight Enthusiast
Joined
Apr 30, 2007
Messages
2,107
Location
Cary, NC - Land of the CREE
Now that I'm home, I have tried to rotate the red disc again to no avail. The thing won't budge, and the two holes are starting to wear. Can someone please help me find the solution to this. I would really like to put the forward clickie in this light....:sigh:
 

bkumanski

Enlightened
Joined
Nov 2, 2008
Messages
273
Location
SoCal
I cannot vouch specifically for the Jetbeam, but it looks like my Ultrafire wf-1200. I replaced the switch in mine to a forward clickie, so I'll give it a stab.

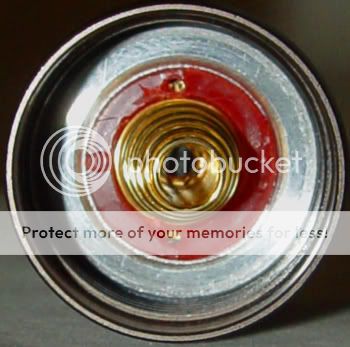
The red center does not screw out, it is a spacer for the switch and board. USUALLY, there are two small holes in the silver ring and this is what screws out. Maybe they put it in backward to prevent people like us from screwing with it. Maybe try this, but very carefully: Try drilling two small holes, not all the way through, the outer silver ring 180 degrees from each other. Be careful and don't drill too big or deep. Then you should be able to unscrew it with a pair of small needle-nosed pliers. Once the silver ring falls out, the inner red will too, as should the switch soldered to the board.

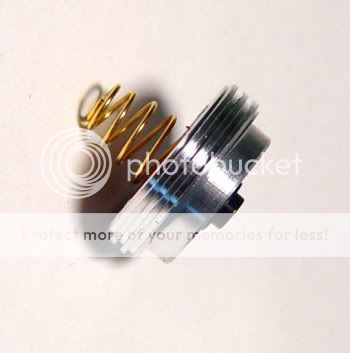
Next, find a forward clickie switch that have terminals long enough to reach the old solder points on the board. The forward clickies are taller (at least the one I used) and a taller boot will be required. Solder the new switch onto the old board and reassemble. I got a switch for a DBS from Flashcrazy at flashlightconnection.com (Thanks Jay!:twothumbs) and used a taller "tactical" boot from lighthound. 30 seconds to solder and done.

Sorry, I don't have a photo site account ot post pics, but I may be able to email you some photos, if you need more clarification. Disclaimer: this is how your switch looks to me, however please only try this if you are comfortable this is how your light is set up.
 

yellow

Flashlight Enthusiast
Joined
Oct 31, 2002
Messages
4,634
Location
Baden.at
2 things:

1st: Your package should have included a few O-rings, spare rubber tailcaps and forward clicky,
thats what is generally to be read, thats what was in the package of my Pro ST.

2nd: there is something wrong with that silver ring!
forget the holes in that red thing, the outside silver ring ist the one to be screwed into the tailcap. It should have the two holes to insert whatever tool one uses to (un-)screw the interiors (I use metal tweezers)

bkumansik's tip is good: carefully drill into the outside silver ring. Just 1-2 mm, enough to grip it, not enough to damage something lying under.
 

bondr006

Flashlight Enthusiast
Joined
Apr 30, 2007
Messages
2,107
Location
Cary, NC - Land of the CREE
Thanks bkumanski and yellow. Yeah, I have the forward clickie and the rubber switch cover for it. I just couldn't figure out how to get the reverse switch out. All my other lights have the two holes in the retaining ring. I wonder why this one doesn't. Anyway, I will give it a go with the drill. Thanks again...:thumbsup:
 

bondr006

Flashlight Enthusiast
Joined
Apr 30, 2007
Messages
2,107
Location
Cary, NC - Land of the CREE
Well, that's just lovely. I got the reverse clickie out, and guess what? It's a one piece unit...not a retaining ring with a switch behind it. I took the damn thing out for nothing. :sigh: I have a forward clickie and rubber boot cover, but no retaining ring....:ironic: What the hell am I going to do now? :shrug::thinking:

Dsc01521.jpg
 

Winx

Newly Enlightened
Joined
Mar 20, 2008
Messages
163
Location
Tampere, Finland
Britelumens.com has changed so there's no picture of the forward clicky. I found this with google and you can see what you should have.

If I remember correct that switch assembly cost about $10 with shipping. <-- Well, maybe $12-15

Ask Britelumens if they still sell it.
 
Last edited:

divine

Flashlight Enthusiast
Joined
Sep 30, 2007
Messages
1,840
Location
Virginia
For what it's worth, I believe the Jetbeam Jet III Pro ST comes with a forward switch in the box.

It comes installed with a reverse clickie, and the extra switch in the box is a forward clickie.
 

csshih

Flashlight Enthusiast
Joined
Sep 21, 2008
Messages
3,950
Location
San Jose, CA
I am sorry for the slow response. seems you got the switch out. odd.

I believe bugoutgearusa.com also carries some switch modules.
 
Top