Poor Man's regulated SST-50 thrower - DOHme!

Techjunkie

Enlightened
Joined
Nov 16, 2007
Messages
943
Location
in the brightly lit suburbs of NYC (Long Island)
Poor Man's regulated SST-50 thrower (Mag Rebel & domeless)

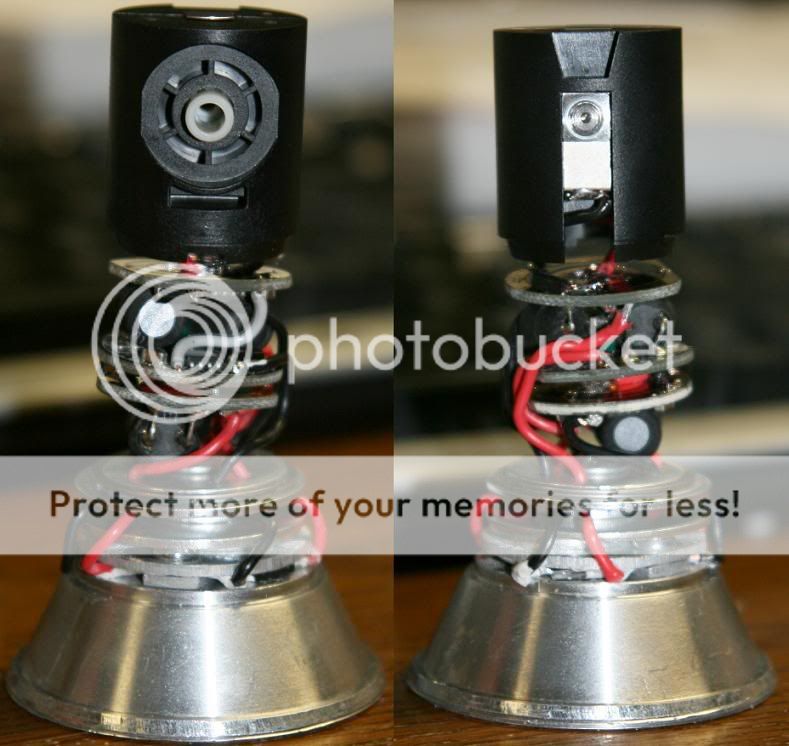
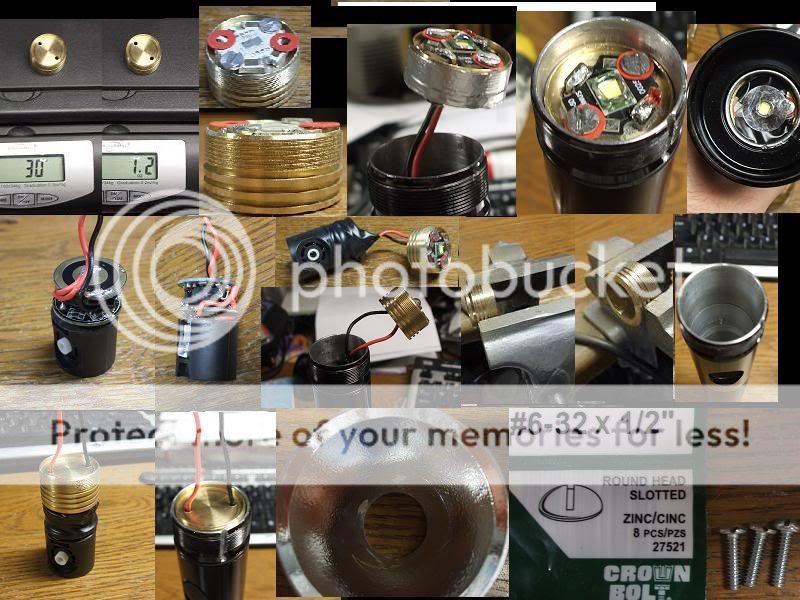
This build uses a Mag 3C that I had honed out to fit two 26650VT batteries and a bunch of spare parts that I had collected from many MC-E projects. After my SST-90 build, I wanted to avoid hand soldering leads directly to the SST-50 surface mount emitter and also wanted to avoid relying on thermal epoxy to mount and cool it. I find the star easier to work with and puts the emitter less at risk of damage from my bumbling hands. I also feel that thermal epoxy doesn't transfer heat as quickly as the solder connecting the emitter to the MCPCB or the thermal grease and screws mating the MCPCB to the heatsink. Two faster junctions is probably as good if not better than one slow one, anyway, I think.

I also wanted to avoid the cost of custom heatsinks and reflectors and wanted to use what I already had on hand for MC-Es. So... the only new part that I ordered was an SSR-50-W57-R21-GJ200 top bin emitter on star from Avnetexpress. Specs peg it at 1200-1500 lumen at max current.

I had a DX 17384 reflector with pill laying around, but I was eager to try out the deeper DX 18841 53x30mm MOP reflector that I had modded for my SST-90 project before deciding to keep the '90 as an aspheric. The deeper reflector outperformed the 53x25mm MOP P7 reflector (12229) on the '90 so I had high hopes for it on the '50. The deeper reflector does not thread to the pill, so I had to come up with some way to use these parts together.

I used my brake hone to widen the neck of the 3C so the heavy brass pill base would fit snugly inside it. After several cycles of hone and test-fit, I ended up removing just a little too much and had to fill the gap with an aluminum foil wrapper around pill. (Single layer, only once or twice around.)

I chose to use two single mode buck regulators (DX 20330) in parallel to drive the SST-50. They're cheap and can be run in parelle, but they're tall and wide. I pushed the coils aside and inverted them to minimize height. If you attempt this, wrap the coils in electrical tape first, because the shrink wrap will perforate when they're compressed and short the coil on the capacitors on the PCB. The height of them proved to be too much to allow the 30mm deep reflector to focus so I had to trim one ring off of the bottom of the pill.

I slipped with the dremel and made a mess of the reflector surface when trying to trim the base a bit more, but that was no matter because the hotspot was not nearly as impressive with the 50 as it was with the 90. In fact, the 30mm deep MOP reflector with the '50 looked exactly like the 17384 reflector looks with the MC-E. I was immeidately underwhelmed.

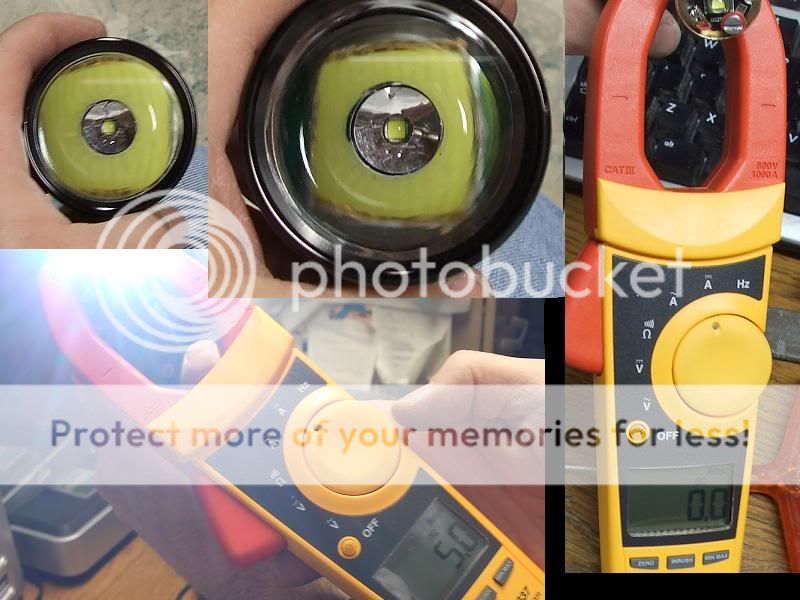
I also had a Mag Rebel LED SMO reflector with the cam cut off to play with. That one is 40mm deep, so I had to cut yet another brass ring off of the bottom of the pill, to allow me to recess the star in the Mag neck so the deep SMO reflector could foucs with the head screwed down far enough to cover the gasket.

Bingo! Awesome hotspot and a clamp meter test shows 5.0A hitting the emitter. Exteneded runs so far show heat in check and no color shift or melting of the plastic SMO reflector. I permanently affixed the focus. I'll have to get my hands on some glow powder to add the finishing touch around the emitter. For now, an LED isolator sticker pretties things up a bit.

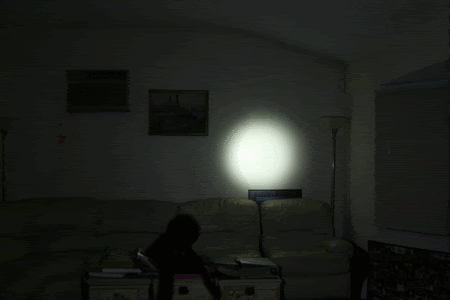
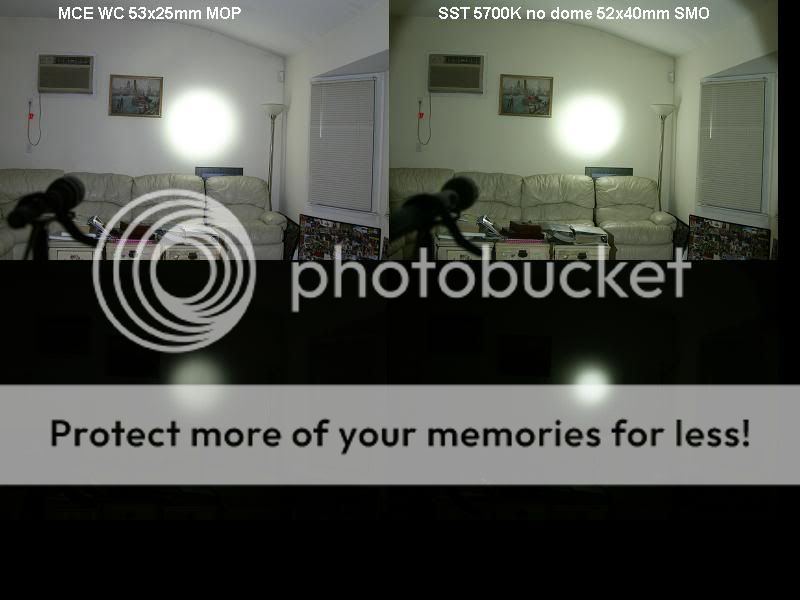
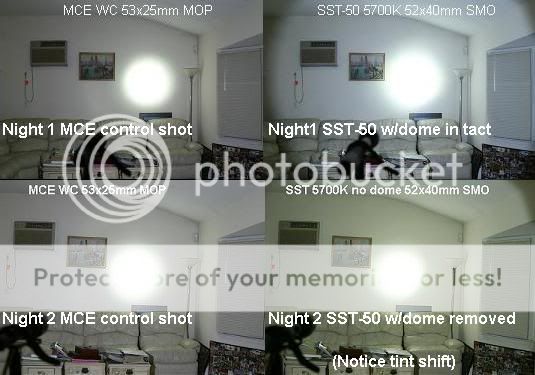
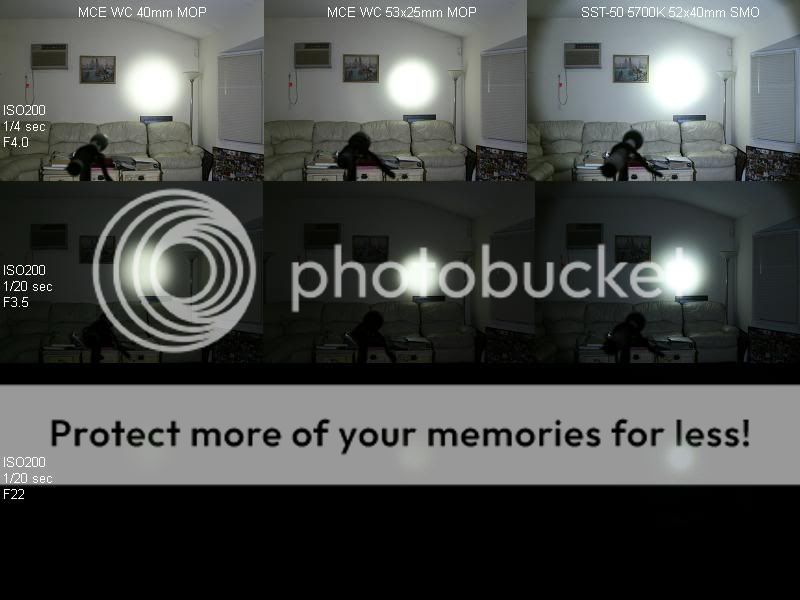
Here's a collage of the build process and some white wall shots I took comparing the SST-50 with the 52x40mm deep SMO to an MC-E with typical 53x25mm and 40mm MOP reflectors. Both MC-Es are WC tint and driven to 3A. The SST-50 is 5700K and driven to 5A. Camera white balance was set to sunlight (5200K).

setupcollage1.jpg


collage2.jpg


14whitewallcollage.jpg


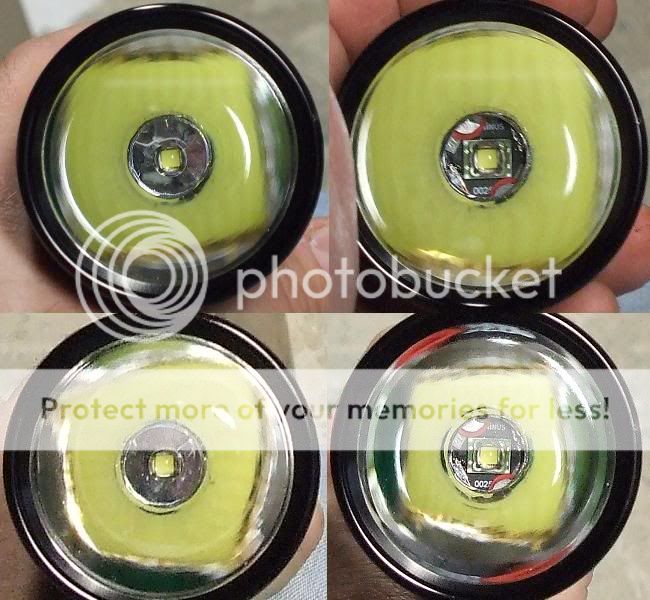
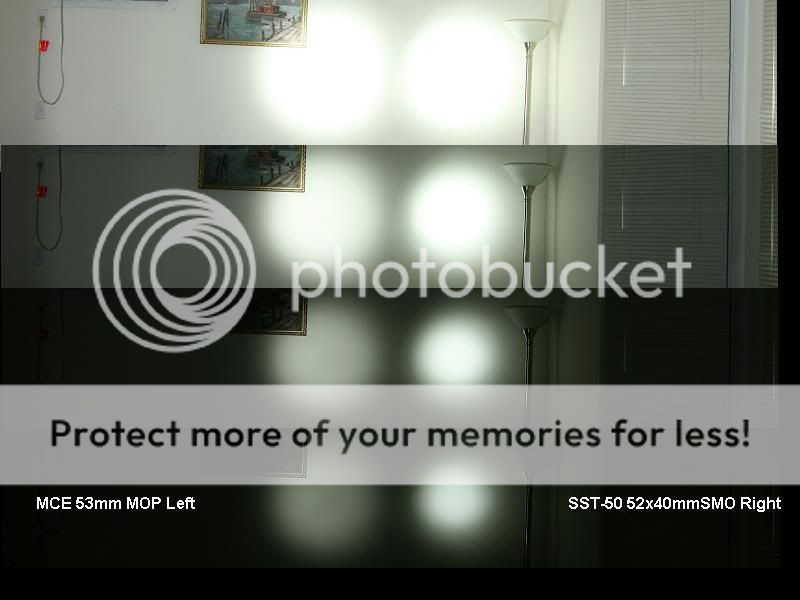
Stopped-down close-ups:
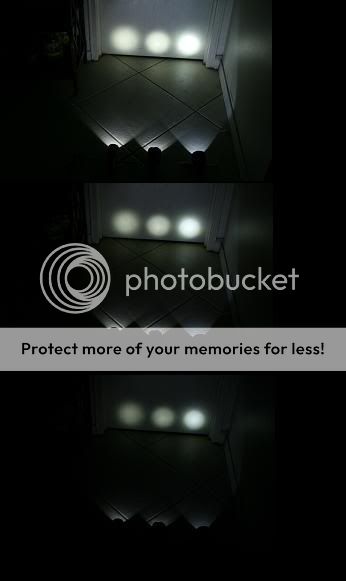
MCE 40mm Left, MCE 53mm Middle, SST-50 Right
15stopped-downclose-up.jpg
 
Last edited:

wquiles

Flashaholic
Joined
Jan 10, 2005
Messages
8,459
Location
Texas, USA, Earth
Re: Poor Man's regulated SST-50 thrower

Nice build ;)

I could not find much on being able to use the DX 20330's on parallel on the DX site. Any more links on using these drivers?
 

tx101

Flashlight Enthusiast
Joined
May 17, 2008
Messages
2,357
Location
London UK
Re: Poor Man's regulated SST-50 thrower

Nice build ;)

I could not find much on being able to use the DX 20330's on parallel on the DX site. Any more links on using these drivers?


Member Ma-sha1 build a Mag SSR50 with the above drivers
Read about it here

https://www.candlepowerforums.com/threads/254481


I suggested using them and DZ confirms that they should work in parallel
BTW I never got around to building one :eek:
 

Techjunkie

Enlightened
Joined
Nov 16, 2007
Messages
943
Location
in the brightly lit suburbs of NYC (Long Island)
Re: Poor Man's regulated SST-50 thrower

I had tried the original version of them in parllel in the past with a 4P MC-E and they didn't increase output because they are/were also voltage regulated and the MC-E just wouldn't draw more current at the output voltage. The clamp meter test between the drivers and the SST-50 in my pic above confirms that they're working in parallel to drive the SST-50 between 4.9-5.1A together. There's no special modd rquired for wiring them in parallel. Just batt+ to batt+, batt- to batt-, LED- to LED- and LED+ to LED+.

I assume that they are also current regulated as decribed in their specs. It would be a kicker if it turns out I didn't need two of them because they're just voltage regulators and could also handle the 5A load individually. (I'll never know in this torch because it's not worth the effort to unassemble it.)


I would have used my old silver 2C and AW IMR26500 instead of the black 3C and Sony 26650VT, but the Mag Rebel LED reflector that I wanted to use would not have fit in the old C head unless I widened the ID of the stop at the bottom. If I did that, then the neck would be able to screw passed the stop, all the way into the head until the head threads carve up the fatter part of the neck just above the switch. I didn't want to permanently lose the stop in case I want to re-mod the host in the future and use a shorter reflector or aspheric and want the stop to work. Also, the ID of the old C is even fatter than the bored-out new C. I'd have had to shim the brass pill with something more than aluminum foil to keep it snug and thermally conductive. Maybe some aluminum flashing (sheet metal) would be just the right size. Next time.
 
Last edited:

ma_sha1

Flashlight Enthusiast
Joined
Jan 10, 2009
Messages
3,042
Location
CT, USA
Re: Poor Man's regulated SST-50 thrower

Member Ma-sha1 build a Mag SSR50 with the above drivers
Read about it here

https://www.candlepowerforums.com/threads/254481


I suggested using them and DZ confirms that they should work in parallel
BTW I never got around to building one :eek:


Tx101, Thanks to your original suggestion after you saw my
failed attempt on trying to wire 6 Pack 24 wires (6x0.8Amp) Driver Pack disaster. This turns out to be a really great solution. After my experience with the 6 Pack attempt, I think I can easily handle making 4 Pack 10A solution for SSR-90 if I need to. :p
 
Last edited:

bigchelis

Flashlight Enthusiast
Joined
Oct 30, 2008
Messages
3,604
Location
Prunedale, CA
Re: Poor Man's regulated SST-50 thrower

Very nice:twothumbs:twothumbs

The hot spot looks both smaller and brigher on the SST-50 or is it my eyes:confused:
 

ma_sha1

Flashlight Enthusiast
Joined
Jan 10, 2009
Messages
3,042
Location
CT, USA
Re: Poor Man's regulated SST-50 thrower

The biggest problem with using these drivers in parallel is where to put them. They're so big that three of them in a Mag leaves no room for a heatsink, for example:

Agree, with stock switch, it'll be hard to make it fit. If I am doing another SST-90 on C Mag, I'd probably do it similar to my 5A/SST-50, i.e. take a longer Mag C & cut it down just above the mag switch hole, toss the Mag switch & make 10A Judico tail switch instead. That way, you could start with 3C, end up with 2C length but have plenty room for heatsinks, 4 drivers + 2 li-ions. If you don't mind the incread length of a 3 C Mag, you could also mount the drivers below the mag switch to avoid cut-em-down.
 
Last edited:

Techjunkie

Enlightened
Joined
Nov 16, 2007
Messages
943
Location
in the brightly lit suburbs of NYC (Long Island)
Re: Poor Man's regulated SST-50 thrower

Very nice:twothumbs:twothumbs

The hot spot looks both smaller and brigher on the SST-50 or is it my eyes:confused:

Not your eyes. The SST-50 spot is smaller thanks to the deep reflector that I never could have used with the MC-E without suffering a giant donut. The spot is actually much brighter (seems like 2-3x as bright) but the pictures don't show it because the camera I used for these shots doesn't have control of shutter speed or F stop. It automatically leveled the photos so they came out looking very much the same.

Agree, with stock switch, it'll be hard to make it fit. If I am doing another SST-90 on C Mag, I'd probably do it similar to my 5A/SST-50, i.e. take a longer Mag C & cut it down just above the mag switch hole, toss the Mag switch & make 10A Judico tail switch instead. That way, you could start with 3C, end up with 2C length but have plenty room for heatsinks, 4 drivers + 2 li-ions. If you don't mind the incread length of a 3 C Mag, you could also mount the drivers below the mag switch to avoid cut-em-down.

I'm not sure these drivers are safe to run without load attached, so if you did put them below the stock switch, you'd need a tail switch too. You'd also want to turn on the top switch first for the same reason. Even if the drivers don't fry with no load attached, they'd be hitting the LED full blast before thottling back once the load is attached.

I like the poor man's cut-em-down method you use. I considered it more than once myself, but the $40 price of a mag click tailswitch always stopped me. I also considered making my own tail switch but wasn't sure I'd like the results if the switch wasn't held into the cap without some kind of retaining ring. (I didn't want to trust epoxy to maintain the contact pressure for high current, even though I've managed to pull it off before.)
 

Techjunkie

Enlightened
Joined
Nov 16, 2007
Messages
943
Location
in the brightly lit suburbs of NYC (Long Island)
Re: Poor Man's regulated SST-50 thrower

I had another one of those Mag 2D Rebel LED reflectors to play with, so I trimmed it down a bit less this time than last time. Last time I wasn't sure if the heatsink pedestal on my SST-90 needed to travel into the reflector, so I cut it down about 1 or 2 mm more than necessary to widen the opening more than the 16mm diameter of the pedestal. (It did not by the way).

First I cut the cam off and noted that the reflector bottomed out on the SSR star, it's lip didn't sit on the rim of the head and sure enough it was not in focus. With the cam removed, I measured 41mm from top of reflector to bottom of hole. I carefully trimmed and filed the bottom of the hole until the reflector height was just perfectly squeezed between the star and the rim when in perfect focus. The end result is that the beam pattern is no different, but the appearance of the reflector is slightly more visually appealing (to me anyway). Now, there's less of the isolator sheet showing and the reflector makes contact with it, whereas before it was hovering above it just enough to see space where I wanted to see a seam.

SMO2collage.jpg


I still want to replace the isolator sheet with glow powder and epoxy. I've ordered some ultra green V10 powder and I already have some Devcon 5 minute epoxy that dries clear. I just hope that the combination can withstand the heat generated by the SSR-50 at 5A. (The epoxy range says -40F to 200F.) I've never done this before, so some advice would be appreciated. I'd hate to cook the epoxy and ruin everything in the process.
 

Techjunkie

Enlightened
Joined
Nov 16, 2007
Messages
943
Location
in the brightly lit suburbs of NYC (Long Island)
Re: Poor Man's regulated SST-50 thrower - better beamshots!

Better white wall shots now in post 1. With fixed camera settings, you get a better appreciation for how much brighter the SST-50 is, especially the stopped-down shots.

I included a 40mm MOP MCE along with the 53mm MOP MCE, to demonstrate how much of a difference a reflector can make. The greatest advantage that the SST-50 has over the MCE here is not surface brightness, but the fact that it can use the deep SMO reflector, which the MCE never could without creating an awful donut.

(The SST-90, not shown here, when used with the 53x30mm deep MOP reflector, cast a hotspot the size of the MCE + 40mm MOP, with the brightness of the SST-50. It was really something to see, but nothing compared to the SST-90 with aspheric.)

Animated GIF - MCE vs. SST-50

whitewallanimatedMCEvsSST50.gif
 
Last edited:

ma_sha1

Flashlight Enthusiast
Joined
Jan 10, 2009
Messages
3,042
Location
CT, USA
Re: Poor Man's regulated SST-50 thrower - better beamshots!

I assume the one with more spill is the SSR-50?

Still too bright to see the difference, need to reduce exposure
a lot more, I think.
 

Techjunkie

Enlightened
Joined
Nov 16, 2007
Messages
943
Location
in the brightly lit suburbs of NYC (Long Island)
Re: Poor Man's regulated SST-50 thrower - better beamshots!

I assume the one with more spill is the SSR-50?

Still too bright to see the difference, need to reduce exposure
a lot more, I think.

If you're referring to the animated gif in the previous post, the SSR-50 is the brighter one with the obvious edge of the spill. The spill of the MCE is either beyond the border of the picture or not contrasted enough against ceiling bounce to be distinguishable in that pic.

:EDIT:

Is this better?

animatedstoppeddownmcdvssst50.gif
 
Last edited:

netprince

Enlightened
Joined
Sep 7, 2008
Messages
547
Re: Poor Man's regulated SST-50 thrower - better beamshots!

I like the new beamshots. Nice comparisons. I am looking forward to getting my sst90 fired up...
 

Aircraft800

Flashlight Enthusiast
Joined
Apr 24, 2007
Messages
1,487
Location
DFW Texas.
Re: Poor Man's regulated SST-50 thrower - better beamshots!

I don't think you'll have any problem with then SSR-50 and Devcon 2 Ton Clear Epoxy with the blue glow. Mine was a SST-50 with a good heatsink and haven't melted anything yet. I would suspect the SSR-50 MCB would do as good of a job dissipating heat:

IMG_7943.jpg


Very nice job on this build! I'm curious to see the long term use of those drivers. I haven't had much luck with the cheap big power drivers, only the <1000mah ones..
 
Last edited:

Techjunkie

Enlightened
Joined
Nov 16, 2007
Messages
943
Location
in the brightly lit suburbs of NYC (Long Island)
Re: Poor Man's regulated SST-50 thrower - better beamshots!

I don't think you'll have any problem with then SSR-50 and Devcon 2 Ton Clear Epoxy with the blue glow. Mine was a SST-50 with a good heatsink and haven't melted anything yet. I would suspect the SSR-50 MCB would do as good of a job dissipating heat:

IMG_7943.jpg


Very nice job on this build! I'm curious to see the long term use of those drivers. I haven't had much luck with the cheap big power drivers, only the <1000mah ones..

Thanks! I checked the specs on the Devcon 2-Ton vs. the Devcon 5 minute and both say -40F to 200F, so what's OK for one should be OK for the other. I'm only using the 5 minute because it's what I have on hand and I'm assuming it's less runny than the slower curing 2-Ton.

I've used the DX 20330 driver in at least three other builds before this and they all continue to perform well. I once received a batch that whined, but DX replaced those for me with the ones in this torch and so far, so good.

I'm tempted to try out the SSR-50 with the reflector from a DX 12163 (MG RX-1 knock-off) or a FM 16mm opening deep reflector, but ponying up $30-$44 for just a reflector on the chance that it might be a little better than the 40mm deep Mag Rebel LED reflector goes against my nature. (For that price I can buy another Phatlight emitter and build/upgrade another torch with parts I've got laying around.)
 

waddup

Flashlight Enthusiast
Joined
Oct 29, 2008
Messages
1,269
Re: Poor Man's regulated SST-50 thrower


i am in awe!

yesterday i tried to turn my 1 mode p7 spear clone into a 3 mode using a shining beam 3 mode driver.

i ordered 2 drivers and destroyed both trying :ohgeez:

how t f you got all those wires in place and soldered and working and in the light without destroying everything i do not know:bow:

i said b4 i wont modd anything again, but i had to try, cost me $18 to learn im really not good at this required tiny parts work.


amazing :thumbsup:
 

Techjunkie

Enlightened
Joined
Nov 16, 2007
Messages
943
Location
in the brightly lit suburbs of NYC (Long Island)
Re: Poor Man's regulated SST-50 thrower

i am in awe!

yesterday i tried to turn my 1 mode p7 spear clone into a 3 mode using a shining beam 3 mode driver.

i ordered 2 drivers and destroyed both trying :ohgeez:

how t f you got all those wires in place and soldered and working and in the light without destroying everything i do not know:bow:

i said b4 i wont modd anything again, but i had to try, cost me $18 to learn im really not good at this required tiny parts work.


amazing :thumbsup:

That's alright, I once fried 3 blue sharks ($25 each) at once in my XX-Ray by accidentally reversing polarity on the plug that I was using to connect them all to the mag switch :ohgeez:

The sad part is after successfully wiring all those 20330s together, I ended up removing all of them to direct drive that three MCE engine from a single AW IMR26500 in The Lil' Giant.
 

Techjunkie

Enlightened
Joined
Nov 16, 2007
Messages
943
Location
in the brightly lit suburbs of NYC (Long Island)
Tonight, I made my first ever attempt at a glow mod. No practice whatsoever, 5 minute DevCon clear epoxy, glow inc. ultragreen V10 glow powder. I knew I was asking for trouble, but sometimes my lack of patience gets the better of me. My first ever test subject - this lovely SST-50 top bin thrower. I didn't want to waste the powder by testing first (stupid) so I charged right in and made a batch big enough to cover the SSR star. Doh! Or should I say, "Dome!" ? I joined the ranks of all the other people who accidentally de-domed their Luminus Phatlight LED.

Using only gentle pressure with a toothpic soaked in isopropyl alcohol, I was scraping some uncured epoxy from the dome when it happened. I don't know if it was simply that feather-light pressure to blame, or if perhaps the alcohol ran down the dome and under it and weakend the bond, but the dome just separated from the emitter with much more ease than any MC-E dome that I've ever knocked off (and I've done that enough times to know that it takes much more effort to remove an MC-E dome).

Next time - slow curing epoxy. I should have listened. The 5 minute stuff thickens extra fast with the ultragreen V10 glow powder added to it.

The good news is that the emitter still works and the separation was clean. No mess left behind. Luminus must put the gel/adhesive on in layers because a thin layer as smooth as glass was left behind on the emitter surface. I even cleaned some debris off of it with the edge of another tootpick wet with alcohol without damaging it.

I had to refocus the reflector, but in the end it still gives a great hotspot, and out throws my WF-600 incan. It might even throw better now.

Here's what this little photodocumented experiment confirmed (see below): 1. With the dome removed, light output does appear somewhat reduced, at least in the spill anyway. 2. With the dome removed, tint DOES shift. Prior to removing the dome, this 5700K SST-50 was cooler than the WC tint MC-E I paired it against. After removing the dome, the SST-50 is warmer.

On to the pics:


1st glow mod attempt: (actually casts green beam with donut when torch is off)
glow.jpg


SST-50 still spanks the MC-E after the dome accident
SST50nodomevsMCE.jpg


Stopped down white wall shots (MCE Left, SST50 Right). SST50 hotspot appears tighter than before, I think.
whitewallstopdown.jpg


Tint shift and possible reduced output after dome removed:
tintshiftwithdomeremoved.jpg
 

Latest posts

Top