Household Maintenance Q&A

Midnight Oil

Enlightened
Joined
Dec 8, 2009
Messages
322
Location
Earth
Can anyone tell me how to remove this shutoff valve under the sink.

SinkValve1.jpg


SinkValve2.jpg


I cranked on it pretty hard with a pair of Channel Locks, but it did not budge.

Thanks.
 

leeholaaho

Newly Enlightened
Joined
Feb 25, 2010
Messages
101
Location
Bath, Pa USA
Just put another valve on the top, I am assumming you want to remove it because you cannot turn it off, is that right??
 

Thermion

Newly Enlightened
Joined
May 21, 2010
Messages
23
Location
Pacifc North West, US
It looks like the spinning sleeve was used to center the flange against the wall. The real pipe is inside the sleeve. Pry the flange off the wall and you should be able to get to the pipe to hold it, then turn off the valve.
just guessing though.
 

Midnight Oil

Enlightened
Joined
Dec 8, 2009
Messages
322
Location
Earth
I'm trying to remove it and replace it with a new "Multi-Turn Valve" by BrassCraft, pictured below.

Multi-TurnValve.jpg


Thanks guys.
 

turbodog

Flashaholic
Joined
Jun 23, 2003
Messages
6,425
Location
central time
A lot of those valves freeze up, regardless of brand. If it doesn't leak I would not mess with it.

Get a dremel/etc and cut the sleeve off/back. Then you can tell if it's a compression fitting into the valve or soldered on. It looks like a compression fitting though.

Be aware, even if the shutoff tightens down, it may not be off. Washers deteriorate and don't seal. This leads to a nasty surprise when you go to remove the line to the faucet.

Or, just say screw it. Get a hacksaw and cut the pipe off right behind the valve. Then solder on a new valve or use a compression fitting. This is likely your easiest option.
 

jabe1

Flashlight Enthusiast
Joined
Apr 25, 2008
Messages
3,108
Location
Cleveland,Oh
First, using a pair of snips, cut the escutcheon and peel it off of the pipe. Now you will need to remove the "sleeve" in the same manner. Maybe you can split it with a dremel, or hold it with pliers and cut it lengthwise with the snips. You need to get at the pipe underneath to hold it firm while unscrewing the valve.
If you are good enough with a sawzall, you could cut the valve off by splitting it at the threaded section. It is critical that the pipe threads are not damaged. Cut two slots in the valve "nut" where the pipe goes in, then with a dull chisel, spread those slots and the valve will come off. Replace it with another threaded valve, not a compression as you showed in your picture.
 

PhotoWiz

Newly Enlightened
Joined
Feb 15, 2007
Messages
33
My guess is that there is a piece of threaded pipe under the sleeve. First, I would remove the vertical flex hose in the photo. Then, I would use a wrench on the flats at the back of the remaining valve. One of two things are likely to happen — either the thread going into the valve will loosen OR the threads in the wall will loosen. Either way, everything will be apart and you can replace or reinstall as desired. The fitting inside the wall will be well-supported and will have other piping holding it in place as well.

If nothing will budge, you could try using a torch to heat the valve at the rear threading and then cool it rapidly with a cold, wet cloth. Remove the rubber valve seal before heating if you want to reuse the valve. Repeat several times to try to break the corrosion seal. Also, apply some penetrating oil if there is just a little space at the end of the sleeve. Tapping lightly with a hammer to set up some vibration may help too.

This may take some time and you may need to repeat the process multiple times.

Good luck!
 

Midnight Oil

Enlightened
Joined
Dec 8, 2009
Messages
322
Location
Earth
The existing valve is no longer operational; it doesn't turn, and the water started to taste funny. I don't drink it though, just brush my teeth and wash my face with it.

Wow, that sounds like a job for a professional plumber. I don't have a recipricating saw, a rotary tool, a torch, or a pair of snips at my disposal, yet.


Sounds like there are a couple of unknowns here:
  1. Whether the existing valve is a compression valve.
  2. If not, whether it's threaded-on or soldered-on.
I guess I'll find out when I manage to remove the sleeve. But I'll need some tools first.

To the hardware store!

Thanks everyone. Enjoy your Memorial holiday.
 
Last edited:

PhotoWiz

Newly Enlightened
Joined
Feb 15, 2007
Messages
33
I'm still opting for the simple solution — threaded pipe! That would make the initial installation easy. And it would make removal easier too.

For the first try, all you need are a few wrenches. It's only if the threads are badly corroded that things like a torch might help. If I'm wrong, THEN move on to the more complicated steps of hack-sawing, Dremeling, etc.

If you loosen the part with flats right behind the valve handle, the valve will come apart, probably revealing a rubber washer that stops the water flow. It is probably deteriorated and the cause of leakage. But taking that apart won't help with removing the whole valve. For that, you need to break the vertical hose connection and use the flats on the rear to unscrew the body.
 

Per-Sev

Enlightened
Joined
Apr 6, 2010
Messages
298
Location
Florida
Can anyone tell me how to remove this shutoff valve under the sink.

SinkValve1.jpg


SinkValve2.jpg


I cranked on it pretty hard with a pair of Channel Locks, but it did not budge.

Thanks.
I have the same shut off valves in my house and every time they stick some I take a crescent wrench and a pair of channel locks and put the crescent wrench on the back part of the valve and then use the channel locks on the handle and try to close it that way. The nut just behind the handle should not be removed unless you shut the main water supply off in fact I would do that first and turn your facet on to make sure all the water is stopped. The valve does not look that bad to me I would just replace the line up to the facet I doubt the bad taste is from the valve. If you are getting some water leaking from the stem then tighten the nut behind the handle it has packing in side and when you tighten it there is more pressure on the stem. It is a big job replacing the valve you have to make sure the pipe behind it does not spin and break or start leaking at the joint in side the wall its just brazed in there unless you don't have copper pipes. If you want to replace the valve take your pics to the local pluming store with you and they will help you do it right the first time. Remember once you start you can't go back if you damage the valve and still can't remove it you will have to call a plumber. I would not mess with it other that running a new line to your facet my house was built in 71 and all my shut off valves work and are original and some look worse that yours.
 

MarNav1

Flashlight Enthusiast
Joined
Mar 27, 2006
Messages
3,192
Location
Nebraska
If you can get the sleeve peeled back then 2 pipe wrenches will fix you up. Forget the channel-locks, this joint has been together for awhile. Don't try to unscrew that valve without a wrench on the pipe behind it (not the sleeve). You don't know how that pipe is supported in the wall, sometimes it's solid, sometimes not. That old valve is a threaded valve, any hardware store should have it. If you need to heat it heat the valve and not the pipe. The problem with heating is the water in there will wick the heat away faster than you can heat it up. A couple 14 in pipe wrenches should fix you up. If the pipe coming out of the wall should unscrew or come loose just take it out. Check it for damage, usually you can reuse it with a little pipe dope or teflon tape on the threads. Hardware stores have short sections of pipe in stock also. When you reassemble it I would stick with the pipe threads, snug em down a bit and you'll be fine. It doesn't have to be super tight. Take your old valve along to match the fitting sizes too. It may sound complicated but it really isn't, breaking it loose is the hardest part. It may open right up or it may take 18 in pipe wrenches and a red face too. Let us know...................
 

Midnight Oil

Enlightened
Joined
Dec 8, 2009
Messages
322
Location
Earth
Hi, Per-Sev.

Thanks for the warning. You're absolutely right. I can't see how the pipes are fed up into the wall, looking up from the floor below, so there is the possibility of damaging piping inside.

Out of stupidity, when I first found out the valve didn't turn, I sprayed on a bit of WD40 :ohgeez:. Just a bit, but I'm now suspicious whether THAT is what I'm tasting :eek:.

Hi, Photowiz.

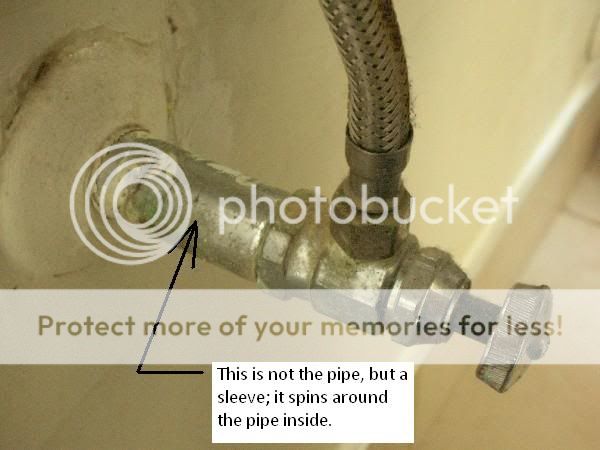
I had worked on the cold water valve, just opposite the one in the pics, before posting here. I was stripping the chrome plating and beginning to strip the flats right in front of the sleeve and it didn't budge at all. That's when I realized, "Crap! The thing could be soldered on." Since I can't see piping in the wall, I'm not confident that it is well secured and supported as you suggested, judging by the workmanship that went into the rest of the house :thumbsdow.

MarNav1,

It sounds like I need to open up a hole in the wall, too? :faint:
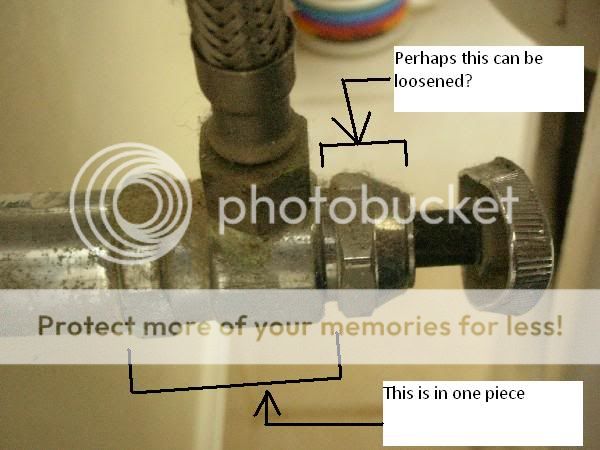
. My coworker advised me not to use a pipe wrench on flats, because it is a pipe wrench and pipes are round. I did try putting a pipe wrench on the flats but it kept slipping when I cranked on it. Any tips?

Let's say the valve has been threaded-on and I've removed the sleeve. How do I grab the copper pipe without damaging it or deforming it when I try again to unscrew the valve. Just wrap it with a thick towel and put a pipe wrench on it?

McFlyFyter

I tried twisting on the flats in the front as well and, like the flats in the back, it didn't budge. I hope to replace it, you know, get a clean start.


So the consensus sounds like, before further twisting and cranking, the first order of business: the sleeve is coming off.

I'll keep you guys updated, but don't hold your breath :green:. Work at the office is picking up and I got some personal stuff to attend to. The boundary between the work week and weekends are...beginning to blur.:shakehead

Thank you all.
 
Last edited:

MarNav1

Flashlight Enthusiast
Joined
Mar 27, 2006
Messages
3,192
Location
Nebraska
If its threaded IE galvanized pipe which I'm pretty sure it is, get the sleeve off enough so you can grab the pipe underneath. Don't worry about the flats on the old valve, you don't care about that. If the pipe wrench is on correctly and has good jaws it won't slip. Unhook your smaller line going to the faucet of course and have your water supply shut off too obviously. Cracking that valve loose is gonna take some muscle and a couple good pipe wrenches. Spin er off put a little pipe dope on the threads and put it back. Whether you replace the sleeve or not is up to you. If the valve is sweated onto a copper pipe, you won't need the wrenches. Cut the pipe off right behind the valve with a tubing cutter and get a compression fitting type valve. Tighten back down firm but you don't have to kill it. Channellocks and a crescent wrench work fine on compression fittings. You can Google many how-to articles on plumbing repair to familiarize yourself with how these things work. Judge your capabilities honestly, not everybody is a plumber. If you don't think you can manage it, call one. Any leaks etc, they have to cover it. Good luck.
 
Last edited:

DM51

Flashaholic
Joined
Oct 31, 2006
Messages
13,338
Location
Borg cube #51
I just looked in the Member List for you and we have the following members:

DC Plumber
Plumber guy
plumberjoe
plumbtrician
ThePlumber

Maybe one of them might be able to advise...?
 
Top