
ti-force
Flashlight Enthusiast
I've got a production version 4sevens Maelstrom S18 here for review.
The S18 is the newest addition to 4Sevens' Maelstrom series of lights. This light was sent to me by 4sevens for review purposes.
Here are the specs for the S18. These were taken from 4sevens' website:
Specifications
"Dimensions:
Length: 9.3 in
Diameter (Body): 1.8 in
Diameter (Head): 2.48 in
Weight (without batteries): 24.5 oz
Battery Compatibility: 6xCR123A (single-use) or 6xRCR123A (rechargeable) batteries.
Operating Voltage Range: 4.5V~8.4V
Outputs and Runtimes:
(runtimes are to 50% output)
Low: 80 lumens, 17.5 hours
Medium: 400 lumens, 3.5 hours
High: 1200 lumens, 0.6 hours
Strobe: 1200 lumens, 1.5 hours
S.O.S.: 2.5 hours
Body Material: Type-III hard-anodized aircraft-grade aluminum
Bezel Material: Stainless steel strike-Bezel
Lens Material: Optical-grade hardened glass lens with external sapphire coating to resist scratches and internal anti-reflective coating to maximize real output
Reflector: Precision-machined and highly polished smooth reflector
Water Resistance: IPX-8
Included Accessories: Holster, instruction manual, 6xCR123A batteries, and spare o-rings
Operation
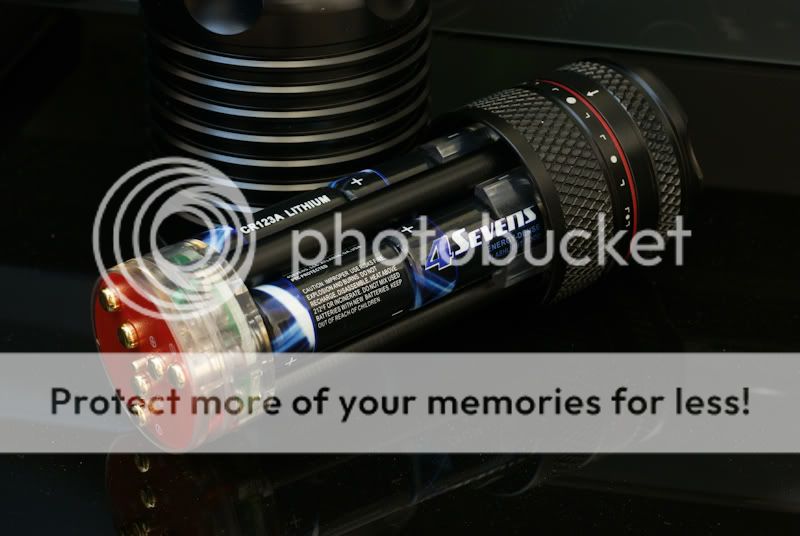
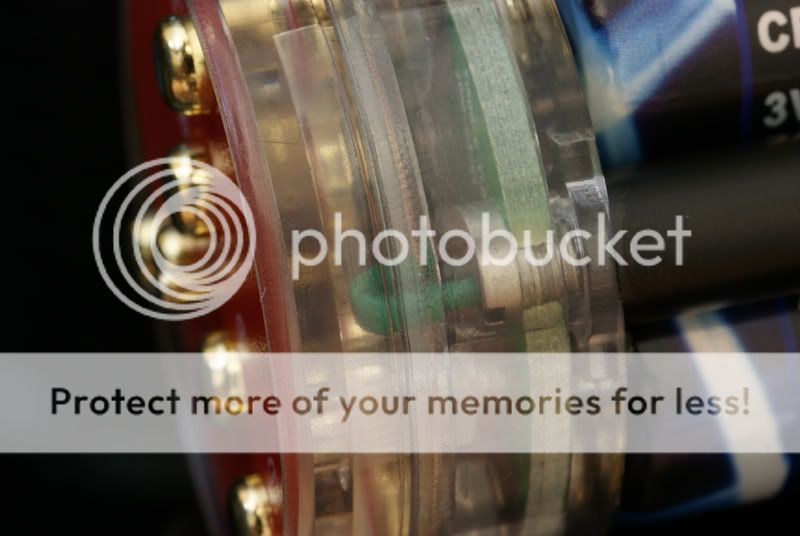
Operating the Maelstrom S18 flashlight is intuitively simple. First ensure that all six batteries are installed correctly in the battery handle**. To access the battery handle, unscrew the tailcap in front of the red o-ring, where the five mode icons are engraved. The battery handle is permanently attached to the tailcap, so please remove it carefully.
Once you have installed the batteries and tightened the tailcap, press the metal button on the back until it clicks and the light will turn on. You can also press the button lightly for momentary-on. To change modes, simply rotate the back of the tailcap to align the engraved arrow with the icon of the mode you want.
** Note: Please always reload the Maelstrom S18 with brand new CR123As. Never mix-and-match CR123As with different brands or with unknown or different remaining capacities. We recommend that you use high quality 4Sevens CR123A cells in the S18. If you are using RCR123A (rechargeables), please ensure they are all the same brand/type and are all fully charged."
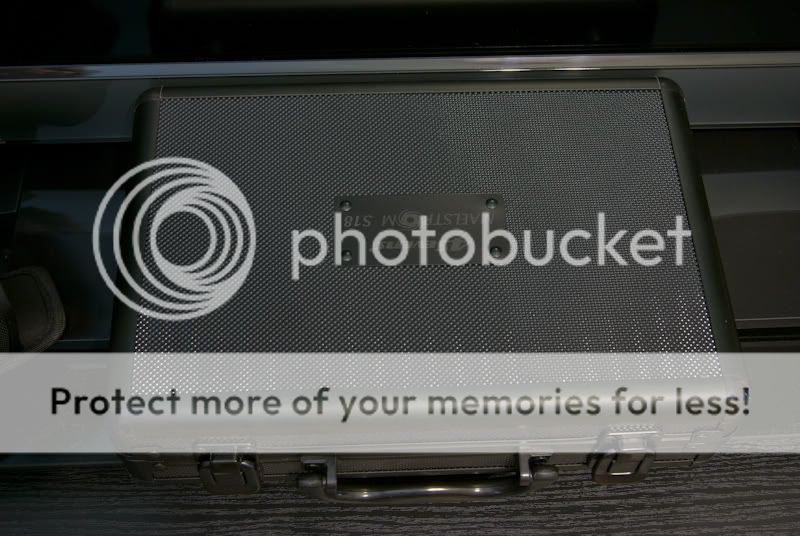
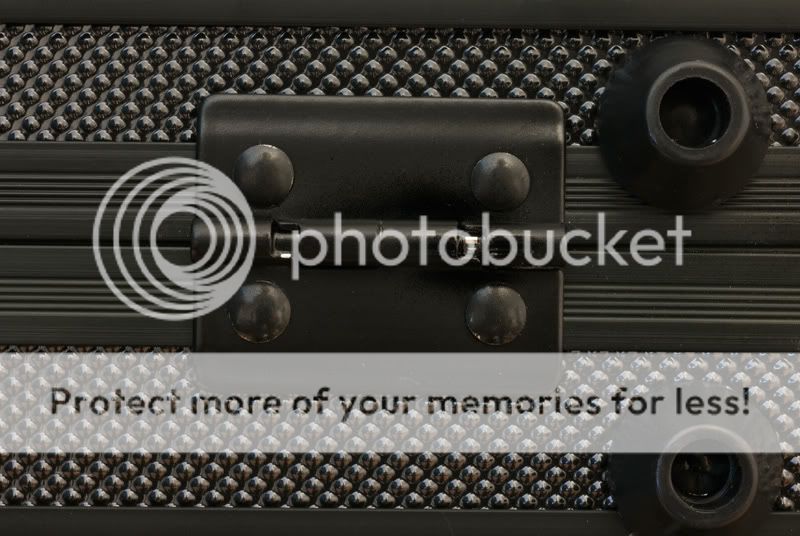
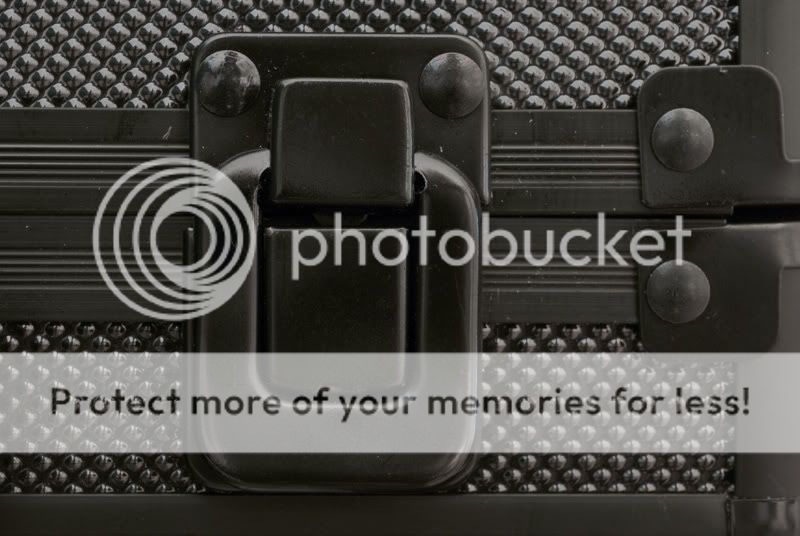
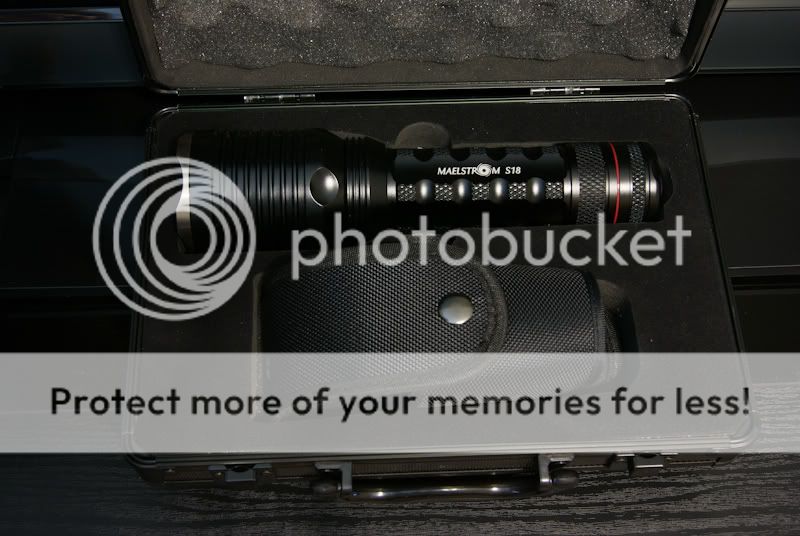
First off, the S18 comes with its own case, which is a first from 4sevens. It's quite nice, and has cutout's for the light and holster to fit perfectly and stationary inside the case. The case itself is plastic, while the trim pieces, hinges and latches are metal.
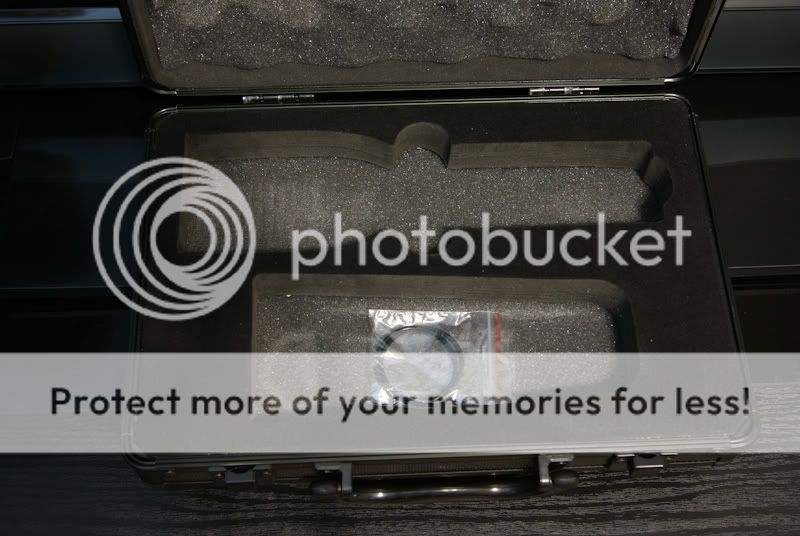
Pictured below is everything that's included when you purchase one of these lights(forgot to take pictures of the provided CR123 primaries, but they are included with the light):

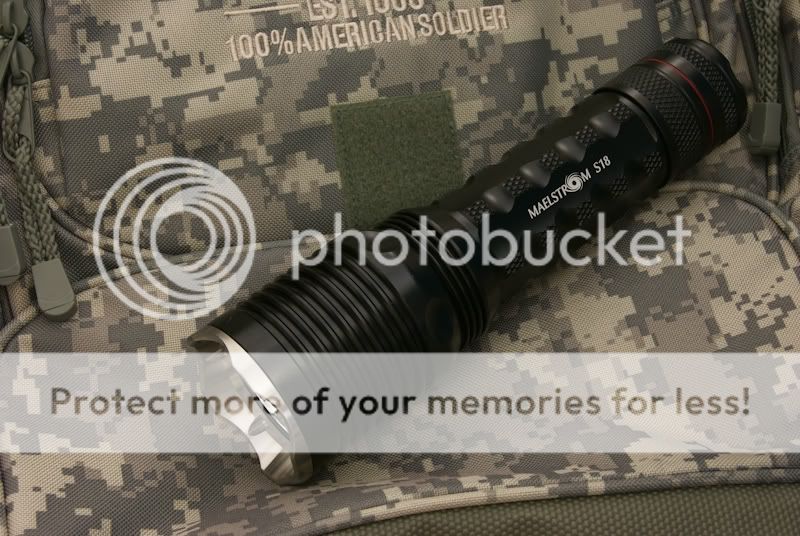
Now for the light itself:
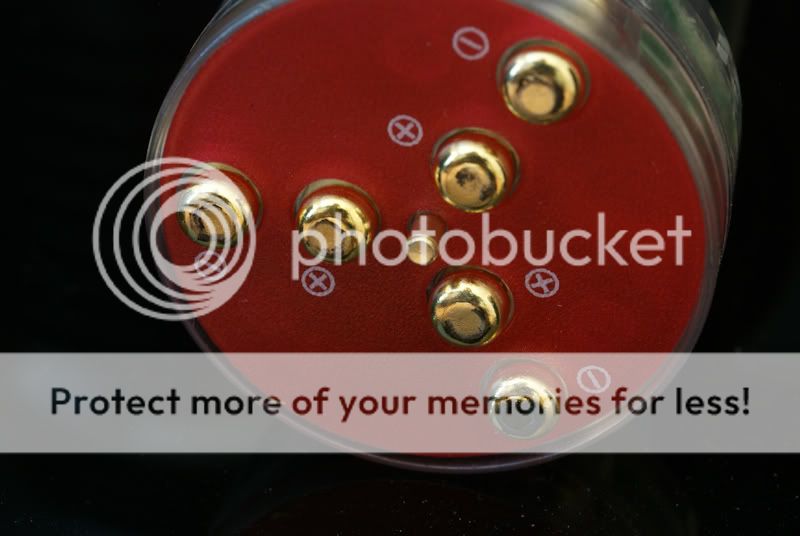
The integrated battery holder, which makes the batteries a 2s3p battery pack as a whole. For those of you who don't know, that means 2 series, 3 parallel. You can also see how to switch modes in these images. Each mode has an icon and you simply twist the rear half of the tail cap in either direction until the arrow points towards the icon that represents the mode you wish to enter:
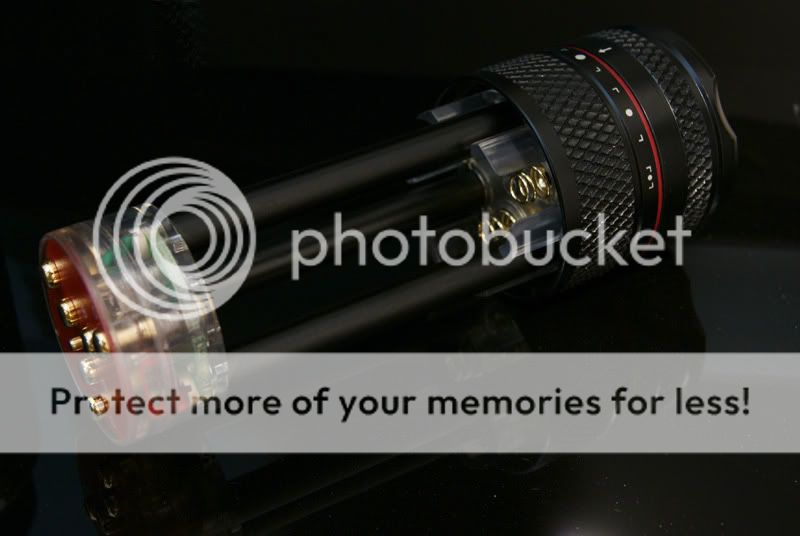
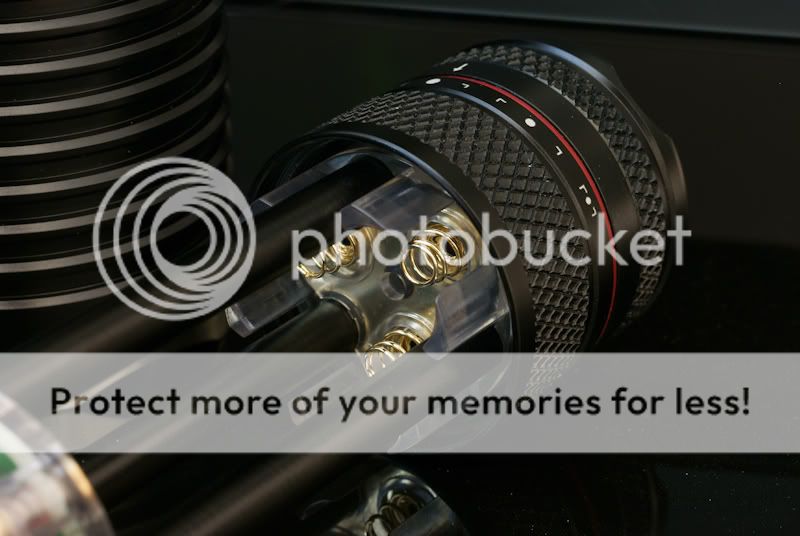
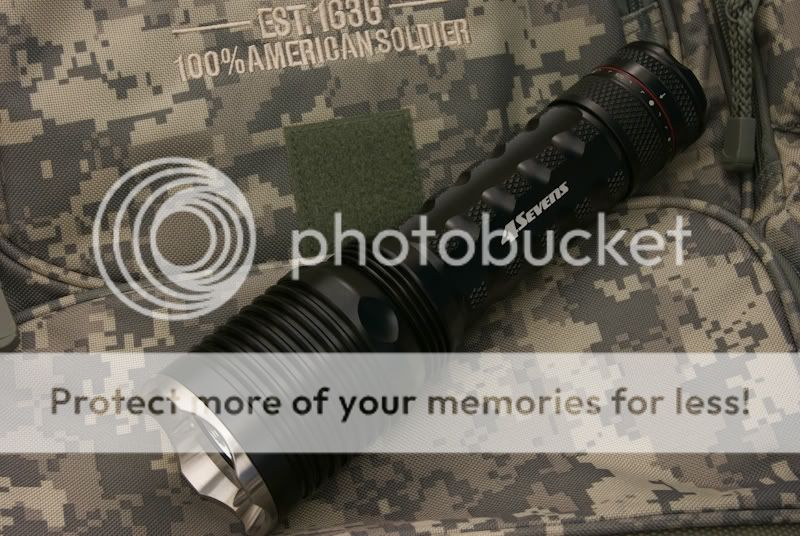
Here's the tail cap switch/button:

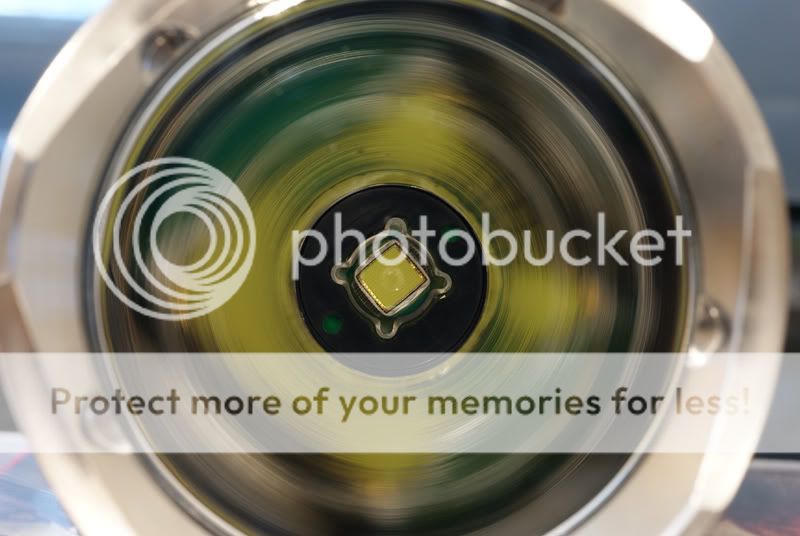
And the business end with the mounted SST-90 :
:

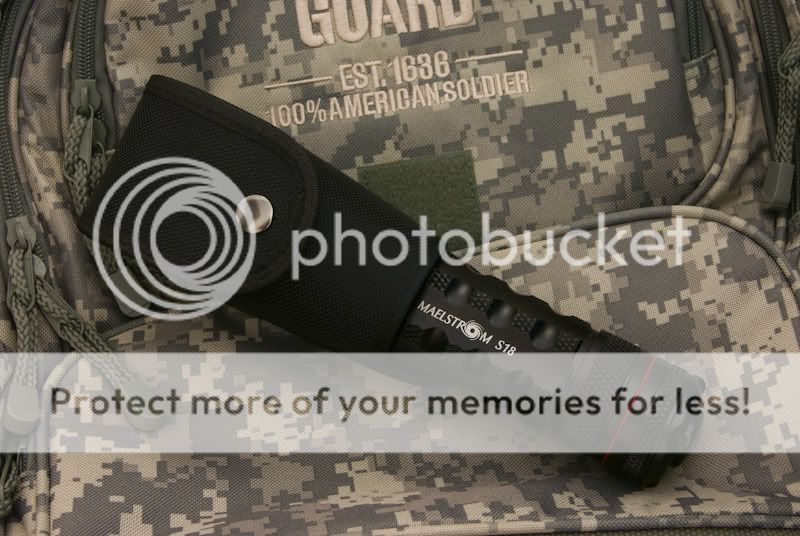
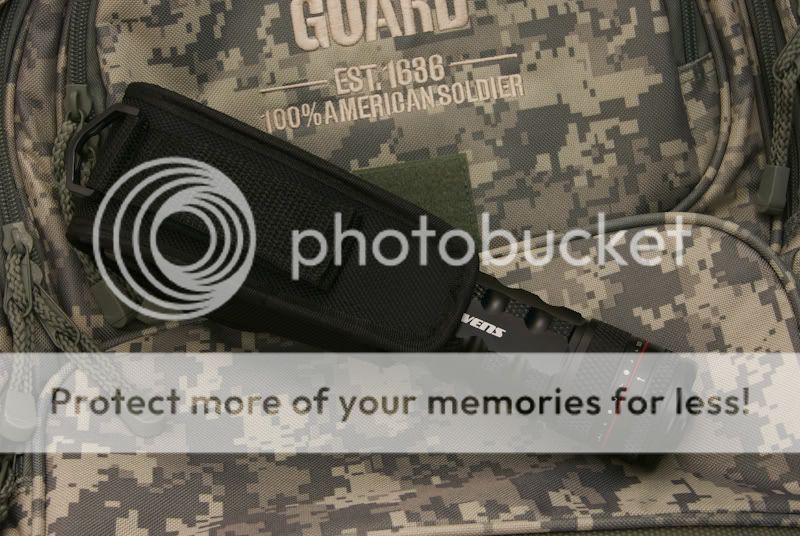
And a couple of pictures of the light in the supplied holster:
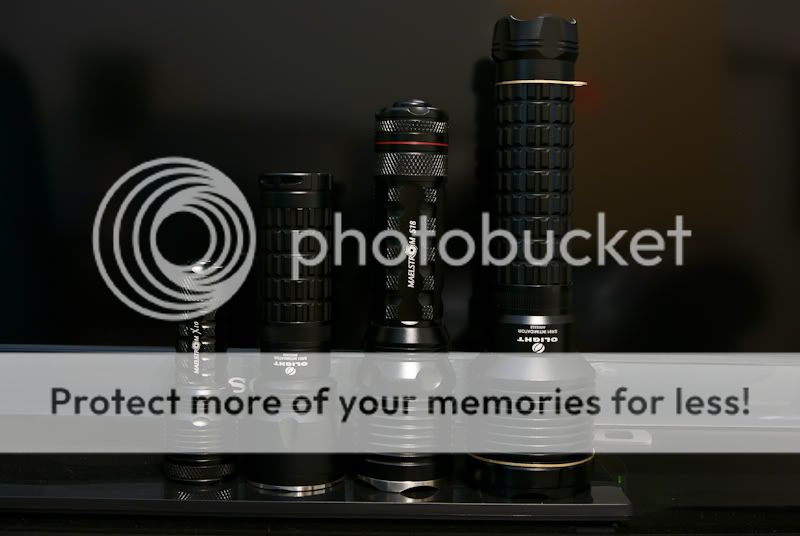
Here's a size comparison image. From left to right- X10, SR51, S18 and the SR91.
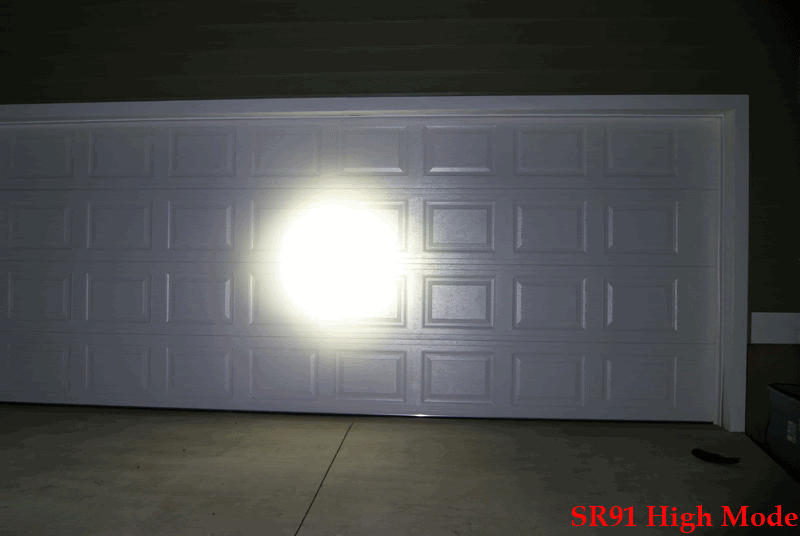
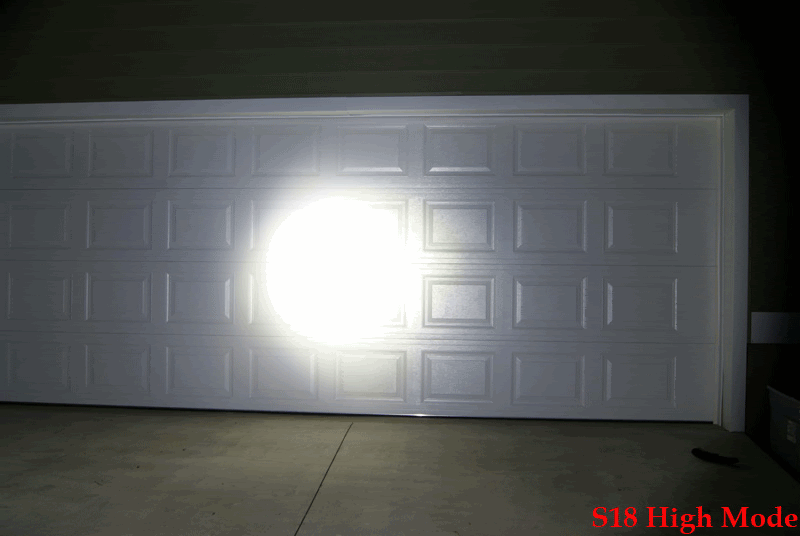
Now it's time for some comparison beam shots against my garage door. All lights were in their highest mode, and all camera settings remained the same for each beam shot taken, and I set the white balance to auto, since we're not comparing tint here, just beam shape. Distance from each light to my garage door is roughly 17ft.
These are .gif's, which I believe help to see the difference between each light better. If you're using a mobile device you may not be able to see the .gif's work properly. If you're viewing it properly you should see two images switching back and forth with each beam shot. Certain browsers also have trouble viewing these:
First off, the S18 compared to the SR91:
Next up is the S18 compared to the SR51:

And the S18 compared to the X10:
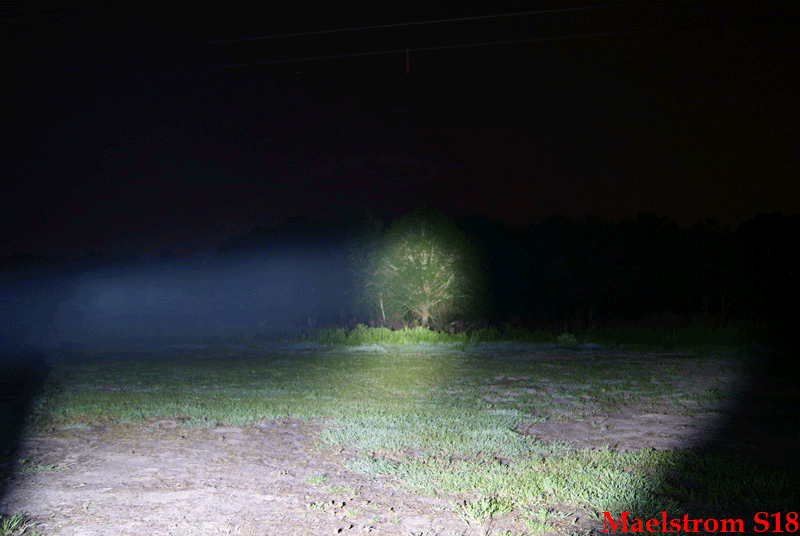
I was able to take some long range beam shots last night. They are not perfect. Bugs kept flying towards my lights, and this can be seen in most of the images. All camera settings remained the same for each image taken. White balance was set to auto. Distance from lights to tree is roughly 90 to 100 yards. NOTE: These images are over exposed. At these distances it has to be done to show the beam profile correctly. The brightness of these images is brighter than the light actually is at these distances. Don't expect these lights to be this bright at these distances in person.
S18 vs SR91
S18 vs SR51

S18 vs X10

Now it's time for some OTF lumen data. If you've seen my X10 review then you're aware of my testing methods. Basically the S18 has thermal regulation like the X10, so I'm testing different cooling methods to gather and post data showing the difference in lumen output by keeping the light from thermally regulating itself, and also showing that there is a loss in run time because of this. I'm still testing, but here are my results thus far:
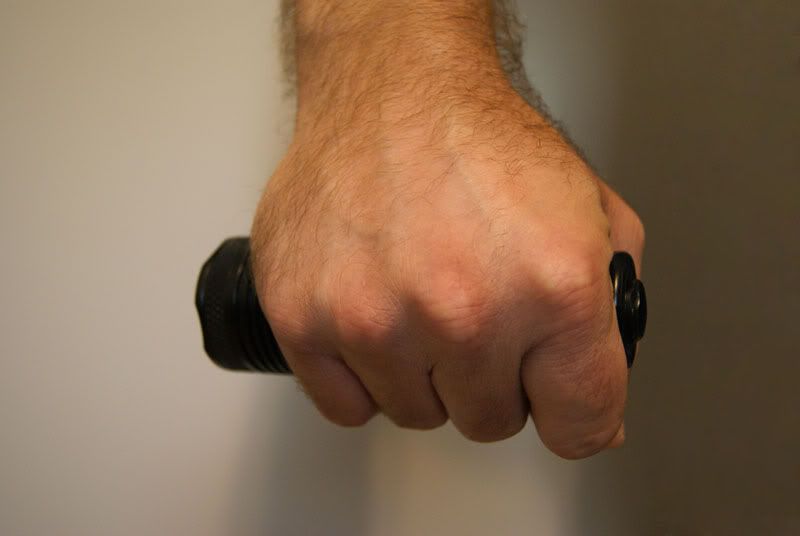
The first graph is of OTF lumens using CR123 primary batteries and holding the light in what I call a 'regular' holding position. This is how I expect most users to hold this light while in use. Here's an example of how I'm holding the light(the S18 is certainly larger than the X10 in the images, but it gives you an idea") ). Click either of the two images for full size:
). Click either of the two images for full size:


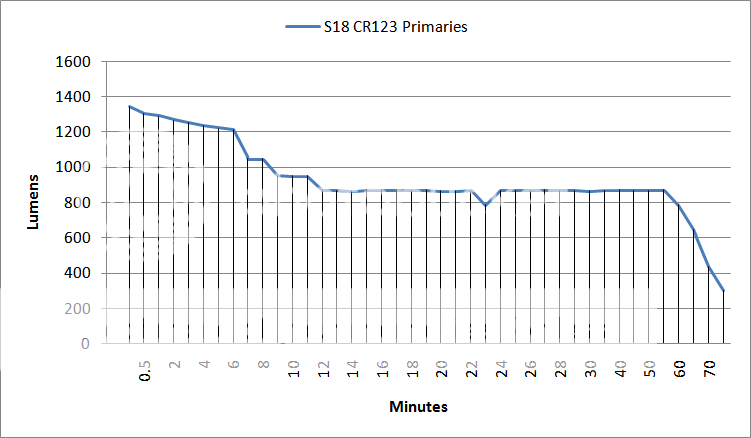
And here are my OTF lumen results:
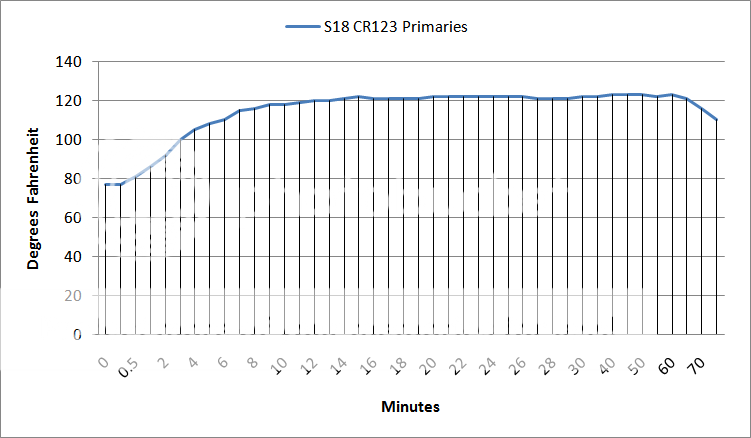
Here's the thermal graph of the lights temperature taken throughout the run time:
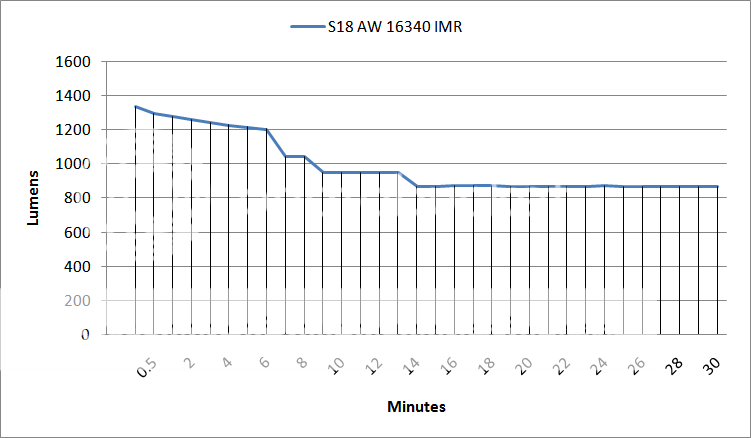
I've also tested the S18 in the holding position using AW 16340 IMR batteries. Here are those results:
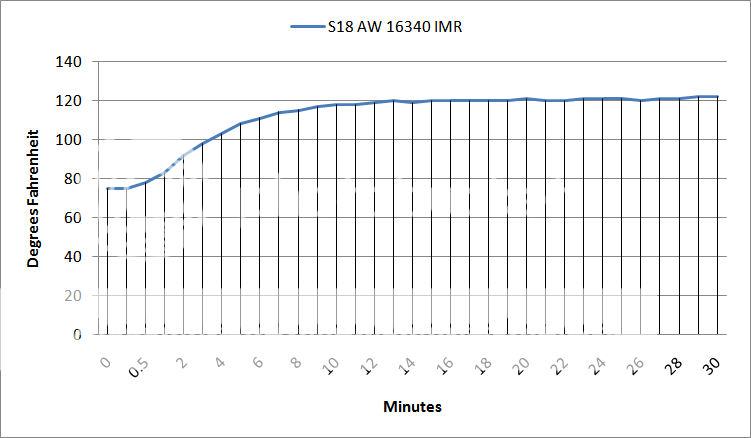
And the thermal graph to go with it:
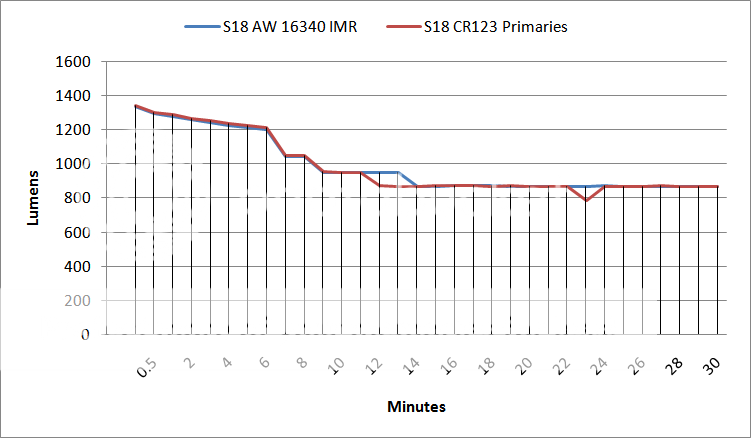
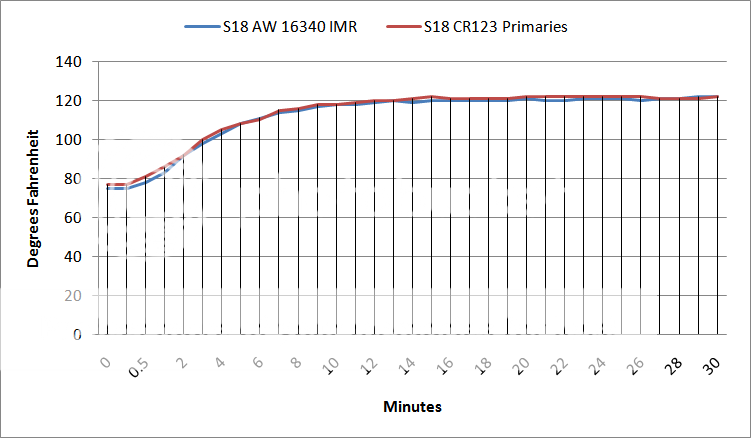
Now both lights together on one graph:
OTF lumens graph:
Thermal Graph:
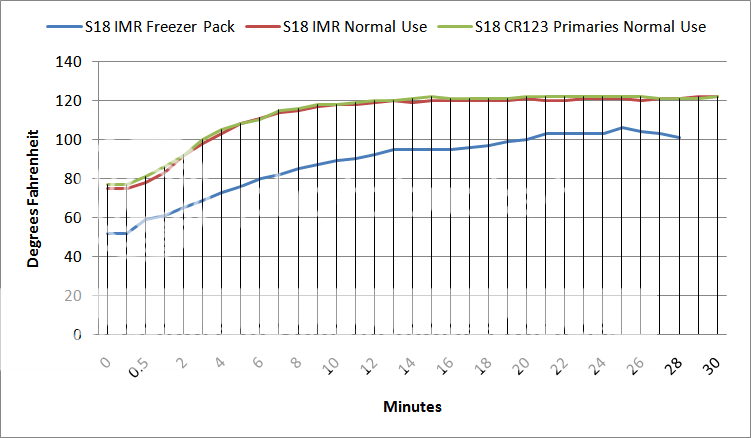
Just finished up testing with 6xAW IMR 16340's and using a freezer pack as the cooling method. Like I've stated in my other reviews of lights that have thermal regulation, the freezer pack method is done mostly to show how the thermal regulation works. Keep the light cool and output remains high and pretty flat, but run time suffers some due to higher drive levels to the emitter. I'm not sure that anyone actually lives in an environment where they could keep this light as cool as I did during my testing, so this method is purely for fun. Here are my results compared against the previous measurements:
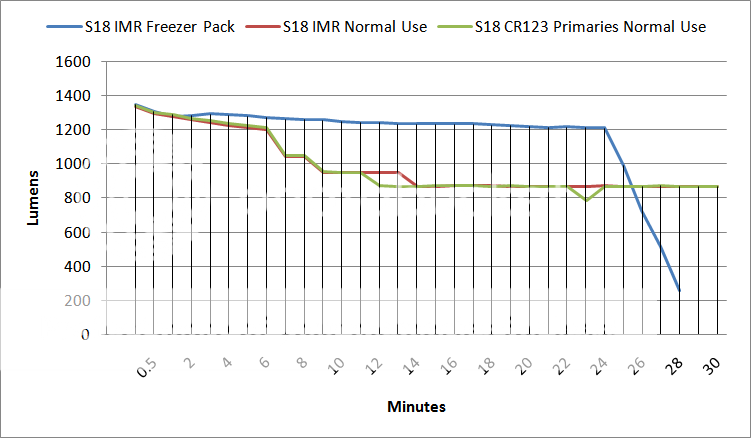
Thermal graph:
I hope this information has been useful for you.
The S18 is the newest addition to 4Sevens' Maelstrom series of lights. This light was sent to me by 4sevens for review purposes.
Here are the specs for the S18. These were taken from 4sevens' website:
Specifications
"Dimensions:
Length: 9.3 in
Diameter (Body): 1.8 in
Diameter (Head): 2.48 in
Weight (without batteries): 24.5 oz
Battery Compatibility: 6xCR123A (single-use) or 6xRCR123A (rechargeable) batteries.
Operating Voltage Range: 4.5V~8.4V
Outputs and Runtimes:
(runtimes are to 50% output)
Low: 80 lumens, 17.5 hours
Medium: 400 lumens, 3.5 hours
High: 1200 lumens, 0.6 hours
Strobe: 1200 lumens, 1.5 hours
S.O.S.: 2.5 hours
Body Material: Type-III hard-anodized aircraft-grade aluminum
Bezel Material: Stainless steel strike-Bezel
Lens Material: Optical-grade hardened glass lens with external sapphire coating to resist scratches and internal anti-reflective coating to maximize real output
Reflector: Precision-machined and highly polished smooth reflector
Water Resistance: IPX-8
Included Accessories: Holster, instruction manual, 6xCR123A batteries, and spare o-rings
Operation
Operating the Maelstrom S18 flashlight is intuitively simple. First ensure that all six batteries are installed correctly in the battery handle**. To access the battery handle, unscrew the tailcap in front of the red o-ring, where the five mode icons are engraved. The battery handle is permanently attached to the tailcap, so please remove it carefully.
Once you have installed the batteries and tightened the tailcap, press the metal button on the back until it clicks and the light will turn on. You can also press the button lightly for momentary-on. To change modes, simply rotate the back of the tailcap to align the engraved arrow with the icon of the mode you want.
** Note: Please always reload the Maelstrom S18 with brand new CR123As. Never mix-and-match CR123As with different brands or with unknown or different remaining capacities. We recommend that you use high quality 4Sevens CR123A cells in the S18. If you are using RCR123A (rechargeables), please ensure they are all the same brand/type and are all fully charged."
First off, the S18 comes with its own case, which is a first from 4sevens. It's quite nice, and has cutout's for the light and holster to fit perfectly and stationary inside the case. The case itself is plastic, while the trim pieces, hinges and latches are metal.
Pictured below is everything that's included when you purchase one of these lights(forgot to take pictures of the provided CR123 primaries, but they are included with the light):
Now for the light itself:
The integrated battery holder, which makes the batteries a 2s3p battery pack as a whole. For those of you who don't know, that means 2 series, 3 parallel. You can also see how to switch modes in these images. Each mode has an icon and you simply twist the rear half of the tail cap in either direction until the arrow points towards the icon that represents the mode you wish to enter:
Here's the tail cap switch/button:
And the business end with the mounted SST-90
:
And a couple of pictures of the light in the supplied holster:
Here's a size comparison image. From left to right- X10, SR51, S18 and the SR91.
Now it's time for some comparison beam shots against my garage door. All lights were in their highest mode, and all camera settings remained the same for each beam shot taken, and I set the white balance to auto, since we're not comparing tint here, just beam shape. Distance from each light to my garage door is roughly 17ft.
These are .gif's, which I believe help to see the difference between each light better. If you're using a mobile device you may not be able to see the .gif's work properly. If you're viewing it properly you should see two images switching back and forth with each beam shot. Certain browsers also have trouble viewing these:
First off, the S18 compared to the SR91:
Next up is the S18 compared to the SR51:
And the S18 compared to the X10:
I was able to take some long range beam shots last night. They are not perfect. Bugs kept flying towards my lights, and this can be seen in most of the images. All camera settings remained the same for each image taken. White balance was set to auto. Distance from lights to tree is roughly 90 to 100 yards. NOTE: These images are over exposed. At these distances it has to be done to show the beam profile correctly. The brightness of these images is brighter than the light actually is at these distances. Don't expect these lights to be this bright at these distances in person.
S18 vs SR91
S18 vs SR51
S18 vs X10
Now it's time for some OTF lumen data. If you've seen my X10 review then you're aware of my testing methods. Basically the S18 has thermal regulation like the X10, so I'm testing different cooling methods to gather and post data showing the difference in lumen output by keeping the light from thermally regulating itself, and also showing that there is a loss in run time because of this. I'm still testing, but here are my results thus far:
The first graph is of OTF lumens using CR123 primary batteries and holding the light in what I call a 'regular' holding position. This is how I expect most users to hold this light while in use. Here's an example of how I'm holding the light(the S18 is certainly larger than the X10 in the images, but it gives you an idea
). Click either of the two images for full size: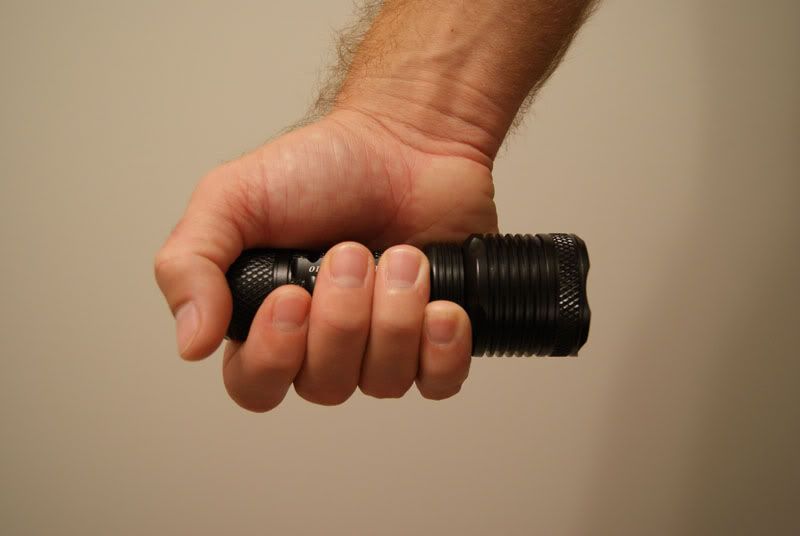
And here are my OTF lumen results:
Here's the thermal graph of the lights temperature taken throughout the run time:
I've also tested the S18 in the holding position using AW 16340 IMR batteries. Here are those results:
And the thermal graph to go with it:
Now both lights together on one graph:
OTF lumens graph:
Thermal Graph:
Just finished up testing with 6xAW IMR 16340's and using a freezer pack as the cooling method. Like I've stated in my other reviews of lights that have thermal regulation, the freezer pack method is done mostly to show how the thermal regulation works. Keep the light cool and output remains high and pretty flat, but run time suffers some due to higher drive levels to the emitter. I'm not sure that anyone actually lives in an environment where they could keep this light as cool as I did during my testing, so this method is purely for fun. Here are my results compared against the previous measurements:
Thermal graph:
I hope this information has been useful for you.
Last edited:
 Thank You Sir, May I have another . . .