
AnAppleSnail
Flashlight Enthusiast
Minimag: Forever LED mod
Recently I mentioned a modified Mini Mag Lite I built for some children I know who want flashlights. The needs were:
*Durable
*Very long battery life
*Cheap
*Simple modification
*Only bright enough to use in the dark
Interested? Read on:
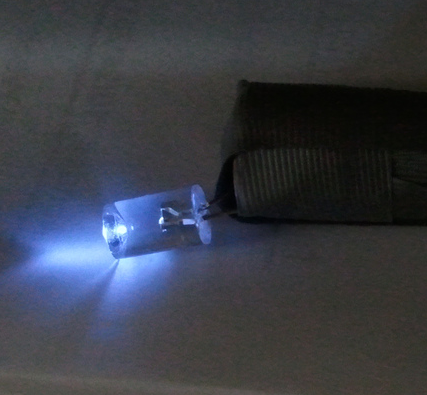
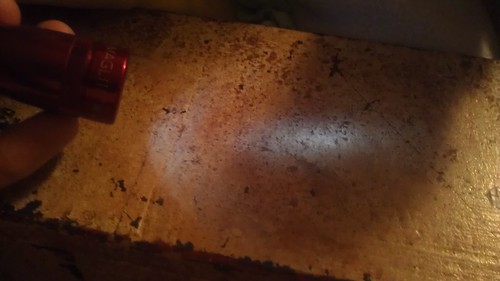
I replaced the bulb in an incandescent Mini Mag Lite with an LED that uses barely-modified optics. This gives me a low-cost, durable host, with low power consumption and a fairly useful beam. First: Runtime discussion.
Most white LEDs will light dimly at about 2.5-2.7v. Two AAs in a Mini Mag Lite give about 3v, which will light most white LEDs dimly. You will have to confirm (By testing in place or measuring before) that the LED you plan to use works in this underdriving situation. I have had good luck with Eneloops and all Alkaleaks. Note that alkaleaks leak! Check periodically, or use NiMHs that you recharge every other month. Most AAs at low drain have about 2 amp-hours capacity, and multi-week runtime at low levels.
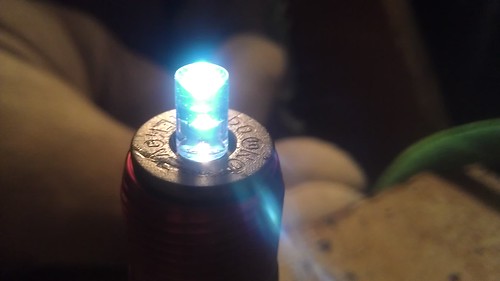
The brightness of this light will follow a direct-drive pattern, dimming down to a low tail. Mine start at about 3-5 lumens, which is plenty for young eyes in dark areas. The focusing ability of the Mag Lite gives respectable reach with this output, as well. Finally, candle mode is maintained, although it is easier to knock the LED out of place than with the bulb.
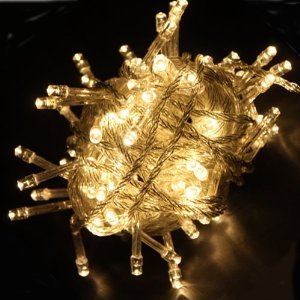
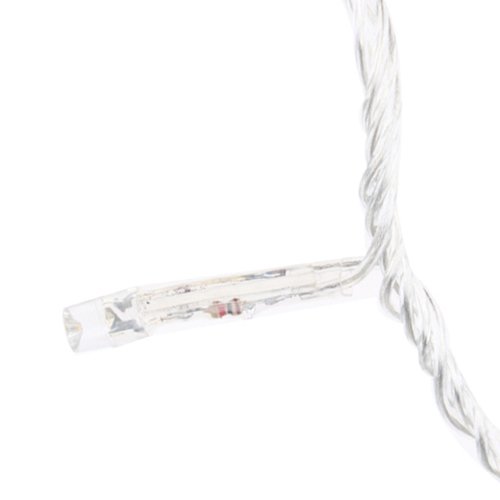
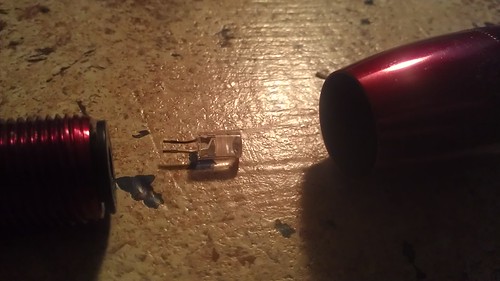
The LEDs come from Christmas lights and other decorations. You want 'Cone-Tip' LEDs, which have a distinctive look and output pattern:
Note the cylindrical overall shape and the cone-shaped dimple on the end. This redirects light outwards, simulating a blob of light rather than a flat diode source.
This blob of light can be adapted to reflectors quite easily since it is similar to a filament, optically speaking. Amazon.com has warm-white LEDs (String of 100, $6) like this, as do many stores. Here is a picture of some "correct" LEDs. You will need an image showing the LEDs themselves to check the type. They are often called 'Fairy Light String.'
Watch out for ones with resistors soldered on. This makes it harder to get enough wire length to connect to the bulb holder.
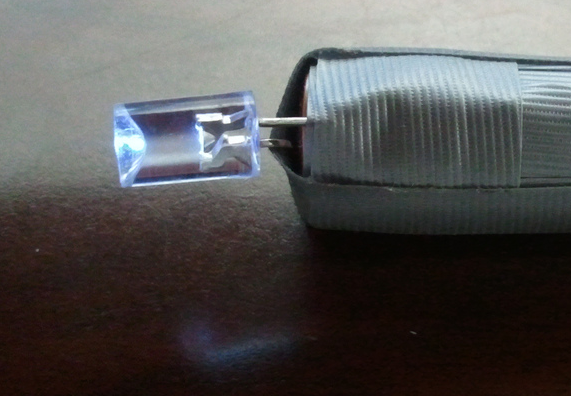
The light modification:
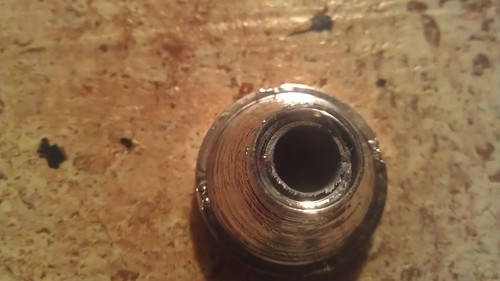
After you clean and lubricate the threads and O-rings, you need only widen the opening at the reflector's base. This allows the LED to pass through and press on the Mini Mag's bulb holder. Drill bits have not served me well!
I use a Swiss-Army Knife-sized knife blade to ream the reflector wider. Carefully avoid touching the reflective surfaces, and blow debris away rather than wiping it off. Hold the reflector carefully and turn the knife like a key in a lock. Rotate the reflector as you do this, and the knife will grind the plastic away. Don't let the knife bite in, as this will split the plastic. Once the reflector's hole lets the LED pass fairly freely, the LED must be placed in the bulb holder.
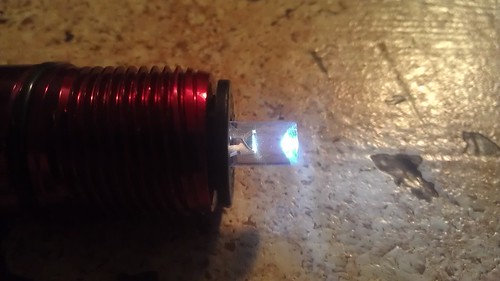
Pinch the leads so that they are slightly closer together. They need to be parallel and closer together than they are originally to fit in the socket. I use needlenose pliers to grab the lead and move it slightly inwards about half a millimeter on each lead. Then carefully press the LED into the bulb holder. If it does not light, remove and rotate the LED half a turn to correct polarity. If it still does not light, you have poor contact in the bulb holder. Slightly bowed or canted leads seem to work best, and I find 8-10mm to be the most reliable length. Stand the LED up completely straight in the holder, then carefully replace the head with reflector and window.
Recently I mentioned a modified Mini Mag Lite I built for some children I know who want flashlights. The needs were:
*Durable
*Very long battery life
*Cheap
*Simple modification
*Only bright enough to use in the dark
Interested? Read on:
I replaced the bulb in an incandescent Mini Mag Lite with an LED that uses barely-modified optics. This gives me a low-cost, durable host, with low power consumption and a fairly useful beam. First: Runtime discussion.
Most white LEDs will light dimly at about 2.5-2.7v. Two AAs in a Mini Mag Lite give about 3v, which will light most white LEDs dimly. You will have to confirm (By testing in place or measuring before) that the LED you plan to use works in this underdriving situation. I have had good luck with Eneloops and all Alkaleaks. Note that alkaleaks leak! Check periodically, or use NiMHs that you recharge every other month. Most AAs at low drain have about 2 amp-hours capacity, and multi-week runtime at low levels.
The brightness of this light will follow a direct-drive pattern, dimming down to a low tail. Mine start at about 3-5 lumens, which is plenty for young eyes in dark areas. The focusing ability of the Mag Lite gives respectable reach with this output, as well. Finally, candle mode is maintained, although it is easier to knock the LED out of place than with the bulb.
The LEDs come from Christmas lights and other decorations. You want 'Cone-Tip' LEDs, which have a distinctive look and output pattern:
Note the cylindrical overall shape and the cone-shaped dimple on the end. This redirects light outwards, simulating a blob of light rather than a flat diode source.
This blob of light can be adapted to reflectors quite easily since it is similar to a filament, optically speaking. Amazon.com has warm-white LEDs (String of 100, $6) like this, as do many stores. Here is a picture of some "correct" LEDs. You will need an image showing the LEDs themselves to check the type. They are often called 'Fairy Light String.'
Watch out for ones with resistors soldered on. This makes it harder to get enough wire length to connect to the bulb holder.
The light modification:
After you clean and lubricate the threads and O-rings, you need only widen the opening at the reflector's base. This allows the LED to pass through and press on the Mini Mag's bulb holder. Drill bits have not served me well!
I use a Swiss-Army Knife-sized knife blade to ream the reflector wider. Carefully avoid touching the reflective surfaces, and blow debris away rather than wiping it off. Hold the reflector carefully and turn the knife like a key in a lock. Rotate the reflector as you do this, and the knife will grind the plastic away. Don't let the knife bite in, as this will split the plastic. Once the reflector's hole lets the LED pass fairly freely, the LED must be placed in the bulb holder.
Pinch the leads so that they are slightly closer together. They need to be parallel and closer together than they are originally to fit in the socket. I use needlenose pliers to grab the lead and move it slightly inwards about half a millimeter on each lead. Then carefully press the LED into the bulb holder. If it does not light, remove and rotate the LED half a turn to correct polarity. If it still does not light, you have poor contact in the bulb holder. Slightly bowed or canted leads seem to work best, and I find 8-10mm to be the most reliable length. Stand the LED up completely straight in the holder, then carefully replace the head with reflector and window.
") I ordered some Nichia GS 5mm leds awhile ago from overseas; I believe they are of the 36 lumen 120 degree variety. I used a rotary tool to open up the reflector. Off of two fresh alkalines it puts out a very respectable amount of light while maintaining the focusing function of the standard incan bulb. I mostly use it as my dedicated moonlight mode light; I run it off of "dead" alkalines from my wireless optical mouse. It puts out maybe 1 lumen for a loooong time.
I ordered some Nichia GS 5mm leds awhile ago from overseas; I believe they are of the 36 lumen 120 degree variety. I used a rotary tool to open up the reflector. Off of two fresh alkalines it puts out a very respectable amount of light while maintaining the focusing function of the standard incan bulb. I mostly use it as my dedicated moonlight mode light; I run it off of "dead" alkalines from my wireless optical mouse. It puts out maybe 1 lumen for a loooong time.