Crelant 7g9 Driver Swap

ryansoh3

Newly Enlightened
Joined
Aug 30, 2012
Messages
55
Hey CPF,

In a few days I'll be receiving my Crelant 7g9 from the giveaway held here: http://www.cpfmarketplace.com/mp/sh...ashlight-for-Celebrating-the-Coming-Christmas

Sounds like many were not satisfied with the driver because it had a next mode memory, where if you turned it off on high, it would go to medium the next time you turn it on.

I'm thinking of swaping the driver out, and I was wondering if any of you guys had any experience with it. Looked through many reviews, but I couldn't see drivers being taken out...

Cheers!

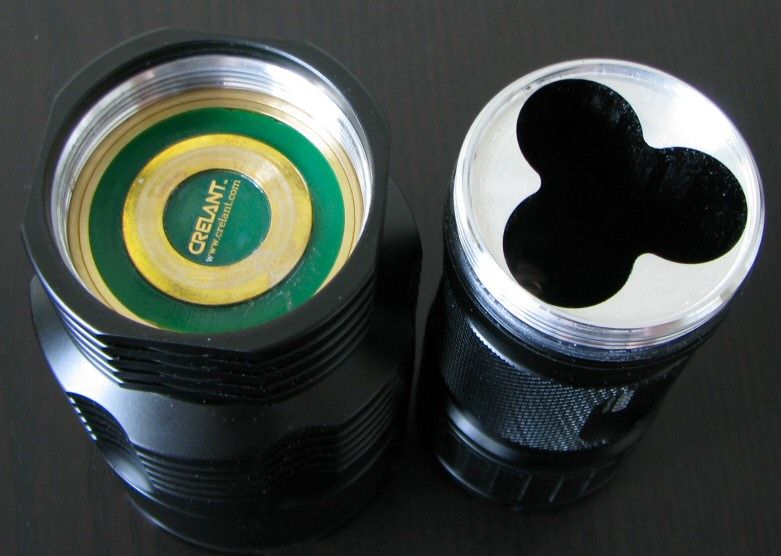
Edit: Here's the driver from Selfbuilt's review: http://www.candlepowerforums.com/vb/showthread.php?340101

7G9023.jpg
 

ryansoh3

Newly Enlightened
Joined
Aug 30, 2012
Messages
55
Thanks for your reply and I'll let you know how it turns out.

Cheers!
 

d337944

Enlightened
Joined
Jul 19, 2010
Messages
507
Location
Australia
Heya ryansoh3

I'm in the same boat mate - hoping to change the driver over.

BUT, just received mine today ... however the positive contact ring already fell off (still works fine), and the rubber tailcap button pushed in (my tailcap / battery holder assembly is well glued so I can't even open mine up to fix this!) ... so I'll need to sort this out as well as looking at upgrading the driver.

Hope yours is in perfect working order mate! Let us know how your driver swap attempt goes if you try it soon.

Cheers
 

ryansoh3

Newly Enlightened
Joined
Aug 30, 2012
Messages
55
Good to know yours has arrived--mine should be here anytime soon.

Sorry about the mishaps with the light... I hope Crelant wasn't giving away defective or returned ones... :shakehead

I'll let you know as soon as I get my light.

Cheers!
 

ryansoh3

Newly Enlightened
Joined
Aug 30, 2012
Messages
55
Yup, mine just arrived, and yes again, it's extremely hard to disassemble.
Mine's in fine condition, but I already hate the driver UI. I also think it's under driven at about 2.5A.

This thing is impossible to take apart! The threads are Loctited together so they won't budge. :(
 
Last edited:

d337944

Enlightened
Joined
Jul 19, 2010
Messages
507
Location
Australia
Yup, mine just arrived, and yes again, it's extremely hard to disassemble.
Mine's in fine condition, but I already hate the driver UI. I also think it's under driven at about 2.5A.

This thing is impossible to take apart! The threads are Loctited together so they won't budge. :(

Happy that yours is in good order mate!

I hear ya - since my last post I've boiled the battery / switch end again for over 15 minutes, and the following day stuck it into the freezer for over 12 hours ... the tailcap is still stuck on tight!! Hence I still cannot properly replace the switch boot (which came off within a few mins of ownership).
I've also now ruined the anodizing with vice grips tearing through leather and rubber during numerous attempts to remove the tailcap. :sigh:

I don't think its loctite on these, more like epoxy!

Aside from this, the light does throw very well -better than my Sunwayman T40CS and also my de-domed Elektrolumens ST90.
 
Last edited:

bshanahan14rulz

Flashlight Enthusiast
Joined
Jan 29, 2009
Messages
2,819
Location
Tennessee
Aside from this, the light does throw very well -better than my Sunwayman T40CS and also my de-domed Elektrolumens ST90.

You guys are already resorting to chucking these things at stuff to disassemble them?! ;-)

I'd say since the contact board is specially designed for that cell arrangement, you may at least want to keep the driver board for use as a contact board.

Also, maybe it might be easier to see what they used to control the modes and maybe reprogram it? I know nothing of that sort of thing, but who knows, maybe it's just a matter of adding or removing a component? Either way, gotta get to the other side of the board to see what's on it.

Wonder if you could take a rubber eraser and get enough grip to unscrew the pill (assumign the pill unscrews?)
 

tx101

Flashlight Enthusiast
Joined
May 17, 2008
Messages
2,357
Location
London UK
Happy that yours is in good order mate!

I hear ya - since my last post I've boiled the battery / switch end again for over 15 minutes, and the following day stuck it into the freezer for over 12 hours ... the tailcap is still stuck on tight!! Hence I still cannot properly replace the switch boot (which came off within a few mins of ownership).
I've also now ruined the anodizing with vice grips tearing through leather and rubber during numerous attempts to remove the tailcap. :sigh:

I don't think its loctite on these, more like epoxy!

Aside from this, the light does throw very well -better than my Sunwayman T40CS and also my de-domed Elektrolumens ST90.


You need more heat.

As a last resort, I use a large butane Jet torch ... works everytime
 

ryansoh3

Newly Enlightened
Joined
Aug 30, 2012
Messages
55
Happy that yours is in good order mate!

I hear ya - since my last post I've boiled the battery / switch end again for over 15 minutes, and the following day stuck it into the freezer for over 12 hours ... the tailcap is still stuck on tight!! Hence I still cannot properly replace the switch boot (which came off within a few mins of ownership).
I've also now ruined the anodizing with vice grips tearing through leather and rubber during numerous attempts to remove the tailcap. :sigh:

I don't think its loctite on these, more like epoxy!

Aside from this, the light does throw very well -better than my Sunwayman T40CS and also my de-domed Elektrolumens ST90.

Wow, sorry to hear about the troubles with your 7G9. I hope they do offer you a replacement.
I guess it's one tough son of a... errm... flashlight. Still no luck opening mine. :D

Aside from this, the light does throw very well -better than my Sunwayman T40CS and also my de-domed Elektrolumens ST90.
You guys are already resorting to chucking these things at stuff to disassemble them?! ;-)
:crackup:Hilarious! :crackup:

I'd say since the contact board is specially designed for that cell arrangement, you may at least want to keep the driver board for use as a contact board.

Also, maybe it might be easier to see what they used to control the modes and maybe reprogram it? I know nothing of that sort of thing, but who knows, maybe it's just a matter of adding or removing a component? Either way, gotta get to the other side of the board to see what's on it.

Wonder if you could take a rubber eraser and get enough grip to unscrew the pill (assumign the pill unscrews?)

Yup, I do hope to keep the circular contact board and use the most non-destructive way to access the driver.
Unfortunately, the pill seems to be epoxied or something; I can't budge it even with a wrench.
I do hope it uses an Atiny13a because that would be every easy to reprogram. :D

Thanks for the replies!
 

TomElf

Newly Enlightened
Joined
Sep 24, 2011
Messages
28
I just replaced my driver today on the 7G9 with one of those new Nangj 2 mode set drivers (blinks after 5 sec on low) from FastTech (their description on the website is wrong), with 3 extras 7135's, so at 3.85A but measures 3.92A (not sure why). Mine was previously modded by a modder here experienced with 7G9's, but the driver seemed to go on the fritz. Oh - I was lucky with my tailcap: it was easy to get apart, I modded it to be more sensitive by replacing the boot and adding something to get the inside knob closer to the button -- works great. It still has the fwd clicky but the new driver has mode memory of course. I'm using it in the 3 mode setting - perfect for me. The + contact board with the brass ring is the driver board -- all the SMD's are on the under side. So, yes, you keep that driver board, strip all the components off, then you got a lot of space to work with, but it can be a little tight on height depending on how you do it. The key to removing the + contact/driver board is to work outside the brass ring - mine was cut off on 2 opposite sides by the modder who did the original job. He probably drilled holes there first, then had leverage to pop it up - it's a very thick board so could probably take a bit of pressure. This light has incredible throw now.
 

d337944

Enlightened
Joined
Jul 19, 2010
Messages
507
Location
Australia
Wow - well done TomElf ... sounds great! The 7G9 is actually a great sturdy host, so with a good driver (like yours!) it should be fantastic.

I've been snowed under with work the last few days, but really want to rip out the existing driver, so hopefully either this evening or tomorrow evening.

Tx101 - yep, already tried a butane blowtorch in an attempt to unscrew the tailcap ... no luck! I could try again and hold the flame against the tailcap for much longer, but I'm afraid it'll melt the large white plastic bit in the tailcap.

Out of curiosity - did anyone receive a spare rubber switch cover with their 7G9? Since my tailcap is glued tight and I didn't get a spare rubber switch cover with mine, I'm thinking that Crelant doesn't want anybody taking apart their 7G9s any more??
 

d337944

Enlightened
Joined
Jul 19, 2010
Messages
507
Location
Australia
Okay - got the driver out with some pics and notes for you guys!
1. Drilled a couple of pilot holes either side of the driver as shown ... tried to use a Circlip Plier to pull the driver out and failed, resulting in several scratches over the positive contact. (NOTE: The usual Positive Contact ring was not even attached when I received my 7G9, and was rattling around inside the light)
jbfl1WLE2BVei0_e.jpg


2. Screwed in (just enough to bite the circuit board firmly) a long screw, and managed to lever the board out!
j0cTU8xMAXVtw_e.jpg


*** NOTE: The wiring in mine was far too short to allow me to pull the board out - I had to stick in a thin pair of scissors to cut the wires ***

3. Back of the driver board after removal ... note how well the board is soldered to the negative contact ring.
jjI0qCq80qqwQ_e.jpg


4. Suggested new drilling / levering point for any others wanting to do this (blue "X"). This new point (if your driver is the same) should be clear of the circuitry in case you want to mod the existing components.
jb2aCPPG8752GT_e.jpg


That's it for now ... when I have some time I'll tinker around with a new driver etc. One issue though - because the wires were quite short, there is not much left sticking out the back of the LED board ... less than 1 centimeter (1/3 of an inch?), so joining them up may be a little tricky!

Cheers
 
Last edited:

TEEJ

Flashaholic
Joined
Jan 12, 2012
Messages
7,490
Location
NJ
So the bezel doesn't unscrew to let the head open from the front?
 

d337944

Enlightened
Joined
Jul 19, 2010
Messages
507
Location
Australia
So the bezel doesn't unscrew to let the head open from the front?

Hi Teej

Not possible on my sample (I've read its the same with others too) - the bezel is glued / epoxied on as tight as my tailcap (which I have not been able to remove).

I'm not sure I want to try boiling / freezing the head unit, as the lens is not borosilicate (pyrex) so the temperature stress may crack it (these methods failed anyway with my tailcap). Have already tried thick rubber, leather, and vice grips with no luck.

Its like Crelant don't want people to mod the 7G9 or something! :(
 

TomElf

Newly Enlightened
Joined
Sep 24, 2011
Messages
28
I can unscrew the SS bezel, but that's it. The lens is behind a lip that seems impassable. I pm'ed Vinh, posted the issue, no response yet, but I know Vinh posted a while back he got his hands on a 7G9 that was dedomed, so someone was able to access the LED...
 

ryansoh3

Newly Enlightened
Joined
Aug 30, 2012
Messages
55
d337944, I can't thank you enough for those shots and notes. :D

I'm not sure I can see the blue X that you marked... perhaps my monitor is too dark? :p

Thanks again for the shots, and I'll try to do the same.

Oh, how much force did you use to pull out the drivers? Was putting it in as easy? Cheers!
 

Tiresius

Enlightened
Joined
Sep 19, 2009
Messages
965
Location
Fresno, CA
Oh man, I feel so dumb now. I forgot to ask if you can solder on 2 joints on the brass ring and take two pliers to push against it to remove the driver. Sorry for not thinking about it like that. The head is supposed to be removed to access the LED but I guess you're right--Crelant does not want us tinkering with their head :D
 

bshanahan14rulz

Flashlight Enthusiast
Joined
Jan 29, 2009
Messages
2,819
Location
Tennessee
I remember reading a thread a few years ago about another notoriously hard to open light, the surefire M1. Milky basically said that he had to use a temperature up around 750 degrees Fahrenheit. This is enough to soften the glue, but also enough to completely melt the clear front lens on the light.

Boiling water is generally about 212 degrees Fahrenheit.

I'd reckon brute force is the only way to go, then. Perhaps you could get the head firmly in a vice, and use a rubber strap wrench to apply constant torque. Then torch the sides as evenly as you can, wherever you think the threads are.

RyanSOH, the blue x is written in pen, at the 6 o'clock position on that photo. On the photo above it, you can see that that part of the circuit board is clear of components and traces.

Looks like this driver is soldered to a brass ring which is then interference fit into the bare aluminum, instead of threaded into matching threads.

Got any shots of inside the head with the driver removed? Or is it just a black anodized chamber with a hole and two wires comign out of it?
 
Top