
NiteCore D11 V.2 Mark III: a Historical and Real World Review
PRIMER
The following information is real world experience from the few NiteCore (NC) D11 V.2 flashlights (FLS) which, at the time of writing this review, I currently own. Though referenced, this review does not reflect the product line in general, and of course, does not cover other NC FLS.
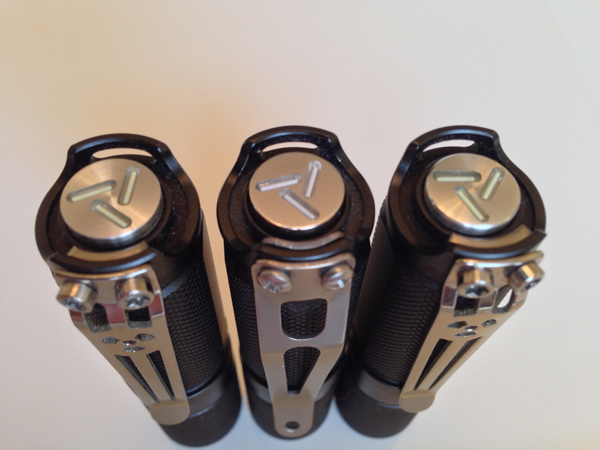
Unless otherwise noted, NC D11 V.2 FLS will be shown, from left to right:
Original D11 V.2 – MKI
Next D11 V.2 – MKII (First Version Labeling – L1)
Next D11 V.2 – MKII (Second Version Labeling – L2)
Current D11 V.2 – MKIII
Much has already been written about older versions of the NC D11. Search Candlepower Forum (CPF) for: information, reviews, and pictures.
HISTORY
Back at the end of 2010, NC came out with the follow up flashlight (FL) to their D10. That follow up was the D11. The first NC D11 had no version number, but at least some of these first D11s had the same parasitic drain issue as was reported on some of the D10s. This drain was personally verified on the later D10 Camo version R2s I owned. Largely due to customer complaints about the parasitic drain issue, the circuit board for the D11 was redone and the FL was rolled out with a second version (V.2).
This second production version is what I am calling the Mark I (MKI).

NC D11 V.2 MKI
What I refer to as the Mark II (MKII), is the MKI with slightly different labeling on the FL itself. Other then esthetics, there is no difference between the MKI and the MKII.

NC D11 V.2 MKII L1

NC D11 V.2 MK II L2
At the end of 2013 one dealer ordered what I call the Mark III (MKIII), from NC. There are several differences among the MKIII versus either the MKI or the MKII. However, aesthetically, the MKIII is more similar to the MKI.
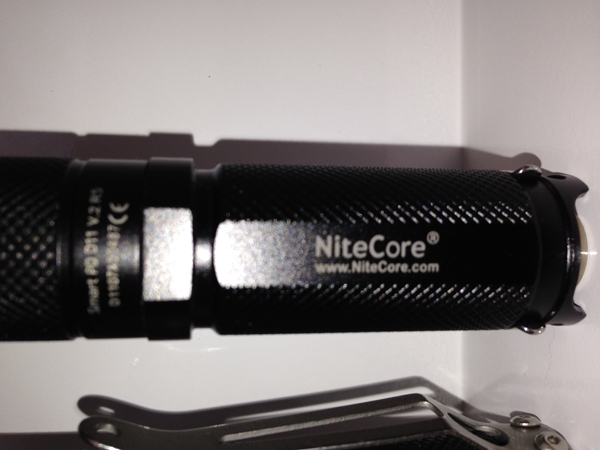
NC D11 V.2 MKIII

All NC D11 V.2s
PACKAGING
For the MKI version of the D11 V.2, the same packaging was used as the D11 (no version). For the MKII version of the D11 V.2, the same packaging was also used as that of the D11. The differentiation being, stickers were added to MKII version packaging.

Packaging for the: original D11 (no version), D11 V.2 MKI and MKII
A single sticker differentiates the MKII – L1 and MKII - L2.
D11 V.2 MKII - L1 Packaging
D11 V.2 MKII - L2 Packaging
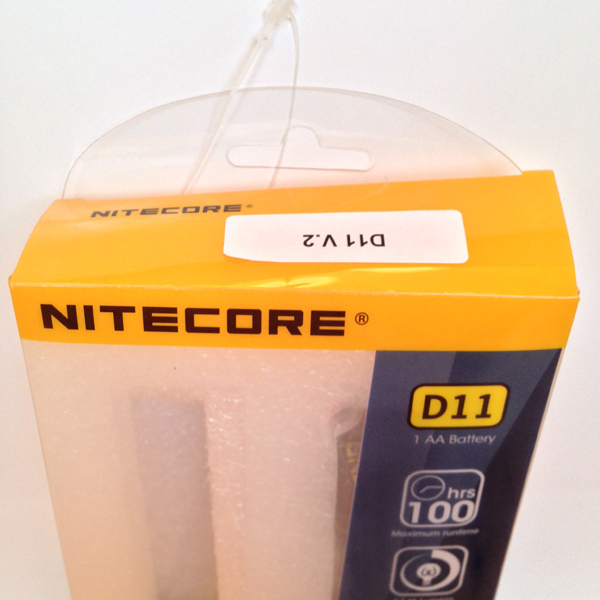
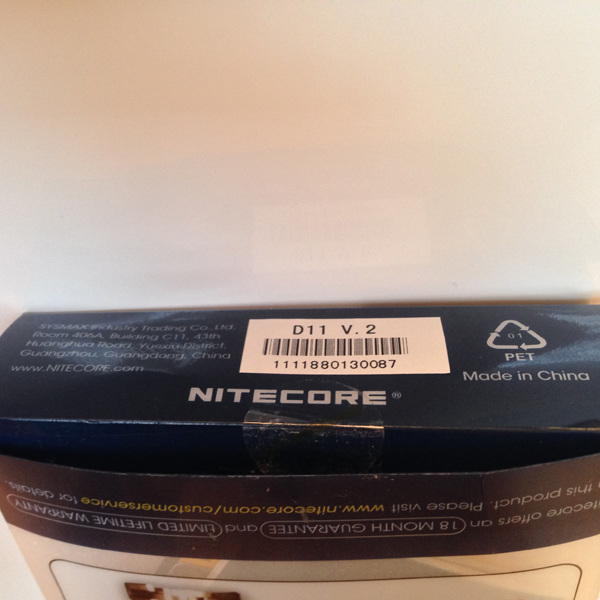
For the MKIII version of the D11 V.2, new packaging was used.

D11 V.2 MKIII Packaging
Included in the MKI and MKII packaging are:
D11 V.2 FL
Lanyard
O-rings
Warranty Card
User Manual
Booklet
D11 V.2 MKI / MKII with their Goodies
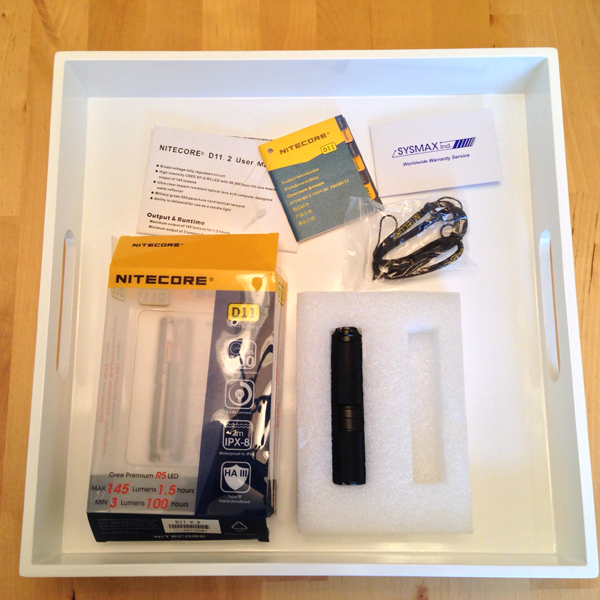
Included in the MKIII packaging are:
D11 V.2 FL
(Listed on the seller's site but not included - lanyard)
O-rings
Insructions
Silica
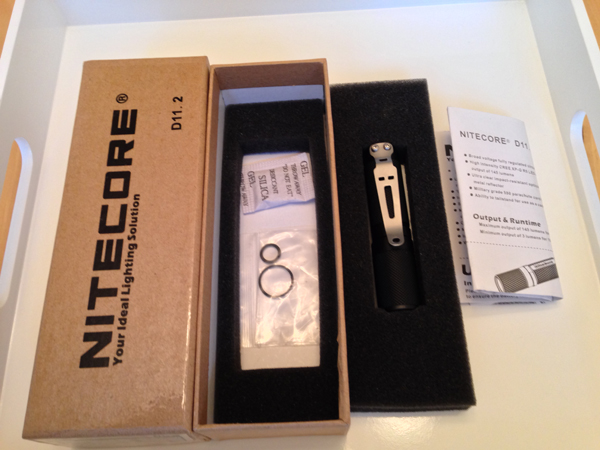
D11 V.2 MKIII and included Goodies
DIFFUSER
Speaking of goodies, here's and oldie but a goodie. The CPF unofficial diffuser works on several NiteCore flashlights.

D10, D11 V.2, and SRT5 all with CPF's Favorite Diffuser
COMPARISON
The user interface (UI) on the MKIII is the same as all D11s; even the original one. For those who do not know, that interface is as follows …
General Activation On / Off via Clicky and Twisty; with Momentary in Twisty / Clicky mode.
(Corrected by LedTed from the Official Manual)
Light Activation
Insert battery and screw the body back on fully, the light is now ON. Click the tail cap once and the light turns OFF. Click the tail cap another time to ON the light again.
Selecting Desired Brightness
When the light is ON, depress the tail cap and hold for more than 0.5 seconds; the brightness level will ramp from MIN to MAX or MAX to MIN depending on starting level. If the tail cap is released, then press-and-hold again; the light performs brightness ramping in the reverse direction. When the desired brightness level is reached, release the button to stop brightness ramping. The user defined brightness level is now memorized. When adjusting the brightness level, the light will flash once to alert the user maximum or minimum level has been reached.
HIGH and LOW Modes
When the light is ON, quickly double-click the switch. The light instantly enters LOW directly. The flashlight has now memorized LOW mode. When the light is ON, quickly single-click the switch and hold. The light instantly enters HIGH directly. The flashlight has now memorized HIGH mode.
SOS and Strobe Mode
When the light is OFF, quickly double-click the switch. The light instantly enters SOS directly. When the light is OFF, quickly single-click the switch and hold. After about two seconds, the light enters STROBE mode directly. When the light enters either SOS or STROBE mode, the user only need to click off the light and then click on to revert to memorized user-defined mode.
Momentary On Mode
Loosen the light bezel about one-half turn, and the light enters momentary on mode. Under this mode, lightly depress the tail cap for ON and release to turn the light OFF. Depress the tail cap further (to detent) for ramping; as above.
Safety Lock-out
Safety Lock-out function can be used to avoid accidental activation. When the light is off, depress the tail cap and hold for more than 1 second, the light will flash once to alert that it has entered safety lock-out mode. Then the light will not turn on due to accidental activation. Under safety lock-out mode, quick triple-click the tail cap or remove and load the battery to deactivate lockout feature.
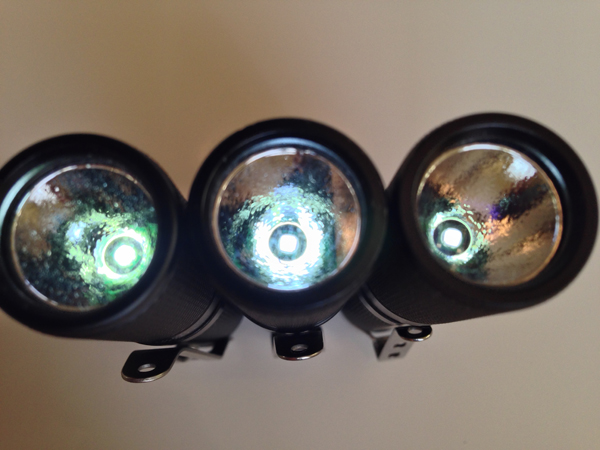
As far as I can tell, the NC D11 V.2 MKIII operated the same as its siblings because it has the same circuit board as its predecessors. I believe that the MKIII also has both the same LED (XP-G, R5) and reflector as its older siblings.
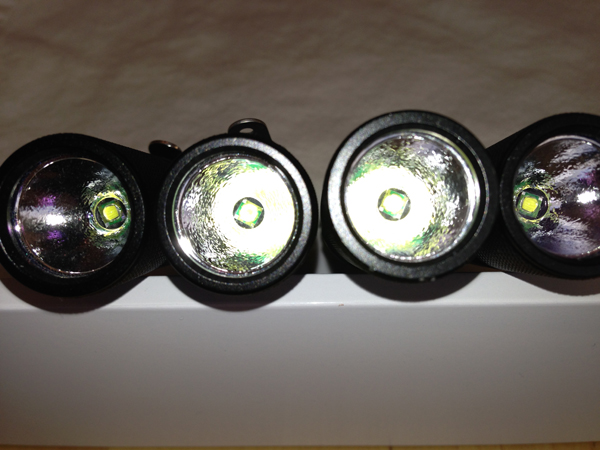
NC D11 V.2 Reflectors and LEDs
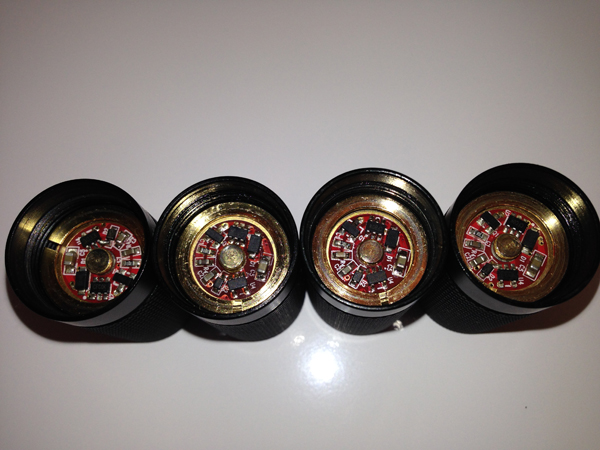
NC D11 V.2 Circuit Boards
In fact, I believe that the entire removable front portion is the same among all three versions. I somewhat verified this by direct visual comparison and by placing the FL heads on each of the different bodies. All three versions (MKI, MKII, and MKII) worked as expected; no matter which head was mounted to which body. In my limited experimentation I did, however, notice that the MKIII head seemed to be "clickier" than the other two. This was true no matter the head / body combination.
The button end of the MKIII is different than the other two FLs. The button end of the piston is 0.005 inches (0.127 mm) smaller in diameter than the two earlier FLs. This is enough of a difference to allow gravity to pull the MKIII piston out of the bodies of both the MKI and MKII.
UPDATE: 07-FEB-14
Fellow CPF'er "aau007" reminded me that diameter is not the only piston difference. Where at least some if the MKI and MKII factory pistons were available with slots for 2 X 8 mm Tritium tubes, none of the MKIII pistons have the slot.
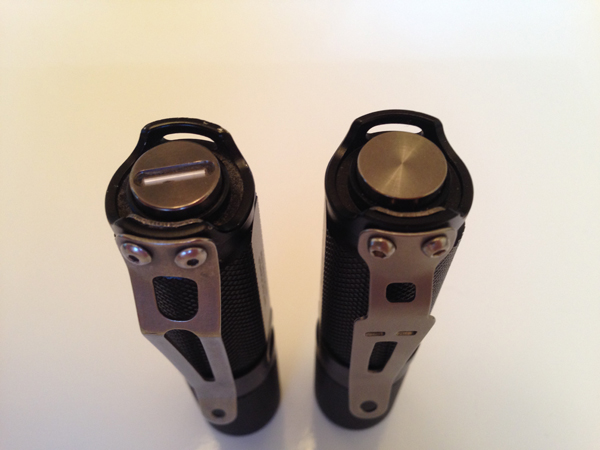
MKII Poston with Tritium Slot and Smaller MKIII Piston
UPDATE: 07-FEB-14
A very limited number of aftermarket Predator, and other Tritium shapes, pistons were available for the MKI and MII, from JHanko, however they may not fit in the MKIII and are no longer available.
Barely discernible colored Trit patterns from Left to Right: Yellow, Ice Blue, and Green
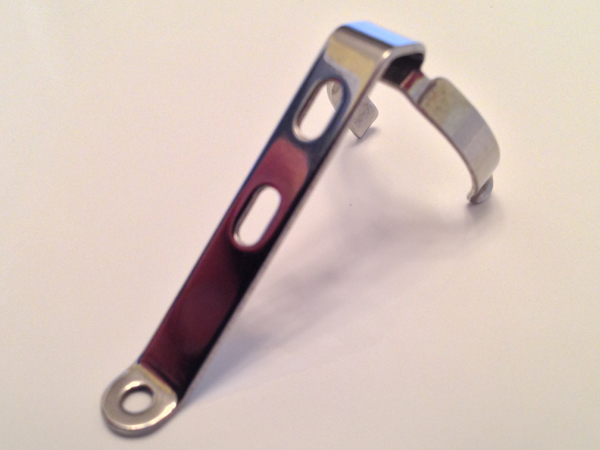
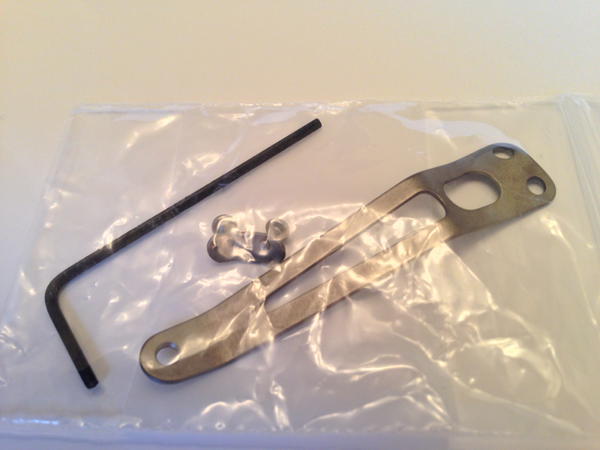
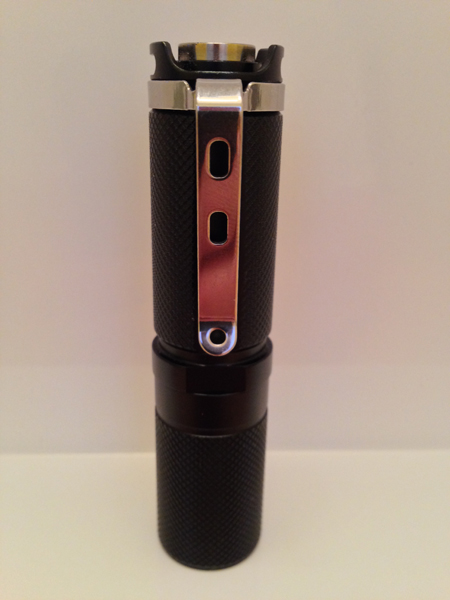
CLIP
I didn't mention the pocket clip before now. This is because the clip on the MKIII is a story onto itself. There was a pocket clip option for both the MKI and MKII. This was a Ti clip and backing hardware with SS metric screws. The clip itself was hard to install; especially with the poorly fitting but included metric Allen wrench. And, the associated hardware was of low quality. In my opinion, the Ti clip was a little too flimsy. And, in my experience, I had to repair several D11 clips by converting the hardware to 2-56.
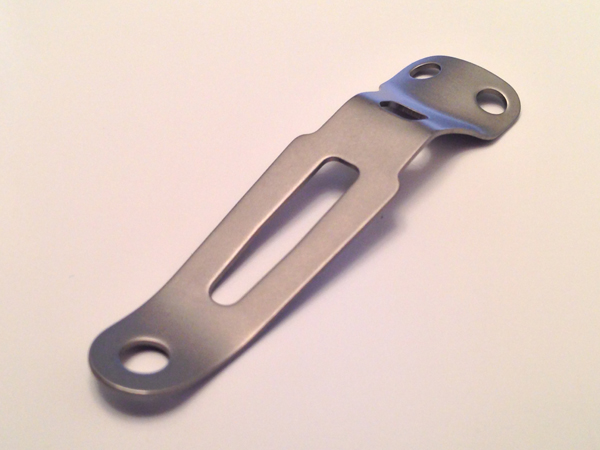
The MKIII Ti clip kit is the same as the kit for the MKI and MKII. However, on the initial order of the MKIII FLS, the dealer asked NC to switch out the tiny Ti backing plate with a SS ring and update the clip to Ti oxide coated SS; with SS screws. Unfortunately, NC said one thing and did another; as they made the ring out of lower quality Al than the FL bodies.
Intended MKIII set up. Even new out-of-box, the SS screws are stripped in the soft Al ring. The fix from NC ("We are aware of this issue …") was to switch to the JetBeam (JB) BA 10 or PA 10 clip-on pocket clip. See UPDATE: 05-FEB-14 blow.
JB Substitute Clip
However, as of the writing of this article, the old Ti screw on clip kit is available. The original screw on NC clip was, and is Ti. The new screw on clip is a SS clip with Ti oxide coating from JetBeam. Per the Ti clip, yes, NC still included the low quality and poor fitting metric Allen wrench.
Original / Current NC Ti Clip Kit
If you can reuse or repair your backing plate, several clips from JB will work; though some have to be slightly modified. (Note: All of the clips pictured are all from SYSMAX, but may be hard to find.)
JB RRT01 Clip
Currently, the MKIII is available with or without a clip. If you order one with the clip, it will now come with the JB clip-on clip.

NC D11 V.2 – MKIII as originally received with JB screw-on clip
NC D11 V.2 – MKIII as currently available with JB clip-on clip
UPDATE: 08-FEB-14
A very limited number of custom aftermarket Biohazard Clips were available for all NC D11s, from JHanko, however they are no longer available.
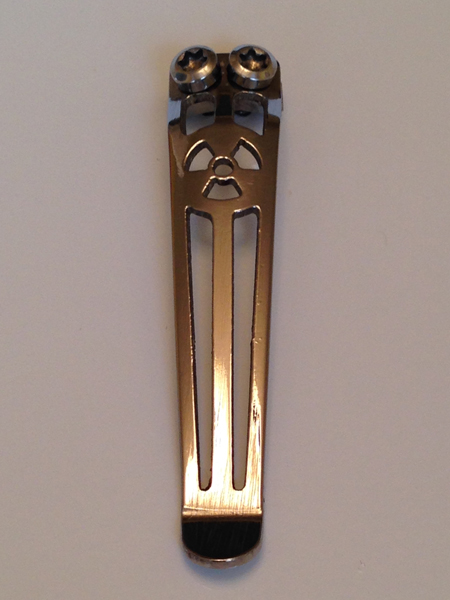
Biohazard Clip
REVIEW
I wish that the dealer and NC would have teamed up to create and improved D11 V.2; rather than just clearing out old stock. For instance, the LED could have been upgraded to XP-G2, R5, or even XM-L2. Another too late idea is that a limited edition Ti body could have been produced. How about two tone, shiny Ti body with jet black Al head? The MKIII could have been the best D11 ever! That's not to say that the NC D11 V.2 MKIII is a poor quality flashlight. Despite the original clip issue, I find the FL very useful for day-to-day tasks; especially at work. In practical use, the MKIII has been my EDC since late December of 2013. Though the clip-on pocket clip is not as secure as the screw-on type, this can be seen as a safety issue. I'd rather have the clip come off and I accidently lose my flashlight to a machine then my leg; or worse – my life. However, I do wish that the clip-on clip retained better to the body of the little FL. Once in pocket, the clip grips very well.
Photography is not allowed in any of the laboratories in which I work. Therefore, the following real life example will be lacking pictures. I've used my NC D11 V.2 MKIII, at work, for inspection several times. The last time I used the D11 MKIII at work was during a bubble test. I used the FL to light the room temperature potable water bath which another technician and I were using to help us test. To avoid surface glare, and to the surprise of my fellow technician, I dropped my MKIII into the shallow bath. The light laid flat on the bottom of the tank with only one inch (2.54 cm) of water above it. Needing more light than I had originally set the D11 MKIII to, I actuated the FL's piston while the light was still submerged. The D11 MKIII was adjusted in this manner two more times and remained in the bath for just over ten minutes. After the FL had finished its lighting task, it was closely examined. Not a single drop of water had ingressed into the body or head.
After a week's time of both indoor (ambient) and outdoor (-17°F or -27 °C) use, follow up inspection showed no "fog" under the lens.
MKII Left and Center, MKIII Right, all fog free but with different tints
UPDATE: 05-FEB-14
The clip-on pocket clip for my D11 V.2 fell off today. Luckily, the FL fell into my pocket and I heard the musical sound of the clip hitting the floor. I rescued the clip and added heat shrink before reinstalling it.

Secure Clip
UPDATE: 08-NOV-14
BATTERY TEST
The same D11 V.2 MKIII was test with three (3) different battery chemistries. Relative peak lux (Lx - pk) readings at one (1) meter (m) were recorded with each battery type (lx/m - pk).
Format
Battery – Nominal Voltage
Lux Reading
1st
Panasonic Eneloop (HR-3UTGA) – 1.2V
1515
2nd
Energizer Lithium (L91) – 1.5V
1560
3rd
Titanium Innovations CR14505 (CRAA) – 3.0V
1630
4th (Emitter Upgrade to XP-L)
Titanium Innovations CR14505 (CRAA) – 3.0V
1915
BEAM SHOTS
Clockwise, starting from the upper left, are beam shots of: Nichia 219 (A), Stock CREE XP-G (R5), XP-L (≈ 5,000 °K), and Stock CREE XP-G (R5). All beam shots from NC D11.2 reflectors (LOP) and glass (anti-reflective).
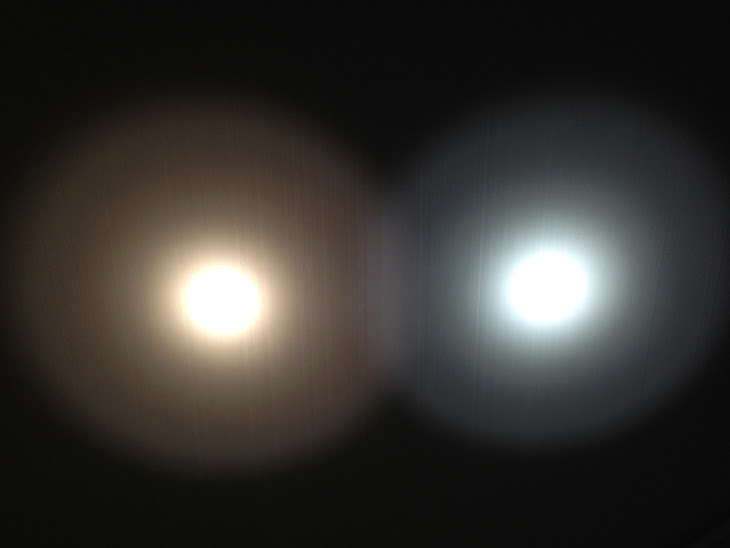

The Nichia 219 (A) emitter upgrade was skillfully performed by our own JHanko.
The XP-L emitter upgrade (≈ 5,000 °K) was expertly performed by our own KDM; who can install any of several different emitter types and colors to suit your needs.
BATTERY UPDATE
I have an interesting battery update. The CR14505 lasted five months of daily but intermittent use in my NC D11.2 modified with an XP-L emitter. Most of the time, the emitter output was kept and used at its lowest setting. Usually, once a day, the output was at max; but only for short periods of time – about a minute. Occasionally, the output was set to the low-mid range; for longer periods – about ten minutes. I do not have actual hours of run time. This is the first CR14505 I had to replace. The battery read almost exactly 2.0 Vdc unloaded. (A week prior, I noticed a diminished output and verified the battery to be at 2.5 Vdc unloaded; just a half volt under the nominal battery voltage.)
The CR14505 could no longer run the LED at max. The a few days prior to replacing the battery, I noticed that the max output strobed and climbed to near the usual max output. I figured that the battery voltage was at the switching point of the buck/boost circuit. I was wrong.
Earlier today, when I tried to switch the output to max, the light blinked. Then it continually cycled from min to max and back. This action was very repeatable. I checked for a problem with the driver / pill, but found none. I checked the original battery and discovered an unloaded reading of 2.0 Vdc. I replaced the battery with a fresh CR14505 and now my light is working very dependably again.
PRIMER
The following information is real world experience from the few NiteCore (NC) D11 V.2 flashlights (FLS) which, at the time of writing this review, I currently own. Though referenced, this review does not reflect the product line in general, and of course, does not cover other NC FLS.
Unless otherwise noted, NC D11 V.2 FLS will be shown, from left to right:
Original D11 V.2 – MKI
Next D11 V.2 – MKII (First Version Labeling – L1)
Next D11 V.2 – MKII (Second Version Labeling – L2)
Current D11 V.2 – MKIII
Much has already been written about older versions of the NC D11. Search Candlepower Forum (CPF) for: information, reviews, and pictures.
HISTORY
Back at the end of 2010, NC came out with the follow up flashlight (FL) to their D10. That follow up was the D11. The first NC D11 had no version number, but at least some of these first D11s had the same parasitic drain issue as was reported on some of the D10s. This drain was personally verified on the later D10 Camo version R2s I owned. Largely due to customer complaints about the parasitic drain issue, the circuit board for the D11 was redone and the FL was rolled out with a second version (V.2).
This second production version is what I am calling the Mark I (MKI).
NC D11 V.2 MKI
What I refer to as the Mark II (MKII), is the MKI with slightly different labeling on the FL itself. Other then esthetics, there is no difference between the MKI and the MKII.
NC D11 V.2 MKII L1
NC D11 V.2 MK II L2
At the end of 2013 one dealer ordered what I call the Mark III (MKIII), from NC. There are several differences among the MKIII versus either the MKI or the MKII. However, aesthetically, the MKIII is more similar to the MKI.
NC D11 V.2 MKIII
All NC D11 V.2s
PACKAGING
For the MKI version of the D11 V.2, the same packaging was used as the D11 (no version). For the MKII version of the D11 V.2, the same packaging was also used as that of the D11. The differentiation being, stickers were added to MKII version packaging.
Packaging for the: original D11 (no version), D11 V.2 MKI and MKII
A single sticker differentiates the MKII – L1 and MKII - L2.
D11 V.2 MKII - L1 Packaging
D11 V.2 MKII - L2 Packaging
For the MKIII version of the D11 V.2, new packaging was used.
D11 V.2 MKIII Packaging
Included in the MKI and MKII packaging are:
D11 V.2 FL
Lanyard
O-rings
Warranty Card
User Manual
Booklet
D11 V.2 MKI / MKII with their Goodies
Included in the MKIII packaging are:
D11 V.2 FL
(Listed on the seller's site but not included - lanyard)
O-rings
Insructions
Silica
D11 V.2 MKIII and included Goodies
DIFFUSER
Speaking of goodies, here's and oldie but a goodie. The CPF unofficial diffuser works on several NiteCore flashlights.
D10, D11 V.2, and SRT5 all with CPF's Favorite Diffuser
COMPARISON
The user interface (UI) on the MKIII is the same as all D11s; even the original one. For those who do not know, that interface is as follows …
General Activation On / Off via Clicky and Twisty; with Momentary in Twisty / Clicky mode.
(Corrected by LedTed from the Official Manual)
Light Activation
Insert battery and screw the body back on fully, the light is now ON. Click the tail cap once and the light turns OFF. Click the tail cap another time to ON the light again.
Selecting Desired Brightness
When the light is ON, depress the tail cap and hold for more than 0.5 seconds; the brightness level will ramp from MIN to MAX or MAX to MIN depending on starting level. If the tail cap is released, then press-and-hold again; the light performs brightness ramping in the reverse direction. When the desired brightness level is reached, release the button to stop brightness ramping. The user defined brightness level is now memorized. When adjusting the brightness level, the light will flash once to alert the user maximum or minimum level has been reached.
HIGH and LOW Modes
When the light is ON, quickly double-click the switch. The light instantly enters LOW directly. The flashlight has now memorized LOW mode. When the light is ON, quickly single-click the switch and hold. The light instantly enters HIGH directly. The flashlight has now memorized HIGH mode.
SOS and Strobe Mode
When the light is OFF, quickly double-click the switch. The light instantly enters SOS directly. When the light is OFF, quickly single-click the switch and hold. After about two seconds, the light enters STROBE mode directly. When the light enters either SOS or STROBE mode, the user only need to click off the light and then click on to revert to memorized user-defined mode.
Momentary On Mode
Loosen the light bezel about one-half turn, and the light enters momentary on mode. Under this mode, lightly depress the tail cap for ON and release to turn the light OFF. Depress the tail cap further (to detent) for ramping; as above.
Safety Lock-out
Safety Lock-out function can be used to avoid accidental activation. When the light is off, depress the tail cap and hold for more than 1 second, the light will flash once to alert that it has entered safety lock-out mode. Then the light will not turn on due to accidental activation. Under safety lock-out mode, quick triple-click the tail cap or remove and load the battery to deactivate lockout feature.
As far as I can tell, the NC D11 V.2 MKIII operated the same as its siblings because it has the same circuit board as its predecessors. I believe that the MKIII also has both the same LED (XP-G, R5) and reflector as its older siblings.
NC D11 V.2 Reflectors and LEDs
NC D11 V.2 Circuit Boards
In fact, I believe that the entire removable front portion is the same among all three versions. I somewhat verified this by direct visual comparison and by placing the FL heads on each of the different bodies. All three versions (MKI, MKII, and MKII) worked as expected; no matter which head was mounted to which body. In my limited experimentation I did, however, notice that the MKIII head seemed to be "clickier" than the other two. This was true no matter the head / body combination.
The button end of the MKIII is different than the other two FLs. The button end of the piston is 0.005 inches (0.127 mm) smaller in diameter than the two earlier FLs. This is enough of a difference to allow gravity to pull the MKIII piston out of the bodies of both the MKI and MKII.
UPDATE: 07-FEB-14
Fellow CPF'er "aau007" reminded me that diameter is not the only piston difference. Where at least some if the MKI and MKII factory pistons were available with slots for 2 X 8 mm Tritium tubes, none of the MKIII pistons have the slot.
MKII Poston with Tritium Slot and Smaller MKIII Piston
UPDATE: 07-FEB-14
A very limited number of aftermarket Predator, and other Tritium shapes, pistons were available for the MKI and MII, from JHanko, however they may not fit in the MKIII and are no longer available.
Barely discernible colored Trit patterns from Left to Right: Yellow, Ice Blue, and Green
CLIP
I didn't mention the pocket clip before now. This is because the clip on the MKIII is a story onto itself. There was a pocket clip option for both the MKI and MKII. This was a Ti clip and backing hardware with SS metric screws. The clip itself was hard to install; especially with the poorly fitting but included metric Allen wrench. And, the associated hardware was of low quality. In my opinion, the Ti clip was a little too flimsy. And, in my experience, I had to repair several D11 clips by converting the hardware to 2-56.
The MKIII Ti clip kit is the same as the kit for the MKI and MKII. However, on the initial order of the MKIII FLS, the dealer asked NC to switch out the tiny Ti backing plate with a SS ring and update the clip to Ti oxide coated SS; with SS screws. Unfortunately, NC said one thing and did another; as they made the ring out of lower quality Al than the FL bodies.
Intended MKIII set up. Even new out-of-box, the SS screws are stripped in the soft Al ring. The fix from NC ("We are aware of this issue …") was to switch to the JetBeam (JB) BA 10 or PA 10 clip-on pocket clip. See UPDATE: 05-FEB-14 blow.
JB Substitute Clip
However, as of the writing of this article, the old Ti screw on clip kit is available. The original screw on NC clip was, and is Ti. The new screw on clip is a SS clip with Ti oxide coating from JetBeam. Per the Ti clip, yes, NC still included the low quality and poor fitting metric Allen wrench.
Original / Current NC Ti Clip Kit
If you can reuse or repair your backing plate, several clips from JB will work; though some have to be slightly modified. (Note: All of the clips pictured are all from SYSMAX, but may be hard to find.)
JB RRT01 Clip
Currently, the MKIII is available with or without a clip. If you order one with the clip, it will now come with the JB clip-on clip.
NC D11 V.2 – MKIII as originally received with JB screw-on clip
NC D11 V.2 – MKIII as currently available with JB clip-on clip
UPDATE: 08-FEB-14
A very limited number of custom aftermarket Biohazard Clips were available for all NC D11s, from JHanko, however they are no longer available.
Biohazard Clip
REVIEW
I wish that the dealer and NC would have teamed up to create and improved D11 V.2; rather than just clearing out old stock. For instance, the LED could have been upgraded to XP-G2, R5, or even XM-L2. Another too late idea is that a limited edition Ti body could have been produced. How about two tone, shiny Ti body with jet black Al head? The MKIII could have been the best D11 ever! That's not to say that the NC D11 V.2 MKIII is a poor quality flashlight. Despite the original clip issue, I find the FL very useful for day-to-day tasks; especially at work. In practical use, the MKIII has been my EDC since late December of 2013. Though the clip-on pocket clip is not as secure as the screw-on type, this can be seen as a safety issue. I'd rather have the clip come off and I accidently lose my flashlight to a machine then my leg; or worse – my life. However, I do wish that the clip-on clip retained better to the body of the little FL. Once in pocket, the clip grips very well.
Photography is not allowed in any of the laboratories in which I work. Therefore, the following real life example will be lacking pictures. I've used my NC D11 V.2 MKIII, at work, for inspection several times. The last time I used the D11 MKIII at work was during a bubble test. I used the FL to light the room temperature potable water bath which another technician and I were using to help us test. To avoid surface glare, and to the surprise of my fellow technician, I dropped my MKIII into the shallow bath. The light laid flat on the bottom of the tank with only one inch (2.54 cm) of water above it. Needing more light than I had originally set the D11 MKIII to, I actuated the FL's piston while the light was still submerged. The D11 MKIII was adjusted in this manner two more times and remained in the bath for just over ten minutes. After the FL had finished its lighting task, it was closely examined. Not a single drop of water had ingressed into the body or head.
After a week's time of both indoor (ambient) and outdoor (-17°F or -27 °C) use, follow up inspection showed no "fog" under the lens.
MKII Left and Center, MKIII Right, all fog free but with different tints
UPDATE: 05-FEB-14
The clip-on pocket clip for my D11 V.2 fell off today. Luckily, the FL fell into my pocket and I heard the musical sound of the clip hitting the floor. I rescued the clip and added heat shrink before reinstalling it.
Secure Clip
UPDATE: 08-NOV-14
BATTERY TEST
The same D11 V.2 MKIII was test with three (3) different battery chemistries. Relative peak lux (Lx - pk) readings at one (1) meter (m) were recorded with each battery type (lx/m - pk).
Format
Battery – Nominal Voltage
Lux Reading
1st
Panasonic Eneloop (HR-3UTGA) – 1.2V
1515
2nd
Energizer Lithium (L91) – 1.5V
1560
3rd
Titanium Innovations CR14505 (CRAA) – 3.0V
1630
4th (Emitter Upgrade to XP-L)
Titanium Innovations CR14505 (CRAA) – 3.0V
1915
BEAM SHOTS
Clockwise, starting from the upper left, are beam shots of: Nichia 219 (A), Stock CREE XP-G (R5), XP-L (≈ 5,000 °K), and Stock CREE XP-G (R5). All beam shots from NC D11.2 reflectors (LOP) and glass (anti-reflective).
The Nichia 219 (A) emitter upgrade was skillfully performed by our own JHanko.
The XP-L emitter upgrade (≈ 5,000 °K) was expertly performed by our own KDM; who can install any of several different emitter types and colors to suit your needs.
BATTERY UPDATE
I have an interesting battery update. The CR14505 lasted five months of daily but intermittent use in my NC D11.2 modified with an XP-L emitter. Most of the time, the emitter output was kept and used at its lowest setting. Usually, once a day, the output was at max; but only for short periods of time – about a minute. Occasionally, the output was set to the low-mid range; for longer periods – about ten minutes. I do not have actual hours of run time. This is the first CR14505 I had to replace. The battery read almost exactly 2.0 Vdc unloaded. (A week prior, I noticed a diminished output and verified the battery to be at 2.5 Vdc unloaded; just a half volt under the nominal battery voltage.)
The CR14505 could no longer run the LED at max. The a few days prior to replacing the battery, I noticed that the max output strobed and climbed to near the usual max output. I figured that the battery voltage was at the switching point of the buck/boost circuit. I was wrong.
Earlier today, when I tried to switch the output to max, the light blinked. Then it continually cycled from min to max and back. This action was very repeatable. I checked for a problem with the driver / pill, but found none. I checked the original battery and discovered an unloaded reading of 2.0 Vdc. I replaced the battery with a fresh CR14505 and now my light is working very dependably again.
Last edited: