
Warning: even more pic heavy than usual. :sweat:
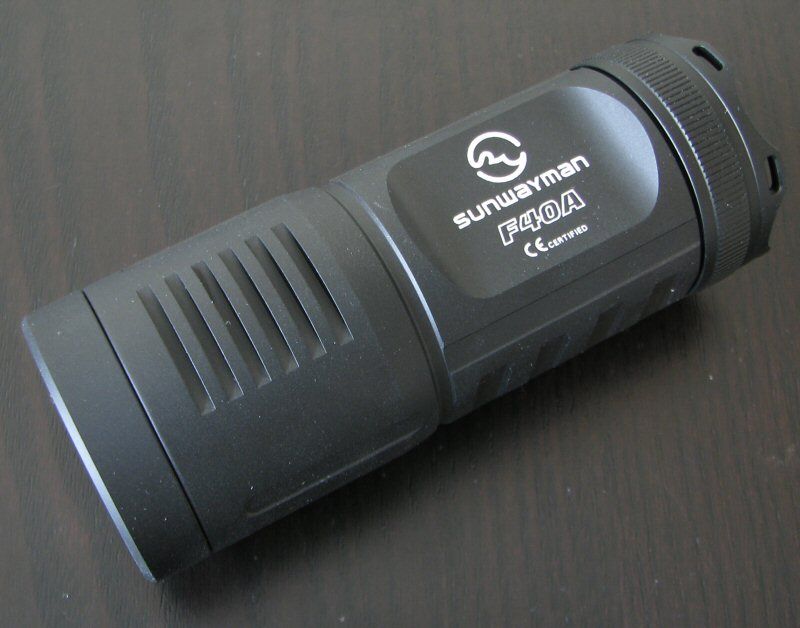
The F40A is the latest 4xAA light from Sunwayman, part of their new Falcon series that incorporates red and blue 5mm LEDs along with the main white XM-L2 emitter. The F40A differs from the other Falcon members I've tested (the F10R and F20C) in that it uses a dual electronic switch interface (i.e., similar to the D40A).
Let's see how it does against other 4xAA lights, including the popular D40A. :wave:
Manufacturer Reported Specifications:
(note: as always, these are simply what the manufacturer provides – scroll down to see my actual testing results).
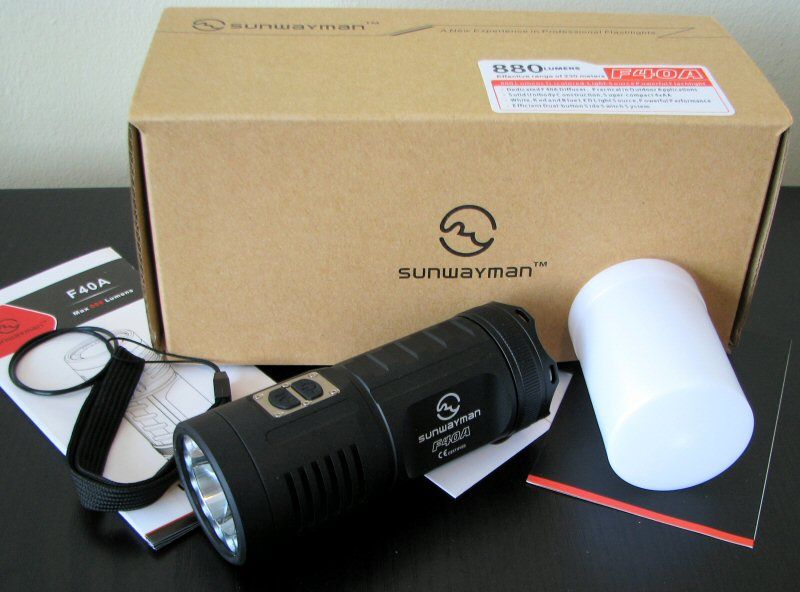
The F40A comes in the standard Sunwayman hard cardboard box packaging. The light and extras are well secured in hard packing material. Inside you will find the light, good quality lanyard with clip, extra o-ring, holster, manual, product insert and warranty card.
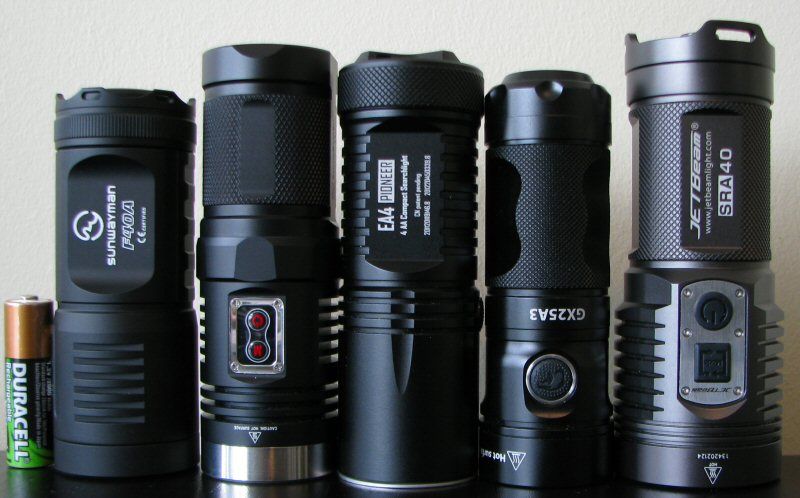
From left to right: Duracell NiMH; Sunwayman F40A, D40A; Nitecore EA4; Eagletac GX25A3; JetBeam SRA40.
All dimensions directly measured, and given with no batteries installed (unless indicated):
Sunwayman F40A 4xAA: Weight: 182.0g, Length: 109.3mm, Weight (bezel): 42.0mm
Sunwayman D40A 4xAA: Weight: 167.9g, Length: 120.4mm, Weight (bezel): 40.0mm
Sunwayman M40A 4xAA: Weight: 247.0g , Length: 145mm, Width 57.0mm (bezel)
Eagletac GX25A3 3xAA: Weight: 151.4g, Length: 109.2mm, Weight (bezel): 38.6mm
JetBeam PA40 4xAA: Weight: 184.0g, Length: 183mm, Width: 40.8mm (bezel), 42.1mm (max width)
JetBeam SRA40 4xAA: Weight 236.0g, Length: 126.1mm, Width (bezel): 48.5mm
Lumintop SD10: Weight: 117.6g, Length: 120.3mm, Width (bezel): 40.1mm
Nitecore EA4 4xAA: Weight: 161.6g , Length: 117.9mm, Width (bezel): 40.2mm
Olight S35 3xAA: Weight 177.3g, Length: 127.7mm, Width (bezel): 38.7mm
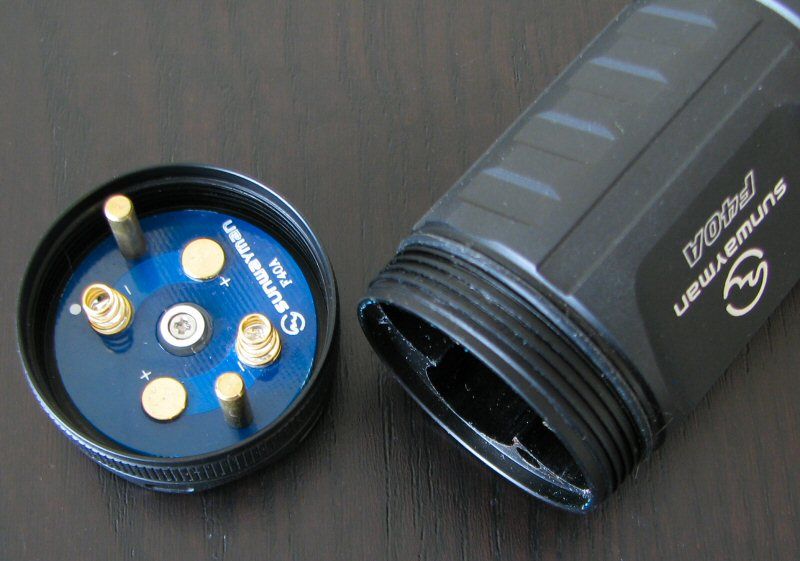
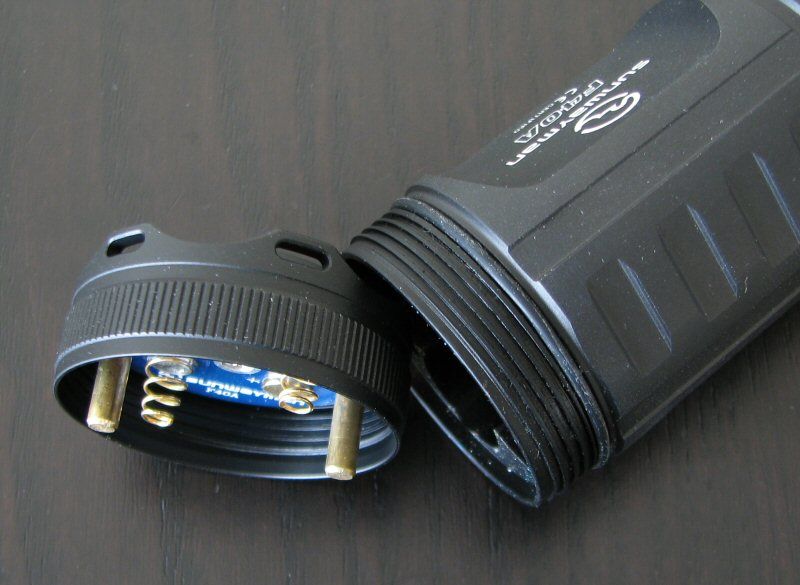


One of the main differences from the 4xAA D40A is that the new F40A doesn't use a battery carrier – the cells are integrated right into the handle. This means one less part contact point is needed, which contributes to making the overall width and length slightly smaller (although the width difference isn't great).
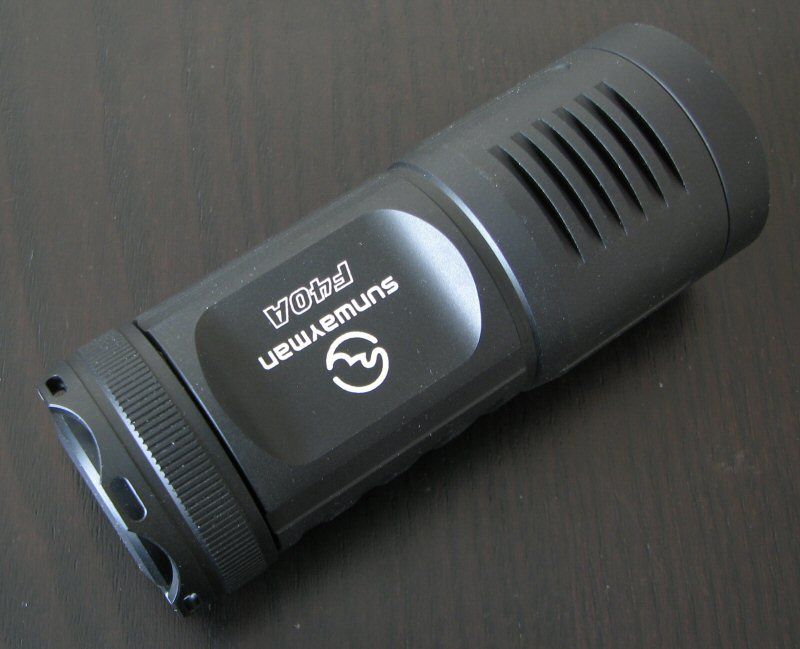
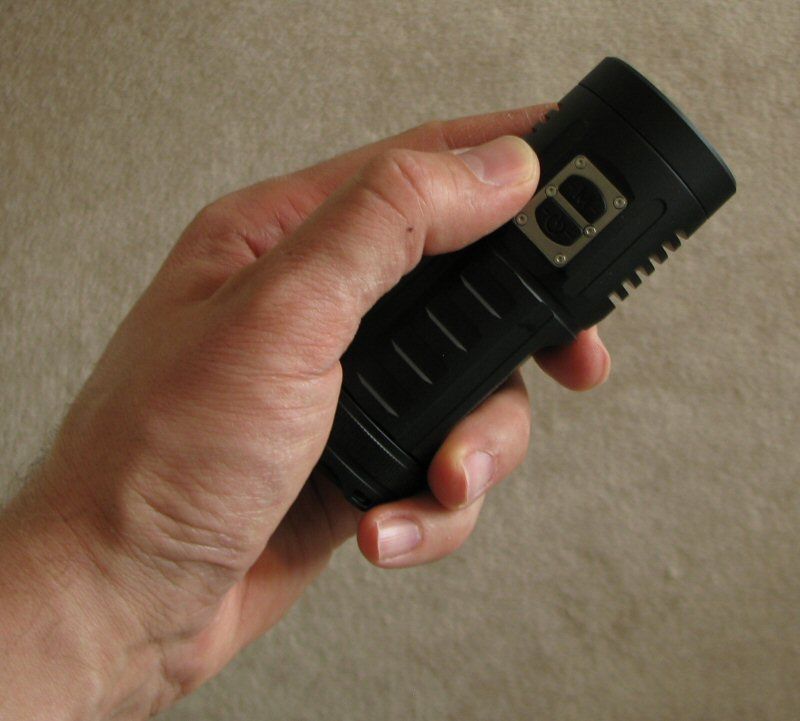
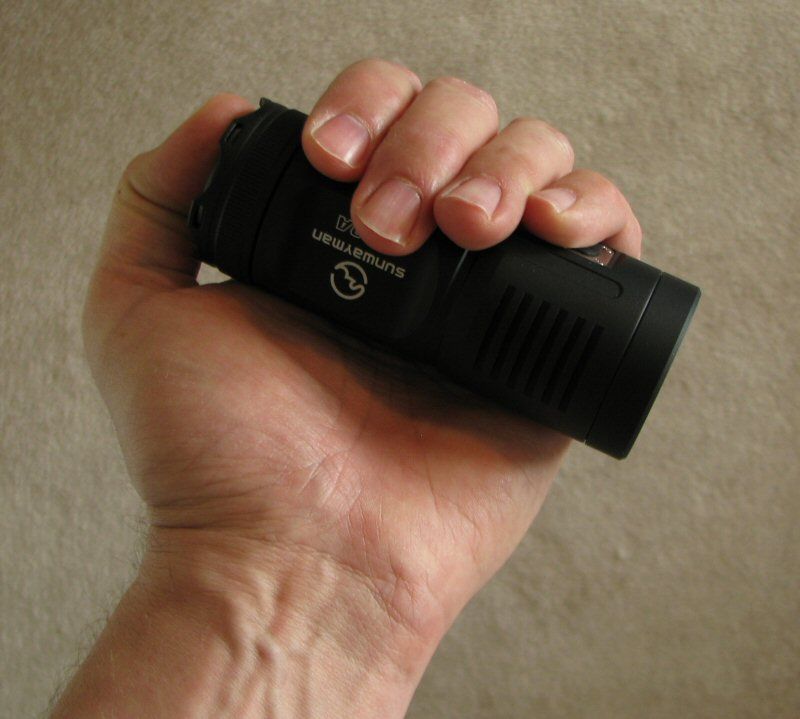
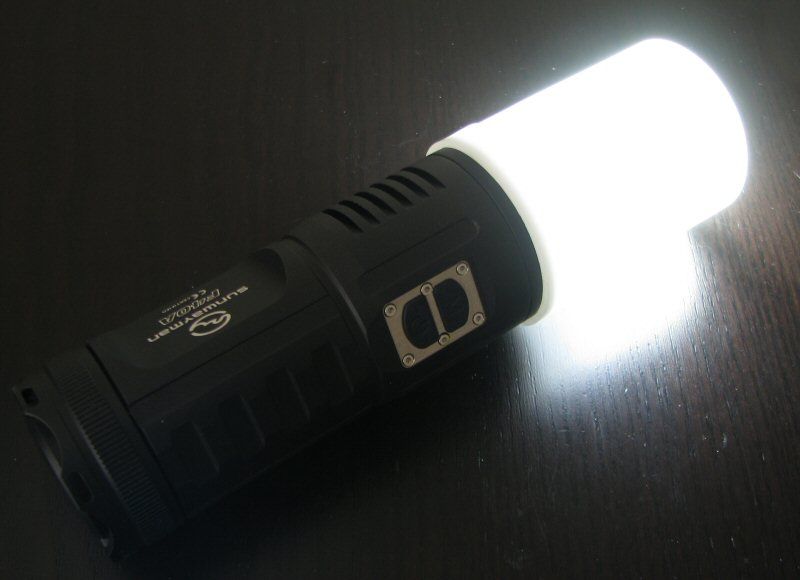
The overall build is different from the other Falcon-series lights I've reviewed. The F40A has much more matte-finishing, with a slightly "grippier" effect (although not as thick as the Armytek lights). There is no real knurling to speak of, but overall grip is style good thanks to all the ridge detail. Hand feel is very good – the light is very compact, and you find the buttons by touch alone fairly easily. Labels are bright white and very clear.
If I were to try and summarize the external build differences to the D40A, I would say the F40A feels more "rugged", whereas the D40A feels more "refined".")
Batteries are inserted directly into the handle, in series. Like with other lights in this class, there is contact plate in the tail that can spin to allow tailcap tightening. Simply line up the two tailcap posts with the corresponding holes on the body of the light
Tail screw threading is square cut (i.e., trapezoid) and is anodized – but that doesn't matter for lock-out, since it is the tension on the springs that control contact. Threading felt stiff on my sample on arrival, but extra lube helped – as did loosening the center screw on the contact board in the tail (i.e., too much resistance initially for turning).
The F40A can tailstand easily, thanks to the flat base. There are lanyard attachment points all along the tail, but these shouldn't interfere with tailstanding.
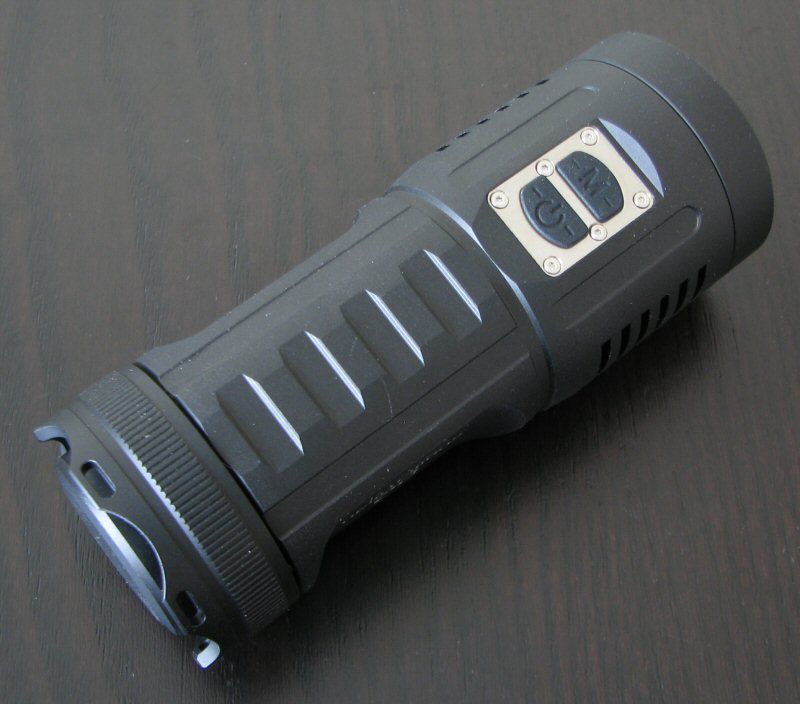
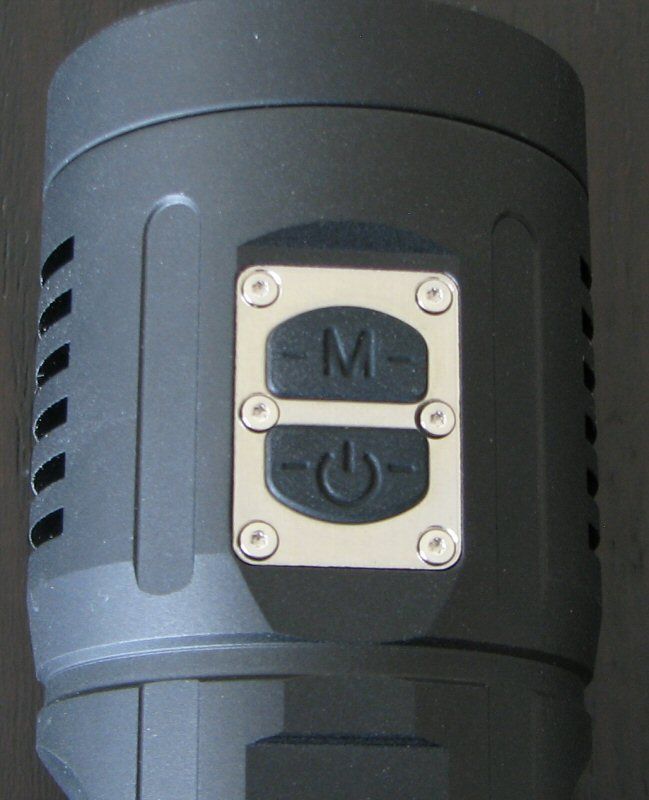
There is a dual-switch interface in the head to control the light. This has changed from the D40A, as there are now distinct (and rubberized) button covers over each switch. See User Interface below for more information.
The head of the light is certainly distinctive – although it does remind me of the original M40C.


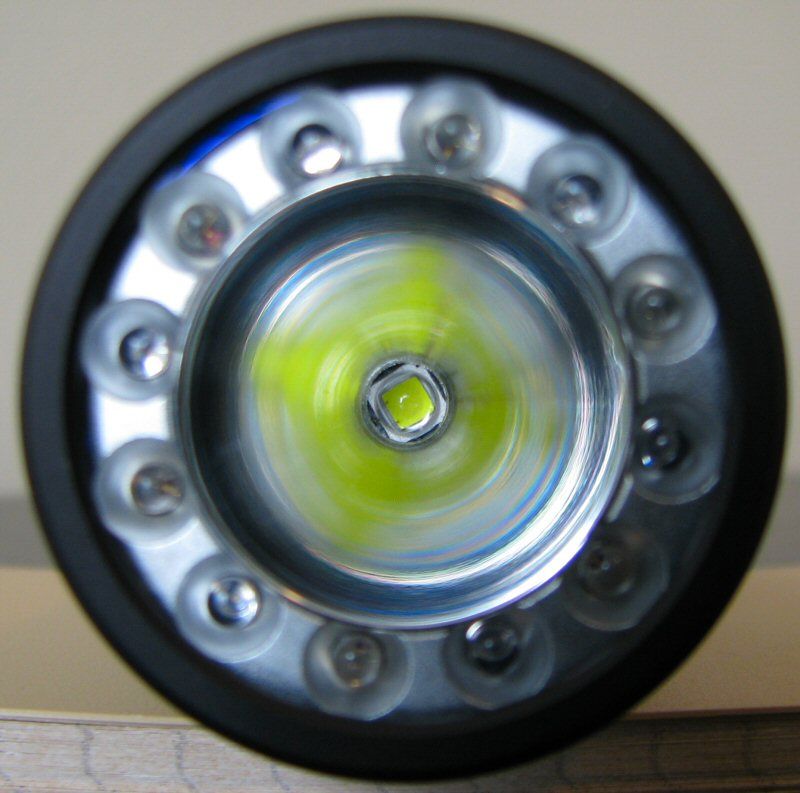
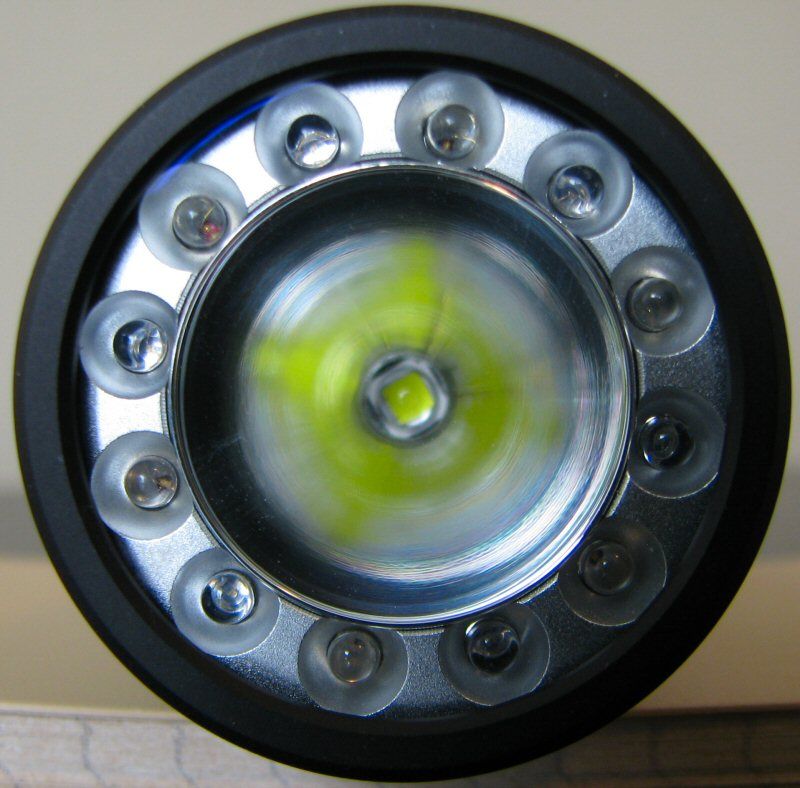
The main reflector for the XM-L2 emitter on the F40A is smooth finish, and relatively deep - although narrow, due to the ring of 5mm LEDs around the periphery. Red and blue LEDs are interspersed (i.e., red and blue are alternating). I've attempted a couple of different focusings above, to make this clear.
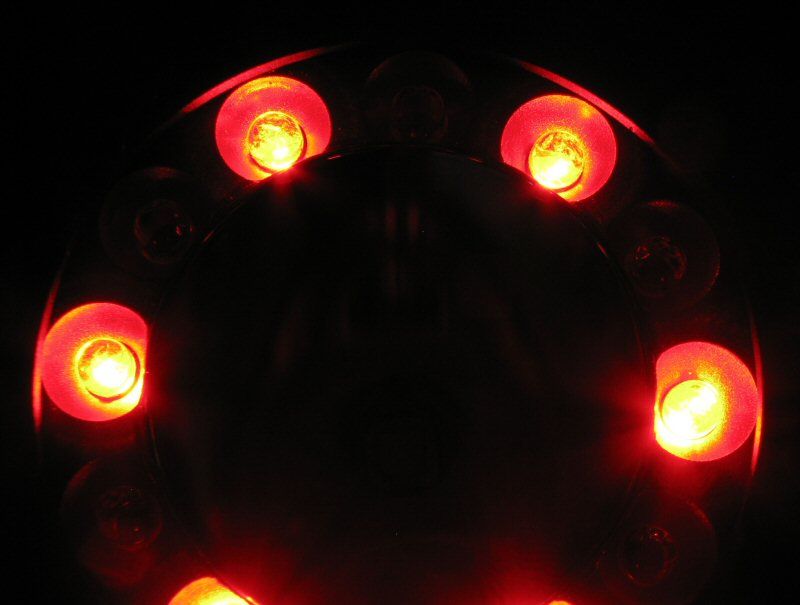
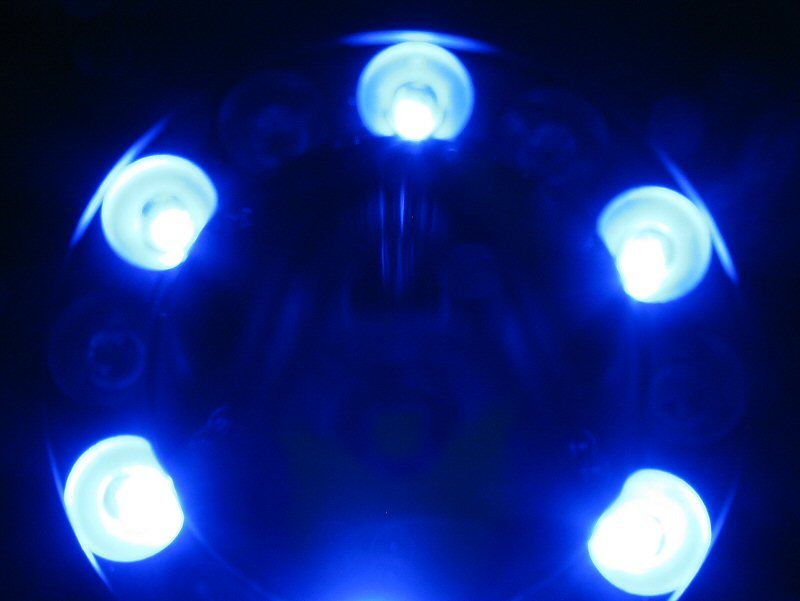
Here is what the red and blue LEDs look like when activated:
Scroll down for beamshots.
User Interface
The interface is generally similar to the D40A, but with some adaptations for the extra blue/red modes. Note that this interface is substantially different from the other Falcon-series lights I have reviewed (i.e., F10R and F20C), which use a single physical clicky switch and head twist.
As with the D40A, main operation is controlled by the lower Power switch – press and release (i.e., click) to turn the white light on at the previously memorized constant output level. While on, click the upper Mode switch repeatedly to cycle between the four main output levels in the following repeating sequence: Turbo > Hi > Med > Lo. As before, I personally would have preferred the other way round.
Turn the light off by clicking the Power switch again. As mentioned above, the light has mode memory, and will return to the last level used when turned back on from off. Note that if you set the light to a lower level, you can jump to Turbo mode directly by doing a quick double-click of the Power switch from Off.
The various "hidden" white emitter modes are where things deviate from the D40A.
Like the D40A, there is a Firefly/Moonlight mode on the F40A – only now you access it by pressing and holding the mode switch when On. As before, the light remembers this mode choice, and comes back to Firefly when you next activate the light normally. It is not part of the mode sequence cycle however.
Full power white emitter strobe is activated by double-clicking the Power switch. This works from both On and Off. A double-click on the Mode switch gives you white emitter SOS (but only when the light is turned on first).
For the colored emitters, these modes are activated b pressing and holding the Power switch for more than 2 secs. The light will activate in the last memorized colored mode.
Change modes by clicking the Mode switch. Colored mode sequence is Red > Blue > Red/Blue Strobe > Red/Blue/White Strobe, in repeating sequence. The Blue/Red strobing effect is very similar to that use by police services. Note that is may not be permissible for you to publicly use this sort of strobe mode in your local area. A lot of municipalities have restrictions on the use of emergency signals, and may not have much of a sense of humor about attempts to imitate police officers.
As with the D40A, press and hold both buttons for more than 2 secs to electronically lock-out the light. The same sequence is required to unlock the light.
Video:
For more information on the overall build and user interface, please see my video overview:
As with all my videos, I recommend you have annotations turned on. I commonly update the commentary with additional information or clarifications before publicly releasing the video.
PWM/Strobe
Reviewer's note: I have recently updated my oscilloscope software, so the traces below may look a little different from my earlier reviews.
There is no sign of PWM that I can see, at any output level – I believe the light is current-controlled.
White Strobe:
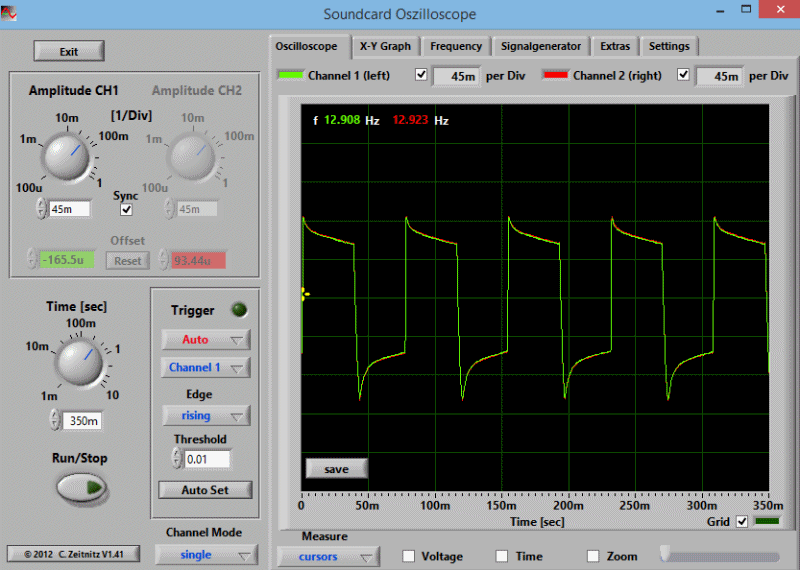
The main strobe is a standard high frequency strobe, measured at 13 Hz (which is similar to my D40A).
Color Strobes:
I haven't done oscilloscope traces for the red/blue strobes, but I have timed them (described below).
Red/Blue Strobe is really a rapidly pulsing strobe of each emitter over a ~1 sec period, alternating between red and blue. The result is that it looks a lot like a set of flashing police lights. Please see my warnings earlier in this review about using this sort of strobe in public.
The Red/Blue/White Strobe is the same as above, although with an additional full power rapid white flash every ~0.6 secs or so.
White SOS:

Standard SOS signal (dot-dot-dot, dash-dash-dash, dot-dot-dot), which completes in about 6 secs.
There is no beacon mode on the F40A.
Standby Drain
A standby current drain is inevitable on this light, due to the electronic switches. My old DMM recently stopped functioning on it uA port, and I am waiting on a replacement. Should be here in a few days – I'll update this review when it arrives.
In the meantime, the D40A is probably a pretty close comparable. On that light, I measured an initial drain of 1.71mA on first contact (for about ~3-4 secs), which then dropped down to an ultra-low 11.4uA until a button was pressed. This is negligible, and not a concern. Oddly, when measuring the locked out current, I got a persistent 311uA on the D40A. Not sure why it was higher.
I will update for the F40A in a few days.
Beamshots:
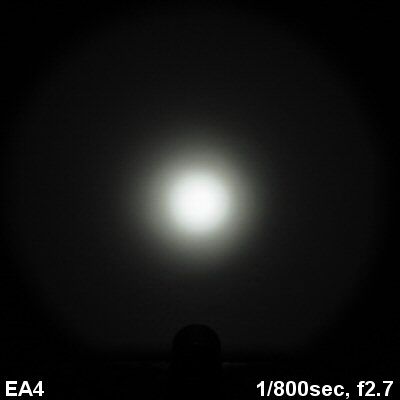
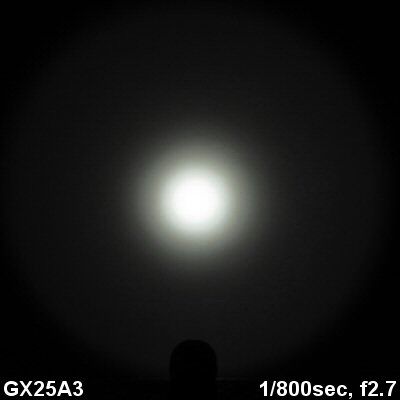
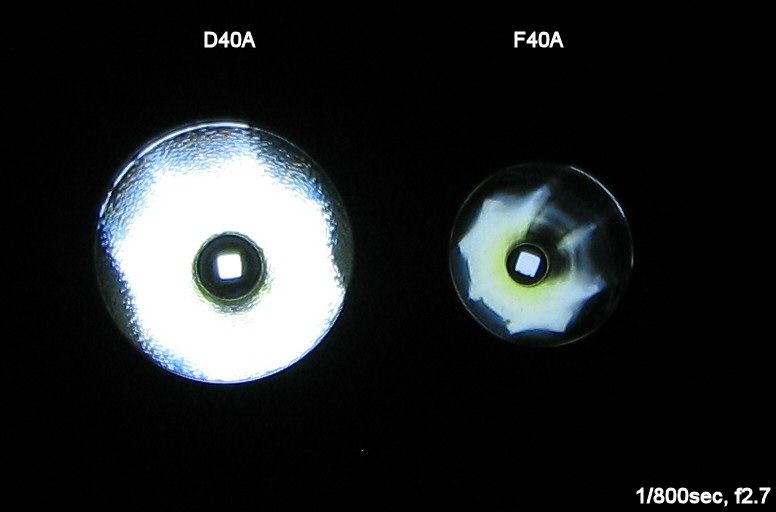
And now the white-wall beamshots. All lights are on Sanyo Eneloop NiMH (4x). Lights are about ~0.75 meter from a white wall (with the camera ~1.25 meters back from the wall). Automatic white balance on the camera, to minimize tint differences.
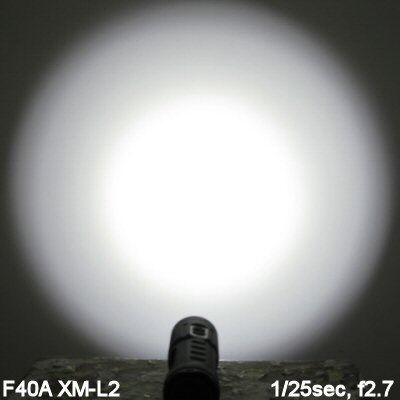
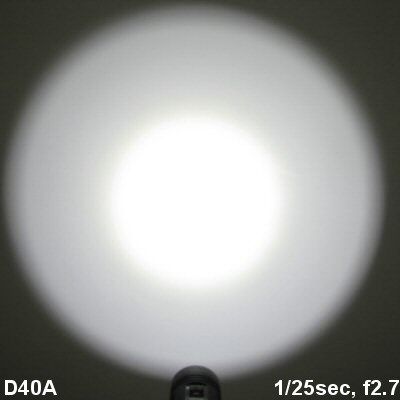
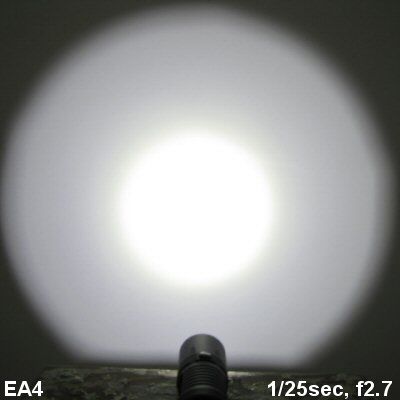
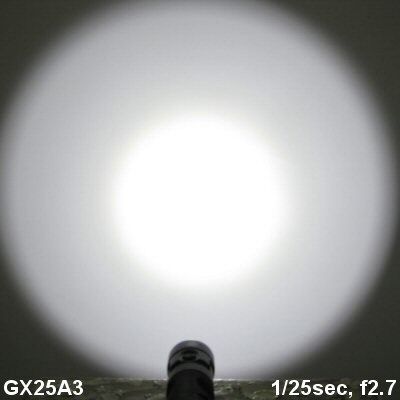
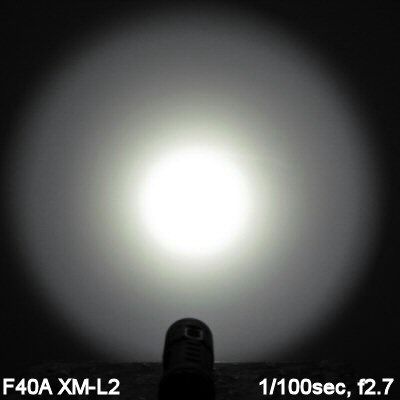
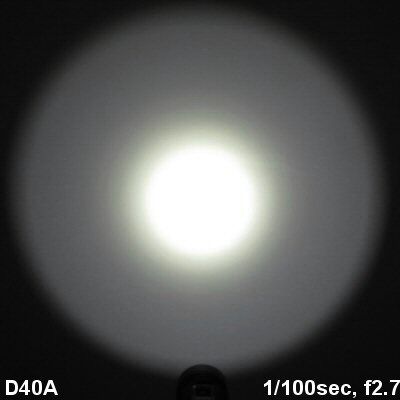
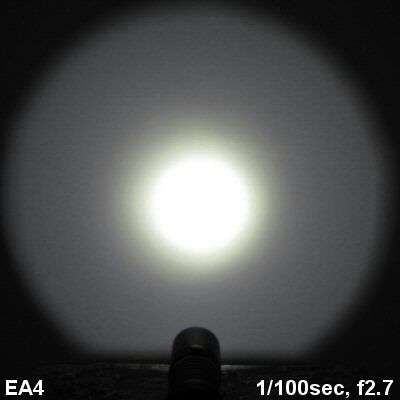
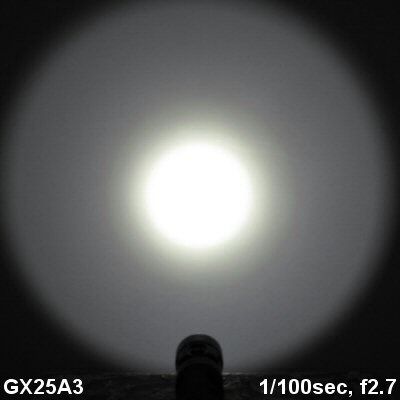
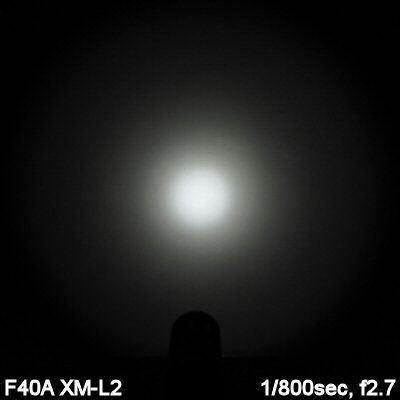
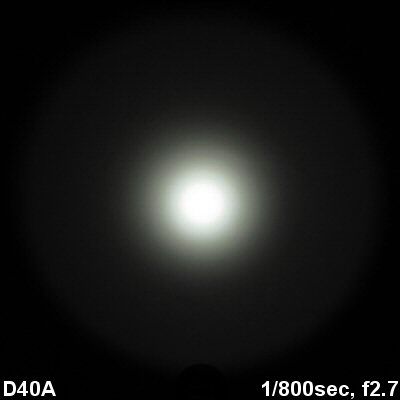
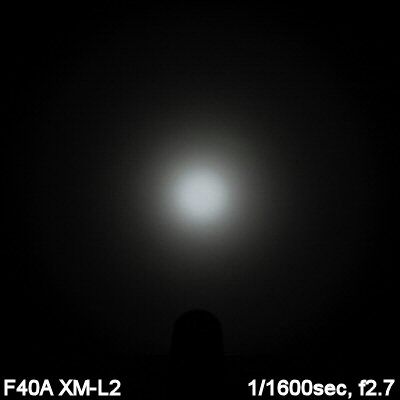
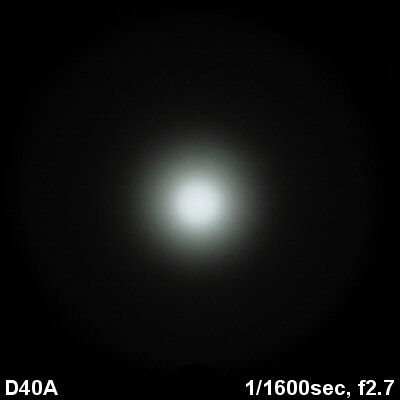
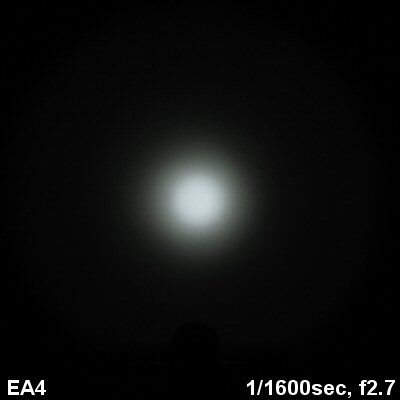

The overall beam pattern is similar to other lights in this class, although with a less intense hotspot on the F40A. Scroll down for my actual beam measures.
F40A Color modes:
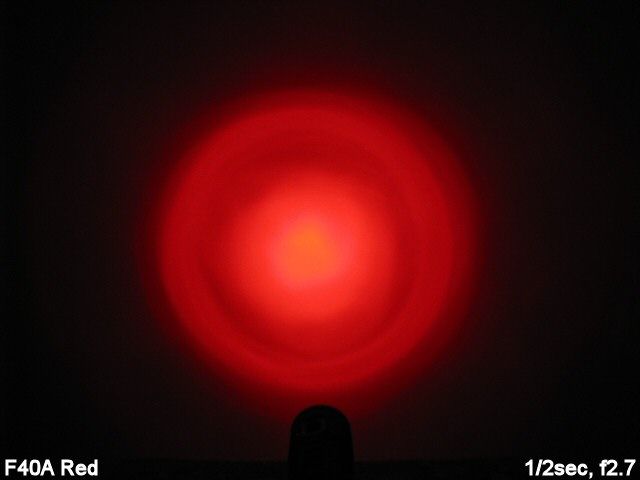
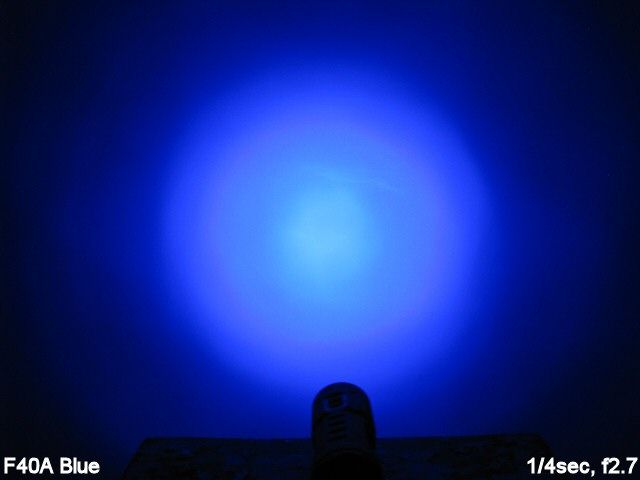
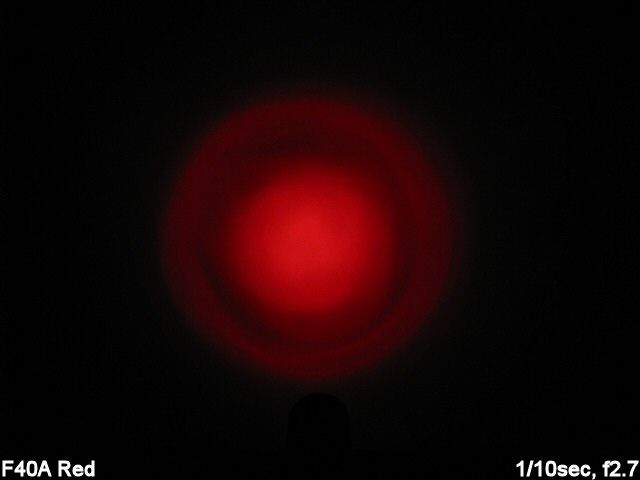
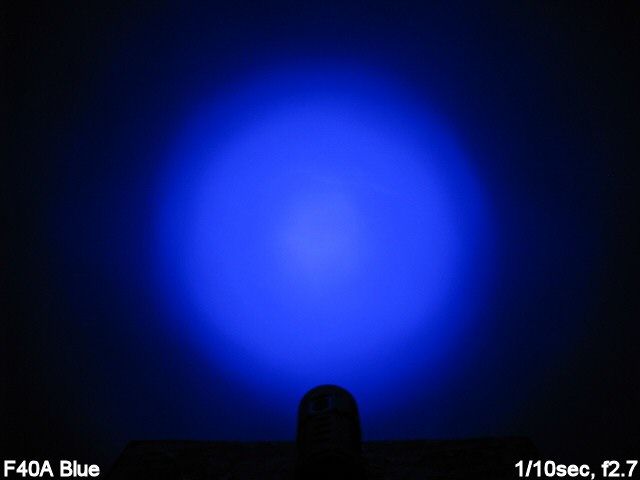
The relative intensity of the red and blue emitters seems much better balanced than on my F10R/F20C samples. I would describe the F40A as having a reasonable amount of light on both (although the F10R/F20C were brighter on blue – see that review for details).
Testing Method:
All my output numbers are relative for my home-made light box setup, as described on my flashlightreviews.ca website. You can directly compare all my relative output values from different reviews - i.e. an output value of "10" in one graph is the same as "10" in another. All runtimes are done under a cooling fan, except for any extended run Lo/Min modes (i.e. >12 hours) which are done without cooling.
I have devised a method for converting my lightbox relative output values (ROV) to estimated Lumens. See my How to convert Selfbuilt's Lightbox values to Lumens thread for more info.
Throw/Output Summary Chart:
My summary tables are reported in a manner consistent with the ANSI FL-1 standard for flashlight testing. Please see http://www.flashlightreviews.ca/FL1.htm for a discussion, and a description of all the terms used in these tables. Effective July 2012, I have updated all my Peak Intensity/Beam Distance measures with a NIST-certified Extech EA31 lightmeter (orange highlights).
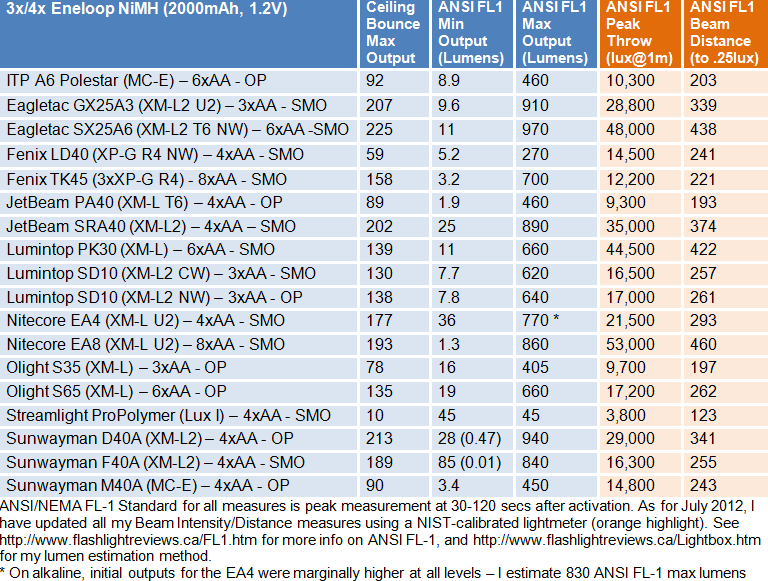
As you can see, despite its small size, the F40A has good max output (and reasonable throw). Of course, throw is lower than the D40A, due to the smaller relative reflector for the white emitter.
One other difference from the D40A is the common "1 lumen" low mode. Only having one sample of each light, it's hard to draw any conclusions here. But my relative output measure estimates are at least consistent across samples – and the F40A is a true ultra-low moonlight on my sample. Here's a couple of comparative beamshots, to show you the difference visually
Moonlight mode comparison:
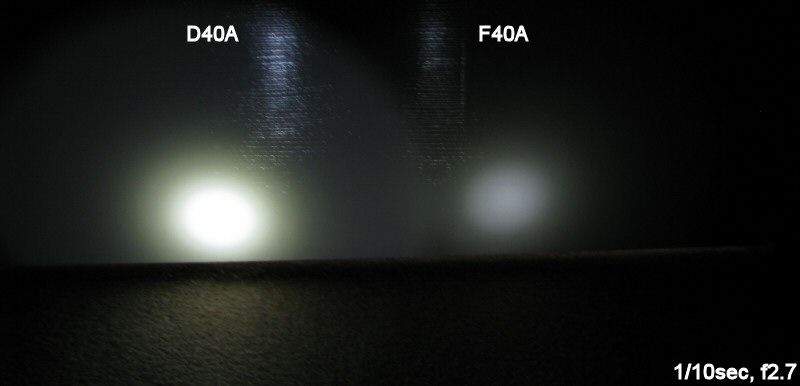
My F40A sample clearly has a much lower minimum output.
As for the red/blue LEDs, it's hard to provide reliable output estimates given the differing sensitivity of light meters to these wavelengths. 5mm LEDs are also relatively low output, further compounding the difficulty. Probably the best way I can describe it is that the brightness of each 5mm emitter is about "typical" here, so the five emitters put together make this reasonably bright for this class. But it is still nowhere near as bright as a typical single colored XP-E emitter (or, oddly, the blue emitters of the F10R/F20C).
Let's see how my white output estimates compare to the official Sunwayman ANSI-FL1 specs for this light:
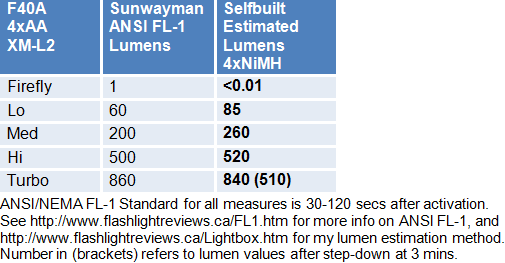
Note that the step-down feature (after 3 mins) actually steps you down directly to the Hi level. See runtimes below for more info.
Output/Runtime Graphs:
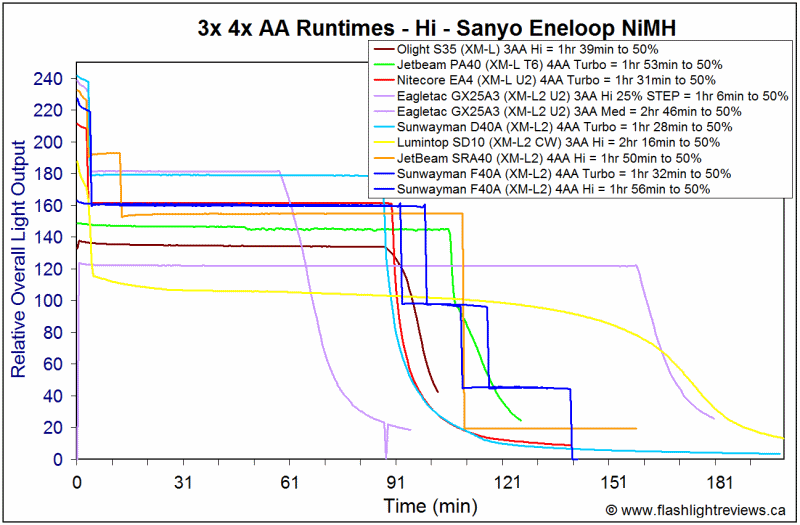
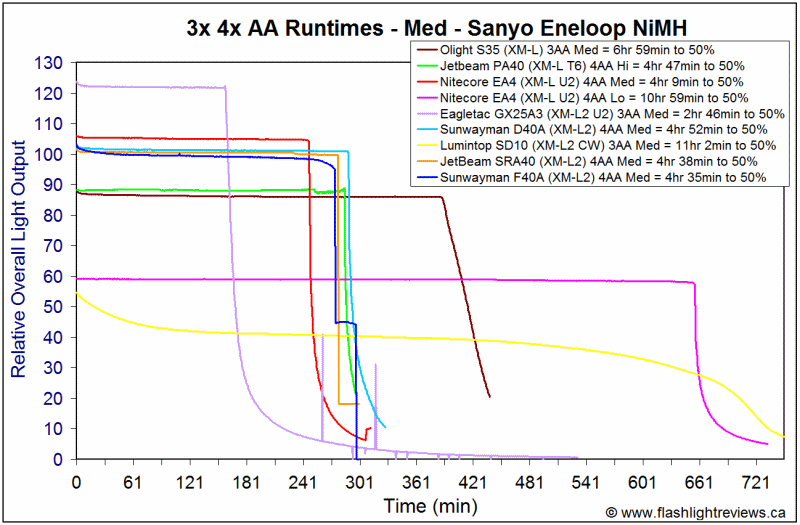
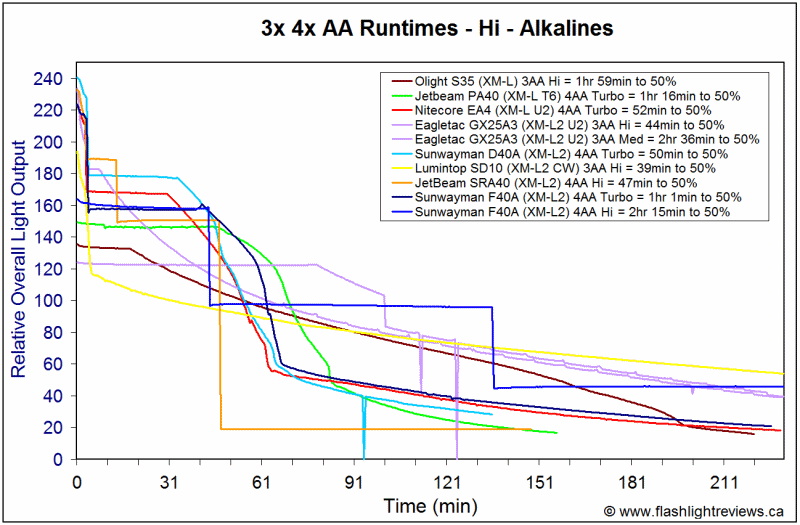
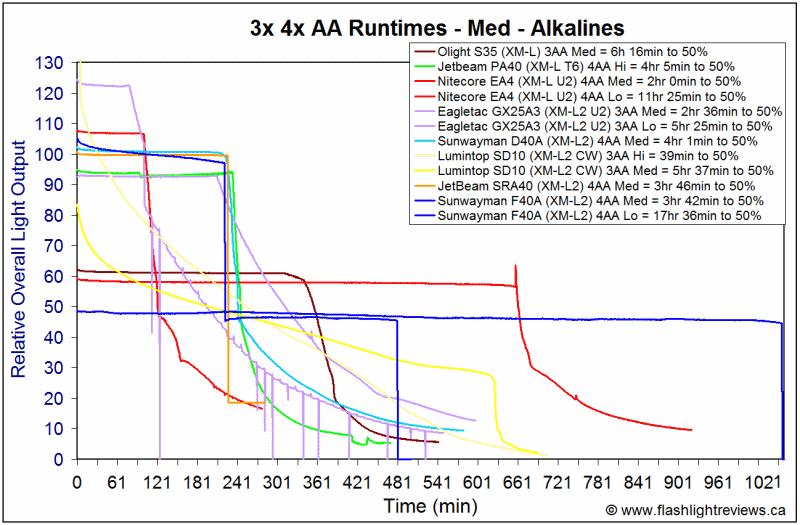

As you can tell from above, Sunwayman is using a good current-controlled circuit in the light. Performance is particularly good on alkalines, where both regulation and runtime are very impressive. The F40A has a more step-wise progression as the batteries drain (i.e., jumping down to the next lower level and maintaining regulation for an extended period). This allows you to better predict the battery charge status, and the relative amount of runtime left.
As with my D40A, the F40A has difficulty running at max output on L91 lithiums initially. The light repeatedly steps down every few seconds, requiring me to manually restart for several minutes (hence the messy initial traces above for these two lights). As before, I suspect the reason for this is that the voltage sensor detects fresh L91s (which can be ~1.7V) as outside the acceptable range for the light. Once you run down the L91s for a few minutes (at a lower level), enough capacity drains off so that you can run the light stably at the higher levels.
Potential Issues
Due to the electronic switch, there is a standby drain when not in use. This drain was negligible on my D40A – and I will update this review in a few days with the F40A results. Unfortunately, you cannot easily lock out the light physically on the F40A (i.e., need to almost completely unscrew the tailcap).
The light won't stay in Hi or Turbo on fresh L91 lithiums without rapidly stepping down. This appears to be an over-voltage issue, and resolves after several minutes of runtime (to drain off full capacity).
The light can roll fairly easily. Use of a lanyard should help.
Preliminary Observations
The F40A is another nice addition to the 4xAA battery class. Regardless of whether or not you need the red/blue 5mm LED modes, its performance as a XM-L2 white light is excellent. Generally similar to the D40A in interface, the F40A has a few refinements in circuit functioning. It also has in my view an improved user interface over the first two members of the Falcon series, the F10R and F20C.
Physically, the F40A is even smaller than the D40A (thanks to the smaller reflector and lack of battery carrier now). It also has a more "rugged" appearance, with thick matte finish anodizing. It's an impressive amount of light in a small package.
User interface is revised from the D40A, to take into account the red/blue modes of the F40A. I still find it relatively easy to use, once you remember than a press-and-hold of the power switch gives you the color modes. Switch design has changed from the D40A, with the F40A having a more typical electronic switch feel (as opposed to the "bubble" switch feel of the D40A).
Output/runtime performance remains excellent at all levels. Regulation pattern has changed from the D40A, as the light now steps down to the next defined level as the batteries run low (and maintains that regulated output for as long as possible). This appears to squeeze a little extra runtime in on all levels.
Main white beam pattern is good as well – while not as throwy as other lights in this class, the beam was still reasonably clean in my testing. I also personally like the range of output levels, although I would note that the Firefly/Moonlight level on my sample was unusually low (i.e. <0.01 lumens).
The red and blue modes provide a fair amount of light for the 5mm class of emitters, with relatively few artifacts. I am personally not sanguine about using the flashing red/blue mode – as these have evidently been designed to closely imitate emergency services. :shakehead It may be different where you live, but I'm pretty sure police in my area would not take kindly to someone trying to imitate their signals. In any case, the F40A is not overly bright on red/blue modes.
Flashing modes aside, the F40A is an excellent 4xAA white LED flashlight. It should compete very well with the other models out there – including Sunwayman's own D40A. Definitely a strong contender in the multi-AA class. :wave:
----
F40A was provided by Sunwayman for review.
The F40A is the latest 4xAA light from Sunwayman, part of their new Falcon series that incorporates red and blue 5mm LEDs along with the main white XM-L2 emitter. The F40A differs from the other Falcon members I've tested (the F10R and F20C) in that it uses a dual electronic switch interface (i.e., similar to the D40A).
Let's see how it does against other 4xAA lights, including the popular D40A. :wave:
Manufacturer Reported Specifications:
(note: as always, these are simply what the manufacturer provides – scroll down to see my actual testing results).
- LED: CREE XM-L2
- Runs on: 4 x AA batteries (batteries NOT included)
- Output mode/Runtime:
- Turbo: 880 lumens/.05 hrs (reverts to High mode after 3 minutes)
- High: 500 lumens/1.6 hrs
- Mid: 200 lumens/5 hrs
- Low: 60 lumens/13 hrs
- Firefly: 1 lumen/450 hrs (18.75 days
- Red LED: 28 lumens/11 hrs
- Blue LED: 20 lumens/15 hrs
- Peak beam intensity: 13,200 cd
- Maximum beam distance: 754.6 ft(230 m)
- Smooth polished reflector for optimal beam distances
- Made from aerospace grade aluminum
- Military specification Type III hard anodized
- Ultra clear tempered glass lens for clear beams
- Constant current circuit for constant output
- Electronic reverse polarity protection
- IPX-8 dust and waterproof
- Dimensions: Length: 4.25" (108mm), Body Diameter: 1.53" (39mm), Bezel Diameter: 1.61" (41mm)
- Weight: 6.38 oz (181g) (excluding batteries)
- MSRP: ~$90
The F40A comes in the standard Sunwayman hard cardboard box packaging. The light and extras are well secured in hard packing material. Inside you will find the light, good quality lanyard with clip, extra o-ring, holster, manual, product insert and warranty card.
From left to right: Duracell NiMH; Sunwayman F40A, D40A; Nitecore EA4; Eagletac GX25A3; JetBeam SRA40.
All dimensions directly measured, and given with no batteries installed (unless indicated):
Sunwayman F40A 4xAA: Weight: 182.0g, Length: 109.3mm, Weight (bezel): 42.0mm
Sunwayman D40A 4xAA: Weight: 167.9g, Length: 120.4mm, Weight (bezel): 40.0mm
Sunwayman M40A 4xAA: Weight: 247.0g , Length: 145mm, Width 57.0mm (bezel)
Eagletac GX25A3 3xAA: Weight: 151.4g, Length: 109.2mm, Weight (bezel): 38.6mm
JetBeam PA40 4xAA: Weight: 184.0g, Length: 183mm, Width: 40.8mm (bezel), 42.1mm (max width)
JetBeam SRA40 4xAA: Weight 236.0g, Length: 126.1mm, Width (bezel): 48.5mm
Lumintop SD10: Weight: 117.6g, Length: 120.3mm, Width (bezel): 40.1mm
Nitecore EA4 4xAA: Weight: 161.6g , Length: 117.9mm, Width (bezel): 40.2mm
Olight S35 3xAA: Weight 177.3g, Length: 127.7mm, Width (bezel): 38.7mm
One of the main differences from the 4xAA D40A is that the new F40A doesn't use a battery carrier – the cells are integrated right into the handle. This means one less part contact point is needed, which contributes to making the overall width and length slightly smaller (although the width difference isn't great).
The overall build is different from the other Falcon-series lights I've reviewed. The F40A has much more matte-finishing, with a slightly "grippier" effect (although not as thick as the Armytek lights). There is no real knurling to speak of, but overall grip is style good thanks to all the ridge detail. Hand feel is very good – the light is very compact, and you find the buttons by touch alone fairly easily. Labels are bright white and very clear.
If I were to try and summarize the external build differences to the D40A, I would say the F40A feels more "rugged", whereas the D40A feels more "refined".
Batteries are inserted directly into the handle, in series. Like with other lights in this class, there is contact plate in the tail that can spin to allow tailcap tightening. Simply line up the two tailcap posts with the corresponding holes on the body of the light
Tail screw threading is square cut (i.e., trapezoid) and is anodized – but that doesn't matter for lock-out, since it is the tension on the springs that control contact. Threading felt stiff on my sample on arrival, but extra lube helped – as did loosening the center screw on the contact board in the tail (i.e., too much resistance initially for turning).
The F40A can tailstand easily, thanks to the flat base. There are lanyard attachment points all along the tail, but these shouldn't interfere with tailstanding.
There is a dual-switch interface in the head to control the light. This has changed from the D40A, as there are now distinct (and rubberized) button covers over each switch. See User Interface below for more information.
The head of the light is certainly distinctive – although it does remind me of the original M40C.
The main reflector for the XM-L2 emitter on the F40A is smooth finish, and relatively deep - although narrow, due to the ring of 5mm LEDs around the periphery. Red and blue LEDs are interspersed (i.e., red and blue are alternating). I've attempted a couple of different focusings above, to make this clear.
Here is what the red and blue LEDs look like when activated:
Scroll down for beamshots.
User Interface
The interface is generally similar to the D40A, but with some adaptations for the extra blue/red modes. Note that this interface is substantially different from the other Falcon-series lights I have reviewed (i.e., F10R and F20C), which use a single physical clicky switch and head twist.
As with the D40A, main operation is controlled by the lower Power switch – press and release (i.e., click) to turn the white light on at the previously memorized constant output level. While on, click the upper Mode switch repeatedly to cycle between the four main output levels in the following repeating sequence: Turbo > Hi > Med > Lo. As before, I personally would have preferred the other way round.
Turn the light off by clicking the Power switch again. As mentioned above, the light has mode memory, and will return to the last level used when turned back on from off. Note that if you set the light to a lower level, you can jump to Turbo mode directly by doing a quick double-click of the Power switch from Off.
The various "hidden" white emitter modes are where things deviate from the D40A.
Like the D40A, there is a Firefly/Moonlight mode on the F40A – only now you access it by pressing and holding the mode switch when On. As before, the light remembers this mode choice, and comes back to Firefly when you next activate the light normally. It is not part of the mode sequence cycle however.
Full power white emitter strobe is activated by double-clicking the Power switch. This works from both On and Off. A double-click on the Mode switch gives you white emitter SOS (but only when the light is turned on first).
For the colored emitters, these modes are activated b pressing and holding the Power switch for more than 2 secs. The light will activate in the last memorized colored mode.
Change modes by clicking the Mode switch. Colored mode sequence is Red > Blue > Red/Blue Strobe > Red/Blue/White Strobe, in repeating sequence. The Blue/Red strobing effect is very similar to that use by police services. Note that is may not be permissible for you to publicly use this sort of strobe mode in your local area. A lot of municipalities have restrictions on the use of emergency signals, and may not have much of a sense of humor about attempts to imitate police officers.
As with the D40A, press and hold both buttons for more than 2 secs to electronically lock-out the light. The same sequence is required to unlock the light.
Video:
For more information on the overall build and user interface, please see my video overview:
As with all my videos, I recommend you have annotations turned on. I commonly update the commentary with additional information or clarifications before publicly releasing the video.
PWM/Strobe
Reviewer's note: I have recently updated my oscilloscope software, so the traces below may look a little different from my earlier reviews.
There is no sign of PWM that I can see, at any output level – I believe the light is current-controlled.
White Strobe:
The main strobe is a standard high frequency strobe, measured at 13 Hz (which is similar to my D40A).
Color Strobes:
I haven't done oscilloscope traces for the red/blue strobes, but I have timed them (described below).
Red/Blue Strobe is really a rapidly pulsing strobe of each emitter over a ~1 sec period, alternating between red and blue. The result is that it looks a lot like a set of flashing police lights. Please see my warnings earlier in this review about using this sort of strobe in public.
The Red/Blue/White Strobe is the same as above, although with an additional full power rapid white flash every ~0.6 secs or so.
White SOS:
Standard SOS signal (dot-dot-dot, dash-dash-dash, dot-dot-dot), which completes in about 6 secs.
There is no beacon mode on the F40A.
Standby Drain
A standby current drain is inevitable on this light, due to the electronic switches. My old DMM recently stopped functioning on it uA port, and I am waiting on a replacement. Should be here in a few days – I'll update this review when it arrives.
In the meantime, the D40A is probably a pretty close comparable. On that light, I measured an initial drain of 1.71mA on first contact (for about ~3-4 secs), which then dropped down to an ultra-low 11.4uA until a button was pressed. This is negligible, and not a concern. Oddly, when measuring the locked out current, I got a persistent 311uA on the D40A. Not sure why it was higher.
I will update for the F40A in a few days.
Beamshots:
And now the white-wall beamshots.
All lights are on Sanyo Eneloop NiMH (4x). Lights are about ~0.75 meter from a white wall (with the camera ~1.25 meters back from the wall). Automatic white balance on the camera, to minimize tint differences.
The overall beam pattern is similar to other lights in this class, although with a less intense hotspot on the F40A. Scroll down for my actual beam measures.
F40A Color modes:
The relative intensity of the red and blue emitters seems much better balanced than on my F10R/F20C samples. I would describe the F40A as having a reasonable amount of light on both (although the F10R/F20C were brighter on blue – see that review for details).
Testing Method:
All my output numbers are relative for my home-made light box setup, as described on my flashlightreviews.ca website. You can directly compare all my relative output values from different reviews - i.e. an output value of "10" in one graph is the same as "10" in another. All runtimes are done under a cooling fan, except for any extended run Lo/Min modes (i.e. >12 hours) which are done without cooling.
I have devised a method for converting my lightbox relative output values (ROV) to estimated Lumens. See my How to convert Selfbuilt's Lightbox values to Lumens thread for more info.
Throw/Output Summary Chart:
My summary tables are reported in a manner consistent with the ANSI FL-1 standard for flashlight testing. Please see http://www.flashlightreviews.ca/FL1.htm for a discussion, and a description of all the terms used in these tables. Effective July 2012, I have updated all my Peak Intensity/Beam Distance measures with a NIST-certified Extech EA31 lightmeter (orange highlights).
As you can see, despite its small size, the F40A has good max output (and reasonable throw). Of course, throw is lower than the D40A, due to the smaller relative reflector for the white emitter.
One other difference from the D40A is the common "1 lumen" low mode. Only having one sample of each light, it's hard to draw any conclusions here. But my relative output measure estimates are at least consistent across samples – and the F40A is a true ultra-low moonlight on my sample. Here's a couple of comparative beamshots, to show you the difference visually
Moonlight mode comparison:
My F40A sample clearly has a much lower minimum output.
As for the red/blue LEDs, it's hard to provide reliable output estimates given the differing sensitivity of light meters to these wavelengths. 5mm LEDs are also relatively low output, further compounding the difficulty. Probably the best way I can describe it is that the brightness of each 5mm emitter is about "typical" here, so the five emitters put together make this reasonably bright for this class. But it is still nowhere near as bright as a typical single colored XP-E emitter (or, oddly, the blue emitters of the F10R/F20C).
Let's see how my white output estimates compare to the official Sunwayman ANSI-FL1 specs for this light:
Note that the step-down feature (after 3 mins) actually steps you down directly to the Hi level. See runtimes below for more info.
Output/Runtime Graphs:
As you can tell from above, Sunwayman is using a good current-controlled circuit in the light. Performance is particularly good on alkalines, where both regulation and runtime are very impressive. The F40A has a more step-wise progression as the batteries drain (i.e., jumping down to the next lower level and maintaining regulation for an extended period). This allows you to better predict the battery charge status, and the relative amount of runtime left.
As with my D40A, the F40A has difficulty running at max output on L91 lithiums initially. The light repeatedly steps down every few seconds, requiring me to manually restart for several minutes (hence the messy initial traces above for these two lights). As before, I suspect the reason for this is that the voltage sensor detects fresh L91s (which can be ~1.7V) as outside the acceptable range for the light. Once you run down the L91s for a few minutes (at a lower level), enough capacity drains off so that you can run the light stably at the higher levels.
Potential Issues
Due to the electronic switch, there is a standby drain when not in use. This drain was negligible on my D40A – and I will update this review in a few days with the F40A results. Unfortunately, you cannot easily lock out the light physically on the F40A (i.e., need to almost completely unscrew the tailcap).
The light won't stay in Hi or Turbo on fresh L91 lithiums without rapidly stepping down. This appears to be an over-voltage issue, and resolves after several minutes of runtime (to drain off full capacity).
The light can roll fairly easily. Use of a lanyard should help.
Preliminary Observations
The F40A is another nice addition to the 4xAA battery class. Regardless of whether or not you need the red/blue 5mm LED modes, its performance as a XM-L2 white light is excellent. Generally similar to the D40A in interface, the F40A has a few refinements in circuit functioning. It also has in my view an improved user interface over the first two members of the Falcon series, the F10R and F20C.
Physically, the F40A is even smaller than the D40A (thanks to the smaller reflector and lack of battery carrier now). It also has a more "rugged" appearance, with thick matte finish anodizing. It's an impressive amount of light in a small package.
User interface is revised from the D40A, to take into account the red/blue modes of the F40A. I still find it relatively easy to use, once you remember than a press-and-hold of the power switch gives you the color modes. Switch design has changed from the D40A, with the F40A having a more typical electronic switch feel (as opposed to the "bubble" switch feel of the D40A).
Output/runtime performance remains excellent at all levels. Regulation pattern has changed from the D40A, as the light now steps down to the next defined level as the batteries run low (and maintains that regulated output for as long as possible). This appears to squeeze a little extra runtime in on all levels.
Main white beam pattern is good as well – while not as throwy as other lights in this class, the beam was still reasonably clean in my testing. I also personally like the range of output levels, although I would note that the Firefly/Moonlight level on my sample was unusually low (i.e. <0.01 lumens).
The red and blue modes provide a fair amount of light for the 5mm class of emitters, with relatively few artifacts. I am personally not sanguine about using the flashing red/blue mode – as these have evidently been designed to closely imitate emergency services. :shakehead It may be different where you live, but I'm pretty sure police in my area would not take kindly to someone trying to imitate their signals. In any case, the F40A is not overly bright on red/blue modes.
Flashing modes aside, the F40A is an excellent 4xAA white LED flashlight. It should compete very well with the other models out there – including Sunwayman's own D40A. Definitely a strong contender in the multi-AA class. :wave:
----
F40A was provided by Sunwayman for review.
Last edited:

