My First Homemade Space Needle II !

milkyspit

Flashlight Enthusiast
Joined
Sep 21, 2002
Messages
4,909
Location
New Jersey
Last night I completed my first homemade Space Needle II. I worked on this thing with great care, being my first effort at building one (and not wanting the emitter to burn itself up). When I finally powered it up, it worked! /ubbthreads/images/graemlins/blush.gif

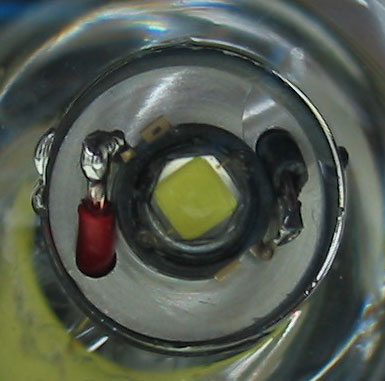
Then I saw that the emitter I chose was the one with a little blue spot in the corner.

/ubbthreads/images/graemlins/icon23.gif

After a good night's sleep, I realized that the light is still pretty good. Outside you don't see the color irregularity, and the throw is great! Plus the heatsinking seems to be doing its job. Being of good Germanic stock /ubbthreads/images/graemlins/wink.gif, I sanded the inside of the battery tube until the Hotlips-C JUST barely wiggled its way into place. I also used a couple relatively stout wires... in fact, I needed to drill the holes through the heatsink a little wider to get the wires to fit, and bending the wires into position for soldering was a mess. I bent the leads on the emitter to the sides to meet the wires, which looks a bit strange but seems to work fine.

Here's a photo of the head end of the light...
image-cpf-homemade-snii-1.jpg


Another photo, this time a closeup of my mediocre workmanship...
image-cpf-homemade-snii-2.jpg


Around dinnertime I tested with the light meter, though I was too lazy to fiddle with finding the optimum focus. Still, it put out 7300 lux on fresh cells, which was pretty nice!

Parts used: Mag 2C (of course), Hotlips-C heatsink, V2T emitter, UCL lens, Arctic Alumina thermal epoxy, 22 gauge stranded copper wire.

I'm already planning my next Mag 2C mod, heh heh...
 

MR Bulk

Flashaholic
Joined
Aug 12, 2002
Messages
6,059
Location
Hawaii
Acrylite will rid you of the blue spot, it becomes just a blue haze in the corner...
 

paulr

Flashaholic
Joined
Mar 29, 2003
Messages
10,832
I've never understood the purpose of the Hotlips in the SN2 (I mean why the finned heatsink instead of a solid slug, since there's no convection inside the Mag tube). Was there ever any consensus about that?

How much work is it to make one of those if you haven't done it before? What tools do you need? I'm kind of interested in trying.
 

hotbeam

Flashlight Enthusiast
Joined
Jan 2, 2003
Messages
1,737
Location
Melb, AU
Paulr, FYI, Hotlips is a solid heatsink. No fins here /ubbthreads/images/graemlins/grin.gif
 

Rothrandir

Flashaholic
Joined
Aug 17, 2002
Messages
7,795
Location
US
paul, as hotty said, the hotlips is a solid slug.
well, sort of.

in addition to the solid slug, it has a shroud that goes down around the bulb post to further improve thermal contact.

i believe you are thinking of a different kind of heastink.
i know charlie made some dcell mags with finned heatsinks, but i'm uncertain if he did it with ccelled ones.

my first several mag mods were using finned heatsinks, because that is all there was available. after i got my lathe i started making my own.
hotbeam liked the design and offered to do a run of them /ubbthreads/images/graemlins/grin.gif
 

milkyspit

Flashlight Enthusiast
Joined
Sep 21, 2002
Messages
4,909
Location
New Jersey
[ QUOTE ]
paulr said:
How much work is it to make one of those if you haven't done it before? What tools do you need? I'm kind of interested in trying.

[/ QUOTE ]

Mine took a few hours, but I was working very slowly and carefully. I didn't want to screw up due to haste. /ubbthreads/images/graemlins/grin.gif

Here's a rough guide to the mod...

SUPPLIES:

Mag 2C
Hotlips-C heatsink
5W emitter (no star)
FlashlightLens.com UCL tempered glass lens (optional)
2C-to-3x123 adapter (can make your own)
Arctic Alumina thermal epoxy
Some decent wire

TOOLS:

Needlenose pliers
Allen wrench (not sure which size)
Big tweezers (optional but might help)
Soldering iron
Dremel with grinding wheel (sandpaper works but is tedious)
Hacksaw (I used a Dremel cutoff wheel)

PROCEDURE:

1. Remove the head and tailcap.
2. Pinch the rubber switch boot with the pliers, and gently pull it out of the flashlight, exposing the switch.
3. Stick the Allen wrench into the switch's center, and loosen the hex bolt until the entire switch assembly falls down the battery tube. Remove the switch assembly from the bottom of the light.
4. Remove the bulb post. I cutoff half of the plastic part. Not sure you need to do that, but it does work!
5. Sand inside the top of the battery tube until the heatsink fits snugly inside.
6. Cleanup your mess from all the sanding.
7. Solder wires to the metal contacts rising out of the switch assembly.
8. Epoxy the emitter to the raised area of the heatsink, taking care to center the LED die as best you can. Gently press the emitter into the epoxy to get as tight a mating as possible. Let it cure. BE PATIENT!
9. Thread the wires through holes in the heatsink.
10. Solder wires to the appropriate leads on the emitter.
11. Hacksaw the cam off the bottom of the Mag reflector.
12. CAREFULLY put everything together again, making sure the reflector clears the sides of the heatsink's center when the head is screwed all the way inward.

[ QUOTE ]
Rothrandir said:
in addition to the solid slug, it has a shroud that goes down around the bulb post to further improve thermal contact.


[/ QUOTE ]

I cutoff half of the bulb post... that is, the PLASTIC part of the bulb post, after removing the springloaded metal portion. Not sure if I had to do that, but it gave me more room down there for the wiring. I also drilled a couple holes in the sides of the remaining portion of plastic post, then threaded the wires through them, which removed any stress on the solder connections to the switch assembly when pulling the wires out of the light. I think THAT part at least is a good thing to do.
 

Ginseng

Flashlight Enthusiast
Joined
Feb 27, 2003
Messages
3,734
Nice work and writeup Scott. You fared a little better than I did when I built my first Megaclops knockoff. I broke both leads off the emitter. Still managed to solder on and make a connection to the stubs though. Whew!

Wilkey
 

richpalm

Banned
Joined
Jun 21, 2003
Messages
965
Location
Central Pa.
Scott! Mediocre my arse! Looks good-with thicker wires you did the right thing tweaking the leads on the emitter-that acts as a strain relief.

I did up a KL1 with a minimag reflector, promptly tore the wires out of the board on disassembly and replaced them with Teflon wire. No more worries about melting insulation any more. /ubbthreads/images/graemlins/grin.gif

Rich
 

MenaceSQL

Enlightened
Joined
May 28, 2003
Messages
319
Location
Georgia
[ QUOTE ]
milkyspit said:

I cutoff half of the bulb post... that is, the PLASTIC part of the bulb post, after removing the springloaded metal portion. Not sure if I had to do that, but it gave me more room down there for the wiring.

[/ QUOTE ]

Milky, the plastic part you mentioned that you cut off will just fall out if you just pop the switch assembly open enough. Just pull out the ground tab that goes into the bulb post first then pry the switch open just enough until the bulb post can be pulled out then snap the switch close again. You can completely open up the switch if you like but just be prepared to pick up the internals of the switch and find out where they go.
 

Wildcat

Enlightened
Joined
Nov 4, 2003
Messages
281
Location
Kingwood, Texas, USA
I'm about to start one of these. Is the Arctic Alumina all you need to mount the emitter? I assume it won't ground out the emitter??? If I ever decide to change out the emitter, is it really hard to get it off the AA?

Thanks,
Neil
 

IsaacHayes

Flashlight Enthusiast
Joined
Jan 30, 2003
Messages
5,876
Location
Missouri
WildCat: You need AA epoxy. It is non-conductive. You could even use ArticSilver which is conductive, as the 5w/blue/etc luxeons have a negative slug.

I think to remove it, I'd heat it up, perhaps leave the light on for a while, then get a flat razor and carefully see if you could slide it under to pop it off, carefull not to lift up on the black part of the luxeon so you could save it and re-use it. Then scrape/sand off the rest of the AA epoxy left over. I've never done this, but I belive this is the best way. Any one else have an idea?
 

milkyspit

Flashlight Enthusiast
Joined
Sep 21, 2002
Messages
4,909
Location
New Jersey
Neil, Arctic Alumina epoxy should work fine. As IsaacHayes said, the slug in the white emitters is electrically negative, as is the body of the Maglite, so there ought to be no problems there.

As far as removing the emitter later, sliding a razor blade flat under the emitter should work. Wiggle gently or tap it gently with a hammer. It might help to heat the Hotlips heatsink before using the razor blade, as that ought to soften the epoxy. Just try not to keep it heated for too long if you want to reuse the existing emitter for something else, as excessive heat could damage it. (That's the reason for the heatsink, right?) Several seconds of heat should cause no problems. Don't burn your fingers!

If you don't care about saving the emitter you're removing, you could just rip it off with pliers then sand the remaining epoxy off the heatsink until the aluminum surface is smooth again.
 

Justintoxicated

Flashlight Enthusiast
Joined
Dec 8, 2003
Messages
1,151
Location
El Cajon, CA
hey milky I jsut finaly got the LED shipment form future and I finished mine tonight...Ill make that post tomarrow and will include my little mistakes to help others.

Thanks for all the advice..I think im going to sputter the lense as I have some to practice on.

Damn future sent me the wrong damn crappy HSs /ubbthreads/images/graemlins/frown.gif
 

Negeltu

Enlightened
Joined
Aug 28, 2003
Messages
724
Location
Oregon, USA
I'm always scared to mess too much with the leads on the led. /ubbthreads/images/graemlins/frown.gif I've broke a few off before. I wish they weren't so delicate. Any reason they can't make them more versatile? Great job on your light... /ubbthreads/images/graemlins/smile.gif
 

Wildcat

Enlightened
Joined
Nov 4, 2003
Messages
281
Location
Kingwood, Texas, USA
I just finished my HSN II. It's bright, but I think I did something wrong. Not to mention my HORRENDOUS /ubbthreads/images/graemlins/sick.gif solder job.

there is a black hole inside the hot spot. What can I do to fix this. The emitter is a UWAU that I got from member eo2eo. It is quite white. Only slighter warmer than my Super Baby Pin. I'll post some pics in a few minutes. Gotta run to the PO.
 

Orion

Flashlight Enthusiast
Joined
Jun 27, 2002
Messages
1,613
Location
Missouri
It is very hard to get rid of the dark spot in the beam when you use a 5 watt LED. Perhaps some have accomplished it, but for the most part, it's because of the 4 die setup.
 
Top