First reflow, need advice.

Thom2022

Enlightened
Joined
Dec 12, 2016
Messages
224
Hey everyone.
So I've just ordered all the bits for what will be my first scratch build.
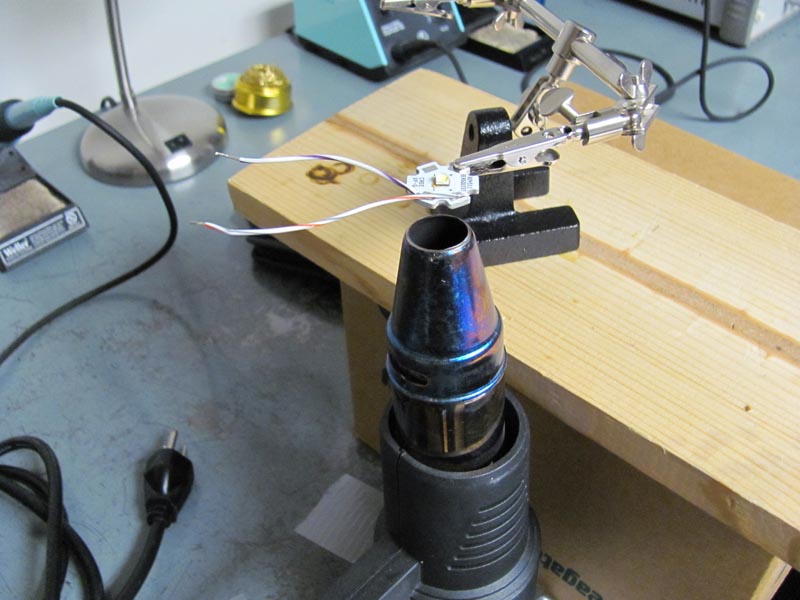
I'm going with 3 nichia 219B-E 4500k 92+ LED's on a noctigon 3XP.
I've decided to mount the LED's myself and am in need of some advice. I get the general idea of how it's done but I can't find a good detailed step by step with concise instruction. One video I watched the person put a line of solder paste across (bridging) all three pad on the board and then pressed the led in and heated it up. I take it the solder will 'run' off the non metal parts of the board under the led. Also how do i tell which side of a bare led is positive?
I have already had a search of the forum but i struggled to find anything.
Thanks in advance
Thom.
 

Lex Icon

Newly Enlightened
Joined
Jan 25, 2015
Messages
109
+1 for the video indicated.
It is a video with a Cree LED marked on the bottom to show polarity.
Your Nichia 219B should have a marking on the top, in a corner, to let you know the negative (-) side of the LED.
 

swan

Banned
Joined
Apr 21, 2011
Messages
669
Location
sydney aus
Are you wiring it parallel or series?

With the noctigon you usually get 4 little bridging pads, 2 for series and 4 for parallel which are easier than solder blobs.

Have a heated surface of 250 degrees c- Add solder paste to pcb sparingly

Observe correct led polarity

Place all leds and all bridging pads on pcb

Place noctigon pcb on heated surface carefully for approx 15 seconds

You should see a puff of smoke and some solder bleed turned shiny-remove carefully and cool

Sometimes you see the led dance a little and you may have to quickly straighten with a tooth pick whilst on heated suface- job done.

Test with a couple of wires and a battery before you fit it to the light [ 1 x 3.7v not fully charged cell if parallel]
 

Thom2022

Enlightened
Joined
Dec 12, 2016
Messages
224
Parallel as its in a single cell s2.
Was thinking of using tiny off cuts of solder braid to bridge the pads.
 

Thom2022

Enlightened
Joined
Dec 12, 2016
Messages
224
Just a quick one. In The video staticx posted the guy says to tap the led down to squeeze out excess solder. Having had a nosey on nichia's website it says not to touch the encapsulant when hot. It also states lead free solder but I only have leaded solder paste. Does this matter too much?
 

swan

Banned
Joined
Apr 21, 2011
Messages
669
Location
sydney aus
People do things in different ways but i recommend you do not touch or press down on the silicon dome it might un seat itself or damage it.

The silicon dome is a primary optic and must remain clean and un damaged.

If you need to slightly reposition an led push them from the lower base substrate.

When heat is applied they will move a little and pull down and i have reflowed a few and never pressed them. If you apply to much solder paste it can sit high so use sparingly.

Leaded solder can be used and will melt easier.

Taking on a triple reflow and bridging is pretty tough for your first go- good luck.
 

Thom2022

Enlightened
Joined
Dec 12, 2016
Messages
224
Yeah it'll be a bit of a challenge. The board doesn't come with the bridge pads so I think I will just tin the pads whilst I reflow the LED's and then just use some small bits of copper braid as originally planned as I feel slugs if solder will look too messy under the optic.
Also what's the cool down rate for nichia's? The graph on their site gives a 5deg/sec up slope but nothing for cooling. Although the gradients look identical so is it safe to assume -5deg/sec will be safe?
 

Thom2022

Enlightened
Joined
Dec 12, 2016
Messages
224
As I don't have any tools for reflowing (should have though about that first) can I just use a gas cooker and a ceramic frying pan or will it transfer head too quickly?
 

hiuintahs

Flashlight Enthusiast
Joined
Sep 12, 2006
Messages
1,840
Location
Utah
I use a heat gun as shown in the pic. Ignore the wires as I put those on afterwards. I duct tape the heat gun to the bench and then use a box to elevate my "helping hands" to the proper level.......about 1" above the heat gun. Heat gun was cheap and is 1200 watts. From the time I turn it on, it only takes about 15 to 20 seconds. As noted from some of the other comments, I can tell when the solder has melted because I see some of it ooze on the side. The LED will wobble a little as it self centers. That is a sure sign that the solder is molten.

From failed experience, I have learned not to use too much solder. On the Cree LEDs there is 3 solder pads, the anode (+), cathode (-) and a center (not connected) to anything pad....probably used for heat sink. There has been times where I got too much solder in the middle and it elevated one side of the LED and did not make contact. I then have to start over.

I lightly run some solder across all 3 of those pads on the star or medium which you are using and then take some solder wick to even it up and take off the excess. You just don't want to have too much solder. I have a small bottle of rosin flux and I squeeze a drop out onto a piece of paper and then use a small straight edge screw driver to dabb some onto those 3 pads. (It does not take much). I position the LED onto the pcb with correct orientation and center the best I can. Once the solder melts it will self center the rest of the way. I then check with a DMM in "diode checker" mode to make sure it took.

I hope this helps. There are a few different ways to do this. I have never worried about the ramp up and down of the heat. After I turn of the heat gun, I blow air across the LED with my mouth. After a minute, I put it on my metal table and that then assures I can touch it without getting burned.

WiXE6VX.jpg
 

Thom2022

Enlightened
Joined
Dec 12, 2016
Messages
224
So I used an old SS frying pan on the gas hob and it works brilliantly. Bit nerve wracking since it was my first attempt and everything is so damned tiny!!! But it all works and is now all assembled woohoooo!!!!
 
Top