
Hi All! Thorfire sent me the BLF Q8 to test and I wanted to share my thoughts here!
As you are probably well aware, this is a joint project between folks BLF and budget friendly flashlight maker Thorfire. If you are looking for a high quality but super affordable "soda can" light with ramping brightness, then say hello to the 5,000+ lumen Thorfire BLF Q8!
OVERVIEW
As a flashlight enthusiast this is an amazing find! You get amazing output, great beam tint and profile, a pretty green back-light side switch, and lots and lots and lots of UI choices, including a super innovative infinite brightness ramping. Also for flashlight "modders" this light is designed to be easily taken apart. The main draw back is related to the complex UI which can be easily messed-up if you don't read the manual a few times. The UI has both "ramping" which uses a press and hold to change brightness, but the "mode" outputs (typical LOW MID HIGH etc) but uses clicks to change brightness instead, so the light is a bit bipolar.
SPECS & FEATURES
Finding info on the light is a bit tricky as most of the source info is on a very long BLF post here(link is external), but Thorfire doesn't seem to have a product page for the Q8. Alternativley, you can find the marketing specs also on Amazon's or Banggood.com's purchase page. Below is a copy and paste from Banggood's page:
Specification:
Features:
• Compact and lightweight 5000 Lumens flashlight
• Utilizes four XP-L LEDs
• Uses four 18650 batteries for maximum runtime up to 1500hours
• Features advanced temperature regulation (ATR) technology
• Integrated power indicator in side switch indicates remaining battery power
• Flashlight can blink out voltage with 0.1V accuracy
• Intelligent memory function for brightness levels
• Direct access to ultralow and turbo outputs
• High transmittance glass
• Stainless steel bezel ring protects core components from damage
• Constructed from aerospace grade aluminum alloy
• HAIII military grade hard-anodized
• Waterproof in accordance with IPX-8
• Tail stand capability
Mode,Lumens and runtime:
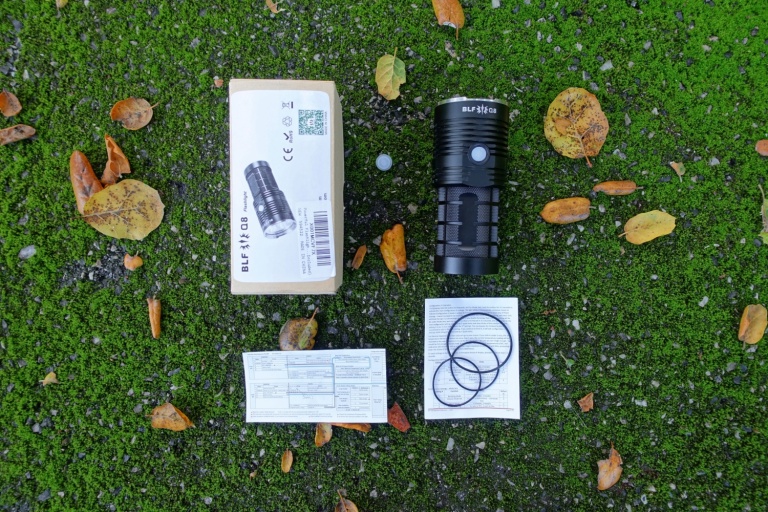
INCLUDED
OPTIONS
There is only one version but there may be factory updates in additional production batches.
PRICE
Current price, at time of writing, is about $75 USD but you might be able to find a steal at around $40.
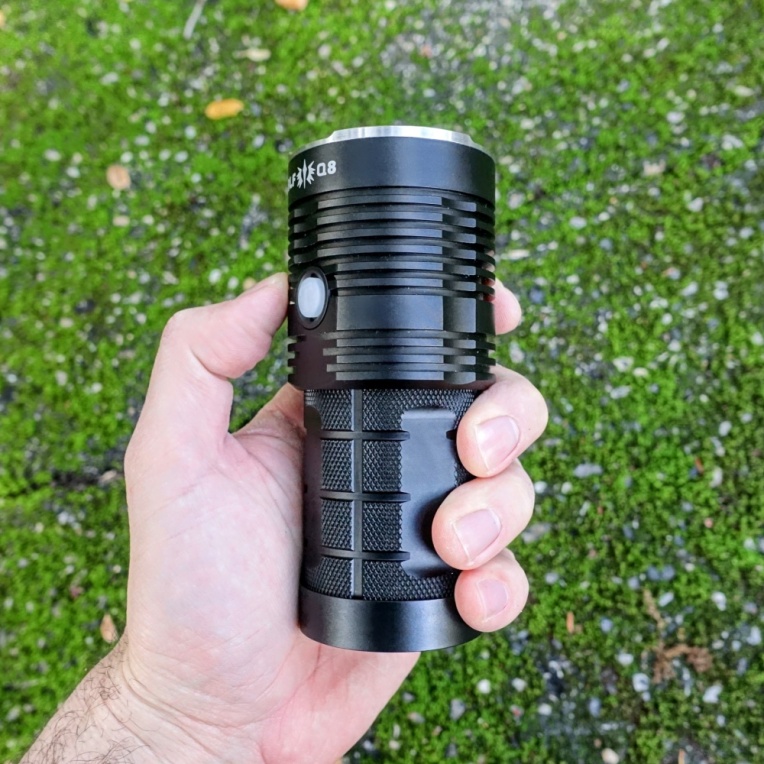
LOOK & FEEL
OUTSIDE
My favorite feature is the green indicator side switch. Overall, this is a very sturdy light and I love the deep-cut diamond knurling. I really like how the anti roll is reverse curves instead of a hex pattern. The flat spot around the button really helps with orientation as well. The steel bezel is a beast.
Wish there was a lanyard loop. The overall length is nice and short but the index finger has to grip around the larger head feels a bit uncomfortable after a while.


INSIDE
The light is easy to open up and surprisingly the tail cap is removable for modding or stowing the UI cheat-sheet in there. Head circuitry is also accessible via a couple of philips screws. The contacts are gold-plated and very sturdy. I've heard that you may get a lumen boost if you replace the stock tail cap screws with brass ones. It's worth mentioning that the LEDs are connected to an "integrated shelf" which which allows the head to more effectively dissipate heat.


ACCESSORIES
No extra accessories included.
OPTICS
LED SPECS
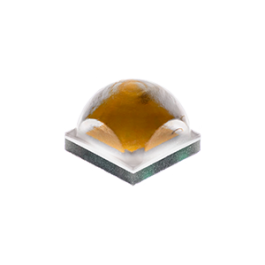
The light has 4x CREE XP-L HD V6 3D
BEAM PROFILE

TINT
The center has a pretty warm center with a bit more neutral tint on the spill. Below is a comparrison of teh BLF Q8 (left) with Nicha 219B (right) (in the Nitecore MT06MD penlight).

BEAM ANGLE
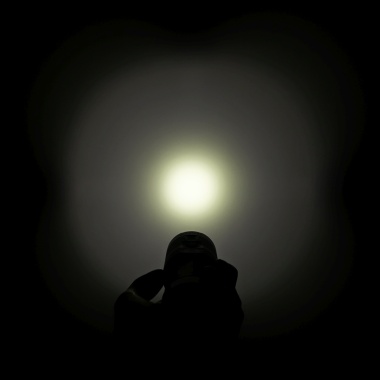
The main spot is pretty tight with a 15 total degree spot; the main spill is about 90 total degrees, but due to crenelated bezel it gets limited to 70 degrees in certain areas.
OUTPUT LEVELS
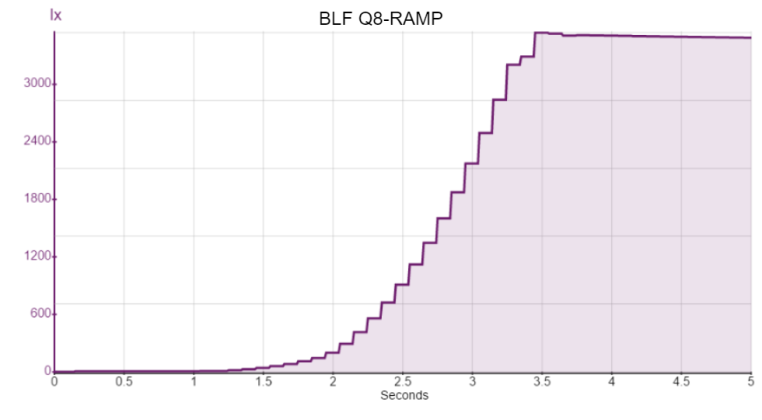
Ramping changes output every 0.1 second. It take a total of 2.25 seconds to ramp from 0 to full. Ramping is nonlinear. There are plenty of mode set options which I'm sure will satisfy pretty much everyone.
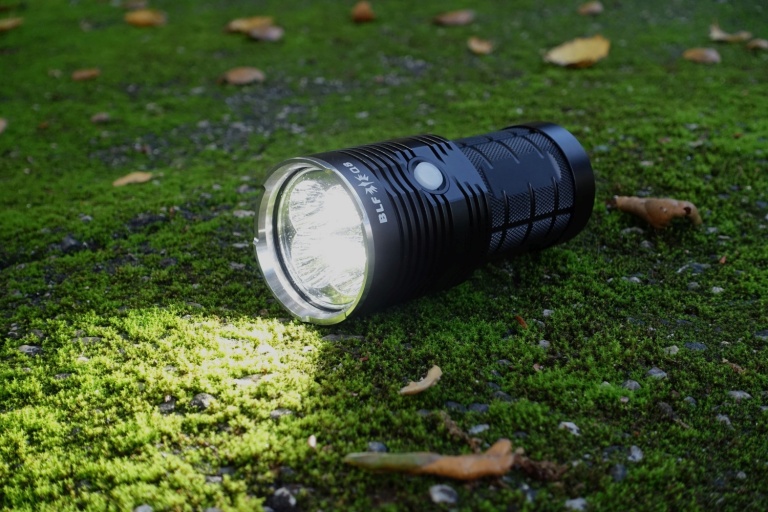
OUTDOOR BEAMSHOTS
All the pictures below are taken with the light in TURBO.


POWER
BATTERY
No batteries are provided but I'm not complaining, this package is an amazing deal. However, there are not completely clear recommendations on batteries for the light by Thorfire. The only guidance they give is that "button-top" style is highly recommended because the of the circular anode contact (which makes it easier to having them all in parallel). Thanks to BLF members testing out for testing out different batteries and measuring outputs (table below).

INDICATORS
The light has very neat green illuminated side-switch. The switch, among other functions, can indicate battery life and low voltage warnings. At any time, you can use the UI to check the (average) battery voltage and the light will blink (both the primary led and the switch led) out the voltage. Also, when the voltage is very low the light will blink 3 times pause and blink 3 times again. There is built-in low voltage protection (LVP) and the manual says it's between 3.0v and 2.8v, and when I tried draining it fully the light would shut of at 2.9v.

PERFORMANCE
NOTES ON METHODS
I measured the light output in relative LUX and I have not spent time yet to calibrate for lumens or factored % of max output. The charts I've provided, while are literally quantitative, I suggest using as a qualitative reference for how the output may behave over time; typically lights aren't left on this long and the max output can be reset. It's worth noting that usually the advertised runtimes for the highest modes are calculated based on frequently resetting the mode back into the highest position possible, which I don't really have time to replicate.
PWM check using a 50 millisecond test period with a sampling rate of 3,000 times per second. For special modes I use a 150 millisecond test with sample rate of x.
Temperature measurement condition is at room temp and currently under no fan cooling.
I am still very new at doing these types of measurements so I am no authority on on this subject, but please let me know if things don't look right or you see anything that I could do to improve for next time.
BATTERIES USED FOR TEST
The below batteries were recommended by BLF members and purchased by me separately. Make sure that you carefully research any cell you are considering using before purchasing.
RUNTIMES
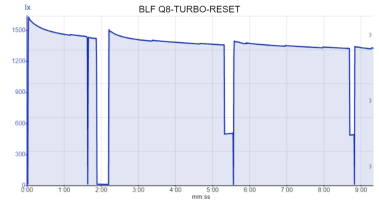
The default setting for turbo is a 3 min timed step-down which is exactly what happened. The turbo can be reset after the timed step-down, as shown in the second chart, but I'm not sure if there is eventually a temperature cap, my guess is no.

PWM CHECK
There appears to be no significant PWM on any constant mode other than the programmable firefly mode. Below is a chart of the light somewhere below 160 lumen mark. For comparison, the second graph shows PWM of the Nitecore R25 flashlight which varies from 0 to 120 lx on the LOW mode.


STROBES
I measured the standard strobe frequency is about 18.2hz. The second chart shows the second more tactical strobe which varies.


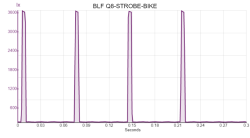
FLASHING/BEACON
Below are charts for the other blinking modes. Note, as the test time increases the sample rate decreases. Note that the bike strobe stays on at a low mode between blinks. Note that the both of the locator beacon modes actually flash twice between their pauses.


TEMPERATURE
A max temp of 124.1°F was observed for TURBO. There is a way to program the light to be limited to a temperature but it is all by feel to your own hand; ie you can't program an exact temperature value. The chart below if for the default 3 min step-down setting.

USER INTERFACE
GENERAL THOUGHTS
Overall, love the ramping version of the UI; however, it's pretty easy to mess up settings by accident plus the "mode sets" UI is a very different UI so you basically have to learn 2 flashlights in one.
The UI is actually a premade UI called NarsilM, which is programmed to be used with a single electronic switch. For me I see 2 major issues with NarsilM: 1. Programming/Settings is too easy to enter (only 8 second long press), 2. Basic UI functions (ie turning the light on/off, and cycling the levels) are almost totally different between ramping and mode sets, so you have to learn TWO complex flashlights. I would have liked programming/settings to be tucked away in what I call the "administration" area (which starts with the battery check). I think that uniformity between the ramping and mode sets would have helped make the UI a lot simpler and therefore easier for non flashlight enthusiasts. Other random suggestions:
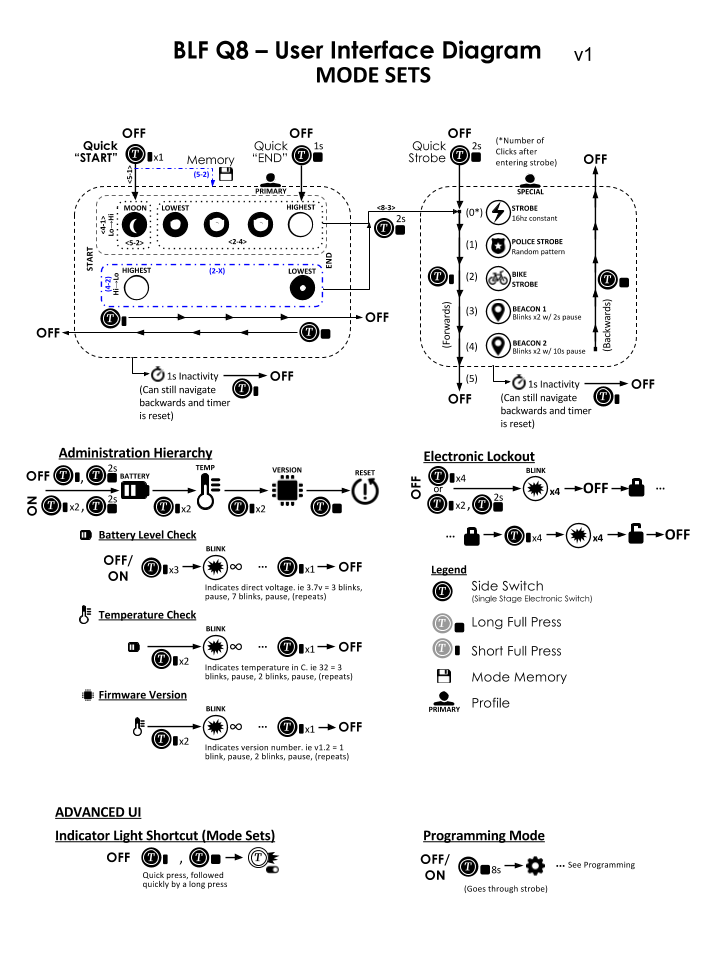
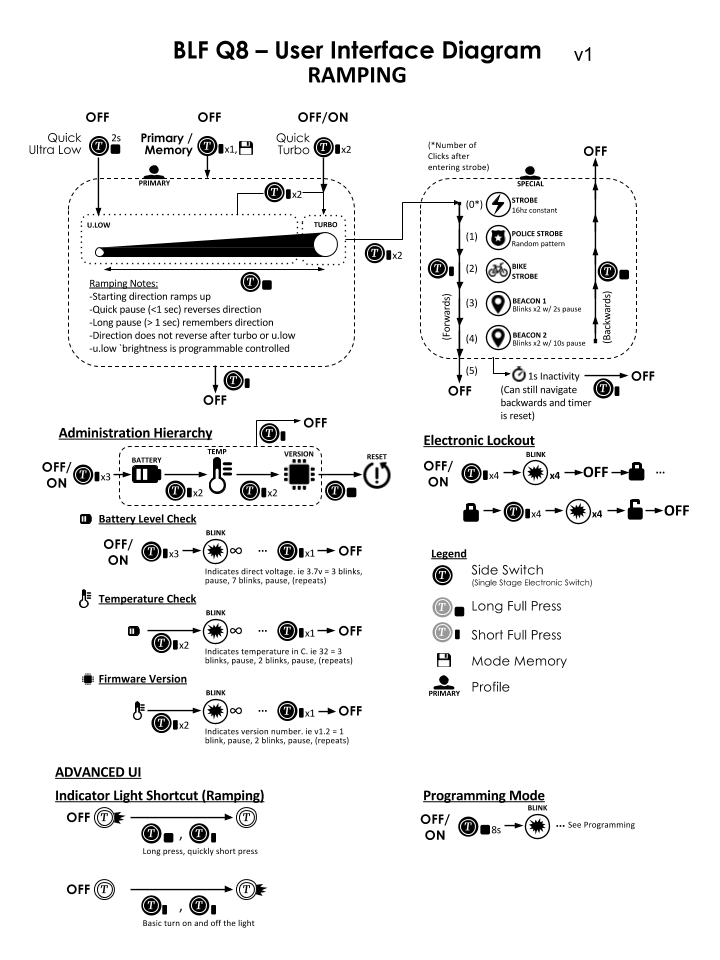
UI DIAGRAM
OK so if you know my work, I like to make UI diagrams and I'm crazy enough to give this one a try. I've probably spent over 5 hours just working on this part of the review alone. After all is said and done I sure hope this actually helps you make sense of this bi-polar light. I've done the main UI for both ramping and mode sets, but what I didn't do was all the settings part but once you understand what all the blinking lights mean it's easy enough to follow the included manual. There are defiantly quirks to the UI (like how the strobes don't go in a circular cycle) but I'm probably not going to describe or show them all. This is for version 1.0 of the firmware and version 1 of my diagram.

SETTINGS
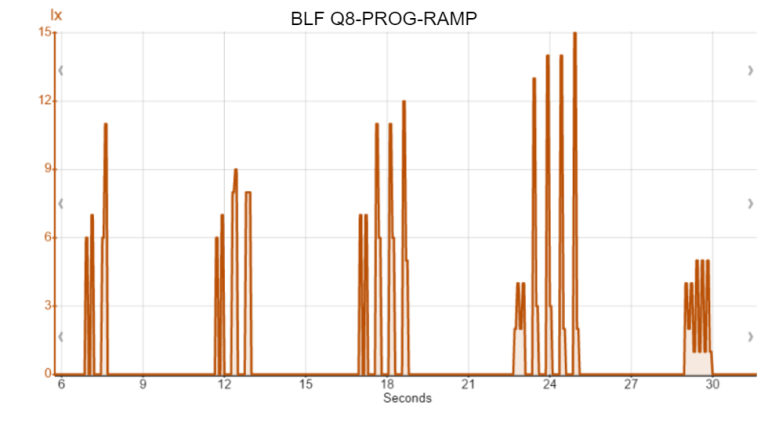
Regarding the settings (aka programming) area, once you enter this area, the main LED will blink twice fast then blink out the setting number you can program, ie 2 fast blinks with 1 blink after is setting #1 "ramping function". Once it blinks out the setting number, you have 3.5 seconds to click the switch to change the setting or you can leave it alone and let it go to the next setting number. After it has gone through all the settings it will blink 5 times very fast and turn off the light. Below is chart which shows the blink pattern for ramping settings. Tip, you can advance to the next setting by longpress, and if you to a really long press it will exit the settings area and turn off the light.
I have also noticed that both ramping and mode set settings are saved separately no matter which one you are currently in. For instance by default, mode sets does not have mode memory, I switched from ramping to mode sets, changed the setting, went back to ramping, then back to mode sets, and it still had mode memory. Also, the settings are saved even if you take the batteries out.
CONCLUSIONS
HIGHLIGHTS
COMMENTS
RECOMMENDED ACCESSORIES
Samsung 30Q 18650 batteries (button top)
NOTES
Disclaimers:
As you are probably well aware, this is a joint project between folks BLF and budget friendly flashlight maker Thorfire. If you are looking for a high quality but super affordable "soda can" light with ramping brightness, then say hello to the 5,000+ lumen Thorfire BLF Q8!

OVERVIEW
As a flashlight enthusiast this is an amazing find! You get amazing output, great beam tint and profile, a pretty green back-light side switch, and lots and lots and lots of UI choices, including a super innovative infinite brightness ramping. Also for flashlight "modders" this light is designed to be easily taken apart. The main draw back is related to the complex UI which can be easily messed-up if you don't read the manual a few times. The UI has both "ramping" which uses a press and hold to change brightness, but the "mode" outputs (typical LOW MID HIGH etc) but uses clicks to change brightness instead, so the light is a bit bipolar.
SPECS & FEATURES
Finding info on the light is a bit tricky as most of the source info is on a very long BLF post here(link is external), but Thorfire doesn't seem to have a product page for the Q8. Alternativley, you can find the marketing specs also on Amazon's or Banggood.com's purchase page. Below is a copy and paste from Banggood's page:
Specification:
| Product name: | BLF Q8 4X XP-L 5000LM Professional Super Bright LED Flashlight |
| Brand: | BLF |
| Model: | Q8 |
| Emitter Type: | XP-L HD V6 3D |
| Light temperature: | 4750K-5000K |
| Light color: | Neutral White |
| Mode: | Smooth ramping or mode set operation |
| Material: | Aerospace grade aluminum alloy construction |
| Total Emitters: | 4x |
| Battery Configurations: | 4 x 18650 or unprotected button top (not included) |
| Working Voltage: | 3-4.2v |
| Switch Type: | Electronic switch |
| Switch Location: | Body side of the flashlight |
| Peak Beam Intensity: | 50,000+ cd |
| Impact Resistant | 1.2meters |
| Max Output: | 5000+ lumens |
| Range: | 450+ meters (max) |
| Lens: | High transmittance glass (no AR coating) |
| Reflector: | Aluminum alloy mirror reflective cup |
| Waterproof: | IPX-8 waterproof |
| Color: | Black |
| Weight: | 400g without battery |
| Size: | 132mm x 59mm x 50mm(length x head x body diameter) |
• Compact and lightweight 5000 Lumens flashlight
• Utilizes four XP-L LEDs
• Uses four 18650 batteries for maximum runtime up to 1500hours
• Features advanced temperature regulation (ATR) technology
• Integrated power indicator in side switch indicates remaining battery power
• Flashlight can blink out voltage with 0.1V accuracy
• Intelligent memory function for brightness levels
• Direct access to ultralow and turbo outputs
• High transmittance glass
• Stainless steel bezel ring protects core components from damage
• Constructed from aerospace grade aluminum alloy
• HAIII military grade hard-anodized
• Waterproof in accordance with IPX-8
• Tail stand capability
Mode,Lumens and runtime:
| Mode Groups: | Runtime and Lumens (manufacturer tested,it will be a little bit different from the real data ) | |||||||
| Group1: | Moon 2LM/1500h | Turbo 5000LM/40min | ||||||
| Group2: | Moon 2LM/1500h | Low 160LM/33h | Turbo 5000LM/40min | |||||
| Group3: | Moon 2LM/1500h | Low 70LM/66h | Mid 1250LM/8h | Turbo 5000LM/40min | ||||
| Group4: | Moon 2LM/1500h | Ultralow 10LM/150h | Low 160LM/33h | Mid 1500LM/6h | Turbo 5000LM40min | |||
| Group5: | Moon 2LM/1500h | Ultralow 10LM/150h | Low1 70LM/66h | Low2 160LM/33h | Mid 1500LM/6h | Turbo 5000LM/40min | ||
| Group6: | Moon 2LM/1500h | Ultralow 5LM/150h | Low 70LM/33h | Mid1 240LM/17h | Mid2 1100LM/10h | High 2500LM/3h | Turbo 5000LM/40min | |
| Group7: | Moon 2LM/1500h | Ultralow1 10LM/400h | Ultralow2 35LM/140h | Ultralow3 95LM/54h | Low1 160LM/33h | Mid 1350LM/8h | High 2500LM/3h | Turbo 5000LM40min |
| Group8: | Moon 2LM/1500h | Low 160LM/33h | Mid 750LM/17h | High 2100LM/5h | ||||
| Group9: | Moon 2LM/1500h | Ultralow 10LM/150h | Mid 520LM/20h | Turbo 5000LM/40min | ||||
| Group10: | Moon 2LM/1500h | Ultralow 10LM/150h | Mid 1500LM/6h | Turbo 5000LM/40min | ||||
| Group11: | Moon 2LM/1500h | Low 160LM/33h | Mid 1350LM/8h | Turbo 5000LM/40min | ||||
| Group12: | Moon 2LM/1500h | Ultralow 5LM/600h | Low 150LM/33h | Mid 1700LM/5.5h | Turbo 5000LM/40min |
INCLUDED

- BLF Q8
- Quick Reference Guide (http://bit.ly/NarsilQ8(link is external))
- Narsil Cheat Sheet (bit.ly/narsil-cs(link is external))
- 3 spare o-rings
- 1 spare button cover
OPTIONS
There is only one version but there may be factory updates in additional production batches.
PRICE
Current price, at time of writing, is about $75 USD but you might be able to find a steal at around $40.
LOOK & FEEL
OUTSIDE
My favorite feature is the green indicator side switch. Overall, this is a very sturdy light and I love the deep-cut diamond knurling. I really like how the anti roll is reverse curves instead of a hex pattern. The flat spot around the button really helps with orientation as well. The steel bezel is a beast.
Wish there was a lanyard loop. The overall length is nice and short but the index finger has to grip around the larger head feels a bit uncomfortable after a while.
INSIDE
The light is easy to open up and surprisingly the tail cap is removable for modding or stowing the UI cheat-sheet in there. Head circuitry is also accessible via a couple of philips screws. The contacts are gold-plated and very sturdy. I've heard that you may get a lumen boost if you replace the stock tail cap screws with brass ones. It's worth mentioning that the LEDs are connected to an "integrated shelf" which which allows the head to more effectively dissipate heat.
ACCESSORIES
No extra accessories included.
OPTICS
LED SPECS
The light has 4x CREE XP-L HD V6 3D
BEAM PROFILE
TINT
The center has a pretty warm center with a bit more neutral tint on the spill. Below is a comparrison of teh BLF Q8 (left) with Nicha 219B (right) (in the Nitecore MT06MD penlight).
BEAM ANGLE
The main spot is pretty tight with a 15 total degree spot; the main spill is about 90 total degrees, but due to crenelated bezel it gets limited to 70 degrees in certain areas.
OUTPUT LEVELS
Ramping changes output every 0.1 second. It take a total of 2.25 seconds to ramp from 0 to full. Ramping is nonlinear. There are plenty of mode set options which I'm sure will satisfy pretty much everyone.
OUTDOOR BEAMSHOTS
All the pictures below are taken with the light in TURBO.
POWER
BATTERY
No batteries are provided but I'm not complaining, this package is an amazing deal. However, there are not completely clear recommendations on batteries for the light by Thorfire. The only guidance they give is that "button-top" style is highly recommended because the of the circular anode contact (which makes it easier to having them all in parallel). Thanks to BLF members testing out for testing out different batteries and measuring outputs (table below).
INDICATORS
The light has very neat green illuminated side-switch. The switch, among other functions, can indicate battery life and low voltage warnings. At any time, you can use the UI to check the (average) battery voltage and the light will blink (both the primary led and the switch led) out the voltage. Also, when the voltage is very low the light will blink 3 times pause and blink 3 times again. There is built-in low voltage protection (LVP) and the manual says it's between 3.0v and 2.8v, and when I tried draining it fully the light would shut of at 2.9v.
PERFORMANCE
NOTES ON METHODS
I measured the light output in relative LUX and I have not spent time yet to calibrate for lumens or factored % of max output. The charts I've provided, while are literally quantitative, I suggest using as a qualitative reference for how the output may behave over time; typically lights aren't left on this long and the max output can be reset. It's worth noting that usually the advertised runtimes for the highest modes are calculated based on frequently resetting the mode back into the highest position possible, which I don't really have time to replicate.
PWM check using a 50 millisecond test period with a sampling rate of 3,000 times per second. For special modes I use a 150 millisecond test with sample rate of x.
Temperature measurement condition is at room temp and currently under no fan cooling.
I am still very new at doing these types of measurements so I am no authority on on this subject, but please let me know if things don't look right or you see anything that I could do to improve for next time.
BATTERIES USED FOR TEST
The below batteries were recommended by BLF members and purchased by me separately. Make sure that you carefully research any cell you are considering using before purchasing.
- Brand: Samsung
- Model: Q30
- Positive Contact: button-top (special order from Bangood.com)
- LVP: non-protected
- Voltage: 3.7
- Capacity: 3000 mAh
- Current: 20A (MAX Continuous)
- Cell Length: 64.85mm
RUNTIMES
The default setting for turbo is a 3 min timed step-down which is exactly what happened. The turbo can be reset after the timed step-down, as shown in the second chart, but I'm not sure if there is eventually a temperature cap, my guess is no.
PWM CHECK
There appears to be no significant PWM on any constant mode other than the programmable firefly mode. Below is a chart of the light somewhere below 160 lumen mark. For comparison, the second graph shows PWM of the Nitecore R25 flashlight which varies from 0 to 120 lx on the LOW mode.
STROBES
I measured the standard strobe frequency is about 18.2hz. The second chart shows the second more tactical strobe which varies.
FLASHING/BEACON
Below are charts for the other blinking modes. Note, as the test time increases the sample rate decreases. Note that the bike strobe stays on at a low mode between blinks. Note that the both of the locator beacon modes actually flash twice between their pauses.
TEMPERATURE
A max temp of 124.1°F was observed for TURBO. There is a way to program the light to be limited to a temperature but it is all by feel to your own hand; ie you can't program an exact temperature value. The chart below if for the default 3 min step-down setting.
USER INTERFACE
GENERAL THOUGHTS
Overall, love the ramping version of the UI; however, it's pretty easy to mess up settings by accident plus the "mode sets" UI is a very different UI so you basically have to learn 2 flashlights in one.
The UI is actually a premade UI called NarsilM, which is programmed to be used with a single electronic switch. For me I see 2 major issues with NarsilM: 1. Programming/Settings is too easy to enter (only 8 second long press), 2. Basic UI functions (ie turning the light on/off, and cycling the levels) are almost totally different between ramping and mode sets, so you have to learn TWO complex flashlights. I would have liked programming/settings to be tucked away in what I call the "administration" area (which starts with the battery check). I think that uniformity between the ramping and mode sets would have helped make the UI a lot simpler and therefore easier for non flashlight enthusiasts. Other random suggestions:
- Ramping – add ramping speed setting
- Mode Sets – add shortcut to lowest output
- Mode Sets – add shortcut for lockout from ON
- Mode Sets – remove one of the shortcuts for lockout from OFF (x2 clicks then long press)
- Indicator – add setting that indicator is one when main LED is on
- Indicator – add setting that adjusts indicator brightness (if possible), ie dim or bright
- Mode Sets – really need a different way to settings area WITHOUT GOING THROUGH STROBE!
- Strobes – would have been neat to have a lightning simulator strobe
- Temperature – add setting that would set max temperature to a specific given number ie click once for 100° F, twice for 110° F, three for 120° F, etc.
UI DIAGRAM
OK so if you know my work, I like to make UI diagrams and I'm crazy enough to give this one a try. I've probably spent over 5 hours just working on this part of the review alone. After all is said and done I sure hope this actually helps you make sense of this bi-polar light. I've done the main UI for both ramping and mode sets, but what I didn't do was all the settings part but once you understand what all the blinking lights mean it's easy enough to follow the included manual. There are defiantly quirks to the UI (like how the strobes don't go in a circular cycle) but I'm probably not going to describe or show them all. This is for version 1.0 of the firmware and version 1 of my diagram.

SETTINGS
Regarding the settings (aka programming) area, once you enter this area, the main LED will blink twice fast then blink out the setting number you can program, ie 2 fast blinks with 1 blink after is setting #1 "ramping function". Once it blinks out the setting number, you have 3.5 seconds to click the switch to change the setting or you can leave it alone and let it go to the next setting number. After it has gone through all the settings it will blink 5 times very fast and turn off the light. Below is chart which shows the blink pattern for ramping settings. Tip, you can advance to the next setting by longpress, and if you to a really long press it will exit the settings area and turn off the light.
I have also noticed that both ramping and mode set settings are saved separately no matter which one you are currently in. For instance by default, mode sets does not have mode memory, I switched from ramping to mode sets, changed the setting, went back to ramping, then back to mode sets, and it still had mode memory. Also, the settings are saved even if you take the batteries out.

CONCLUSIONS
HIGHLIGHTS
- Great ramping UI
- Lovely warm tint
- Bright green illuminated side switch
- Huge output with fantastic price per lumen
- Modder friendly
- Good heat dissipation
- Highly configurable (even the indicator light)
- Nice details: steel bezel, metal reflector, and tripod thread
- Can run on a single 18650
COMMENTS
- UI easily changed by accident
- UI for ramping vs mode sets is not consistent
- Bit of battery confusion but go for high-drain button top cells
- Some smudge on the positive contact
- No lanyard hole
RECOMMENDED ACCESSORIES
Samsung 30Q 18650 batteries (button top)
NOTES
Disclaimers:
- CivilGear Reviews received this product for testing and providing an honest review.
- CivilGear Reviews was not paid for writing this review.
Last edited: