Yellow Navy Battle Lantern to LED help

bl4kkat

Newly Enlightened
Joined
Mar 2, 2006
Messages
93
Location
Virginia Beach
Hi everyone I was wondering if anyone has messed with a battle lantern within the past year or so to convert to LED?

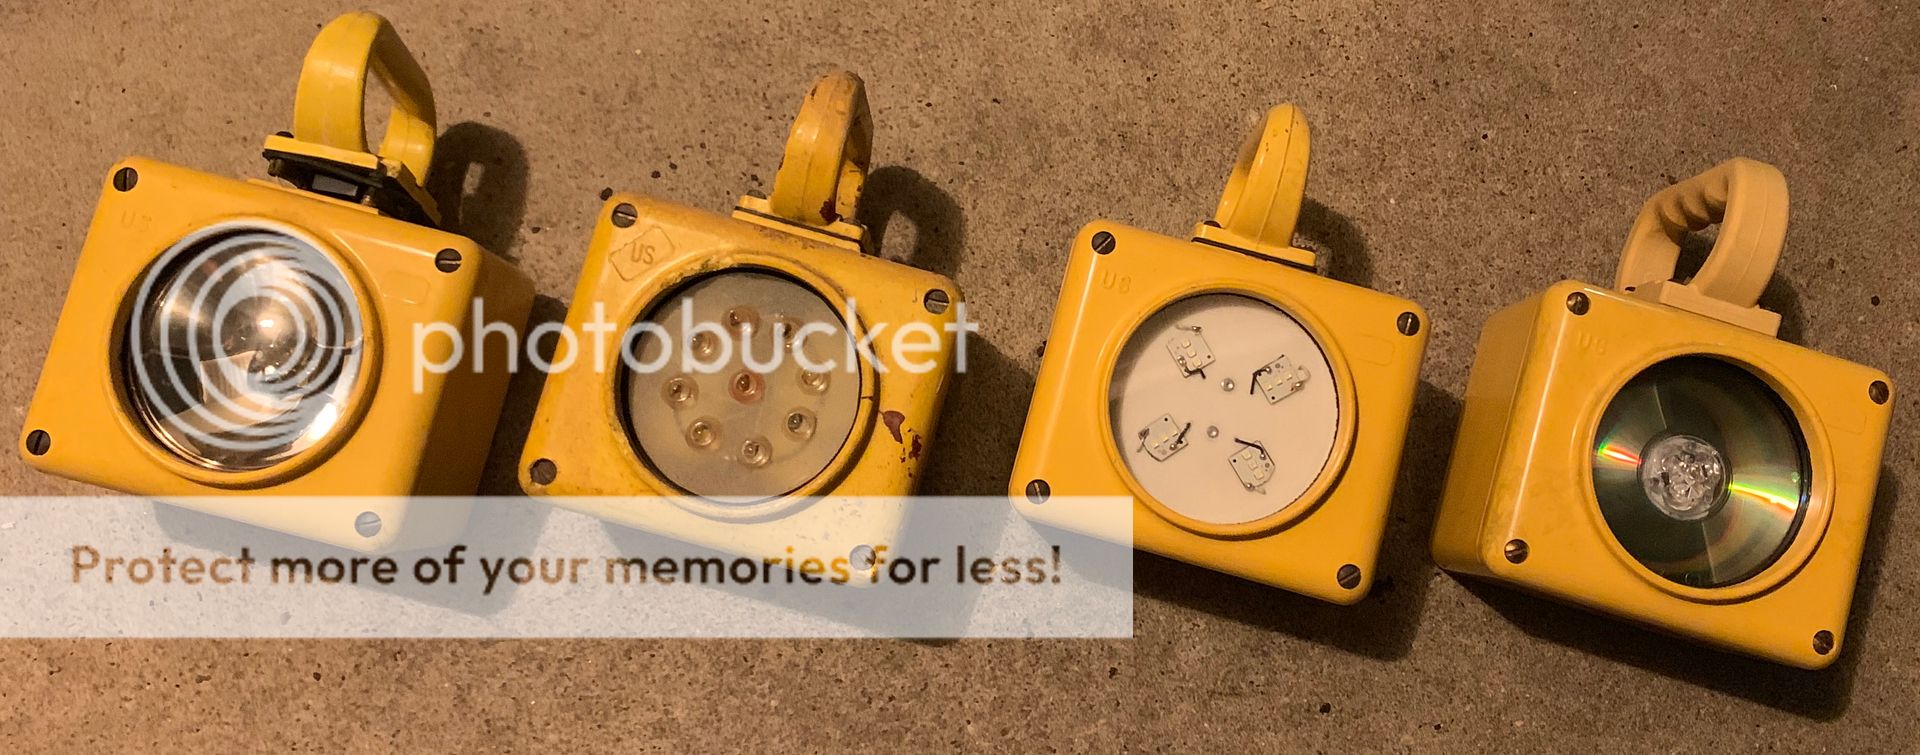
I have one I modded almost 10 years ago with 5 ~ 7 10mm white LEDs from Radio Shack to use 6v. Back then it was a pretty crude mod and more of a challenge to myself to make it more usable again. I forget the exact details but I remember that each LED did have a resistor. I was debating if I should wire all the LED to one resistor (cheaper), or if I should add a resistor to each LED which is the proper way from what I was told, but still did not under stand why exactly (expensive). I ended up going the proper and expensive way. Now a days it sits in my son's bedroom to have on while theres a storm out side. I don't mind him leaving it on over night because of the insane runtime and I can use the cheap zinc 2-pack lantern batteries from Wal-Mart.

Beam profile I was after was a combination of spot and flood. I ended up making a "Spoting lantern" with very little flood. But at least I get better runtime with with the original incadescent bulb.


I did mod another one about 3 years ago using four cheap 0.99 cent head lamps from Wal-Mart. It used two CR2032 coin cells. Long story short, cut off the portion of the LED and PCB (I think it also hada resistor in line with the PCB), wired them in a 2S + 2P to get a 6v input. They were mounted on a piece of plastic board cut to the diameter of the bulb housing. Then I drilled and taped two holes for the bolt heads to make contact to the spring loaded contact pins on the battle lantern housing(had to make sure was correct or it would not turn on). Last was to cut a piece of Lexian platic as the "Lens" with rubber gasket... Boom and done!

I don't remember the runtime with the first lantern, but the more recent one with the scavanged head lamps is as follows:
1 Zinc 6V Rayovac lantern battery => ~54 hours from 100% to about 50%

I had no light meter or anything to measure the lightout put, just using my good ol eyes =)
Pretty much turned the light on Friday night before I left work, came back after the weekend, and on Monday saw it was still lit. Left it on, came back Tuesday and noticed that it pretty dim a couple of hours before lunch and ended the run time test. So again not exactly scientific but it gives you a rough idea of runtime. Also again this was using just one zinc battery NOT two batteries.

I am fairly confident that I can acheive longer runtimes depending on battery setup. Examples one or two batteries and which type of chemistry (zinc, alkaline, or rechargables). I am also aware they do have D to F adaptors also. Just for fun I did four AA > D adaptor (enloops) then D > F adaptor. Light still works but didn't want to do a runtime test for fear of possibly ruining my enloops.

Beam profile for this light is ALL flood no hot spot. In a perfect world I still would like a combination of spot/flood but I am not thinking if I want something like that I will need to incorporate a reflector of some sort and I don't have the capability for that nor do I want to try and engineer something from scratch. So I am totally fine with an all flood light. I can always pick and choose from my other EDC lights I have on hand.


So here if where I am at now. I want to do another "flood' build, have it multi-mode. Here are my requirements:
Runtime: at least 48 hours Hight mode (20 ~ 50 lumins?)
at least 48+ hours on low mode (12 lumins?)
at least 100+ hours on low low/moonlight mode (1.00 - 0.01 lumins?)
and lastly have a Beacon Mode not to be confused with Strobe

I have been looking around Mountain Electronics, Illumn, and google for multi-mode drivers. My main use for the light is a hurricane/black out light with the main focus on long runtime. I already have other lights that are 80+ lumins in various battery configurations. If anyone is familiar with the battle lanterns they have a ginormouse amount of space. So space for the drivers is not an issue, and if what ever electronics is that big, I can sacrifice on battery space for the from a 2 cell to single cell lantern.


I look forward to everyone's recomendations!
Thanks in advance

Mark
 

DIWdiver

Flashlight Enthusiast
Joined
Jan 27, 2010
Messages
2,725
Location
Connecticut, USA
Let's see...

50 lumens at 150 lm/W (easily achieved at that output level) would take 1/3W. To run 48 hours would require 16 Wh. I think a single square lantern battery is probably several times that, even in carbon-zinc. Even 4 decent C or D cells would beat 16 Wh. Two decent LiIon 18650 cells would beat it too.

In other words, it shouldn't be hard to get 5-10 times your desired runtime with good batteries, at 50 lumens. At 1 lumen, with a good driver, your runtime should be measured in months.

For an LED, I think I would choose a small COB type, as it won't have a super bright spot emitter. That way you don't have to diffuse it to make it less painful to look directly at the light.

For drivers, I'm not going to be much help, as I'm more of a DIY guy there. Maybe someone can recommend a configurable one that you can adjust the modes to suit your preferences. Maybe contact Mountain? They must carry something like that, and I hear they are super helpful.
 

alpg88

Flashlight Enthusiast
Joined
Apr 19, 2005
Messages
5,339
you can just get led par36, and rewire so 2 6v cells run in series, but you'll get no modes, but those par36 available in many different outputs, you can try adding drivers to them, maybe it will get you modes,
i have a yellow battle lantern, i experimented with mine, but ended up using aircraft par36 adapter, 35w hid, and 8 18650 in a separate metal box outside, I tried nimh and li ion inside, but heat killed them.
just google par36 led, and replace inc one for it, you can experiment with batteries too, i used to crack open 6v lantern cell case, remove elements and put li ions, and nimh in there instead.
 

bl4kkat

Newly Enlightened
Joined
Mar 2, 2006
Messages
93
Location
Virginia Beach
DIWdriver:
Now that you mention it, I forgot to list which LED emitter I was planning on using. Lately I have been getting more and more into the high CRI lights and so far my personal experiences has been with a Lumintop 2x AAA 219b(?) pen light which wasnt too bright, and the really poopular/hyped up Lumintop FW3A with the SST-20 4000K Neutral White 95+ CRI.

With the first light I wasn't too keen on the whole CRI thing so I gave it away to a relative who works in the volunteer rescue squad. Figured it would be perfect since the main selling point for that light was that it was a multi mode so low mode can be used for eye examinations and the warmer tint was easier on the eyes. That was about two years ago. BTW if you get a chance I encourage anyone to do a ride along with volunteer rescure squads, it's kindda nice to see what they go through.

I decided to give those CRI lighst another try since its been a while, and I kindda wanted another light since my EDC was either a 3~4 year old AA Jetbeam or a AAA Olight i3EOS. The final push was that Illumn had a coupon code so I figured I would try the SST-20. When the light did come in the mail and try it out, just like the penlight I wasn't impressed, in fact I was a little disapointed. Should have gone the Cree XP-L route since I already knew I liked the higher tinted better (5000k).

Not until this week did I have an appriciation for the high CRI lights. We were helping an older lady from church downsize from a two level home to a single level home. With that said, it was ALOT of giving away random furniture and boxing things that was going to be brought to the new house. Loading the boxes into the big box truck was as first somewhat lit, but when it started to get to around 7:30 pm it was starting to get dark. Brought out the FW3A and my buddy whipped out his right angle led light. I hung my light on the support railing on one side of the wall and my buddy hung his light on the opposite side of the wall. So loading the truck you can clearly see a big difference on color tint with both lights. If I had to guess I would say his tint would be around the 5500-6000K range while my light is 4000k (SST-20). Not to get too technical I don't know the lumin output of his light and it was one of those 6 5mm led single mode type light you can get at your local auto store. The FW3A was in its medium mode, if you can call it that, it wasn't at max or high mode. So now I can see why some people say the high CRI is "easier" on the eyes and colors don't seem "washed out" compared to the highter tinted lights. But in their defense they do seem brighter for the same amount of lumin output.

So much from that loooooooooooong story. The type of LED emitter I am looking at is a high CRI type and ill probably pick the one from Mountain Electonics 219C Nicha (also because its the only one available at this time).
 

bl4kkat

Newly Enlightened
Joined
Mar 2, 2006
Messages
93
Location
Virginia Beach
alpg88:
At first I was thinking of going that route because of all the available space in the lantern, but since I have other 18650 and 26650 lights that are capable of high output, I came to the conclusion of a genal long runtime "hurricane" or "blackout" light. The multi-mode thing would be really great and would add more utility even if it was as simple as a high/lo mode. But so far looking for a multi-mode is really limited at the time.

I didn't know they have LED Par36 bulbs, but I really shouldn't be surprise now that most major manufacturers are now catching up to the whole LED thing. So far the LED variants I looked up seems to be in the 12 - 24v range, but I could mod it to run 6V. But the applications looks to be more for landscaping and not so much flashlight or mobile use. I do appriciate the info tho, don't get me wrong. =)


When I get home later tonight I will try and snap a picture of both battle lanterns inside and out. If I can find a good spot I may also post a beam profile picture also. Just for those that may be curious and possible inspire someone to the creative juices flowing.

As for the time being I am waiting on a reply from Mountain Electronics with a question on possibly using a Buck driver and Nichia combo.
 
Last edited:

alpg88

Flashlight Enthusiast
Joined
Apr 19, 2005
Messages
5,339
you could go nichia and a driver route, but then you'll need to worry about how to mount it in the lantern, optics, heatsinks, waterproofing..... so much easier to use low wattage warm, par36, (they come in several beam profiles) you can throw in a resistor for mods, replace single throw switch for double throw with center off. rewire it so 2 6v cells to run in series. and that is it. you want it to be emergency light, so make it as simple as possible so it is reliable.
 
Last edited:

bl4kkat

Newly Enlightened
Joined
Mar 2, 2006
Messages
93
Location
Virginia Beach
I was really hoping I could adapt a multi-mode flashlight into the Battle Lantern. Personally I think it would be cool to bring a little functionality to the light for various tasks. Some would argue the "Keep It Simple" or "If it ain't broke don't fix it", but I already have one and just want to experiment.

If the link works, here is a picture of two that I have modded already. They were mentioned earlier in the first post. The one car left is an original (handle is damaged) while the one to the far right is one of those LED retro fit kits. It funny how they used a cd with a hole cut to fit the optics. Not sure if the picture is clear enough to see it.

6A3418BC-EB15-48FD-9D0C-DDE9C2284149_zpsen8m4bk3.jpeg
 
Last edited:

bl4kkat

Newly Enlightened
Joined
Mar 2, 2006
Messages
93
Location
Virginia Beach
alpg88:
Interesting link, but may I ask what is that box for hanging out in the back? I see the lantern still retains the orignal bulb.


To recap on the picture I posted, the first lantern I made into LED is the second from the left with (as you can see) has nine 10mm LEDs. Mounting was not a problem, I cut a piece of thin rubber I found somewhere and made a gasket for the front. The LEDs are mounted on sheet what I believe is lexian I bought at Home Depot. LEDs are glued in place with some GID epoxy with the idea of an after glow with the light is turned off. Sadly that is not the case, you pretty much have to charge the GID epoxy with another light source which kind of defeats my intened purpose. Now if left somewhere with bright light like out in the sun or a well lit room it would be okay. However nearly ten years the epoxy is starting to yellow which makes charging the GID pigment harder to charge and also be less bright. Beam pattern isn't what I expected it to be, it was more throwy than floody as I mentioned before. Runtime with one carbon-zinc battery lasts more than one night and that was it for the run time tests. Only reason I stoped there was because I was discouraged with how the beam pattered turned out and all the effort put into the project. That was then, this is now, so I will do a better test when I get the chance and also compare it with the other two LED battle lanterns I now have.


The second light third from the left is four head lamps taken apart and mounted on a plastic board wired in a 4P to match the 6v comming from the battery. In the first post I mentioned it was a 2S + 2P configuration, and I think that is a mistake because one head lamp is 6v (uses two 3v coin cells in series => 6v). This was made about 3 years ago so everything is from memory. Beam pattern on this is LOTS of flood but no throw. Runtime is in excess of 54 hours on one carbon-zinc battery. So I know it will have better runtime with two batteries, whether they are carbon-zinc or alkaline.


The last light on the right is an LED retro fit kit. This one was installed last week and the reason that sparked my interest in building another and possibly better LED Battle Lantern than my last two. The kit did not come with any instructions, so a quick YouTube search came up with a video on how to install. Followed the on screen instructions aaaaaaaand... It works! I even had a rechargeable 6V battery my buddy gave me that works with the unit (don't know how old the battery is though). What ever electronics that is used to control everything is potted and shaped just like a 6v lantern battery. Which means it makes the Battle Lantern a single cell rather than a two cell... Bummer. Beam profile is good mix of flood and spot, possibly because of the triple LED with optics. I just thinks its funny because the manufacturer just took a cd and enlarged the center hole to fit the optic around it. Im sure it was a cost effective step on their part.

What ever kit I got must be a "Black Out" kit as I would call it, I don't know the proper name/term you would call it if you do know what it is so just bear with me. There is a power plug under the handle which only a 90 degree plug will will. I had to steal the one on my tv... It works like this: Plug the light into the outlet and the toggle switch in one direction, a small LED will turn Red. After a couple of minutes it will turn Green, but the lantern it self will not turn on. My guess is that the circuit is charging the battery. If you unplug the power cord from the Battle Lantern it turns one, if you plug it back in, it turns off. So as I said earlier, I call it the "Black Out" light.

Now if you turn the toggle switch the other way the light turns on whether it is plugged in or not. If you turn the light on while the power cord is plugged in, the Red/Green LED indicated flashes red and green rapidly.

When you look as the inner retaining right, the LED module is permanently riveted to the ring, so you toss the original ring and bolt the LED module in the lantern. However on the board where the two leads are soldered to, the positive is soldered to the "High", and another spot that is "Low" and is unused.

So if I wanted, I can go three ways with this kit.

1) Put the put the lantern back to its original configuration, but keep the LED and ditch the incan. bulb

2) Do the same as #1 except add a switch to choose between High/Low modes. The switch can be external, probably near the On/Off toggle switch, or keep it internal. If internal, it would be a hassel to switch between High/Low because you would have to take it apart.

3) Keep the retrofit kit and like #2 add a High/Low switch option.
 

alpg88

Flashlight Enthusiast
Joined
Apr 19, 2005
Messages
5,339
the bulb is not original, it is 35w hid, in landing light par36 adapter, the box is an aluminum outdoor electrical box from ace harware, with 8x18650 cells and balance controller inside, ballast and igniter are inside the lantern.
 

bl4kkat

Newly Enlightened
Joined
Mar 2, 2006
Messages
93
Location
Virginia Beach
After Hurricane Dorian passes thought my area I can post a more detailed build on each light for those that are interest. I think it would be fun to see how I went about converting my first two lanterns and compare it to this commercial version. So for now I will have to leave everyone hangin for a bit.

In the mean time I will be taking precautionary measures for Hurrican Dorian. I don't think it will be bad for the Hampton Roads area but, North Carolina isn't that far from me and they already issued a state of emergency.

Better to be safe than sorry!
<(~_^)>
 

bl4kkat

Newly Enlightened
Joined
Mar 2, 2006
Messages
93
Location
Virginia Beach
alpg88:
Wow 35w HID? That is awsome! Let me understand this correctly...

3.7v x 8 => 29.6v

Does the HID bulb get hot? I am under the impression that all HID bulbs get hot so I am assuming the same for this one as well. Or does the aluminum enclosure double as a heat sink? Either way thats pretty cool!
 

alpg88

Flashlight Enthusiast
Joined
Apr 19, 2005
Messages
5,339
alpg88:
Wow 35w HID? That is awsome! Let me understand this correctly...

3.7v x 8 => 29.6v

Does the HID bulb get hot? I am under the impression that all HID bulbs get hot so I am assuming the same for this one as well. Or does the aluminum enclosure double as a heat sink? Either way thats pretty cool!

4s2p, 16,8v fully charged.
bulb does get hot, but nothing that the case and adapter can't handle, the box only works as a place to store batteries in, no heat transfer is involved. i tried having batteries in the lantern first, but they overheat and die, they have to be isolated form heat created by bulb and ballast.
 
Last edited:
Top