Ok, part 1.
For all pictures, click for big.

Ok, this is the box/case. I said before that its cheap, but not bad. That was premature, as i didnt notice something thats visible in the big picture: 7 of the 8 corner plastic pieces were shattered (thanks UPS) -> It is on the brink of falling apart non stop


Ah, here it is open. You see the light, the PSUs (top left AC, middle car), the Yellow-filter (top right).
THe piece in the middle is a dummy battery, which also has a rubber cap on it that will protect the contacts of the real battery when its charged/used as flashlight (but that later)

Here is the light itself. There is nothing to complain on the finish. Its not hard anodized, but it certainly feels nicer to use than a maglight. Also, i didnt notice any machining errors/scratches/etc.

Now here is the yellow-filter. Its just pressed onto the top of the flashlight, and is kept there by sticktion (the black stuff is rubber). It didnt catch that well on the flash, but you can see a little blue: The think is anti-reflection coated on both sides.

Thats the back unscrewed: The threads a mildly lubricated, and dont "grind" at all. A lot different from certain DX lights. The switch is in the battery back, and is a reverse clicky (which might be sensible, considering the health of the bulb, as well as the problems of unintentional activation.
The sealing is done with an oring around the button: The end-cap presses on the seal perpenticular.

Here you can see the o-ring a bit better.

OK, this is the front of the battery. You notice the 4 spring-loaded contacts (those are protected by the aformentioned rubber cap), the charging port, an on-off switch and the three leds that are switched on/off. Like i said, the LEDs are decently bright, but it doesnt look like it here as its ISO 100 and 1/160s, off axis.

Here you can see it a bit better. The rubber cap leaves the leds, the switch and the charging port open, btw.

Ok, here is the interesting side of the flashlight. (and it was nearly impossible to get in focus correcly
Cremelated (spelling) bezel, but not sharply so. The reflector is very deep for its diameter, to house the HID, thats why there is this reflective band around the bezel inside the glass. This makes more light escape into spill.

Ok, right into the front. Its not as offcenter as it looks like, as it was pretty hard to get to align it correctly. Orange peel is medium for that reflector size. Btw, notice that most of the insulation of the top contact has eben striped, which results in much less "bar" in the beam than an automotive bulb.

The same again? I should have looked over the photos before uploading
.
Well, here you can see it bigger, and with focus on the base of the HID. Also notice the bezel being not that badly manufactured.

The reflector unscrewed. Its aluminium, as expected. Notice that the focussing is not done via this thread, so it can be fixed in place forever (as the bulb is not really changeable).
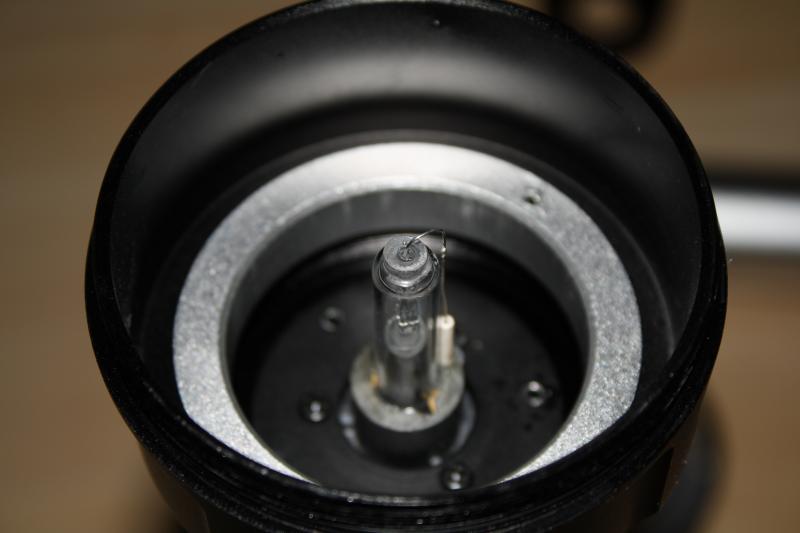
Naked HID. You see again the stripped insulation, and the fact that the tiop connection has been soldered, as it seems (or spot-welded. At least there is a point). The non-black aluminum is the part which allows focusing. (it has a C-profile, stopping motion in both directions after a few mm).

Same again, ab it closer. Notice that is seems that the bottom of the bulb is glued in.


